
Related Manuals for Redring 3L WM


Summary of Contents for Redring 3L WM
- Page 1 USER INSTRUCTION MANUAL Autofill Wall Mount Boilers Redring Warranty 2 Year Parts 2 Year Labour HELPLINE 0344 879 3588 083329501 - 05/12/13...
-
Page 2: Table Of Contents
Contents 1.0 About your Product My Product (please complete this section) page 3 Introduction page 4 Warranty page 4 Important Information page 5 Installation page 5 Before Connection to the Power Supply page 7 Water Connection page 7 Electrical Connection page 7 Overflow & Drainage page 8... -
Page 3: About Your Product My Product (Please Complete This Section)
1.0 - About your Product My Product We strongly recommend that you spend some time to fill in the information below and keep it in a safe Please complete the form below: place. This will save you time if you need to contact our After Sales team. IMPORTANT:The serial number can be found on the bottom of your appliance. Model Number: Product Code: Serial Number:... -
Page 4: Introduction
Introduction Thank you for purchasing this Auto fill Wall Mount Water Boiler. • Please read this instruction booklet carefully, and follow all instructions. To ensure you obtain full benefits from your new appliance: • If you are unsure of any aspect of the installation, use or performance of your appliance, please contact our After Sales team on 0344 879 3588 Warranty Your water boiler comes with a 2 year parts and 2 year labour warranty from the date of purchase. In the unlikely event of breakdown, please contact us on 0344 879 3588 Your warranty is given subject to the appliance being used in accordance with the instructions sup- plied, and on the supply voltage marked on the rating label. It is also subject to fair wear and tear con-... -
Page 5: Important Information
The use of an electrical appliance requires the following common sense safety rules. Primarily there is Important Information a danger of personal injury and secondly damage to the appliance and property. These are indicated in the instructions by the following two conventions: WARNING: Danger of personal injury. - Page 6 • Ensure the appliance is on vertical surface and the base of the appliance is horizontal. Location: • Consideration should be given for serving requirements. • It is recommended that the unit is installed over a sink or draining area. • Ensure that safe operational access to the appliance is unrestricted. • Do not site the appliance directly beneath wall cupboards, other wall mounted appliances and low ceilings that are susceptible to damage from water vapour.
-
Page 7: Before Connection To The Power Supply
• The water boiler is only to be installed in locations where it is overseen and where mainte- Product Safety: nance is restricted to trained personnel. • Always turn the appliance off after use, and allow it to cool down. Once it has cooled down, unplug before adjusting, moving or cleaning. WARNING: Metal surfaces may become very hot whilst in operation. Use caution when touching these surfaces. Before Connection to the Power Supply •... -
Page 8: Overflow & Drainage
• As an option the boiler overflow outlet may be connected to a drainage system. Overflow & Drainage Note: There may be some steam emissions from the vent at the base of the appliance during the initial fill stages but the steam emissions will lessen as the volume of water increases in the tank. vent for the appliance. Under no circumstances should this flexible hose become blocked or restricted in any way. WARNING: The flexible hose connected from the over flow also acts as a Other Safety Considerations • Isolate the appliance from the mains supply when cleaning or not in use. •... -
Page 9: Product Specification
WARNING: Turn off the power supply cleaning or before replacing any parts. Product Specification Model 3L WM 5L WM 7.5L WM Height (mm) Width (mm) Depth (mm) -
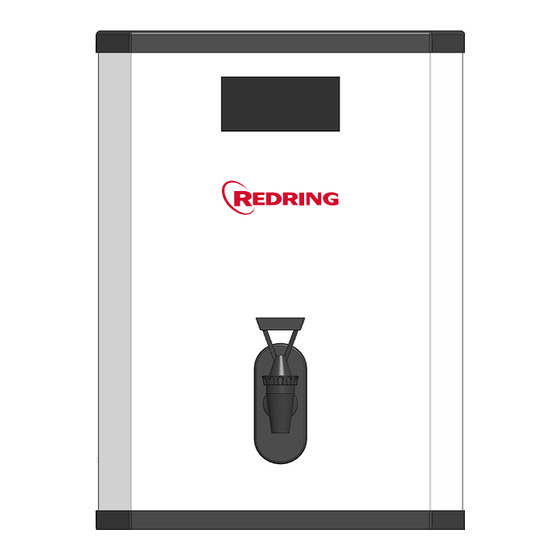
Page 10: Parts Diagram
Parts Diagram Our automatic fill water boilers are designed for continuous operation and should only be switched off for the purpose of maintenance or emergency. Removable tank lid for descaling (inside unit) On/Off switch Dispensing tap Neon Hose for connection to drinking water Indicator non-Genuine parts are fitted, you may stop your appliance from operating safely and invalidate the Important: Genuine replacement parts must be fitted by a qualified service engineer. If generic warranty. -
Page 11: User Guide Controls
Operating the Appliance Green – Appliance is on Red – Appliance requires descaling or maintenace Power button – Turn appliance on/off... -
Page 12: Conections & Overflow
Connections & Overflow: Remove the outer casing (see installation). Push Blue pipe Connection to a water supply: into the grey fitting. Push Blue pipe into this fitting The other end of the blue pipe can be fitted with the same type of grey fitting, which is connected to Connection to mains water supply: your main water supply. To start the boiler, plug it in and turn on the mains power then hold the Power button until the product activates. Ensure boiler is connected to the mains water supply. Hold to receive hot water... -
Page 13: Maintenance & Spare Parts Cleaning Instructions
Cleaning Instructions We recommend cleaning your water boiler on a regular basis. Failure to do this may result in the appli- ance not operating to its full potential and could invalidate your warranty. CLEANING WARNING: Isolate from the electrical supply before cleaning and allow water boiler to cool. -
Page 14: Descaling
Descaling The descaling procedure must be performed by trained personnel as it requires the removal of pan- els from the boiler and access to live electrical components. Always use a descaling agent suitable for stainless steel. 1. Isolate the boiler from electrical supply. 2. -
Page 15: Installation Diagram
Installation Dimensions 300mm... -
Page 16: Faq's
FAQ’s a. Yes, your appliance should be positioned on a flat, level surface that is capable of taking 1. Are there any restrictions as to where I should locate my water boiler? the weight of the appliance when full of water. Consideration must also be given to serv- ing requirements and safe operational access to the appliance must also be ensured. For a detailed overview of installation requirement, please refer to pages 5, 6 and 7 of this instruction book. -
Page 17: Notes & Comments
.................................................................................................................................................................................................................................................................................................................................................................................................................. Contact us / email us through: Web : www.redring.co.uk Telephone: General : 0344 879 3588 Post: Glen Dimplex Heating & Ventilation Millbrook House Grange Drive Hedge End Southampton SO30 2DF... -
Page 18: Spareslist
Spare Parts Lists 3.0l white 22672801 Spare No. Part No. Description 95719683 563259003 CASE outer WM 3L 95719787 703257505 PANEL front WM 95719667 083246600 CASE lid front 95719654 082569400 PLUG hole blanking 14.7mm 95719661 083212000 ELBOW 3/8-1/4 JG P1211208S 95719659 083211700 ELEMENT 3Kw submersible 95719676... - Page 19 3.0l stainless 22672805 Spare No. Part No. Description 95719679 503259001 CASE outer WM 3L 95719685 703257503 PANEL front WM 95719667 083246600 CASE lid front 95719654 082569400 PLUG hole blanking 14.7mm 95719661 083212000 ELBOW 3/8-1/4 JG P1211208S 95719659 083211700 ELEMENT 3Kw submersible 95719676 083336000 GASKET level sensor...
- Page 20 5.0l white 22673801 Spare No. Part No. Description 95719682 563259002 CASE outer WM Whi 95719686 703257504 PANEL front WM 95719667 083246600 CASE lid front 95719654 082569400 PLUG hole blanking 14.7mm 95719661 083212000 ELBOW 3/8-1/4 JG P1211208S 95719659 083211700 ELEMENT 3Kw submersible 95719676 083336000 GASKET level sensor...
- Page 21 5.0l stainless 22673805 Spare No. Part No. Description 95719678 503259000 CASE outer WM 95719684 703257502 PANEL front WM 95719667 083246600 CASE lid front 95719654 082569400 PLUG hole blanking 14.7mm 95719661 083212000 ELBOW 3/8-1/4 JG P1211208S 95719659 083211700 ELEMENT 3Kw submersible 95719676 083336000 GASKET level sensor...
- Page 22 7.5l white 22674801 Spare No. Part No. Description 95719682 563259002 CASE outer WM Whi 95719686 703257504 PANEL front WM 95719667 083246600 CASE lid front 95719654 082569400 PLUG hole blanking 14.7mm 95719661 083212000 ELBOW 3/8-1/4 JG P1211208S 95719659 083211700 ELEMENT 3Kw submersible 95719676 083336000 GASKET level sensor...
- Page 23 7.5l stainless 22674805 Spare No. Part No. Description 95719678 503259000 CASE outer WM 3L 95719684 703257502 PANEL front WM 95719667 083246600 CASE lid front 95719654 082569400 PLUG hole blanking 14.7mm 95719661 083212000 ELBOW 3/8-1/4 JG P1211208S 95719659 083211700 ELEMENT 3Kw submersible 95719676 083336000 GASKET level sensor...
- Page 24 You must provide to Redring or its authorised agents on request the original receipt as proof of purchase and - if required by Redring - proof of delivery. If you are unable to provide the documentation, you will be required to pay for any work required.
Need help?
Do you have a question about the 3L WM and is the answer not in the manual?
Questions and answers