
Subscribe to Our Youtube Channel
Related Manuals for Makeblock laserbox


Summary of Contents for Makeblock laserbox
- Page 1 User Manual Makeblock Co., Ltd. Address: 4th Floor, Building C3, Nanshan iPark, No.1001 Xueyuan Avenue, Nanshan District, Shenzhen, Guangdong Province, China www.makeblock.com D1.1.2_KD010204000 D1.3.5_KD010098000...
- Page 2 (Shenzhen) will bear no responsibility for any loss resulting therefrom, except for losses due to improper installa- tion or operation by Makeblock professional maintenance personnel. Makeblock Co., Ltd. (Shenzhen) has collated the Manual rigorously and carefully, but we cannot guarantee that the Manual is completely free of error or omission.
-
Page 3: Table Of Contents
Technical support: support@makeblock.com Note: The above information may be subject to change due to objective factors, and please refer to the latest release of Makeblock. If you use the internet or phone call to get our support, additional fees may apply. - Page 4 Please keep the inside of the Laserbox clean. Residues and chippings accumulated during cutting and Laser operation is prohibited when the lid/tray is li ed. Make sure that the Laserbox is closed by the lid/tray during operation and do not tamper with engraving are dangerous and may cause fire.
- Page 5 Never leave the Laserbox unattended during operation. There is a risk of fire if the Laserbox is started due to Power button of the Laserbox is at the rear of it. Pressing (-) to power it on and pressing “o” to power it o .
-
Page 6: List Of Items
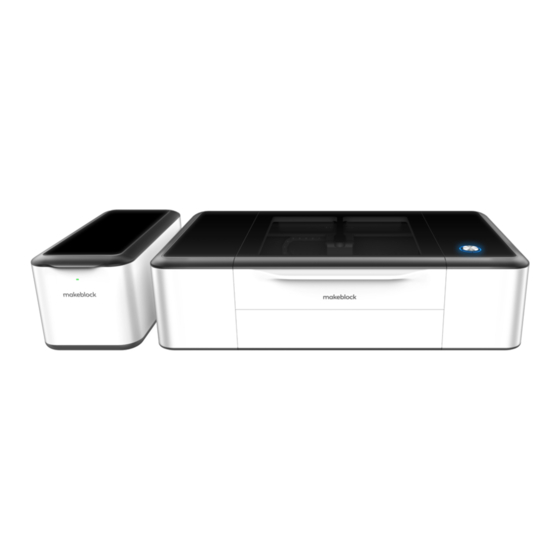
List of Items Meet Your Laserbox Laserbox Button Annular Indicator Power Button Power Interface USB Interface Ethernet Cable Interface Smoke Outlet Laserbox × 1 Smart Smoke Purifier × 1 Power Cord × 1 USB Cable × 1 Aviation Interface Push User Manual Aviation Connector ×... - Page 7 Smart Smoke Purifier Camera HEPA Composite Filter Laser Head Indicator Tray Aviation Interface Honeycomb Panel Smoke Inlet Laser Tube Smoke Outlet...
-
Page 8: Quick Operation Guide
Connect the smart smoke purifier 1.Connect the purifier with the 2m-exhaust pipe and lay the pipe to the window. 2.Connect the Laserbox and purifier with the 1.5m-exhaust pipe. 3.Connect the Laserbox and purifier with the aviation connector. 4.Connect the power supply. - Page 9 The startup following website. process takes a while, and please https://www.makeblock.com/maker-tools/laserbox be patient. There are three ways to connect a computer to the Laserbox. Choose the best according to your situation. Ethernet Wi-Fi...
- Page 10 Finish Cancel Next Connect with the USB cable 1. Connect a computer to the Laserbox with the USB cable. 2. Open the so ware, select “Connect to a 3. Select “USB” and click “Next” to start the 4. Successful connection.
- Page 11 Connect with an Ethernet cable (not included in the package) 2. Open the so ware, select “Connect to a 3. Select “Ethernet” and click “Next” to start 1. Connect your computer to the Laserbox with an Ethernet cable. 4. Successful connection. new Laserbox” and click “Next”.
- Page 12 Next Back Next Wi-Fi wireless connection 1. Connect a computer to the Laserbox with the USB cable. 2. Open the so ware, select “Connect to a 3. Select “Wi-Fi” and click “Next”. 4. Connect to the existing Wi-Fi network. new Laserbox” and click “Next”.
- Page 13 Place the o icial materials in the Laserbox working area. Start cutting / engraving Note: Cutting/Engraving Material Requirements can be found in the appendix.
- Page 14 Open the Laserbox Click "Send" to send the image to the Laserbox. A er the transmis- so ware and select the sion is completed, the Laserbox sample image. You can also would be ready, and the annular import or draw images yourself.
- Page 15 5 seconds. the button on the Laserbox to Method 2: Method 3: continue with the task. Note: A er starting cutting/engraving, you can also cancel the task by clicking “Pause -> Cancel” in the Laserbox so ware interface.
-
Page 16: More Features
1. Draw an image, preferably with a Deli S550 oil-based marker. 2. Place the material and close the lid. 3. Press the button on the Laserbox to start the task. Note: For optimal cutting / engraving e ect, it is recommended to use the Deli S550 oil-based marker, draw the image as far as possible from the ring code and the edge of the material, and place the material in the center of the honeycomb panel. -
Page 17: Image Extraction
Image extraction 2. Start the Laserbox and select “Marquee” to put the image you want to extract in a selection box. The Laserbox has a built-in camera that extracts the surface image for further creation. 1. Place the object for image extraction. -
Page 18: Appendix 1: Cutting/Engraving Material Requirements
Solid purple The Laserbox firmware is being upgraded. Note: The use of poor quality materials may result in poor cutting/engraving. It is recommended to use Makeblock o icial materials. The use of the materials not recommended above may damage the device, and the resulting damages are not covered by... -
Page 19: Product Warranty Information
②Warranty service mode is specified by Makeblock or an appropriately certified technical testing personnel based upon the technician’s judgement of the problem. On-site service is only provided for hardware failures. So ware failures will not be eligible for on-site service. - Page 20 (such as casing, components, and circuits etc.) due to insect, rat bites, or any foreign materials; Failure or damage due to installation, repair, alteration, addition or removal by any agency or personnel not authorized by Makeblock;...
Need help?
Do you have a question about the laserbox and is the answer not in the manual?
Questions and answers