
Subscribe to Our Youtube Channel
Related Manuals for DenMat Sapphire plus


Summary of Contents for DenMat Sapphire plus
- Page 1 Instructions for Use Dental Curing Light with Optional Tooth Whitening Conforms to AAMI Std ES60601-1, IEC Stds60601-1-6, 80601-2-60 & 62366 Certified to CSA Std C22.2 NO. 60601-1-6...
-
Page 2: Table Of Contents
Table of Contents Warnings and Precautions .......................1-2 Electromagnetic Compatibility ......................3 Important Start-up/Set-up Instructions ....................4 Device Description and Intended Use ...................5-6 Controls and Functions ..........................6 Control Panel ............................7 Accessories ...............................7 Set-up and Operation Instructions .......................8 Light Meter (Radiometer) ........................9 Curing Mode ............................9-10 Curing Instructions.......................... -
Page 3: Warnings And Precautions
Before connecting the Sapphire Plus to the mains (the AC wall outlet), verify that the voltage to be applied is within the range of that specified on the identification label on the backside of the instrument. If you have any questions concerning the proper voltage, call the factory for clarification. - Page 4 DenMat for repair. Do not store liquid above the Sapphire Plus. Disconnect the Sapphire Plus power cord from the power outlet and contact the factory for service instructions if the light or the main unit has been exposed to liquid spills, dropped, or otherwise damaged (including the power cord), or otherwise malfunctions.
-
Page 5: Electromagnetic Compatibility
/ medical installation. The equipment generates radio frequency energy. If not installed properly, the Sapphire Plus may interfere with other medical devices. Since there is no guarantee in a particular installation that other device that interference will not occur, test the installation prior to use. Ensure that other devices in the vicinity operate without interference and also ensure that the Sapphire Plus is operating correctly. -
Page 6: Important Start-Up/Set-Up Instructions
Important Start-up/Set-up Instructions (Follow these instructions prior to using the system) Attach the AC Power Cord to the power inlet on the Sapphire Plus light source and plug into AC outlet. AC Plug Input Install the Curing Light Guide by inserting the proximal end of the handpiece into the front panel receptacle until it stops. -
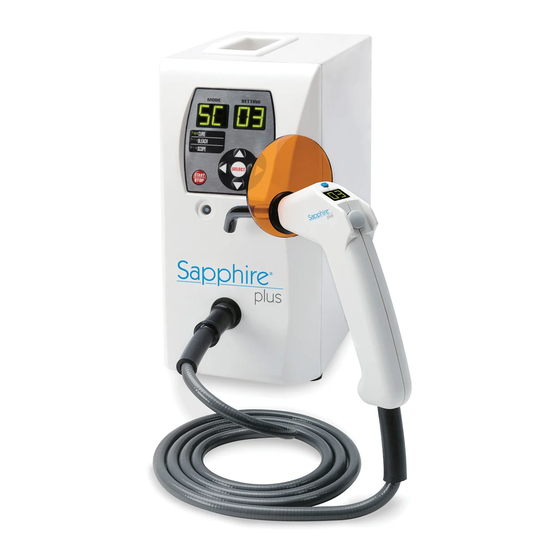
Page 7: Device Description And Intended Use
Fuse Device Description and Intended Use The Sapphire Plus system consists of a xenon plasma arc light source (lamp), power supply and a light guide with a pistol-type handpiece with user interface controls. The Sapphire Plus system is a source of illumination for curing dental restorative materials and is a source of illumination for tooth whitening. -
Page 8: Controls And Functions
Sapphire Plus Control Panel: Includes control wheel and select button, mode indicator, display windows, and start/stop button. Sapphire Plus Display Windows: Digital display of the pre-set time, program mode, and light meter. Fiber Optic Light Guide: Flexible optical device for delivery of light. Make sure the light guide is pushed all the way in until it stops. -
Page 9: Control Panel
Light Guide and Tips REMOVABLE TIPS The Light Guide provided with the Sapphire Plus provides an optical path for transmitting light energy from the source to the tips. Both the Light Guide and removable tip are available through Den-Mat Holdings, LLC as spares or replacement parts. -
Page 10: Set-Up And Operation Instructions
Follow all operating instructions for the selected handpiece. Install Power Cord, Install Handpiece, and Power Up Install the AC power cord into the power inlet on the back of the Sapphire Plus light source and into a grounded AC socket. -
Page 11: Light Meter (Radiometer)
Light Meter (Radiometer) Use the Sapphire Plus light meter to validate the power density (light intensity or mW/cm ) output of the curing handpiece prior to each use. The light meter window is located below the system control panel. CAUTION: DO NOT USE 2 mm OR 4 mm TIPS ON THE LIGHT METER WINDOW... -
Page 12: Curing Instructions
Curing Mode (continued) To change from the C1 to the C2 timer, press the LEFT and RIGHT arrow keys on the CONTROL WHEEL. The display windows show “C2” in the MODE window and “05” in the SETTING window. The ACTIVATOR button on the curing handpiece will activate and deactivate the lamp. -
Page 13: Bleach (Whitening) Mode
start the system. After the timing cycle is completed and the light turns off, test the bottom surface for hardness using a dental probe. If the material is not completely cured, restart the system again for another 5-second exposure. Test, and repeat again, if necessary. This will give you an indication of the optimum timing increment for the specific restorative to be used. -
Page 14: Whitening Instructions
WARNING: Do not perform single tooth whitening in bleaching mode, since the power setting could be too high and since the timers are designed for bleaching for longer periods associated with using the Whitening Crystal. Do not use tip sizes less than 12 mm for single tooth whitening. WARNING: Do not direct the light on to unprotected gingiva or skin. - Page 15 (if possible). STEP 10 11. Press the Optional button on the Sapphire Plus light keypad, then press 2 to select bleaching mode. The letters BL (bleach) will appear in the Program window, the number 60 will appear in the seconds window and 60 minutes will appear on the pistol handle.
- Page 16 15. Move the Sapphire Whitening Crystal away from the teeth. Leave the Paint-On Dental Dam in place and vacuum gel from the teeth. Wipe with gauze and rinse the teeth while suctioning. Avoid splatter. Some patients with heavy discoloration or areas of unseen hypocalcification may need another 15 to 30-minute session to achieve desired whitening results.
- Page 17 PLUS LIGHT ® Whitening will also occur, to a lesser extent, if a Sapphire Plus light is not used. Follow instructions above, disregarding use of the Sapphire Whitening Crystal; maintain gel on teeth as indicated, for the periods described. However, for maximum results, use the Sapphire light with Whitening Crystal as recommended.
-
Page 18: Sanitizing And Sterilizing
The light guide cannot be autoclaved. It should be sanitized by using a non-abrasive disinfectant. Do not use glutaraldehyde-type disinfectants. Cleaning The Sapphire Plus System WARNING: Unplug the power cord prior to cleaning with any liquid. Allow the system to cool prior to cleaning. -
Page 19: Troubleshooting
Troubleshooting Problem The control panel and handpiece display does not light up. Buttons do not respond. Corrective action Check the AC electrical outlet, power cord, and power input on the light to verify that all connections are secure and that AC power is on at the outlet. Verify that the power switch is in the ON ( I ) position. Problem The control panel display lights up but the handpiece display does not light. -
Page 20: Lamp Replacement Instructions
3. Afterwards, the lamp may be disposed in normal trash. If unsure about the instructions, DO NOT PROCEED! Contact Den-Mat Holdings, LLC at 1-800-445-0345. DenMat can also give instructions regarding shipping the lamp back to DenMat and will dispose of the lamp properly. -
Page 21: Fuse Replacement
Close up the unit. Do not replace power cord. Do not plug in the unit into the mains . Do not power on the unit. Contact DenMat and return the unit for repair per Step 7 below. -
Page 22: System Warranty
Buyer purchases the Sapphire Plus system from Den-Mat Holdings, LLC on the terms, conditions, and provisions of this limited warranty and waives all other rights and claims against Den-Mat Holdings, LLC for any damages or remedies exceeding said limited warranty. -
Page 23: Contact And Order Information
Call your DenMat Technical Sales Representative to learn how to increase profits with your Sapphire Plus. Restorative Materials Virtuoso Flowable Custom Kit #030381800 ® A low-viscosity, easy-flow composite material with excellent physical properties. Virtuoso Universal Introductory Kit #030381950 ® A micro hybrid composite for posterior and anterior restorations. - Page 24 Den-Mat Holdings, LLC MDSS GmbH 1017 W. Central Avenue Schiffgraben 41 Lompoc, CA 93436 USA 30175 Hannover, Germany 4010489 Symbols Glossary available at: www.denmat.com/symbols ©2018 Den-Mat Holdings, LLC. All rights reserved. 823057820 R:3 07/18CM...
Need help?
Do you have a question about the Sapphire plus and is the answer not in the manual?
Questions and answers