Advertisement
Quick Links
Advertisement

Related Manuals for Skriware Skribot


Summary of Contents for Skriware Skribot
- Page 1 SKRIBOT SKRIBOT A S S E M B L Y M A N U A L Model: Canopus...
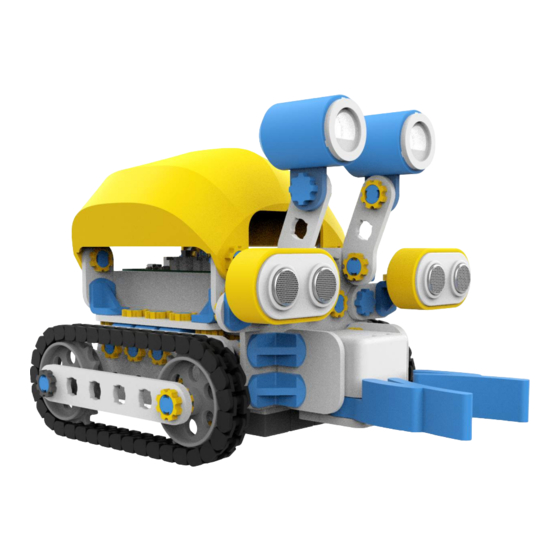
- Page 2 HELLO, I’M SKRIBOT...
- Page 3 Before assembling your Skribot, Partslist make sure you have all of the parts ready Battery pack Battery Skribrain Charger Distance sensor LED eye Gripper Motor Contrast sensor Drive wheel Passive wheel Shell 4x5 Plate 2x6 Plate 1x6 Plate 1x5 Plate...
- Page 4 L3 Rotating Bolt L3 Rigid Bolt Passive wheel Drive wheel...
- Page 5 Make sure the nuts are oriented the correct way Wrong Correct How to use the tools...
- Page 6 CAUTION ! DO NOT OPEN OR CLOSE MANUALLY...
- Page 7 L3 Rigid Bolt Mind the correct orientation of the yellow nut while screwing...
- Page 11 Top View...
- Page 12 S t e p 4 S t e p 5...
- Page 14 Drive wheel Passive wheel Drive wheel Passive wheel Drive wheel i f y o u h a v e a b l a c k n u t i n y o u r s e t , u s e i t , i f n o t , u s e t h e y e l l o w o n e R o t a t e t h i s n u t c o u n t e r - c l o c k w i s e Passive wheel...
- Page 15 L3 Rigid Bolt...
- Page 17 S t e p 1 0 S t e p 9...
- Page 18 S t e p 8 S t e p 1 0...
- Page 19 L3 Rigid Bolt...
- Page 20 S t e p 1 2 S t e p 1 3...
- Page 21 S t e p 1 4...
- Page 22 L3 Rigid Bolt...
- Page 24 S t a r t f r o m t h i s s i d e click...
- Page 25 L3 Rotating Bolt...
- Page 26 Each track consists of 37 track links 7 4 x x 37 click...
- Page 28 Place the battery into the compartment...
- Page 29 slide in...
- Page 30 E L E C T R O N I C S Do not remove the protective sticker from Skribrain. Turn the power off before removing and plugging any cables!
-
Page 31: Programmable Leds
Programmable LEDs LED2 LED1 LED1 LED2... - Page 32 Contrast sensors...
- Page 33 Distance sensors...
- Page 34 Gripper SERVO1 SERVO2 SERVO1 SERVO2...
- Page 35 Motors...
- Page 36 Battery...
- Page 37 T u r n o n / o f f S k r i b o t After making sure that everything is connected correctly, turn on the Skribot with the toggle marked in the picture. Small diode next to the toggle will turn on, indicating that Skribot has a power supply.
- Page 38 LED Battery Battery charged Charge the battery Battery critical! Charge the battery immediately or you risk damaging it.
- Page 39 LED Bluetooth Skribot paired Skribot unpaire d Communication error...
- Page 40 O p e n i n g t h e s h e l l Be aware of the cables Press Press Press Press...
- Page 41 LED Charger Battery charged Charging battery...
- Page 42 Skribots App Working with tablet or smartphone compatible with the wide range of iOS and Android devices, Skriware's mobile application allows you to control Skribot remotely and program it using an approachable, graphical interface.
Need help?
Do you have a question about the Skribot and is the answer not in the manual?
Questions and answers