Table of Contents

Related Manuals for EROAD Ehubo 2

Summary of Contents for EROAD Ehubo 2
- Page 1 EROAD ELD User Manual VERIFIED Self-certified and registered on FMCSA https://eld.fmcsa.dot.gov/List Please keep this Device Name: EROAD ELD ELD User Manual Model: Ehubo 2 in the truck cabEL Software Version: v1.33.104 or higher ELD Identifier: EROAD1...
- Page 2 Please contact your nearest EROAD office if you require any further assistance. Copyright © 2018 EROAD Inc. All rights reserved. No part of this User Manual may be reproduced, distributed, or transmitted in any form or by any means without the express written permission of EROAD Inc.
-
Page 3: Table Of Contents
Content Introduction 1.1 Locating the Device Serial Number 1.2 PIT Group Verification Driving Setup 2.1 Logging in to the EROAD ELD 2.1.1 Login Name Search 2.2 Reviewing the Home Screen 2.3 Off-Duty Counter 2.4 Changing Your Duty Status 2.4.1 Duty Status 2.4.2 Personal Conveyance Status... - Page 4 5.2 Displaying Your Records 5.2.1 Viewing Header Information 5.2.2 Viewing Graph Logs 5.2.3 Viewing All Events 5.2.4 Viewing Unidentified Driving Times Issues 6.1 Managing Malfunctions 6.2 Resolving Data Diagnostics Appendix 7.1 Contacting EROAD 7.2 Glossary 7.3 Error Messages and Malfunctions...
-
Page 5: Introduction
Depot application. It gives you control to change duty status and manage your logs, among other features. The EROAD ELD is installed in the cab of the truck. It measures the distance you travel, and captures location [via a global positional system (GPS)], route, and operational data from the truck. -
Page 6: Locating The Device Serial Number
EROAD ELD meets the technical specification requirements of 49 CFR Part 395, Subpart B and Appendix A. EROAD is the first ELD provider to complete an independent test and verification of our ELD solution by PIT Group. Tip: The first-time appearance of an acronym or abbreviation is spelled out in this manual;... -
Page 7: Driving Setup
Complete the following setup activities before you begin to drive. 2.1 LOGGING IN TO THE EROAD ELD Perform the following tasks to login to the EROAD Electronic Logging Device (ELD). Locate and tap your name on the Login screen. (optional) Tap the Down arrow to see more names, if your name is not on the first screen. -
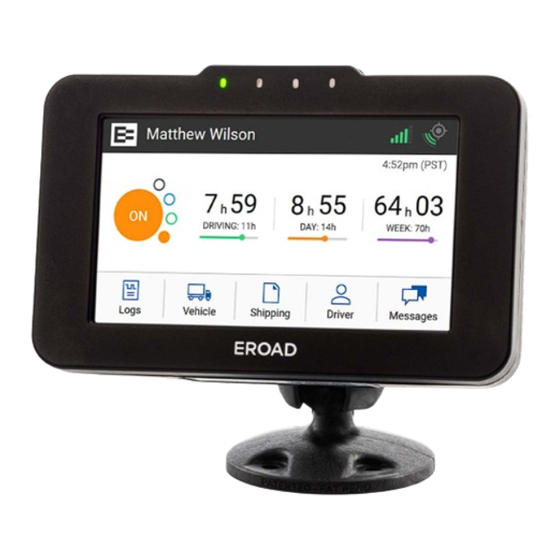
Page 8: Reviewing The Home Screen
Tap the Search button, and then tap on your name when the list displays. Enter your four-digit personal identification number (PIN) using the 10-key pad as shown above. Contact your supervisor or dispatcher if you forgot your PIN or if your name is not on the list. -
Page 9: Off-Duty Counter
Menu Option Description Allows you to see a graphical representation of your duty status for a 24-hour period. You can cycle through previous days to check log history. Additional options include: • View/Edit (section 3.6) • Hours of Service (HoS) (section 2.6) •... -
Page 10: Changing Your Duty Status
2.4 CHANGING YOUR DUTY STATUS There are four standard duty status options on the EROAD ELD. Your carrier might allow you to use the optional statuses. Each status is color-coded. Duty Status Icon Description Off duty, you are not working. -
Page 11: Duty Status
2.4.1 Duty Status Perform the following steps to change your duty status. Tap the large circle on the left side of the Home screen. Your duty status is listed in the middle of the circle. Example: Tap On . The Change Duty Status screen appears. -
Page 12: Yard Moves Status
The home screen changes to a dark background while you are driving the vehicle. The EROAD ELD is designed to prompt the driver about the Off - Personal Conveyance duty status, if the vehicle is shut off while in this status. The Continue Personal Use screen displays when the ignition is activated in the vehicle. -
Page 13: Using Quick Remarks
The home screen changes to a dark background when you are driving the vehicle. 2.5 Using Quick Remarks Drivers can use the Quick Remarks feature on the EROAD ELD when logging in and/or when changing duty status. The Quick Remarks screen automatically appears after you select your duty status. -
Page 14: Summary
Tap the HoS icon on the Logs menu. 2.6.1 Summary This tab section shows your 14-hour driving window, 11-hour driving limit, and the duty cycle (either 60/7 or 70/8). The screen displays the remaining time against each of these limits. •... -
Page 15: Rulesets
Tip: Tap the Back arrow at the top of the screen to return to the previous screen. 2.6.3 Rulesets More than one ruleset might be available depending on your jurisdiction. Example: Drivers operating under the Texas Intrastate ruleset have the option of selecting this ruleset on the Hours of Service screen. - Page 16 • Driver is not prompted to take a 30-minute break after eight hours of On- duty time. 100 Air-Mile • HOS counters display 11-hr driving limit, Short Haul 12-hr driving window, and 60/70-hr (week) limit. • Applied when a driver operates under the Interstate rule set and extends the driving limit by two hours.
-
Page 17: Adding Or Dropping Trailers
2.7 ADDING OR DROPPING TRAILERS The EROAD ELD lets you easily add or drop trailers. You need to enter the trailer number in the EROAD ELD each time you connect a trailer to your vehicle. 2.7.1 Adding Trailers Perform the following steps to add a trailer. -
Page 18: Dropping Trailers
A confirmation message displays that the trailer number was removed. 2.8 ENTERING A SHIPPING DOCUMENT The EROAD ELD allows you to quickly enter a shipping document (such as a bill of lading). The following sections describe how to add or delete a shipping document. -
Page 19: Deleting A Shipping Document
Enter the document ID in the Add Document field. Tap the Add button. A confirmation message appears to confirm the update. Tip: Use the Remarks feature if you want to enter a shipping document on a prior day. You can add a remark to the first ON duty status to include the shipping number. -
Page 20: Setting Wmt Configuration (Oregon Only)
Tap the Delete button in the confirmation prompt. 2.9 SETTING WMT CONFIGURATION (OREGON ONLY) The EROAD ELD lets you easily change your vehicle weight configuration for use with Weight-Mile Tax (WMT) reporting. Perform the following steps to set your configuration. This applies to drivers operating in the State of Oregon. -
Page 21: Entering Fuel Gallons
Tap the Save button. Note: The list of available configurations for your vehicle are options that your motor carrier has registered with the DOT. Contact your supervisor if you cannot see the right configuration for your vehicle. 2.10 ENTERING FUEL GALLONS Perform the following steps to enter fuel gallons. -
Page 22: Vehicle Information
Tap the Back arrow to return to the Home screen. 2.11 VIEWING VEHICLE INFORMATION Perform the following steps to view vehicle information. Tap the Vehicle icon on the Home menu. Tap the Vehicle Info icon on the Vehicle screen. This screen includes the CMV Power Unit Number, Plate number, Truck Tractor VIN, and number of miles. -
Page 23: Everyday Use
Certain tasks are performed daily. This chapter describes how to add a co-driver, change drivers, review and correct logs, insert missing records, add remarks, delete records, certify your logs, and log out of the EROAD ELD. 3.1 DRIVING MODE Your duty status automatically changes to Driving as soon as your vehicle reaches five miles per hour. -
Page 24: Exiting Driving Mode
Note: This process can be applied in reverse, if you begin from the Co-Driver View. Tip: • EROAD ELD logs are secure and prevent unauthorized access to another driver’s logs. • You must enter your PIN number at the prompt, if you begin from an opposite view. -
Page 25: Adding A Co-Driver
). You are returned to the Home screen. 3.1.2.1 Exiting Driving Mode Alternative Process The screen on the EROAD ELD automatically changes if your vehicle is stationary for five minutes. You have 60 seconds to respond to the prompt, otherwise, your status changes to On Duty, if you ignore the prompt. -
Page 26: Changing Drivers
The Active Driver must change his duty status to ON Duty , Sleeper Berth or OFF before changing drivers on the EROAD ELD, when a co-driver is present. Perform the following steps before the vehicle is in motion when you change drivers. Tap the Driver icon on the Home menu. -
Page 27: Changing Vehicles
Perform the logout procedure in the first vehicle. See section 3.9, Finishing Your Day / Logging out more information. Perform the login procedure on the EROAD ELD in the second vehicle and set your duty status. See section 2.1, Logging in to the EROAD ELD and section 2.4.1, Duty Status... -
Page 28: Reviewing Logs
Enter the message in the text field using the key pad. Tap the Send button to send the message. 3.6 REVIEWING LOGS The EROAD ELD lets you quickly verify that your logs are accurate and complete. Perform the following steps to review your logs. Tap the Logs icon on the Home menu. -
Page 29: Daylight Savings Time
A Certified icon displays under your name, if the logs have been certified. An Uncertified icon appears if you still need to certify your logs. Note: See section 3.8, Certifying Your Logs for more information. 3.6.1 Daylight Savings Time Daylight savings time is automatically applied to the log graph as a vertical orange line with an abbreviation of DST. -
Page 30: Adding A Remark
Tap the Duty Status on the graph that you want to correct, or tap the Left arrow or Right arrow below the graph to locate the duty status that needs correction. Tap the Edit icon on the lower right side of the screen. The selected log entry for that day appears on screen highlighted in green. -
Page 31: Deleting A Record
Tap the Remark icon. The Add a Remark screen appears. Enter your comments in the Add Remark field. Tap the Done button. 3.7.2 Deleting a Record You can use the Delete icon to delete a record. Perform the following steps to delete a record. See section 3.7, Correcting Logs for illustrations of steps 1 –... -
Page 32: Inserting A Missing Record
Tip: You cannot delete driving time that was not manually entered. 3.7.3 Inserting a Missing Record Perform the following steps to insert a missing record. Tap the Logs icon on the Home screen. Tap the Left arrow or Right arrow until you locate the point in your logs where you want to insert a record. - Page 33 Tap the duty status that you want to insert. Tap the Next button. The Add Start Time screen appears. Tap the Up arrow or Down arrow to set the hour, minute, and AM or PM setting. Tap the Next button. The Add CMV screen appears. Tap the Next button to confirm the CMV.
-
Page 34: Editing An Existing Record
Tap the Edit icon. The Edit Status screen appears. The EROAD ELD allows you to proceed through the Edit wizard to access the following screens: Edit Duty Status, Edit Start Time, Edit CMV, Edit Location, and Add a Remark, in this order. -
Page 35: Certifying Your Logs
3.8 CERTIFYING YOUR LOGS It is best to certify your logs at the end of each trip. Perform the following steps to certify your logs if any previous days are uncertified. Tap the Logs icon on the Home screen. Tap the Certify icon on the Logs screen. -
Page 36: Finishing Your Day / Logging Out
Perform the following steps to logout. Tap the Driver icon on the Home screen. Tap the Logout icon. The EROAD ELD prompts you to certify your logs if they are uncertified. See section 3.8, Certifying Your Logs for more information. -
Page 37: Advanced Log Edits
Drivers have two ways to view and make corrections that are suggested by the supervisor. A prompt appears when you log into or out of the EROAD ELD or you can review the suggested changes later through the Logs menu. -
Page 38: Reviewing Suggested Edits From The Home Page
4.1.2 Reviewing Suggested Edits from the Home Page Perform the following steps to review supervisor suggestions if any new edits are made after you logged into the EROAD ELD. Tip: An alert appears on the Logs icon on the Home screen when there are new edits to review. -
Page 39: Swapping Driving Time
4.2 SWAPPING DRIVING TIME The driver and co-driver are responsible for setting status changes. The EROAD ELD lets the co-driver swap driving time on a portion of the log if the active driver forgot to change driving status. The co-driver performs the following steps to swap driving time. - Page 40 Tap the View/Edit icon on the Logs screen. Tap the Left arrow or Right arrow on the bottom of the screen until you locate the point in your logs where you want to swap the driving time. Tap the Edit icon.
-
Page 41: Claiming Unidentified Driving Time
A swap becomes effective when the co-driver accepts the change. 4.3 CLAIMING UNIDENTIFIED DRIVING TIME The EROAD ELD automatically records driving time including time frames when the driver did not log in. You can claim unidentified driving time in two different ways, which are described in the following subsections. -
Page 42: Claiming Unidentified Trips In Logs
4.3.2 Claiming Unidentified Trips in Logs Menu Perform the following steps to claim unidentified driving time if you forgot to log in before your trip. Tap the Logs icon on the Home screen. The Logs screen appears. Tap the More icon on the Logs screen. -
Page 43: Emailing Logs To Yourself
4.4 EMAILING LOGS TO YOURSELF It is good practice to keep a back-up copy of your logs. Perform the following steps to email your logs from the EROAD ELD to your email address. Tap the Logs icon on the Home screen. The Logs... - Page 44 Tap the More icon on the Logs screen. The Logs menu expands to reveal additional menu options. Tap the Email Logs icon. The Email Logs screen appears. Enter your email address in the Email Logs field. Note: This field is pre-populated if your supervisor added an email address to your Driver Profile in Depot.
-
Page 45: Roadside Inspection
The inspector can see only the required information when the device is in Inspection mode. The EROAD ELD does not allow the inspector to change your logs. It allows the inspector to either transfer or display your records. -
Page 46: Transferring Your Records
Hand the device to the inspector along with the visor cards and follow instructions. The inspector might request that you either transfer (export) your records or display the records. These functions are described in the following sections. Tip: • Your personal privacy is important. You must enter your PIN to exit the Inspection mode after the inspection is completed. -
Page 47: Transfer Via Email
5.1.1 Transfer Via Email Perform the following steps to transfer records via the email option. Perform the steps in section 5.1, Transferring your Record Tap the Email button. The Comment screen appears. The FMCSA destination email address is preprogrammed in the ELD. Enter the safety official’s code in the Comment field. -
Page 48: Transfer Via Web Services
5.1.2 Transfer Via Web Services Perform the following steps to transfer records via Web Services. Ensure that you have completed the steps described in section 5, Roadside Inspection. Tap the Transfer button. Tap the Web Services button. Enter the safety official’s code in the Comment field. See section 5.1.1, Transfer Via Email for an illustration of the... -
Page 49: Viewing Header Information
5.2.1 Viewing Header Information Header information displays a variety of information on driver status, truck and shipping information, and so on. The header information demonstrates that your EROAD ELD logs are compliant with regulations. This information includes the following criteria: •... -
Page 50: Viewing Graph Logs
Tap the Left arrow icon beside the date to back up to a prior date or tap the Right arrow icon beside the date to advance to a current date. Tap the Down arrow icon on the right side of the screen to see more information or tap the Up arrow icon to move up to the top of the list. -
Page 51: Viewing All Events
Tip: The inspector can navigate through the logs for the last eight days by tapping the left or right arrows next to the date at the top of the screen. 5.2.3 Viewing All Events The All Events tab displays a list that includes: event time, location, odometer reading, engine, hours, event type, and origin. -
Page 52: Viewing Unidentified Driving Times
5.2.4 Viewing Unidentified Driving Times The Unidentified tab displays the times when the vehicle was driven without the driver logging into the EROAD ELD. Perform the following steps to view unidentified driving times. Ensure that you have completed the steps described in... -
Page 53: Issues
6 Issues The EROAD ELD is fully compliant with the Federal Motor Carrier Safety Administration (FMCSA) requirements. It generates data diagnostic events and malfunctions, if there is missing data or a fault that affects the completeness of the logs or accuracy of the device. -
Page 54: Resolving Data Diagnostics
Tap the Issues icon. The Current Issues screen appears. Tap the Details button to view more information about the malfunction. Note: Tapping the red banner on the Home screen jumps to the Current Issues screen. Refer to the malfunction information on the visor card or contact your supervisor if a malfunction is not resolved. -
Page 55: Appendix
This appendix contains supplemental information to aid you in using the EROAD ELD. 7.1 CONTACTING EROAD Drivers should first contact their supervisor with any questions. Supervisors may contact their EROAD representative, when needed. EROAD, Inc. 7618 SW Mohawk Street Tualatin, OR 97062 1-855-50-EROAD or 1-503-305-2255 support@eroad.com... -
Page 56: Error Messages And Malfunctions
Yard Move 7.3 ERROR MESSAGES AND MALFUNCTIONS The following list represents typical error messages that might appear. It is not intended to be all inclusive. Refer to the EROAD ELD visor cards or contact EROAD for more information. Message Description or Remedy Data diagnostic –... - Page 57 There are no driver Your login has not been entered logins available yet, in the EROAD Depot application. please contact your Use your paper logs and contact carrier manager and your supervisor. keep paper logs.
- Page 58 With EROAD, you can have the best of all worlds. EROAD’s user-friendly ELD is built on the same advanced technology platform as our tax, safety, and fleet management solutions. That means reliability you can count on, and a partner you can trust. With EROAD’s...
- Page 60 EROAD.COM Confidence in every mile.
Need help?
Do you have a question about the Ehubo 2 and is the answer not in the manual?
Questions and answers