Table of Contents
Advertisement
Quick Links
About OrthAlign, Inc.
OrthAlign is committed to providing surgeons with
user-friendly, cost-effective, surgical navigation products
for precise alignment.
For more information about the KneeAlign® 2 System,
please contact us at 866.582.0879 or info@orthalign.com.
120 Columbia, Suite 500
Aliso Viejo, CA 92656
866.582.0879
www.orthalign.com
KneeAlign
1/2012 001029 Rev K
2 System
®
Surgical Technique Manual
Tibia and Distal Femur Navigation
Advertisement
Table of Contents

Related Manuals for OrthAlign KneeAlign 2 System

Summary of Contents for OrthAlign KneeAlign 2 System
- Page 1 ® Surgical Technique Manual Tibia and Distal Femur Navigation About OrthAlign, Inc. OrthAlign is committed to providing surgeons with user-friendly, cost-effective, surgical navigation products for precise alignment. For more information about the KneeAlign® 2 System, please contact us at 866.582.0879 or info@orthalign.com.
-
Page 2: Table Of Contents
KneeAlign 2 System Surgical Technique Manual ® KneeAlign 2 System ® Set up precise • alignment • simplified Step Install Sensor Battery This technique guide describes the proper use of the KneeAlign® 2 System. This system is not compatible with its previous generation, Open navigation unit package and pass sterile inner blister package into operative field. -
Page 3: Step 3 Attach Bracket
KneeAlign 2 System Surgical Technique Manual KneeAlign 2 System Surgical Technique Manual ® ® Set up Set up Step Step Attach Bracket Hold Vertically • Attach navigation unit to mounting bracket by sliding calibration Step 2: unit in the direction indicated by arrow on bracket. Rest navigation unit vertically on level surface and hold Attach sensor to coupler at other end of mounting steady with ball in circle. -
Page 4: Step 7 Assemble Femoral Jig
KneeAlign 2 System Surgical Technique Manual KneeAlign 2 System Surgical Technique Manual ® ® Set up Set up Step Step Maximum Setting Assemble Femoral Jig Assemble tibial Jig Push guide rod in direction indicated by arrow labeled • Assemble tibial jig as follows: “Lock”... -
Page 5: Step 9 Select Knee
KneeAlign 2 System Surgical Technique Manual KneeAlign 2 System Surgical Technique Manual ® ® Set up Femur Step Step Select Knee Secure on Femur • Press button to select “L” (Left) or “R” (Right) for leg • Expose knee. being operated on. •... -
Page 6: Step 3 Attach Sensors
KneeAlign 2 System Surgical Technique Manual KneeAlign 2 System Surgical Technique Manual ® ® Femur Femur Step Step Attach Sensors maneuver Leg • Attach navigation unit and sensor to microblock. • Hold femur stationary until green light appears TIPs for Maneuver: on navigation unit screen and unit starts to beep Maneuver must be completed before beeping stops Align ball in center of rectangular box on side of screen... -
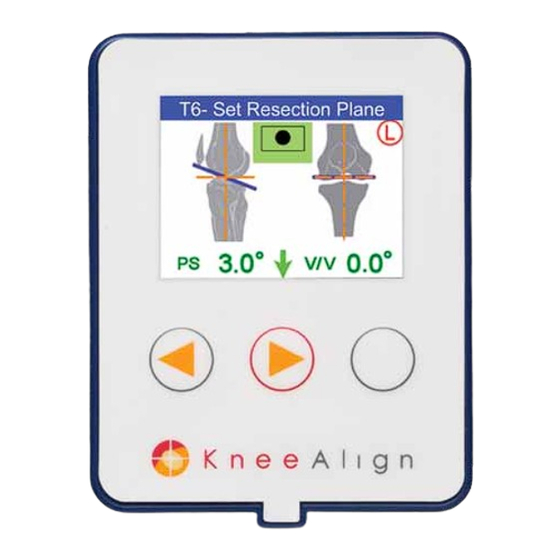
Page 7: Step 5 Set Resection Plane
KneeAlign 2 System Surgical Technique Manual KneeAlign 2 System Surgical Technique Manual ® ® Femur Femur Step Step Set resection plane Set resection Depth (cont.) • Set desired varus/valgus and flexion/extension angles TIP: Resection depth is indicated by scale on anterior face of using ball driver to adjust microblock’s navigation screws. -
Page 8: Step 2 Secure On Tibia
KneeAlign 2 System Surgical Technique Manual KneeAlign 2 System Surgical Technique Manual ® ® tIBIA tIBIA Step Step Attach Sensors Secure on tibia (cont.) • Remove navigation unit and sensor from Midline probe should not be impacted into tibial plateau. mounting bracket and attach to tibial jig. -
Page 9: Step 4 Register Lateral Malleolus
KneeAlign 2 System Surgical Technique Manual KneeAlign 2 System Surgical Technique Manual ® ® tIBIA tIBIA Step Step register Lateral malleolus Set resection plane • Palpate lateral malleolus and place cup of malleolar • Retract malleolar probe to maximum anterior position. probe on its apex. -
Page 10: Step 7 Set Resection Depth
KneeAlign 2 System Surgical Technique Manual KneeAlign 2 System Surgical Technique Manual ® ® tIBIA tIBIA Step Step Set resection Depth Finished tibia • Insert tibial cutting block and rotate it into position against • Use of navigation unit for tibial resection is finished. Adjust Resection Depth tibia. -
Page 11: Setup
KneeAlign 2 System Surgical Technique Manual KneeAlign 2 System Surgical Technique Manual ® ® trOuBLeSHOOtIng trOuBLeSHOOtIng Setup Femur mAneuVer (cont.) Press center button to repeat maneuver, increasing femoral rotation to at least 10°. Calibration step during set-up invalid due to incorrect attachment of sensor. Reattach sensor correctly and repeat validation steps. -
Page 12: Specifications
KneeAlign 2 System Surgical Technique Manual KneeAlign 2 System Surgical Technique Manual ® ® InStrument SpeCIFICAtIOnS OrDerIng InFOrmAtIOn Product description catalog number KneeAlign® 2 Navigation Unit 133631 KneeAlign® 2 instrument Set Replacement Parts KneeAlign® 2 Tibial Jig Body 401594 KneeAlign® 2 Mounting Bracket 402046 Ankle Tube 401582...
Need help?
Do you have a question about the KneeAlign 2 System and is the answer not in the manual?
Questions and answers