Table of Contents
Advertisement
Quick Links
Advertisement
Table of Contents

Related Manuals for CS THERMOS Arianna Series

Summary of Contents for CS THERMOS Arianna Series
- Page 1 Air heaters Instructions for models: Arianna - Cortina - Garda - Sirmione...
- Page 2 Dear Customer, We wish to thank you for choosing a CSTHERMOS stove and welcome you into our pellet/biomass/sized chip heating world. We remind you that our products are manufactured wholly in Italy with superb quality materials and are accurately tested in compliance with the provisions of the safety regulations in force. Great innovation and sophisticated design are added to this guarantee of quality and comfort.
-
Page 3: Table Of Contents
CONTENTS Page Safety regulations 4 Models of stove dealt with in this manual ....................8 Receiving the equipment ................................9 Transport and handling ................................10 Description of the parts................................12 Arianna, Cortina, Garda, Sirmione stoves........................12 Stove dimensions ................................14 Pellet container .................................. -
Page 4: Safety Regulations
1 - SAFETY REGULATIONS Safety regulations for the user This manual is an integral part of the product: it is important to read it in all its parts before installing or using the equipment. Ensure it is always available, also in case of a move/sale/ transfer to another owner, so that it can be consulted by the new user, installer or by any authorized staff. - Page 5 Safety or equipment automatic adjustment devices must be modified only by the manufacturer or by an authorized service centre or supplier, during the whole life of the system. If the equipment is not to be used for a long time, switch off the main power switch. If the equipment does not work or you notice functional or structural changes, disconnect it from the power mains and contact a service centre authorized by the Manufacturer or Dealer without attempting any DIY.
- Page 6 Do not disconnect it by unplugging it when there is a flame on in the burner. Do not use the unit to cook food or heat drinks. Do not use the product as a supporting structure or as a ladder. To prevent fires, do not hang wet clothes on the unit to dry them, drying racks can be positioned at a safe distance.
- Page 7 Risk of ASPHYXIA if there is no correct fume expulsion. We advise you to periodically inspect and keep the flue and fire outlets clean. Risk of FIRE if flammable objects are placed on the surface of the unit or if solid or liquid flammable materials are positioned near it.
-
Page 8: Models Of Stove Dealt With In This Manual
2 - STOVE MODELS DEALT WITH IN THIS MANUAL Arianna Cortina Garda Sirmione 10/12 9/10 9/10/12 code 6118250 iss. 10-2018... -
Page 9: Receiving The Equipment
3 - RECEIVING THE EQUIPMENT When you receive the equipment, check its packaging is intact. In case of visible damage or if some pieces are missing, do not install it, but contact the Manufacturer straight away. If no anomaly is found, the product can be installed. Handle the equipment following the Manufacturer's instructions shown on the packaging and in this manual. -
Page 10: Transport And Handling
4 - TRANSPORT AND HANDLING The apparatus must be lifted with a winch fitted with a hook (A) and handled with a transpallet or forklift truck of suitable capacity. The area of movement must be free from objects or people not involved in the transport operation. If the equipment is handled using a winch, it is necessary to use some spreader bars (C) between the lifting ropes, to prevent the unit from being damaged and ensure no excessive pressure is applied to the packaging or machine itself. - Page 11 Lifting with a transpallet or forklift truck If the transport is done using a transpallet, ensure it is adequate to the weight and size of the packaged equipment. Insert the forks into the points provided for handling (usually in the central position), to keep the centre of gravity of the load balanced.
-
Page 12: Description Of The Parts
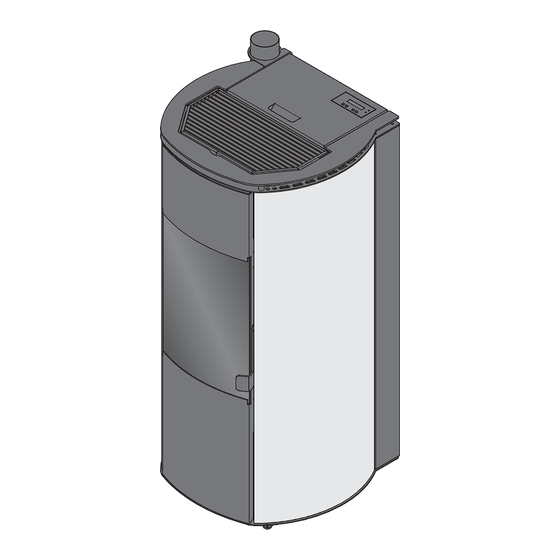
5 - DESCRIPTION OF THE PARTS Arianna, Cortina, Garda, Sirmione stoves Arianna Cortina Garda 10/12 9/10 Sirmione 9/10/12 Description 1) Container lid 2) Display 3) Technical data label 4) Top discharge arrangement 5) Burner 6) Ash drawer 7) Explosion relief 8) Hearth door 9) Glass cleaning air adjuster code 6118250 iss. - Page 13 Arianna 10/12 Cortina 9 Cortina 10 Garda 9 Sirmione 9 Sirmione 10/12 Description 10) Auger thermostat 11) Electrical outlet 12) Boiler thermostat 13) Flue gas discharge 14) Duct arrangement code 6118250 iss. 10-2018...
-
Page 14: Stove Dimensions
Stove dimensions Arianna 10/12 Cortina 9 Cortina 10/12 Garda 9 Flue gas discharge External air intake Duct arrangement Hot air outlet code 6118250 iss. 10-2018... - Page 15 Sirmione 9 Sirmione 10/12 Flue gas discharge External air intake Duct arrangement Hot air outlet code 6118250 iss. 10-2018...
-
Page 16: Pellet Container
Pellet container All stove models are fitted with an internal container to load the pellets. Capacity varies according to the model. The container is always in the top part of the appliance and is protected by a lid. To load, lift the lid and let the pellets slide into the container. Find below an example with a stove model, the system for the other stoves is exactly the same. -
Page 17: Stove Serial Plate
Stove serial plate The plate with the data regarding the stove is located on its back. It supplies important technical information that is vital in case of a request for maintenance or repair of the equipment. Please do not remove, damage or modify it. Find below an example of serial plate, the details regarding your stove can be found in the following chapter. -
Page 18: Stove Technical Data
6 STOVE TECHNICAL DATA UNITS OF TECHNICAL DATA Arianna 12 Arianna 10 Cortina 10 Cortina 9 MEASUREMENT Thermal power input 13.1* 10.8* 10.8* 10.0* (wood pellet fuel) Rated thermal power 11.9* 10.1* 10.1* 9.2* (wood pellet fuel) Reduced thermal power 4.9* 4.9* 4.9*... - Page 19 Garda 9 Sirmione 12 Sirmione 10 Sirmione 9 10.0* 13.1* 10.8* 10.0* 9.2* 11.9* 10.1* 9.2* 4.2* 4.9* 4.9* 4.2* 91.7* 90.8* 93.8* 91.7* 93.0* 93.8* 93.8* 93.0* 0.12 0.10 0.08 0.12 0.44 0.30 0.30 0.44 16.8 <47 <47 <47 <47 wooden pellets wooden pellets...
-
Page 20: Fuels
7 - FUELS There are numerous types and qualities of wooden pellets on the market, so it is important to choose one that con- tains no glue, resins or chemicals and may cause early clogging of the smoke discharge, the formation of corrosive gases, loss of efficiency and the emission of polluting substances into the atmosphere. -
Page 21: Installation
8 - INSTALLATION Pre-installation Before installing the stove, check that everything has been prepared. Find below a quick checklist, for the complete information always refer to the pre-installation card. Check that: - the surface supporting the unit is level and cannot be affected by the heat;... -
Page 22: Flue Pipe
Flue pipe For the stove to work well, the flue must be made by a qualified engineer that must comply with the regulations in force (UNI EN 10683). If that is not the case, the company cannot be held responsible for any malfunctions. To clarify things: chimney or flue is the vertical part of a duct that is characterized by its own draft (natural convection). - Page 23 In particular, as to flues/smoke ducts, we wish to remind you of the following: MATERIALS: - They must withstand mechanical stress; - They must withstand any acid condensation that may form from the combustion products (the use of STAINLESS STEEL 316 is recommended); - They must be waterproof;...
- Page 24 - It must prevent rain, snow and foreign bodies from getting in. - It must not be close to other buildings, but have a free outlet that ensures combustion gases are dispersed into the atmosphere and above all, if the outlet is on a roof, its height must exceed the reflux area. The pictures below are just an example.
- Page 25 - The flue must have the same section as the smoke discharge pipe of the stove, or bigger; - No other pipe must be located in the flue. In pellet stoves, smoke extraction is guaranteed by a fan keeping the combustion chamber pressurized, combined with a state-of-the-art chimney that must allow smoke evacuation using the natural draught.
-
Page 26: Electrical Arrangement
Electrical arrangement All the units are fitted with an electrical supply cable: if this has to be replaced (i.e. if damaged), contact an authorized Technical Service Centre. Before connecting the unit, make sure that: the electrical system is fitted with a 6A thermo-magnetic circuit breaker the system characteristics meet the details on the data plate applied to the unit (electrical power, rated voltage, etc.) the system is fitted with an efficient ground connection, in compliance with the legal regulations in force... -
Page 27: Unpacking
8.4 Unpacking We recommend you unpack the equipment only after transporting it to the place where it must be installed and only at the time of installation. This operation must be done using all the possible personal protection equipment used to protect people (gloves, safety shoes, etc.). -
Page 28: Setting Up The Stove
Setting up the stove After unpacking the stove, position it in the room where it will be used. In moving the stove, pay attention not to damage its external parts. Please pay attention to the distances mentioned above. In positioning the stove, make sure there are no objects underneath it that might affect its correct positioning. -
Page 29: Connecting The Flue Through The Stove Rear Outlet
Connecting the flue through the stove rear outlet The stove can be connected to the previously installed flue pipe only horizontally, on the back. A "T" piece, or an extension followed by a "T" piece, can be connected directly. Please use pipes suitable to discharge pressurized fumes and fitted with seals (UNI EN 1856-1 and 1856-2). The assembly is shown with one model of stove, the procedure for the other models is the same. - Page 30 Rotate the fume motor for the side Standard outlet outlet according to the stove model, unscrewing the 2 screws (4). NB: pay attention to the position of the fixings, as shown in the figura. Side outlet: - Arianna 10/12 - Cortina 10 - Sirmione 10/12 Side outlet: - Garda 9...
-
Page 31: Combustion Air Inlet
Combustion air inlet Combustion air can be taken from the room, if sufficiently ventilated, or from the outside, if not: this way optimal combustion is guaranteed, avoiding opening an air intake in the room. In both cases, refer to the regulations about installation in force (UNI 10683 and UNI7129), to avoid health risks for those who spend time in the room where the equipment is installed. -
Page 32: Air Ducting In Garda 8, Cortina 8, Sirmione 8 Models
8.10 Air ducting in Arianna 10/12, Cortina 10, Sirmione 10/12 models Before starting work on the burner, disconnect the stove from the mains and turn the circuit breaker on the main panel to OFF. The ducting kit must be installed by qualified engineers. In the above models, it is possible to direct hot air to the back of the stove installing the appropriate kit. - Page 33 CROG. MISC. CIRC-AMB code 6118250 iss. 10-2018...
-
Page 34: Electrical Connections
8.11 Electrical connections On the back of the stove there is a socket for the electrical connection. To get power, just connect the cable supplied to the unit as well as to a wall schuko socket. Before connecting it, make sure the circuit breaker is OFF. CONNECTION OF THE ROOM THERMOSTAT AND DUCTING THERMOSTAT (OPTIONS) It is possible to connect a room thermostat (option) that detects the temperature in the area where it is installed and that enables and disables the operation of the stove. -
Page 35: Electronic Board
8.12 Electronic board ROOM COMMUNICATION AUGER THERMOSTAT SENSOR CRUCIBLE CONTACT SENSOR ROOM SENSOR PROBE FUME FUME ENCODER PROBE PROBE SANIT AUX P. H2O - CRG + FUMI T. AMB SC-SA V. AMB FUMI CROG. MISC. CIRC-AMB T. H2O T. COC PRESS COCLEA AIR PRESSURE... -
Page 36: Use
9 - USE DISPLAY DISPLAY KEYPAD DESCRIPTION Button - switches the stove ON/OFF in manual mode (keep pressed for three seconds), cancels alarms and exits programming Button - changes screen and confirms the set data Button - used to increase the values to be set Button - used to decrease the values to be set MEANING OF THE LED LIGHTS... -
Page 37: Commissioning
Commissioning Once installation been completed and all the above has been checked, the system can be started for the first time. Only a CSTHERMOS authorized engineer can do this, also informing the customer on the operations to carry out to make the stove work correctly. -
Page 38: Programming
Programming MAIN SETTINGS Press the key repeatedly to access the desired setting. Press to modify. "Room temp." menu: the Mon 09:00 20.0°C desired room temperature is Press to enter the sub-page or to confirm 25.0°C a new set value. set for manual operation (no automatic programming). - Page 39 AUTOMATIC SWITCH-ON PROGRAMMING Capital letter = day enabled Activate Lowercase letter = day disabled timer to modify. selects the daily block to program. to confirm. PR01 lmmgvsd 20° PR01 lmmgvsd 20° to set programming. ON 00:00 OFF 00:00 ON 00:00 OFF 00:00 for the following program.
-
Page 40: Operation Phases
Operation phases DISPLAY MESSAGE MEANING Pre-ventilation phase and check of safety devices with crucible cleaning before Cleaning fuel loading. Switching-on phase with fuel loading into the burner and simultaneous power Loading ON to resistors. Pause Flame wait pause Flame wait Waiting phase within which time ignition must take place Flame stabil. -
Page 41: Alarm Code List
Alarm code list For your safety, do not tamper with or modify any component of the equipment: the manufacturer does not guarantee its correct operation, which can be very dangerous. In case of malfunction, problems or if a safety device is triggered, please call authorized personnel. Anyway, all operations must be carried out with the burner off and cooled down and with the power disconnected. -
Page 42: Cleaning
10 - CLEANING During maintenance, use personal protection equipment all the time (i.e. gloves). For the stove to work perfectly, we recommend it undergoes thorough cleaning at least once a week. 10.1 Cleaning the outside To clean the outside, use: soft cloths neutral products, suitable for painted or plastic surfaces. -
Page 43: Cleaning The Biomass Burner
10.2 Cleaning the biomass burner Before starting any operation on the burner, wait for it cool down (about 3 hours). Clean the burner at least once a week. Before starting work on the burner, disconnect the stove from the mains and turn the circuit breaker on the main panel to OFF. - Page 44 Unburnt residue inside the crucible can be vacuumed but can also be made to fall onto the bottom with a scraper, from where they will then go into the ash collection drawer. Once cleaning is complete, the burner lid can be refitted and closed, carrying out the same operations in reverse order.
-
Page 45: Cleaning The Combustion Chamber
10.3 Cleaning the combustion chamber Before starting work on the burner, disconnect the stove from the mains and turn the circuit breaker on the main panel to OFF. Cleaning by turbulators must be performed at least once a week, as described below: - Raise or remove any covers. -
Page 46: Emptying And Cleaning The Ash Collector
10.4 Emptying and cleaning the ash collector Checking the ash collector must be carried out at least once a week. Take care because there may be some incandescent pieces among the residues. If they come into contact with flammable material, they may cause a fire. To open and empty the ash collection drawer, follow the procedure below. -
Page 47: Cleaning And Maintenance Of Other Parts
Check and lubricate the bushings of the fuel loading auger and of the burner. Check and clean the heating fan as required. For any other operation not mentioned in this list, please refer only to the CS THERMOS service centre. -
Page 48: Disposal
11 - DISPOSAL ADVICE TO DISPOSE OF THE PRODUCT CORRECTLY Waste of electrical and electronic equipment (WEEE) pursuant to Decree-Law 49/2014 implementing Directive 2012/19/EU. At the end of its useful life, the product must not be disposed of together with urban waste but must be delivered to the appropriate collection centres or to the dealers that offer this service. -
Page 49: Notes
12 - NOTES code 6118250 iss. 10-2018... - Page 50 code 6118250 iss. 10-2018...
- Page 51 Maximum care has been paid to guarantee the accuracy of this manual. The Manufacturer reserves the right to modify the equipment or the documentation at any time, without notice. Therefore there might be small differences between this manual and the product you have received: we apologize in advance for any inconvenience.
- Page 52 100% tested & certified 100% made in Italy Authorized dealer CS THERMOS SRL - Società Uninominale Via Padania 35 - Z.I. 31020 San Vendemiano Treviso - Italy TV Companies' Register - Tax code / VAT No. 03892500269 Fully paid-up share capital €100,000.00 Tel.
Need help?
Do you have a question about the Arianna Series and is the answer not in the manual?
Questions and answers