Table of Contents
Advertisement
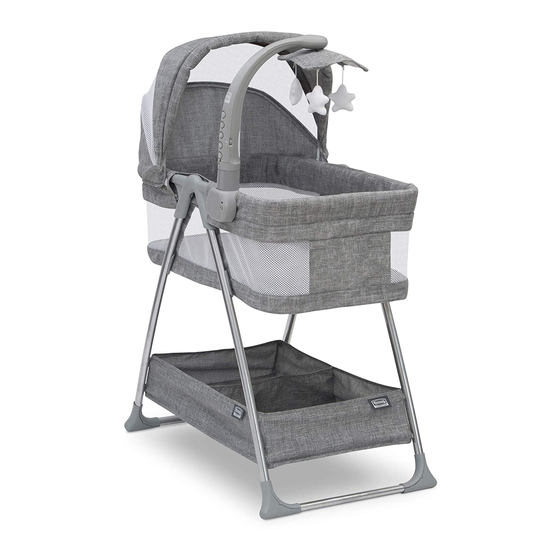
CITY SLEEPER BASSINET
Read all instructions BEFORE assembly and USE of product. KEEP INSTRUCTIONS FOR FUTURE USE.
25601
ASSEMBLY INSTRUCTIONS
CHOKING HAZARD
Adult assembly required because of
small parts. Keep assembly parts out
of reach of children under 3 years.
Required Tools: 4 "AA" Batteries (Not included), Screwdriver (Not included)
Customer Service: (646) 435-8726
INSTRUCTION MANUAL
Styles and colors may vary
www.DeltaChildren.com
DCP WF IM 03-20-2019 V2
Advertisement
Table of Contents

Related Manuals for Simmons City Sleeper


Summary of Contents for Simmons City Sleeper
- Page 1 CITY SLEEPER BASSINET INSTRUCTION MANUAL Read all instructions BEFORE assembly and USE of product. KEEP INSTRUCTIONS FOR FUTURE USE. 25601 Styles and colors may vary ASSEMBLY INSTRUCTIONS WARNING: CHOKING HAZARD Adult assembly required because of small parts. Keep assembly parts out of reach of children under 3 years.
-
Page 2: Part
WARNING WARNING: Do not use this bassinet if you cannot exactly follow the accompanying instructions. Failure to follow these warnings and instructions could result in serious injury or death. • Read all instructions before assembling unit. KEEP INSTRUCTIONS FOR FUTURE USE. DO NOT USE THIS UNIT IF THE INSTRUCTIONS CANNOT BE STRICTLY FOLLOWED. - Page 3 WARNING Read all instructions BEFORE assembly and USE of product. KEEP INSTRUCTIONS FOR FUTURE USE. CAUTION - Changes or modifications not expressly approved by the party responsible for compliance could void the user’s authority to operate the equipment. NOTE: This equipment has been tested and found to comply with the limits for a class B digital device. pursuant to Part 15 of the FCC Rules.
- Page 4 STOP Please DO NOT return this product to the store. If you experience any difficulty with assembly, missing parts or use, please DO NOT return this item to the store. Retail stores are unable to properly assist you. Contact our Customer Service Department directly for assistance (646) 435-8726 www.DeltaChildren.com •...
-
Page 5: Table Of Contents
PARTS IMPORTANT! Please remove all parts from the package and identify them before assembly. Fabric Liner Part # 50518 Clip On Mobile Arm Base Legs Part # 50520 Part # 50519 Canopy Toy Mobile Top Support Tube Part # 50521 Part # 50523 Fabric Storage Liner Part # 50522... - Page 6 FRAME ASSEMBLY Center Joint Center Joint Top Support Tube Base Leg 1 Base Leg 2 Locate the top support tube and LEFT base leg. Locate the RIGHT base leg. Align the base leg “A” to “A” on the top support bassinet and insert it into the center joint until the Insert the base leg “B”...
- Page 7 MATTRESS BOARD ASSEMBLY M5 Screw – 1.7cm – 4x – Actual Size Locate the mattress support board, four (x4) M5 X 1.7cm screws, and a Phillips screwdriver (not included). Top View of Bassinet Frame Using a Phillips screwdriver and four (x4) M5 X 1.7cm screws, tighten the mattress board onto the plastic mattress board support nuts.
- Page 8 FABRIC LINER ASSEMBLY Start BACK SIDE zipper pull tab is located on left side Start FRONT SIDE zipper pull Canopy tab is located on right side Attachment Holes Fabric Liner Clip on mobile arm attachment joints Correct Placement BACK SIDE FRONT SIDE Locate the fabric liner.
- Page 9 FABRIC LINER ASSEMBLY Canopy Attachment Holes START Clip on Mobile Arm Attachment Joints BACK Fig. 1B Top Support Tube FRONT Zipper pull tab slider Place the front bassinet fabric over the front rail tube. Align NOTE: One side of the fabric liner has the canopy attachment and fasten zipper to top rail (Fig.
- Page 10 MATTRESS PAD & FABRIC STORAGE LINER ASSEMBLY Mattress Pad with Sheet Fabric Liner Button Hole Fully Inserted Plastic Nub Through Storage Button Hole Plastic Nub Align the bottom storage button holes to the eight (8) storage plastic nubs located on the base legs to secure the entire fabric liner in place.
- Page 11 CANOPY & CLIP ON MOBILE ARM ASSEMBLY Canopy Ratchet Canopy Attachment Holes Locate the clip on mobile arm and canopy toy mobile. Hook and Loop Patch Fit the canopy toy mobile to the mobile arm. Push the canopy toy mobile up firmly to lock in place. Completed Canopy Attachment Position the canopy over the top end of the bassinet, opposite the clip on mobile attachment joints.
- Page 12 CLIP ON MOBILE ARM ASSEMBLY Clip on Mobile Arm Clip on Mobile Arm Attachment Joints 90° Align the clip on mobile arm to one of the clip on mobile arm attachment joints on the front side of the frame and push down to lock in place. NOTE: Slide mobile arm horizontally to remove.
- Page 13 BATTERY INSTALLATION 1.5V X 4 “AA” (LR6) 1,5V x 4 « AA » (LR6) In exceptional circumstances, batteries may leak fluids that can cause a chemical burn injury or ruin your product. To avoid battery leakage: • Do not mix old and new batteries or batteries of different types: alkaline, standard (carbon-zinc) or rechargeable (nickel-cadmium).
- Page 14 MOBILE ARM UNIT OPERATION Rotate Mobile Toys Twinkling Lights Music Volume Switch Music Vibration Night Light Mobile Functions On/Off Vibrations Switch Mobile Functions On/Off Switch • Push the Mobile Functions On/Off button at the base of the mobile arm to turn on power. This is the main power switch to the mobile arm and also turns on the power LED on the Night Light button.
- Page 15 NOTES Customer Service (646) 435-8726 www.DeltaChildren.com...
- Page 16 Delta Children 114 West 26th Street New York, NY 10001 (646) 435-8726 www.DeltaChildren.com...
Need help?
Do you have a question about the City Sleeper and is the answer not in the manual?
Questions and answers