
Related Manuals for DIGITALas DD-5100


Summary of Contents for DIGITALas DD-5100
- Page 1 DIGITALas, JSC Ukmergės 234A, Vilnius, LT-07160 Tel :+370 5 2336619 info@digitalas.lt www.digitalas.eu...
- Page 2 Digital Door phone DD-5100...
-
Page 3: Table Of Contents
1.1. General features of the DD5100 Digital Door phone................3 1.2. Dimensions............................4 Chapter 2. Components of the System......................6 Chapter 3. Connection of DD-5100 door phone....................7 3.1. A standard wiring diagram.........................7 3.2. Video camera wiring diagram......................8 3.3. Door phone connection to the network....................8 Chapter 4. - Page 4 DD-5100 5.1. Introduction to Net configurations....................30 5.2. Ways to connect DD5100 to Network (Net types)................30 5.2.1. NET1............................30 5.2.2. NET2 ............................30 5.2.3. NET3............................31 5.3. Network configuration........................31 5.3.1. Net configuration examples......................31 5.4. Error codes............................31 Chapter 6. Error, its identification and troubleshooting................32 User Manual..............................33 1.
-
Page 5: Chapter 1. About Dd-5100 Door Phone
Chapter 1. About DD-5100 door phone DD-5100 is a cutting edge nowadays door phone of a high protection level and a modern design, intended for blocks of flats and could be used in an unfriendly environmental conditions. Door phone is created, considering the cutting edge technical solutions. Outdoor station panel, system controller, commutator and other parts are integrated in one unit of a door phone, so less material is used for mounting the system and more time is saved. -
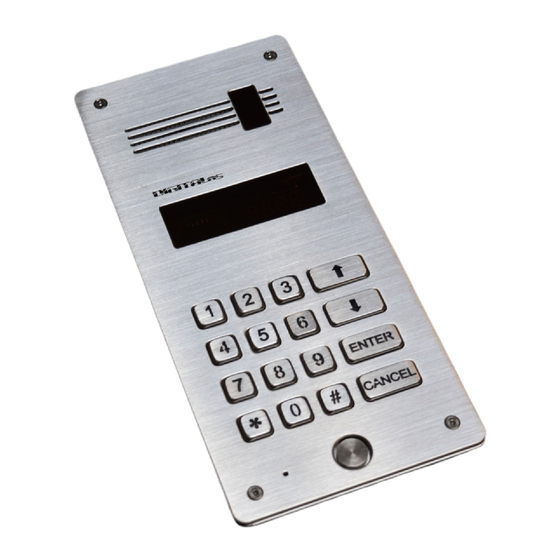
Page 6: Dimensions
DD-5100 1.2. Dimensions ENTER CANCEL Fig. 1: Dimensions of DD-5100 door phone Fig. 2: Dimensions of door phone rain shield DR-1... - Page 7 Fig. 3: Dimensions of Name frame NF-1...
-
Page 8: Chapter 2. Components Of The System
Door phone rain shield DR-1 Door phone rain shield is needed in order to arrange a door phone DD-5100 in the easiest way, avoiding insert into a plaster. Rain shield protects an appliance of direct rain and other environmental factors. -
Page 9: Chapter 3. Connection Of Dd-5100 Door Phone
Connection of DD-5100 door phone 3.1. A standard wiring diagram For basic usage of DD5100 doorphone, only connections made to right connector (see Fig. 4) are mandatory. A minimal standard DD-5100 door phone completion involves: Door phone module DD-5100 •... -
Page 10: Video Camera Wiring Diagram
DD-5100 is mounted for each entrance. Several configurations are possible. If only two doorphones in a network are needed, simplest solution is connect two DD-5100 as shown in fig. 8. In this configuration one DD-5100 doorphone needs to be configured as L type, and NET1 configuration selected, other DD-5100 should be configured as H type with NET1 configuration selected. - Page 11 Video splitter VD-1x5 VO1 VO2 VO3 VO4 Power supply Door unlock switch (12VDC 0,3A) Electric lock/electromagnet Electric lock/electromagnet Regulated power supply (12VDC 1,5A) +12V Handsets / Monitors Monitor power supply Fig. 6: Wiring diagram for two DD-5100 call modules, NET1 configuration...
- Page 12 DD-5100, configured as L type and NET1 configuration selected, is mounted at the entry to stairway. Guest, using H type DD-5100 at the gates, can call to any Flat thru L type DD-5100, but only audio conversation is possible.
- Page 13 Power supply (12VDC 0,3A) (12VDC 0,3A) Electric lock/electromagnet Regulated power supply (12VDC 1,5A) +12V Handsets / Monitors Handsets / Monitors Monitor Monitor power supply power supply Fig. 7: Wiring diagram for more than two DD-5100 call modules, NET2 or NET3 configuration...
- Page 14 Door unlock switch Electric lock/electromagnet Electric lock/electromagnet Regulated power Power supply supply (12VDC 1,5A) +12V (12VDC 0,3A) Monitor power supply Handsets / Monitors Fig. 8: Wiring diagram for more than two H type DD-5100 call modules, any NET configuration enabled...
- Page 15 Electric Lock / Electromagnet Door Unlock Button Power Supply (12VDC 0,3A) Power Supply (12VDC 1,5A) Monitor Handsets / Monitors Audio / Video Line Power Supply Fig. 9: Wiring diagram for up to three DD-5100 call modules with video interconnection, NET configuration disabled...
- Page 16 DDSV1 – 3 LED1 LED1 LED1 Audio / Video Line 1 Audio / Video Line 2 Audio / Video Line 3 Fig. 10: Wiring diagram for one master and three slave DD-5100 call modules with video switching, NET configuration disabled...
-
Page 17: Chapter 4. Programming Menu Description
Chapter 4. Programming menu description 4.1. Activation of programming mode: A new door phone outdoor station module does not contain Service PIN – SPIN code programmed in advance, so during the first programming procedure the System will ask to enter the mentioned code. During the first programming procedure enter *1002#. - Page 18 DD-5100 Programming >> 1. Tag >> 1. U.Add 2. S.Add 3. C.Add 4. Auto Add >> 1. on 2. off 5. Del >> 1. One 2. Group 3. S.One 4.C.One 5. All 2. Code >> 1. U.Pin 2. S.Pin 3. C.Pin 4.
- Page 19 Tag >> Action with Tags 1. U.Add Add User Tag [TM/RFID], (1-1376) U.Tags. 1. ID=0 – U.Tags not related to users ID 2. ID=(1-255) – U.Tags related to users ID [visual] and {audio} notifications: [n.- ] - Next U.Tag number in the memory [done] {pyyp} –...
- Page 20 DD-5100 Code >> Action with PIN Codes 1. U.Pin Add or Delete User PIN code related to Users ID (1-255): To delete U.PIN code, enter User ID and enter U.PIN=0000 [visual] and {audio} notifications: [done] {pyyp} – U.PIN is saved [Err] {pyp pyp} –...
- Page 21 [Err] {pyp pyp} – Wrong time value (=0 or >60) 2. Off Turn off door unlock timer (in case error): [visual] and {audio} notifications: [done] {pyyp} – Timer is turned off CS.no call signal number (1-15) UnL.beep Unlock Signal in handset ON / OFF 1.On Unlock Signal in handset on [visual] and {audio} notifications:...
- Page 22 DD-5100 [done] {pyyp} – Setting is saved [Err ] (pyp pyp) – Incorrect User ID Enable >> Enable User ID 1. One Enable one User ID [visual] and {audio} notifications: [done] {pyyp} – User ID is enabled [Err] {pyp pyp} – Incorrect User ID (ID=0 or ID>255) 2.
-
Page 23: Dd-5100 Programming Manual
7. Net Net configuration 4.3. DD-5100 programming manual Programming mode consists of 8 main MENU items. For programming mode menu structure see fig. 12. Menu items are placed in the order that the most frequently used settings could be reached the first. ( e.g. add /... -
Page 24: Actions With Identificators
DD-5100 delete Tags). Programming mode [1.tAG] - actions with identificators [2.CodE] - actions with codes [3.SEttinGS] - system settings [4.voL] – volume control [5.USEr] - subscribers administration [6.AddrESSinG] – setting of addressing [7.nEt] – network settings [8.F.rESEt] - reset to factory settings Fig. -
Page 25: Auto Add Function
Next time the tag is placed, tag ID will be shown on the screen and doors will open. When all tags was read, auto add function must be disabled. Auto add function is very useful in situation when DD-5100 configuration was lost or doorphone was damaged –... -
Page 26: Delete System Identificator, Related To Sequence Number
4.3.2. Actions with codes Door phone DD-5100 does not contain door unlock codes generated and entered to memory in advance. Each user has a possibility to create and change his door unlock code, using user’s programming li nk (See User’s Manual. -
Page 27: Setting Of Unlock Delay Time
Selection of a lock type Door phone DD-5100 allows to manage locks of two types ( Fig. 18): 1. NC – locks, connected to normally closed circuit, i.e. locks with a permanent power supply, paused only when unlocking (electromagnetic lock); 2. NO - locks, connected to normally opened circuit, i.e. -
Page 28: Door Unlock Timer In Error Case
DD-5100 4) enable access using TM tag: [3.SEttinGS] > > [3.Acc.tYPE] > > [1.t.tAG] > > [2. En] > > [donE] ENTER ENTER ENTER ENTER 5) disable access using RFID tag: [3.SEttinGS] > > [3.Acc.tYPE] > > [1.r.tAG] > > [1.diS] >... -
Page 29: Volume Control
4.3.4. Volume control DD-5100 door phone allows to manage audio signal sound volume digitally. That means sound levels could be regulated any time easily without any additional tools. For Structural scheme of volume control menu see fig. 23. There are three types of setting a signal sound level: 1) indoor conversation volume 2) outdoor conversation volume 3) volume of system sound (buttons beep sound, door unlock sound etc.). -
Page 30: Disable A User According To Id
DD-5100 [1.onE] – disable user according to ID [5.USEr] [1.diSAbLE] [2.GrouP] – disable users gruop by ID interval [3.UnLc] – Disables the option to open the door from Fig. 25: User disable submenu the apartment sctructure Disable a user according to ID When disabling a user from the system according to ID the possibility to use handset and individual door unlock code are totally limited. -
Page 31: Setting Of Addressing
4.3.6. Setting of addressing DD-5100 door phone system allows to use three types of addressing (fig. 27) - regular, shifted and hotel. The mentioned types are described in detail below. [6.AddrESSinG] – setting of addressing [1.rEGULAr] – regular addressing [2.ShiFtEd] – shifted addressing [3.hotEL] –... -
Page 32: Network Settings
DD-5100 2) Add logic addresses of the first floor (101-109): [6.AddrESSinG] > > [3.hotEL] > > [1.Add] > > [Fni- ] > (enter ID=101 of the first ENTER ENTER ENTER flat in first floor) > > [Lni- ] > (enter ID=109 of the last flat in first floor) >... -
Page 33: B) Network Settings Menu For L Type Configured Doorphone
After reset a) variant (main – default) network settings menu is active. 4.3.8. Reset to factory settings DD-5100 has two reset options: reset only DD-5100 settings, and complete reset including deleting of all users data. Structure of factory reset menu is shown in fig. 33. [8.F.rESEt] – reset to factory settings [1.ProG.] - reset DD-5100 settings to default values... - Page 34 DD-5100 an example of full reset: [8.F.rESEt] > > [2.ALL] > > [rSt?] > > [donE] ENTER ENTER ENTER After this step the system restarts automatically and factory settings come into effect. NOTE. Restoring of factory settings is valid for only ones, defined in table 4.
-
Page 35: Chapter 5. Doorphone Net Types And Configuration
Chapter 5. Doorphone net types and configuration Warning: Net configuration is supported only in DD-5100 doorphone with software version v.358 and higher. Important: intercom connecting to the network is recommended to connect the call through a network extender panels that protect the call panel of Electromagnetic pulse interference and remove the impulse line(fig. -
Page 36: Ways To Connect Dd5100 To Network (Net Types)
DD-5100 possible L values (1-9999) 5.2. Ways to connect DD5100 to Network (Net types) 5.2.1. NET1 In this configuration, at one end L type doorphone (max handset count = 255) and at least one H type doorphone at other end are used. In order to use more than one H type doorphone, H type doorphones needs to be connected over Network modules, which output should be connected to L type doorphone input, as shown in fig. -
Page 37: Error Codes
Error, its identification and troubleshooting Door phone DD-5100 graphically indicates the main errors. Graphical codes and descriptions of errors, fixed by a door phone are presented in table 5. In case of Er2-Er5 errors, doors have been unlocked every 5 minutes automatically. - Page 38 DD-5100 Er-4, Er-5: restart the system – switch off the door phone power supply and switch it on again. In case error • mark appears, demount module and present it to service workshops.
-
Page 39: User Manual
User Manual NOTE. Each flat is delivered with an appropriate manufacturer PIN code – 1234. Change it, otherwise doors unlock code and new identificator programming function are unavailable. 1. How to use a door phone: For connection with a subscriber enter his/her flat number (from 1 to 9999) and press ENTER (otherwise call will be started automatically after 3 sec). -
Page 40: Programming Of New Identificators
DD-5100 If made a mistake, press and start the procedure over. If all steps are performed correctly, the PIN code will CANCEL be changed. 5. Programming of new identificators NOTE. This function is unavailable in case factory PIN code is not changed. The System will ask to change a factory code first and then programming of identificators becomes available.
Need help?
Do you have a question about the DD-5100 and is the answer not in the manual?
Questions and answers