Advertisement
Advertisement
Table of Contents

Related Manuals for ezee eZee Bike


Summary of Contents for ezee eZee Bike
- Page 1 www.eZeebike.com SPRINT USER MANUAL...
-
Page 3: Table Of Contents
Simply moving Guarantee conditions Legal regulations Technical data Parts Identification Assembly Checklist Battery charging How eZeebike works Maintenance Troubleshooting Afterword Contents... -
Page 4: Simply Moving
Congratulations on the purchase of your eZee bike. You’re one step closer in realizing a whole new way of commuting that is fast, fun and friendly to the environment. The hub motor is brushless and uses a technology called Pulse Wave Modulation control, so that its not subject to wear like a regular DC motor. -
Page 5: Guarantee Conditions
The following guarantee conditions complement your legal rights. How the guarantee applies As the makers, we guarantee against possible material or construction defects. Provided the following conditions are satisfied : Proof of purchase. The guarantee starts on the date of purchase. Only the first owner is entitled to the guarantee. -
Page 6: Legal Regulations
USA regulations allow a power assisted maximum speed of 20 mph. eZee bike made for the USA has a motor nominally rat- ed at 350 watts but up to a maximum rated power of 700 watts. -
Page 7: Technical Data
Sprint Technical Data Weight 26.7 kgs Motor Electric brushless hub motor 250W (EU) / 350W (US) with planetary reduction gears Battery Pack Lithium Ion with battery management circuit 37V 10Ah (370 Wh capacity) 3.1 kgs Low voltage protection 28 V Discharge temperature limit -15°C to +55°C Controller LED self diagnostic system... -
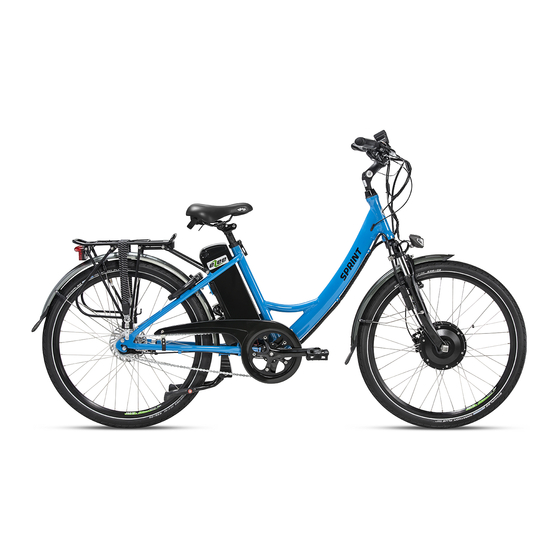
Page 8: Parts Identification
Sprint 26 27 28 29 30 31 21 20 19 18 17 16 15 14 13 12 11 10 Brake cables Front LED lighting Mudguards V-Brakes Rims Spokes (13g) Hub motor Reflectors Tyres 26” x 1.95” Suspension front fork Motor wire casing Bearing race Frame Pedals... -
Page 9: Assembly
Sprint If you have received your bike through mail instead of picking it up from your local bike specialist, please read this section before proceeding to assemble. Unpack Carefully remove the bicycle by lifting it straight out of the box. Becareful not to scratch yourself on the carton staples. Remove the packing material around the bike and stand the bike on a clean flat surface. - Page 10 Sprint Tools required you will need a Allen / Hex key metric set Philips head screwdriver Open-end flat wrenches metric measurements 6mm - 17mm Front wheel ensuring that it is properly seated in the dropout slots. Tighten the nuts alternatively on both sides till the wheel is secured. Tightening torque Seat post and align.
- Page 11 Sprint fork, the mudguards are made of polycarbonate and should not rattle when they’re securely fastened. Brakes the bicycle. To minimise the risk of injury, its vital to ensure they are corrected adjusted. Ensure that the V-brake blocks are parellel to the rim, and that the distance between them do not exceed 2mm, then tighten the brake mounting bolts.
- Page 12 Sprint Battery controller box and turn key counter clockwise while pressing it in, so that it arrives in the open position. Release the catch located at the underside of the saddle to flip it over. Locate the battery flanges in their slots in the battery holder;...
-
Page 13: Checklist
Sprint Usage ‘commuters’ bike and is best suited for usage in urban environment and roads. While cycling, it is your responsbility to be attentive of your environment and traffic rules, as this concerns the safety of all who share the paths, especially you. wear shoes that stay on your feet and grip firmly to the pedals. -
Page 14: Battery Charging
Before your first ride, the battery needs charging. Bring it to a wall socket. (220V - 230V AC EU other countries or 115V AC US) Battery Charging Fuse / Fuse holder (30 amps) Battery grip Charging socket Battery slot guides Batter lock slot Serial number, battery information Insert charging plug into socket on... - Page 15 Check the indicator lights on the front of the charger. light indicates that the charger is connected and running from an A/C outlet. YELLOW light indicates that the battery is charging GREEN light indicates that the battery is fully charged It will take a maximum of 6 hours to fully charge your battery.
- Page 16 Sometimes after temporary disconnection, the charging status light may give a false green reading. To verify that your battery is fully charged, switch the charger off, wait for the charger lights to go out and switch it back on again. The charging status light should quickly return from amber to green, when the battery is fully charged.
-
Page 17: How Ezeebike Works
Your first ride we recommend you practice handling the bike in a safe area away from obstructions and traffic. The motor may look small, but it’s powerful! You’ll be riding faster than you think. EPAC / Pedelec up by a sensor in the bottom bracket. This allows the drive system to be engaged. - Page 18 Variable Power Assist (VPA) have received or chosen a potentiometer dial. This set-up is only compatible with EPAC mode eZeebikes. The dial settings from 0 - 8 correspond accordingly to the level of continous power assistance acheived by the motor during pedalling.
- Page 19 Lighting system performance reflectors at the front, sides and rear. Front and rear LED lights are powered by the main battery, electrical consumption is negligible, be safe, use them often. Lock the ‘OFF’ position and removing it will shut the system off and lock the battery in place.
-
Page 20: Maintenance
< Maintaining your bicycle ensures you’ll get the most out of every ride and out of the entire life of your eZee bike. How much of your bike’s maintenance you can do yourself will depend on your knowledge, skill, experience and whether you have the necessary tools for the job. - Page 21 Repairing a punctured tyre recommend that you get a specialist to carry out the repairs. You can always of course consult a specialist and carry out the repairs on your own. As there are no electronic components on the rear wheel, its removal follow standard proceedures as with normal bicycles with internal gears.
-
Page 22: Troubleshooting
Electronic self-diagnostic system When the bicycle is functioning normally, the red LED that is situated by the controller is lit continually. In the case of an electronic malfunction, the controller comes programmed with diagnostic capabilities to determine where the fault lies. The red LED will emit a series of blinks, count them and refer to the table below for its explanation and solutions. - Page 23 The faults listed may not cover every possible failure. In the event of moisture or water entering the controller, haphazard signals might appear. We’ve designed the eZeebike to repel water as much as possible, encapsulating circuit boards with silicone resins and connections with silicone grease. Since this manual simply cannot cover every detail that might occur during the lifetime of your product.
-
Page 24: Afterword
As people all around the world have begun to realize how easy and beneficial it is to ride our electric bike. At eZee, our mission is simple - to continue to make the best electric bike out there. We’re on the constant lookout for ways to evolve our bikes, to find methods and adapt solutions for our bikes to enrich lives everywhere.