Advertisement
Advertisement
Table of Contents

Related Manuals for Pulse Aloha 1021-SSB


Summary of Contents for Pulse Aloha 1021-SSB
- Page 1 Aloha Shower System Model #1021-SSB PW-91021-1525BSS Owner's Manual...
- Page 2 Aloha Shower System/PW-91021-1525BSS Please Read The Following Instructions COMPLETELY Before Beginning! Our goal is to ensure your installation goes smoothly and safely. Please read these instructions carefully and follow recommendations for plumbing and mounting. After reading instructions, if you determine you do not have the necessary skills and/or tools, we recommend that a licensed plumbing contractor complete the installation.
-
Page 3: Table Of Contents
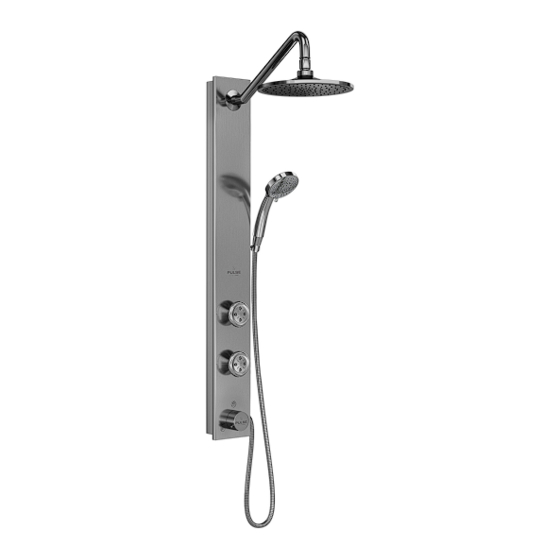
Shower System Parts Legend 1. Shower System......1 10. Rubber Washer ...... 1 18. Nut 4mm ......... 2 11. Retaining Washer ....1 19. Non Slip Washer ....2 2. Shower Arm ......1 12. Mounting Plate ...... 1 20. 1-3/8" Machine Screw ..2 3. -
Page 4: Showerhead
Installation Instruction BEFORE YOU BEGIN Measure the following to ensure your Shower System will fit properly. New Construction Retrofit 28” minimum 28” minimum Make sure distance from water outlet and Remove existing shower arm and shower head. mixing valve trim (NOT INCLUDED) is a Make sure distance from water outlet and minimum 27"... -
Page 5: Brass Nut
Installation Instructions Step 1 Step 2 Step 3 Step 2 Step 1 Back of Aloha Mixing valve (NOT INCLUDED) [Step 1] Secure shower arm (2) onto unit by tightening [Step 1] Apply a generous amount of PTFE (plumber's) tape (24) to end of end of nipple (13). brass nut (6) on the back of unit. -
Page 6: Mounting Plate
Installation Instructions Drill-less Option Figure 1 Back of mounting plate [Step 1] Remove face of tape (14) from mounting plate Connect main supply line (9) to brass nipple (13). (12), apply glue (25) as shown and slide plate over nipple (13) through predetermined hole (A,B,C). -
Page 7: Hand Shower
Installation Instructions Insert washer (7) into the hex end of the handshower Product Fully Assembled hose (22). Attach hose to handshower (21) outlet located on the bottom of the diverter. Insert washer (7) into the tapered end of the hand shower hose (22) and attach the handshower (21). -
Page 8: Flow Restrictor
For other purchasers, repaired or replacement Products will be covered for the balance of the original warranty period. PULSE ShowerSpas, Inc. | 297 Anna Street | Watsonville, CA 95076 | 831.724.7300 www.PulseShowerSpas.com PULSE19-REV. B...
Need help?
Do you have a question about the Aloha 1021-SSB and is the answer not in the manual?
Questions and answers