
Related Manuals for Bpt ETI/SER Xip


Summary of Contents for Bpt ETI/SER Xip
- Page 1 Server ETI/SER Xip ETI/SER XIP Manuale per l’installatore ETI/SER XIP Installer manual QUESTE ISTRUZIONI DEVONO ESSERE ALLEGATE ALL’APPARECCHIO - THESE INSTRUCTIONS SHOULD BE ATTACHED TO THE APPARATUS 24800940 - 09-03-10...
-
Page 2: Contenuto Della Confezione
5- Piedini adesivi in gomma 5- Rubber feet Per usare ETI/SER XIP sono necessari: To use ETI/SER XIP, you will need: • Un display con ingresso DVI o HDMI + DVI (incor- • A display with DVI or HDMI input + DVI (inclu-... - Page 3 L’interfaccia video è DVI-D su connettore HDMI. Display interface is DVI-D over HDMI connector. Per connettere ETI/SER XIP a un Monitor DVI To connect ETI/SER XIP to a DVI display Usare il cavo adattatore HDMI a DVI. Usare un cavo Use the provided HDMI to DVI adapter.
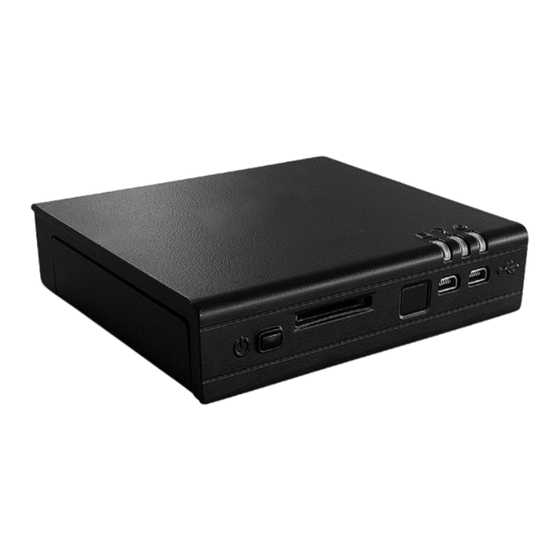
- Page 4 ETI/SER XIP è dotato di un pulsante di accensione. ETI/SER XIP has a tactile power push-button. Per spegnere ETI/SER XIP mantenere premuto il To switch off ETI/SER XIP hold the button for 3 pulsante per 3 secondi. seconds . Al termine di una interruzione dell’alimentazione After a power failure ETI/SER XIP restart automati- ETI/SER XIP riprenderà...
-
Page 5: Avvio Del Sistema
Connettere ETI/SER XIP Connecting ETI/SER XIP • Connettere il jack dell’alimentatore alla presa • Gently insert the DC plug into the ETI/SER XIP DC dedicata sull’ ETI/SER XIP e connettere la presa in jack. Connect the power supply to the AC cord dell’alimentatore alla rete elettrica. -
Page 6: Manutenzione
ETI/SER XIP non necessita di alcuna manutenzione. The ETI/SER XIP requires no maintenance. You L’apertura di ETI/SER XIP fa decadere la garanzia. should not take the ETI/SER XIP apart - this will Le seguenti operazioni possono essere svolte da void its warranty. - Page 7 Manuale per l’installatore - Installer Manual 3. Riposizionare il coperchio dell’Hard disck e ser- 3. Replace the HDD cover and tighten the two rare le due viti. screws. 4. Serrare le quattro viti dell’Hard disck indicate 4. Tighten the four HDD screws indicated below. di seguito.
- Page 8 Eventuali aggiornamenti del presente documento sono disponibili sul sito www.bpt.it. Any updates made to this document are available at this site: www.bpt.it. Il produttore si riserva il diritto di apportare qualsiasi modifica al prodotto al fine di migliorarne le funzionalità.
Need help?
Do you have a question about the ETI/SER Xip and is the answer not in the manual?
Questions and answers