Table of Contents
Advertisement
Advertisement
Table of Contents

Related Manuals for RRD GLOBAL BAR V7


Summary of Contents for RRD GLOBAL BAR V7
- Page 1 GLOBAL BAR V7 Simple / Functional / Safe / Durable • USER MANUAL...
- Page 2 Before using this bar for the first time, please read the users manual carefully. This manual is intended to educate you about your new RRD bar and provide you with information for the correct set-up, tuning, maintenance and care of the bar...
-
Page 4: Table Of Contents
CONTENT General informations Global bar features Wind conversion table Global bar New features on the global bar v7 Velcro loop to prevent de-power cord from “flapping” around. Adjusting the power of your kite with the clam cleat with open velcro... - Page 5 Guidelines listed in this Userís Guide and by using common sense. The use of this RRD Product and any of its components involves certain inherent risks, dangers, and hazards, ineluctable and unpredictable, which can result in serious personal injury and death to both the user and to non user third parties.
- Page 6 RRD Product may suffer, as a result of the use of the RRD Product, and any of its related components. Due to any cause whatsoever, including...
- Page 7 READ THE FOLLOWING POINTS BEFORE ASSEMBLING YOUR NEW RRD BAR Warnings: • Kite flying can be dangerous. • Always use extreme caution when using this product. • Misuse of this product can cause serious injury or death. • Only use this product if you are in good physical health.
- Page 8 CHOOSE SAFE WEATHER CONDITIONS • Never learn to use this product in more than 10 knots of wind. • Never use this product in high or gusty winds. • Never use this product in thunderstorm and lightning conditions. • Only use this product when you can remain in a standing position.
- Page 9 CAUTION! Please note, that you should check the bar, and maintenance it at least after every 250 hours of use, or after six months. This is in order to check if the lines are still in good condition and if all the parts of the bar are subject to wear and need to be serviced.
-
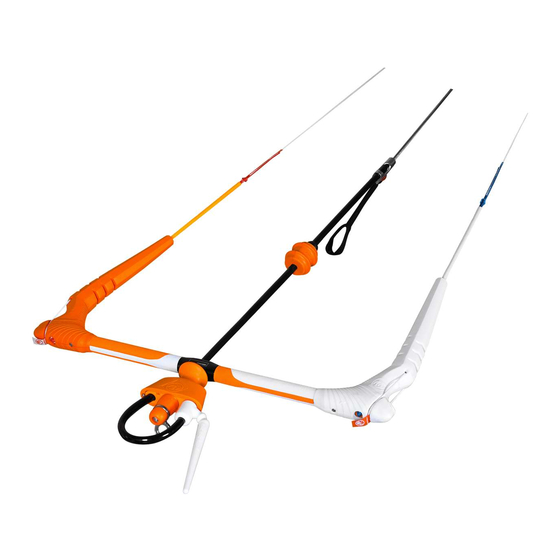
Page 10: Global Bar Features
GLOBAL BAR FEATURES The Global Bar is ready to use. See the diagram for its components and parts. CNC milled and anodized Chicken loop safety release system with aluminium central bar with oversized handle and increased sliding oversized oval recesses to potential of all components to secure an improve de-power tube effective functionality over the years. - Page 11 Left red back line Right blue back line Chicken loop safety release system Pulley De-power stopper Side floaters Alu tube 20mm Power trim with clam cleat New de-power stopper EVA float: by simply pushing up or down the EVA float you can trim the de-power rope length according to your height or depending on the conditions you are kiting in.
-
Page 12: Wind Conversion Table
WIND CONVERSION TABLE BFT M/S KM/H KNOTS DESIGNATION 0-0,2 0-0,8 0-0,6 0-0,5 Calm 0,3-1,5 0,9-5,5 0,7-3,5 0,6-3,0 Light air 1,6-3,3 5,6-12,1 3,6-7,5 3,1-6,5 Light breeze 3,4-5,4 12,2-19,6 7,6-12,2 6,6-10,5 Gentle breeze 5,5-7,9 19,7-28,5 12,3-17,8 10,6-15,5 Moderate breeze 8,0-10,7 28,6-38,8 17,9-24 15,6-20,9 Fresh breeze 10,8-13,8... -
Page 13: Global Bar
GLOBAL BAR The Global Bar Bar is ready to be used as it comes from the bag with your new kite. The bar is equipped with the new “Rigid Thread” flying lines , specifically developed in order to limit as much as possible their possible stretching. -
Page 14: New Features On The Global Bar V7
NEW FEATURES ON THE GLOBAL BAR V7 We have taken out any unecessary items instead of adding them, to make every component more functional. Simply said: ”you cannot break what does not exist”. LONGER DEPOWER ROPE • The de-power rope is extended with 10 cm, to increase depower ability. -
Page 15: Velcro Loop To Prevent De-Power Cord From "Flapping" Around
VELCRO LOOP TO PREVENT DE-POWER CORD FROM “FLAPPING” AROUND You have the option to use the Velcro loop on the de-powercord to prevent the cord from flapping around or getting tangled, this is especially handy when the kite is fully depowered. ADJUSTING THE POWER OF YOUR KITE WITH THE CLAM CLEAT WITH OPEN VELCRO LOOP Pulling on the black handle will shorten your front lines and the kite will have less power. -
Page 16: Adjusting The Power Of Your Kite With The Clam Cleat With Closed Velcro Loop
ADJUSTING THE POWER OF YOUR KITE WITH THE CLAM CLEAT WITH CLOSED VELCRO LOOP The same procedure of power /de-power you kite can be used with the CLOSED velcro loop around the de-power cord. Since this operation will be slightly more difficult than when having an open velcro loop outside the de power cord, we recommend to get familiar with this option and practice de-power release before going in the water. -
Page 17: How To Lock The Chicken Loop Into Your Harness Hook
HOW TO LOCK THE CHICKEN LOOP INTO YOUR HARNESS HOOK The chicken loop is designed with a new moulded multiple pre-set positions rotor head chicken loop finger to help you stay locked into your quick release. Before you hook in and connect the finger to your harness hook: make sure that your safety release is attached and that your li- nes are set up properly without any tangles... -
Page 18: Release Of Power / Quick Release
RELEASE OF POWER QUICK RELEASE SAFETY SYSTEM The new one-line safety system makes Quick Release Trim Loop: the kite de-power 100% in case you need Grab the orange quick release trim it. You connect the kite leash to only one Loop and force it up away from your line, which makes the kite loose all its body (photo). -
Page 20: Reassembling The Chicken Loop
REASSEMBLING THE CHICKEN LOOP Follow the steps described in these pictures. Keep in mind that you only reassemble your chicken loop again when the kite is secured, so it can’t suddenly power up again. -
Page 21: Safety Leash
“safety release system”, when you rele- difficult to release the safety system on ase you will achieve a total power loss your chicken loop. of 100% (RRD recommends only using this mode). 2) “Suicide mode” By attaching the lea- sh both on the ring and the black chicken loop tube. -
Page 22: Releasing The Safety Leash
RELEASING THE SAFETY LEASH Always remember that your safety leash is the last connection between you and your kite. Only release it in case of extreme emergency and remember that an uncontrolled kite is a great danger for other individuals on land and on the water. If your kite keeps pulling you for any reason after releasing your safety on the chicken loop, you can release yourself from your leash with the quick release at the bottom of the leash. -
Page 23: Reassembling The Safety Leash
REASSEMBLING THE SAFETY LEASH Follow the steps described in these pictures. Keep in mind that you only reassemble your safety leash again when the kite is secured, so it can’t suddenly power up again. -
Page 24: Un-Twisting Power Lines
UN-TWISTING POWER LINES To untwist the power lines while flying the kite, you can just spin the black tube of the de-power rope in the opposite di- rection (see pics) -
Page 25: Correct Way To Store The Global Bar
CORRECT WAY TO STORE THE GLOBAL BAR Wrap the flying lines leaving the black plastic de-power rope straight making sure not to wrap it around the bar. CORRECT STORAGE INCORRECT STORAGE... -
Page 26: Relaunching The Kite
RELAUNCHING THE KITE If the kite is straight downwind of you, with the leading edge on the water, you can simply pull on one of the back leader lines to relaunch the kite. As you pull the leader line in, the kite will roll on its side and work its way to the edge of the window. -
Page 27: Tip: Steps To Check The Flying Lines Alignment
TIP: STEPS TO CHECK THE FLYING LINES ALIGNMENT The flying lines should not or hardly stretch with the exclusive RRD Rigid Thread lines, but follow these steps in the rare case that they did stretch a bit: Unroll your kite lines from the bar and lay your bar down;... -
Page 28: Warranty
Products can be returned only if a return be issued a return authorization prior to authorization number (RA) is given by the shipping to RRD International Srl. Ricci International Srl Distributor in ad- Please call or write for claims proces- vance. -
Page 29: Warranty Link
WARRANTY LINK Scan this: or go to: www.robertoriccidesigns.com/equipment/warranty/... -
Page 30: The Rrd "Rigid Thread Lines
But what we definitely didn’t want and/or need to change are the lines. In addition to the new systems, the ‘RRD Global Bar V7’ is still equipped with special lines called “RIGID THREAD LINES” . These are used exclusively on the RRD bars with great success for over 6 years. A product that’s now widely tested around the world, but there is little known about the details by kiteboarders. - Page 31 WHY ARE RRD KITE LINES INNOVATIVE? Unlike standard braided lines, the unidirectional structure of ‘Rigid Thread Lines’ provides a fiber memory that is significantly more efficient .
- Page 32 PHOTO: MARTIN RENDO RIDER: ABEL LAGO RRD • Roberto Ricci Designs is a registered trademark licensed to: Ricci International Srl • Italy www.robertoriccidesigns.com...
Need help?
Do you have a question about the GLOBAL BAR V7 and is the answer not in the manual?
Questions and answers