
Related Manuals for Roma Medical Tulsa S245


Summary of Contents for Roma Medical Tulsa S245
- Page 1 Roma Tulsa User Manual Model - S245 - Please ensure that this user manual is read and understood before using the scooter.
-
Page 2: Table Of Contents
Contents Introduction Intended Use Technical Specifications Feature Guide Safety Advice Adjustments Tiller Angle Adjustment Seat Swivel Seat Removal Tiller Controls Brake Release / Free Wheel Operation Starting to Drive Getting started Moving off Steering Ramps and Slops Surfaces Transferring Storage Battery and Battery Charger USB Charging Port Maintenance... -
Page 3: Introduction
Introduction Congratulations on your purchase of the ROMA S245, Tulsa scooter. This scooter incorporates the latest innovative designs. ROMA S245 can be used in confined spaces both indoors and out. A direct drive rear transaxle and electromagnetic brake give a safe and efficient ride. Intended use The ROMA S245 is intended for indoor or outdoor use in pedestrian areas by a single individual with limited mobility up to a maximum weight of 136kg (21st). -
Page 4: Feature Guide
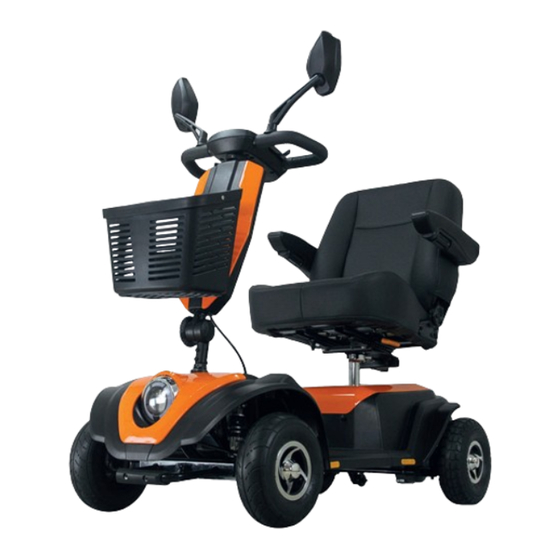
Feature guide ‘Tulsa’ Shopping basket Wing mirrors USB charging port Flip up arms rests & padded seat Seat swivel adjustment. Rear shock absorbers Pneumatic tyres Front shock absorbers Front LED headlight Handy storage basket... -
Page 5: Safety Advice
Safety advice • Read this manual carefully before using your scooter. • Turn the power off when transferring to and from the scooter. • Select a slow speed when going down gradients (max 8°) or over uneven ground. • Keep your feet on the scooter whilst driving. •... -
Page 6: Adjustments
Adjustments Tiller Angel Adjustment At the bottom right hand side of the scooter you will find the angle adjustment handwheel. To adjust the angle, loosen the handwheel by turning anti-clockwise. Once the desired angle is achieved tighten by rotating clockwise. Ensure the tiller is fully secure before using the scooter. Seat Swivel The seat has a lockable swivel base to allow easier transfers. -
Page 7: Seat Removal
Seat Removal To remove the seat, fold down the back of the seat and simply lift the seat away from the chassis while lifting the seat swivel lever. Caution: Do not hang baggage or other objects on the back of the seat as this may affect stability. -
Page 8: Tiller Controls
Tiller Controls Battery Gauge (1) This gauge gives you a guide to the amount of charge left in the scooters batteries. This will give the truest reading when the scooter is in motion. Note: Always fully charge the batteries before driving your scooter and never let the batteries become completely drained, as this may cause permanent damage to the batteries. -
Page 9: Brake Release / Free Wheel Operation
Front Lights (4) This button operates the LED headlight. On / Off Key (5) The key switch is located on the right side of the tiller. Simply insert the key and turn clockwise to switch the power on. The display will light up to indicate the power is on. There may be a slight delay before the thumb levers operate as the controller checks the scooters circuits. -
Page 10: Starting To Drive
Caution: Never leave the scooter unattended whilst in free wheel mode as it will roll away down an incline. ‘Free wheel’ mode should only be used in an emergency to move the scooter due to power failure. NEVER move the scooter in this mode whilst it is occupied. NEVER tow the scooter. -
Page 11: Moving Off
Moving Off Insert the key and switch on the power and initially set the speed control to a low setting. The further you pull the lever the faster the scooter will travel, but only to the maximum speed that has been selected. -
Page 12: Storage
Storage Your scooter should be stored in a dry environment, preferably a garage or shed. Tarpaulins and covers may create condensation during certain weather conditions. If your scooter is to be stored for prolonged periods, fully charge the batteries and disconnect the battery plugs. - Page 13 Caution: Do not charge the batteries for longer than 12 hours. Always charge the batteries in a well-ventilated indoor area. You must still maintain charging the batteries even if the scooter is not to be used for a prolonged period of time (2 to 3 weeks). Failure to do so could result in permanent damage and render the batteries unusable.
-
Page 14: Usb Charging Port
USB Charging Port USB Charging Port Caution: USB Charging port can cause small electrical shocks when wet. Please ensure that the USB port is free from liquid. Please note liquid damage is not covered by warranty. Maintenance Product Life Expectancy Your scooter has been designed to provide the user with a long, reliable life provided it is correctly maintained and regularly serviced by an authorised dealer. -
Page 15: Error Chart
Troubleshooting Your scooter is fitted with the latest in electronic controls that are programmed to protect the electrical system from abnormal overloads. Fuses There are two fuses on the battery cables to give protection against possible overload on the wiring. Check list If your scooter fails to operate, please check the following: •... -
Page 16: Further Information
Note: Should your scooter fail to operate after checking these possible problems, consult your local ROMA dealer immediately. If the scooter is switched on and not operated for a period of time (approx 10 minutes) it may enter ‘sleep’ mode. This is indicated by the spanner flashing on / off continuously. Simply switch the scooter off and on to reset the controller. - Page 17 Product Stability Scooters and powered wheelchairs are designed to allow the user flexibility of movement in restricted areas. Driving at maximum speed and attempting sharp turns can create a situation where the prod- uct becomes unstable. Therefore it is essential that the user pay attention to the guidance set out in this manual.
-
Page 18: Warranty
Warranty Terms and Conditions This is to certify that your Roma Medical product is warranted for a period of 12 months from the date of original purchase. This warranty is not transferable. Should a defect or operating fault arise within this period the Dealer from where the product was originally purchased should be notified immediately. - Page 19 Notes...
- Page 20 York Road Bridgend Industrial Estate Bridgend CF31 3TB United Kingdom Telephone: 01656 674488 Facsimile: 01656 674499 Email: sales@romamedical.co.uk Web: www.romamedical.co.uk...
Need help?
Do you have a question about the Tulsa S245 and is the answer not in the manual?
Questions and answers