
Related Manuals for Olide SD3108

Summary of Contents for Olide SD3108
- Page 1 Automatic Swing door Operator SD3108 Product manual Notes: please keep the manual properly for reference. Do △ △ △ △ carefully read this manual before use.
- Page 2 Safety Warning! Please read carefully the instructions before installing the door operator, we do not take responsibility for the loss or damage due to the improper use disobeying the following cautions. Do use the power conforming to the regulations! Or otherwise, it may result in △...
-
Page 3: Table Of Contents
Content 1. Product Overview 1.1 Product Procedure 1.2 LED Indicator 1.3 Main Parameters 2. Installation 2.1 Installation Notice 2.2 Want your door to be 2.3 Installation measurement and mode 3. Wiring diagram 4. Debugging 4.1 Control programmer debugging 4.2 Remote control function debugging and management 5. -
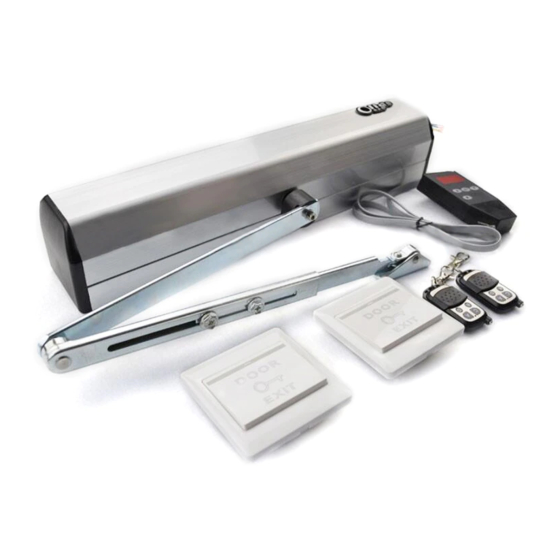
Page 4: Product Overview
1.Product Overview Cover Sliding arm... - Page 5 Articulated arm Please carefully read this instruction for better use this equipment. The automatic swing door operator SD3108 is intelligent equipment controlled by the microcomputer, enjoys excellent capability and strong function. Surface mounting △ △ △ △ Push-Go: Automatic activation by pushing or pulling door panel △...
-
Page 6: Led Indicator
Easily adjustable opening &closing speeds △ △ △ △ Manual operation in case of power failure △ △ △ △ 1.1 Operation Procedure Activated by the signals from external control device, unlock → open → buffer action&stop→hold-open→close→buffer action&stop→lock and seal. 1.2 LED Indicator Green lighting LED: Operation status Red LED lighting LED: The operator is supplier with power... -
Page 7: Installation
2 Installation 2.1 Installation Notice ◆The operator is available both for the left handing and right handing door ( can mounted on the hinge side or not the opposite hinge side.) Articulated arm and sliding arm both can be used to this operator. ◆Door leaf max weight and width: Please refer to the max limit of the door application;... -
Page 8: Want Your Door To Be
2.2 What your door to be ◆Become inductive automatic door by connecting sensor inductor. ◆Become identifying automatic door by connecting code remote control or card reader and other door access control system. ◆Become apartment automatic door by connecting building intercom system. ◆Become long-distance wiring control automatic door by connecting push button on the table or wall. -
Page 9: Installation Measurement And Mode
2.3 Installation measurement and mode Installation measurement and mode (The measurement is in millimeter millimeter) · A. Sliding arm model A. Sliding arm model Sliding arm model, left outward opening installation Sliding arm model, left outward opening installation Sliding arm model, right outward opening installation Sliding arm model, right outward opening installation... - Page 10 · B. Articulated arm model model · Articulated arm model, left arm model, left handing, outward opening installation ward opening installation Articulated arm model, right arm model, right handing, inward opening installation inward opening installation...
- Page 11 2.3.1 Supplement Notice It is suggested to fix the driving arm to the door frame vertically, or fix at a 15° ° ° ° angle with the vertical line. When the door leaf and door frame are on the same plane; If the door is fixed at the different depth of the door frame, it should be noticed that for articulated arm model, the linkage arm should be lengthened;...
- Page 12 On the edge of inner frame In the middle of frame Figure 3 Figure 4 On the edge of outer frame Figure 5...
-
Page 13: Wiring Diagram
Notes to installation Do install in accordance with the dimension stated in this manual; the incorrect installation will directly affect the machine operation even cause failure damaging the machine. When the equipment is being installed, do tighten reliably to prevent the machine from loosening to result in the incorrect identification of door and cause vibration;... -
Page 20: Debugging
4. Debugging 4.1 Control programmer debugging Notes: Do not inset or draw out the debugger with power; do after power disconnection. Debugger operation: The debugger is connected to the telecommunication interface of controller to display XXXX-XXXXXXX characters; enter the menu of parameter of automatic door by pressing SET and adjust UP or DOWN;... - Page 21 0-120 Hold-on open time Delay open time Left and right directions of door opening Fire alarm signal open/close door 30-200 Opening/Closing angle 0-30 Locking force 0-60 Opening braking force 0-60 Closing braking force Debugging Further introduction: 1.Opening speed, 10-100 adjustable 2.closing speed, 10-100 adjustable 3.The speed of damping opening, 1-10 adjustable 4.The speed of damping closing, 1-10 adjustable...
-
Page 22: Remote Control Function Debugging And Management
4.2 Remote control function debugging and management One remote control can control a lot of operators, and one operator can be controlled by 15 remote controls utmost, but the operator only accept authorized remote control, you do not worry that your neighbor’s remote control can open your door. You need to manage the remote control when adding or canceling them: Matching the code: authorize the remote control Press And Release The code-matching white button S1 on power supply (see above... - Page 23 Troubles Shooting Trouble Reason Solution No indicator LED lights Power failure · Open the cover of machine on power supply body; check if the fuse of 220V/110V power is burned down. · Open the outer crust and check if happens 220V or 110V power fuse blowout.
- Page 24 adjusted too large opening (Option B) 2. The signal of door · Reclose the power, close the opening is sent door and power on once before the powering again. on and resetting; · Remove the external signal 3. Failure of external signal...
Need help?
Do you have a question about the SD3108 and is the answer not in the manual?
Questions and answers