Advertisement
Quick Links
Advertisement

Related Manuals for Oklahoma Sound GSL


Summary of Contents for Oklahoma Sound GSL
- Page 1 The Greystone Lectern ASSEMBLY MANUAL Model # GSL...
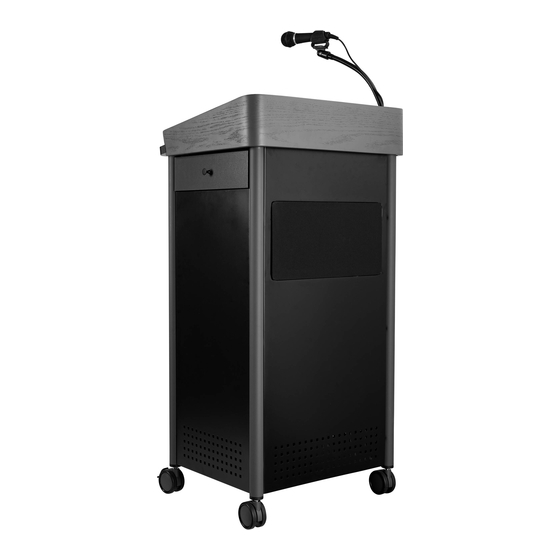
- Page 2 INTRODUCTION Congratulations!! On your purchase of the Model GSL Lectern. The perfect lec- tern that provides an all-in-one presentation experience. This beautifully hand- crafted lectern is built with durable steel parts along with a curved plywood top. The unit is equipped with a front 8” drawer, two side pull-out shelves and a slid- ing keyboard tray.
- Page 3 ASSEMBLY INSTRUCTIONS Assembly Tips Do not use a sharp instrument such as a knife or screwdriver to open the packag- ing, as this may scratch or damage the unit. All assembly should be done on a clean protected surface such as a carpet or the ...
- Page 4 Parts Front panel (A) Back panel (B) Right panel (C) Left panel (D) Shelves x 3 Casters (O) Doors (G) & (H) Lectern top & support brackets Keyboard parts Drawer parts ...
- Page 5 Assembling the unit: Caster installation- 1) Install the two locking casters on the front tubes of panel A. Use the enclosed wrench to tighten. 2) Install the two non-locking casters to back tubes of panel B. Use the enclosed wrench to tighten.
- Page 6 Attaching Front panel to side panels- 1) Lift partially assembled unit to an upright position and begin by aligning holes of right side of tube of front panel (A) to holes on side panel (C). Install by using three black 15mm Phillips head screws from hardware packet #3.
- Page 7 Cabinet Shelf Installation- 1) Place one shelf (Part F) at the bottom of cabinet assuring that it is firmly resting on ledg- es of the interior of the side and pack panels of cabinet. While holding on a slanted position, place the remaining two shelves (Parts F) on the ledges of side panels assuring that they are firmly resting on ledges of the interior of the side panels of cabinet Door assembly &...
-
Page 8: Top Assembly & Installation
Top assembly & installation- 1) Carefully remove lectern top (Part E) from carton and place upside down. 2) Identify right & left lectern support brackets (Parts M & N). 3) Place bracket (M) on right side aligning with pre-drilled holes on under side of top. 4) Using four Philip-head black 10mm screws from hardware packet #3, install by tightly screwing screws into pre-drilled holes. - Page 10 Keyboard assembly & installation- 1) Identify keyboard front panel (Part J) and using a silver Philips head screw and black knob from hardware packet #1, install knob onto front panel. 2) Identify keyboard panel (Part # J-1) and connect front panel to it in the following manner: 3) Tightly Screw in one cam bolt (found in packet #2) at each of the two outer holes of the inside of the front panel.
-
Page 11: Drawer Assembly
Drawer assembly 1) Identify the five drawer panels (Parts I 1-5) and assemble drawer in the following manner: 2) Begin by screwing right & left side panels (Part # I-2 & I-3) to back panel (Part I-4) using four flat-head screws found in packet #2. Note: Drawer tracks shall be on the outside. 3) Insert bottom panel (Part # I-5) into the grooves located at bottom of side and back panels. -
Page 12: Drawer Installation
Drawer Installation- 1) To install drawer into cabinet, pull inner portions of tracks out of the cabinet. 2) Next insert tracks that are on drawer sides into inner portion of cabinet tracks while pulling down black plastic tabs on track. Side shelf assembly &... - Page 13 Side shelf assembly diagrams-...
Need help?
Do you have a question about the GSL and is the answer not in the manual?
Questions and answers