Table of Contents
Advertisement
Advertisement
Table of Contents

Summary of Contents for Econolux UBATPY60BK
- Page 1 UBATPY60BK UBATPY60SS Single Pyrolytic Oven Instruction Manual...
-
Page 2: Table Of Contents
Content 1…………………………………..…………………Important safety information 2…………………………………..…………………Installation 3…………………………………..…………………Prior to start up of the appliance 4…………………………………..…………………Your new oven 5…………………………………..…………………Program and function instruction 6…………………………………..…………………Grill guidance 7…………………………………..…………………Before using the oven for the first time 8…………………………………..…………………How to operate the oven 9…………………………………..…………………Troubleshooting 10…………………………………..………………Baking and grilling tips 11…………………………………..………………Maintenance and cleaning 12…………………………………..………………Environmental note 13…………………………………..………………Test dishes... -
Page 3: Important Safety Information
Important safety information This User Instruction Manual contains important information, including safety & installation points, which will enable you to get the most out of your appliance. Please keep it in a safe place so that it is easily available for future reference; for you or any person not familiar with the operation of the appliance. - Page 4 unless necessary for cooking or ● MPORTANT: The adjacent furniture or cleaning purposes. housing and all materials used in the ● nly use utensils that are suitable for installation must be able to withstand a use with ovens. minimum temperature of 85°C above the ambient temperature of the room it is located in, whilst in use.
- Page 5 play with the appliance. It might be ● ever use a damaged appliance! dangerous to allow the children to touch Disconnect the appliance from the the appliance. power source and contact your supplier if it is damaged. ● anger of electric shock! Do not General Safety attempt to repair the appliance yourself.
- Page 6 ● ● ttention, always wear gloves when ote! A switched fused connection unit handling products containing glass. having a contact separation of at least 3mm in all poles should be connected ● or your safety, this product is made of in fixed wiring.
-
Page 7: Installation
Installation Before installation The appliance should be installed built in the cabinet . It should be keep safety distance with appliance and the kitchen walls. Detail pls check below picture . (values in mm). Surfaces, synthetic laminates and adhesives used must be heat resistant up to 85°C above the ambient temperature of the room it is located in, whilst in use. -
Page 8: Prior To Start Up Of The Appliance
by an authorized qualified person and the appliance is only guaranteed after correct installation. Risk of electric shock, short circuit or fire by damage of the mains lead! The mains lead must not be clamped, bent or trapped or come into contact with hot parts of the appliance. -
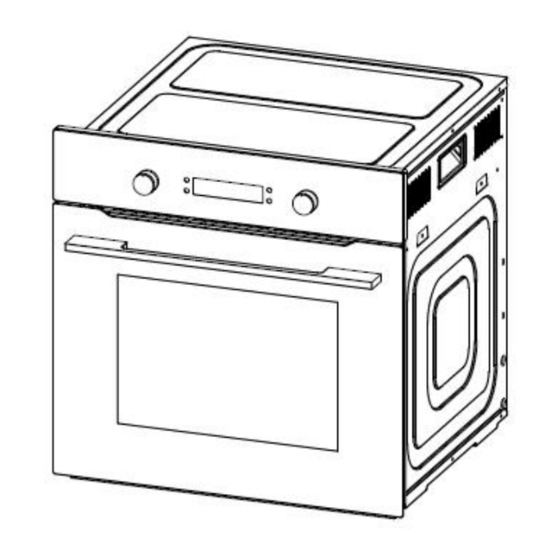
Page 9: Your New Oven
Your new oven A. Oven overview 1、Control panel 5、Handle 2、Wire rack 6、Fan motor( behind steel plate) 3、Tray 7、Lamp 4、Door 8、Grill heating element B. Technical specifications Voltage/frequency 220-240V~50Hz Total power consumption 2.800KW Cable type/section H05VV-F 3*1.5mm Cable length 1.2m External dimensions(height/width/depth) 595/595/575(mm)... - Page 10 way round. Inserting accessories You can insert the accessories into the cooking compartment at 5 different levels. Always insert them as far as they will go so that the accessories do not touch the door panel. The accessories can be pulled out approximately halfway until they lock in place. This allows dishes to be removed easily.
- Page 11 Wire rack Used for roasting and for placing the food to be baked, roasted or cooked in casserole dishes to the desired rack. D. Control panel Here, you will see an overview of the control panel. Depending on the appliance model, individual details may differ.
- Page 12 Display screen icon Display screen icon instruction Icons Function Icons Function Unit of degree Celsius ℃ Corresponding heating elements while working Work time setting icon System time icon Reservation function,setup Door lock icon start working time Display the day of time Clock icon value,including hour,minute and second icon “:”...
-
Page 13: Program And Function Instruction
Program and function instruction 1、Power on Connect your appliance to the mains supply, all indicator lights of the display board will light up for 1s and then remind the user to input the time. Default time show 12:00, hour 12 will flash, the time can be input at this stage, refer to clock setting requirement for details. - Page 14 3、The choice of function Under standby status, switch different functions by rotating the programming switch KB1 in turn, refer to Pic below for the order( not recyclable,oven function will remember the last operation). Function mode diagram When selecting the function, the clock position shows the default time of the corresponding function, the temperature position shows the default temperature of the corresponding function.The first switch, for temperature adjustable function level,default temperature value and temperature icon “℃”...
- Page 15 Reservation status display: “ ” reservation icon will display, “ ” clock icon will display,clock position will display system time, the selected menu will display,temperature will display setting or default temperature. For example,after setting up the function level,grill time and temperature,if you don’t use the reservation function, you can touch “...
- Page 16 closing signal, the failure code "E-3" will be displayed and the self-cleaning function will be stopped. At this time, the door should be closed again and the self-cleaning function should be restarted by pressing “ ”. When the temperature of the cavity exceeds 300 ℃,you can press “...
- Page 17 Except for defrost mode, from the beginning to the cumulative 15 minutes of work, if the cavity Only when press “ ” for 3S can temperature does not reach the set cancel the lock memory function. temperature, door lock will be activated automatically and with memory function.
- Page 18 Heat element abnormality, alarm display effect C、 Door lock will self-check after power on, if the correct signal is not detected for 20 consecutive seconds, indicating a failure of the door lock, or the door is not closed or is not closed in place during self-cleaning, the screen displays E-3 if the correct signal for the door is not detected.
- Page 19 Touch “ ” key under standby state to enter to alarm function setting, this time the clock position hour value will flash,minute value will long lit and alarm icon “ ” keep bright. (1) Rotate programming switch KB2 to set the hour time, at this time the hour value is always bright, the value setting range is 0-23;...
- Page 20 Function Icons Default Temperature Default Function description mode temperature range time Rapid preheating mode: This mode the inner and outer part of the top heat element and the bottom heat element are both activated to alternately heat circulating, in this Function 1 50-250 50:00...
-
Page 21: Grill Guidance
Grill mode (inner top and bottom heating): Suitable Function 6 50-250 60:00 for grill meat or baking food on one layer. Full Grill: For this mode, all of inside and outside top heating element working, quantity of heat will downward to the 50-230 60:00 Function 7... -
Page 22: Before Using The Oven For The First Time
however you should extend the cooking time given on the food packaging by approximately ten minutes. ◆ Check carefully if there were no extra parts before the start of cooking and bake, and remove them to ensure safety. ◆ Please put the pan in the middle of the oven and leave sufficient gap on the pan to allow the hot-air to flow. -
Page 23: How To Operate The Oven
1、Use dark coloured or enamel coated cookware in the oven since the heat transmission will be better. 2、While cooking your dishes, perform a preheating operation if it is advised in the user manual or cooking instructions. 3、Do not open the door of the oven frequently during cooking. 4、Try to cook more than one dish in the oven at the same time, whenever possible . - Page 24 telephoning the service department. Some problems can be resolved without requiring an engineer visit. Normal operation: When oven working, you may hear some noises caused by the expansion of the metal. Foods with high moisture content will produce steam. This steam will exit at the oven exhaust and may be seen blowing out of the ventilation slots.
-
Page 25: Baking And Grilling Tips
the oven has cooled. Long press “K3+K4” key at the same time Door lock abnormality under standby status,door lock will be released in force when hearing “di”,door Temperature sensor lock icon will extinguish and oven door abnormality Oven door is can be open. - Page 26 Baking trays that are placed in the oven at the same time will not necessarily be ready at the same time. 12、Condensation forms when you bake moist cakes. Baking may result in the formation of water vapour, which escapes above the door. The steam may settle and form water droplets on the control panel or on the fronts of adjacent units.
-
Page 27: Maintenance And Cleaning
Maintenance and cleaning ⚫ The oven should be cleaned after every use. When cleaning the oven the lighting should be switched on to enable you to see the surfaces better. ⚫ The oven chamber should only be washed with warm water and a small amount of washing-up liquid. - Page 28 Remove the door ➢ Full open the door. ➢ Fold up the right and left side of locking rod. (picture A) ➢ Close the door until reach to stop step, hold on both left and right sides of the door, then reclose the door, upward and downward and pull out the door.
-
Page 29: Environmental Note
Regular inspections Besides keeping the cooker clean, you should: 1. Carry out periodic inspections of the control elements and cooking units of the cooker. After the guarantee has expired you should have a technical inspection of the cooker carried out at a service centre at least once every two years. 2. -
Page 30: Test Dishes
Test dishes We provide all kinds of recipes and ideal setting for choice here. It will show you which heating type and which temperature are of best suits for your dishes. You can find information about the appropriate accessories and its insertion height, as well as tips on cooking containers and methods of preparation. - Page 31 Rack layer 200-220 30-40 Whole fish(1.0Kg) Rack layer 180-200 40-50 Whole fish(1.5Kg)...
Need help?
Do you have a question about the UBATPY60BK and is the answer not in the manual?
Questions and answers