Table of Contents
Advertisement
Advertisement
Table of Contents

Related Manuals for GMS B36


Summary of Contents for GMS B36
- Page 1 ÖÇ GÖÇMAKSAN Rev:01/2013...
-
Page 2: Table Of Contents
CONTENTS CONTENTS .............................. 1 LIST OF FIGURES ..........................2 TAGS USED ON THE MACHINE......................3 INTRODUCTION ............................ 4 1. MAIN PARTS OF BENDING MACHINE ..................4 2. MACHINE ASSEMBLY ........................5 3. MACHINE RUNNING PROCEDURES ORDER ................6 4. TECHNICAL DATA ..........................7 5. -
Page 3: List Of Figures
LIST OF FIGURES Figure 1: Main parts of bending machine ....................4 Figure 2: Leveling the machine on a solid ground ..................5 Figure 3: Control buttons .......................... 6 Figure 4: Placing the irons on the machine correctly ................8 Figure 5: Incorrect connection of the irons on the machine .............. -
Page 4: Tags Used On The Machine
MAIN SAFETY INFORMATION ➢ This symbol is put before the articles giving warning explanations in order to draw attention of the trained operator to important functions. € This symbol is put before the articles giving warning explanations in order to draw attention of the trained operator to electrical issues. -
Page 5: Introduction
INTRODUCTION B 36 Mechanic Iron Bending Machine is made only with the purpose of steel material bending. Using other than the indicated purposes are prohibited. It is possible to mount various apparatuses on the machine optionally for bending in different shapes. In order to obtain the best yield from the machine it should be in a situation so that it can be worked easily and in a position that more productivity might be obtained from the operator. -
Page 6: Machine Assembly
Zero Adjustment Machine Frame Bending Sleeve 13 Bending Plates Electricity Board Cap 6 Stirrup Pin 10 Retainer 14 Bending Flange Switch Adjustment Adjustment Straight Pin 15 Control Panel spanner Sensor Pin Bending Pin 12 Machine Table 16 Foot Pedal 17 Plate 2. -
Page 7: Machine Running Procedures Order
3. MACHINE RUNNING PROCEDURES ORDER • Be sure that the machine is assembled in conformance with the Machine Assembly procedures. • If there is any object on the machine (including the bending apparatus) they must be removed. • LEFT-RIGHT switch on the control panel of the machine is turned to LEFT or RIGHT position, MAN AUTO switch is turned to MAN position and machine turning direction is confirmed by pressing on the foot pedal. -
Page 8: Technical Data
4. TECHNICAL DATA Machine Bending Capacity: Steel Quality Diameter/Bending Capacity 45 kg/mm² Ø 36x1 Ø 18x2 Ø14x2 Ø9x4 Ø6x6 65 kg/mm² Ø 28x1 Ø 16x2 Ø14x2 Ø9x3 Ø6x4 85 kg/mm² Ø 26x1 Ø 12x2 Ø9x2 Ø9x3 Ø4x6 Steel Quality Diameter/Bending Capacity 45 kg/mm²... -
Page 9: Using The Machine
6. USING THE MACHINE 6.1 Correct Connection of the Irons on the machine Fixing the iron to be bent on the Fixing the iron to be bent on the machine with the help of retainer machine with the help of bending (4a) sleeves.(4b) (4a) -
Page 10: Incorrect Placement Of The Irons To Be Bent On The Machine
(5a) (5b) Figure 5: Incorrect connection of the irons on the machine 6.3. Incorrect placement of the irons to be bent on the machine (6a) (6b) Incorrect connection of multi-irons Incorrect connection of multi-irons to be to be bent on the machine with bent on the machine with retainer bending sleeves (6c) -
Page 11: Prohibited Usage On The Machine
(6d) Figure 6: Wrong placement of the irons on the machine Figure 7: Wrong positioning of the person making bend 7. PROHIBITED USAGE ON THE MACHINE ➢ When bending no one must stand in front of the machine and any one standing must be taken away. (Figure 7) ➢... -
Page 12: Scope Of The Warranty
➢ No other parts should be mounted to the machine other than the ones manufactured by Göçmaksan company. ➢ No bending should be made on the machine with bending apparatus which are deformed, cracked or have an increased hole diameter. ➢... -
Page 13: Work Clothes
The aforementioned protectors will be used. In case of not using these apparels there are risks of injury, cutting and trapping hands. 9.2. Work clothes Inappropriate clothes against snatch or grip while working with the machine are listed below and in case of not conforming to this list might cause risk of injury. -
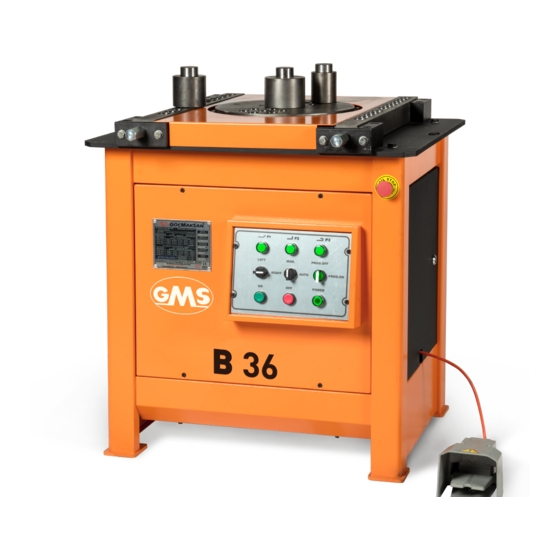
Page 14: Controls And Settings On The Machine
Figure 8: Handling the machine 11. CONTROLS AND SETTINGS ON THE MACHINE Figure 9: Machine control panel and functions BUTTON FUNCTION It ensures settings for bent bar bending... -
Page 15: Thermal Flow Setting Range And Motor Protection Switch
It ensures settings for protector bending It ensures settings for hook bending Left-Right It changes machine's rotation direction to left or right. Man-Auto It provides machine to be controlled automatically and manually. Machine operates in normal mode. The bending is made Program OFF according to the preferred angle. -
Page 16: Bent Bar Bending Setting (45°)
11.2. Bent Bar Bending setting (45°): Prog. Off Normal Bending Setting Systems: Before starting angle setting, it should be ensured that there is no any material on the machine other than the bending equipment. The Switch button should be taken to OFF position and P1 button should be pressed. There are 3 Switch Pins with same heights on the bending disc. -
Page 17: Protractor Bending Setting (90°)
foot pedal as the bending process is started. The stopped machine might be turned to the starting point back manually by continuously pressing the Foot Pedal and it is ensured to be turned to the automatic mode again. Furthermore when the machine is at the AUTO position, Bending Disc might be stopped by holding the Foot Pedal pressed while returning, after the bending process is completed. -
Page 18: Hook Bending Settings (180°)
11.4. Hook Bending Settings (180°): It is set with the same method carried out in bent bar bending by pressing the P3 button on the control panel. NOTE: The required angle is set for P3 BUTTON by moving the figure: 10 switch pin 3 to left and right. - Page 19 (13h) Programming the described shape: a) Press P3 button for once for the 1st angle, b) Press P2 button three times successively for 90° bending in 2nd, 3rd and 4th angles. c) The programming process for the 5th angle made after pressing P3 button is saved to the memory by pressing the foot pedal and programming process is completed.
-
Page 20: Figure13: Stirrup Bending Demo
(13c) (13d) (13e) (13f) (13g) (13h) Figure13: Stirrup bending demo... -
Page 21: Maintenance And Lubrication Instructions
WARNING!!! In order to fix the faults and determine the electricity malfunction if it is required to open the power panel, power connection of the machine must be turned off and competent technicians should make the maintenance. 12. MAINTENANCE AND LUBRICATION INSTRUCTIONS It is important to make maintenance correctly in order to extend service life of the machine and to ensure safe bending. - Page 22 NO FAULT DESCRIPTION SOLUTION 1. Missing phase might come to 1. Check the phases. the electric supply system where the machine is connected. 2. Check the button. If it is pressed open it by turning to the direction of 2. Emergency stop button might the arrow on the button.
- Page 23 1. The plug might be displaced. 1. Check the plug. 2. Pedal switch might be out of 2. Check the SWITCH. Change them Machine order. if they are out of order. running although the foot pedal is pressed. 3. Contactors in the electricity 3.
-
Page 24: Machine Equipment List
14. MACHINE EQUIPMENT LIST PART NUMBER DESCRIPTION PIECE B36-01 MACHINE BODY B36-02 PLANET PLATE SHEET B36-03 PLANET REDUCER STEM STEEL B36-04 PLANET REDUCER B36-05 ADJUSTMENT SPANNER B36-06 PLATE B36-07 CE LOGO - PLANET B36-08 COVER HINGE B36-09 ELECTRICAL PANEL B36-10... - Page 25 B36-41 MEDIUM CASING B36-42 RIGHT MAINTENANCE COVER B36-43 PANEL LOCK GÖÇMAKSAN WRITING B36-44 B36-45 LOWER CASE COVER B36-46 M6X15 COUNTERSUNK BOLT DIN6921 B36-47 FOOT PEDAL B36-48 EMERGENCY STOP B36-49 HANDLING TAG LEFT-RIGHT SWİTCH B36-50 B36-51 CONTROL PANEL COVER B36-52 BACK MAINTENANCE COVER...
-
Page 26: Machine Assembly
15. MACHINE ASSEMBLY... -
Page 27: Machine Electricity Scheme
16. MACHINE ELECTRICITY SCHEME... -
Page 29: About Company
17. ABOUT COMPANY GÖÇMAKSAN...
Need help?
Do you have a question about the B36 and is the answer not in the manual?
Questions and answers
Table overrunning no electro magnetic brake what brakes the motor
The GMS B36 table uses a mechanical system to brake the motor, as it does not have an electromagnetic brake.
This answer is automatically generated
Hello! If possible, pinout on the controller - without abbreviations? The bending angle setter on our B36 is a batch type, not a push - button one.
The GMS B36 controller uses the following pins associated with specific bending modes:
- Pin 1: Used with the P1 button for bent bar bending.
- Pin 2: Used with the P2 button for protector bending.
- Pin 3: Used with the P3 button for hook bending.
These pins, called switch pins, are positioned on the bending disc to set the bending angle. Moving the switch pins closer to the measurement sensor decreases the bending angle, while moving them farther increases the angle.
This answer is automatically generated
Здравствуйте! Если возможно, распиновку на контроллере - без аббревиатур? Задатчик угла гибки на нашем B36 - пакетного типа, а не кнопочный.