Advertisement
Table of Contents
- 1 Table of Contents
- 2 Description
- 3 Instructions for the Correct & Safe Use of the Equipment
- 4 Position and Description of the Commands
- 5 Correct Installation of the Equipment
- 6 Electrical Diagrams and Connections
- 7 Change of Frequency
- 8 Changing the Functions
- 9 The TWIN SYSTEM
- 10 Working Principles
- 11 Working Principles of the TWIN SYSTEM
- 12 Identifying and Replacing Fuses
- 13 Technical Features
- 14 Warranty Conditions
- Download this manual
Installation, start up and operating manual -
Radio control BRICK and PAIL
CONTENTS
• Description .................................................................... 3
• Keeping the RC system in good efficiency...................... 10
• Position and description of the commands ..................... 11
• Failure of the Equipment .............................................. 16
• Correct installation of the equipment ............................ 18
• Electrical diagrams and connections .............................. 20
• Change of frequency .................................................... 28
• Changing the functions ................................................ 35
• The TWIN SYSTEM.................................................... 37
• Working principles ....................................................... 39
• Working principles of the TWIN SYSTEM..................... 41
• Identifying and replacing fuses ..................................... 42
• Technical features........................................................ 43
• Warranty Conditions..................................................... 44
The use and installation of the
should be made only by authorized and
qualified personnel, incorrect use or
installation can cause serious damage to
people and things.
This
instruction
manual
CAREFULLY before installing or using the Radio
Remote Control.
2
version 5.6 Gen.16
WARNING !
radio control
must
be
READ
®
REM
device
- ITALY
Advertisement
Table of Contents

Subscribe to Our Youtube Channel
Related Manuals for REMdevice BRICK


Summary of Contents for REMdevice BRICK
-
Page 1: Table Of Contents
Installation, start up and operating manual – version 5.6 Gen.16 Radio control BRICK and PAIL CONTENTS • Description ..............3 • Instructions for the correct & safe use of the equipment .. 3 • Keeping the RC system in good efficiency...... 10 •... -
Page 2: Description
Radio control BRICK and PAIL Transmitter unit BRICK 09 DESCRIPTION START RED LED The equipment consists of a transmitter unit that can be BRICK or BUTTON (BATT) PAIL, a receiver RxDIN-CL or RxDIN with antenna and a contact-less recharge unit. - Page 3 And simultaneously press Press the buttons or move the command joysticks to carry out the the START button, then function required. Note that the buttons of the BRICK keypad are release it all. Figure 2 double step: increasing the pressure on the button makes a second...
- Page 4 Installation, start up and operating manual – Installation, start up and operating manual – version 5.6 Gen.16 version 5.6 Gen.16 Radio control BRICK and PAIL Radio control BRICK and PAIL RED LED Charging the batteries (BATT) The radio control unit’s batteries are inside the transmitter...
- Page 5 Radio Control unit. operate for approximately 35 hours (of continuous use). Only specialised personnel authorised by REMdevice must carry out It is necessary to charge the batteries just once a extraordinary maintenance and repairs. The use of unsuitable week (e.g., in the weekend).
-
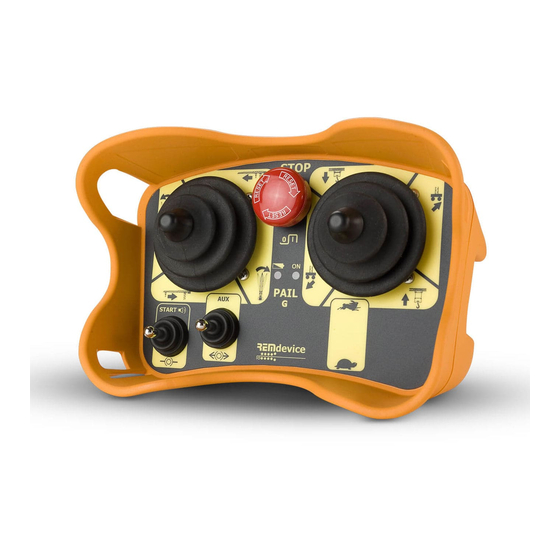
Page 6: Position And Description Of The Commands
5.6 Gen.16 Radio control BRICK and PAIL Radio control BRICK and PAIL DISPOSITION AND DESCRIPTION OF THE COMMANDS BRICK - Version with RxDIN-CL and RxDIN Receiver BRICK - Version with Rubybox CL Receiver BRICK 09 BRICK 10 BRICK 09 Edil... - Page 7 Pail – Version with Rubybox CL Receiver for A and PR13 for B controlled by the PR25 and PR26 buttons. On the BRICK 12 model with 12 buttons, the commands PR27 and PR14 are only on the sixth line of buttons.
- Page 8 Figure 9 connection cable, emergency STOP button contacts. Note: Both the BRICK and PAIL transmitters have the function of the commands shown on the plates on the product or supplied. If different labels or plates were used, the symbols must strictly observe the functions and movements of the machine and must comply with the laws in force.
-
Page 9: Correct Installation Of The Equipment
Installation, start up and operating manual – Installation, start up and operating manual – version 5.6 Gen.16 version 5.6 Gen.16 Radio control BRICK and PAIL Radio control BRICK and PAIL Diagnostics CORRECT INSTALLATION OF THE EQUIPMENT The installation of the radio control unit must only be undertaken by... -
Page 10: Electrical Diagrams And Connections
Installation, start up and operating manual – Installation, start up and operating manual – version 5.6 Gen.16 version 5.6 Gen.16 Radio control BRICK and PAIL Radio control BRICK and PAIL If it is considerate appropriate to further protect the casing, use non- ELECTRICAL DIAGRAMS AND CONNECTIONS metallic materials to build a protection. - Page 11 Installation, start up and operating manual – Installation, start up and operating manual – version 5.6 Gen.16 version 5.6 Gen.16 Radio control BRICK and PAIL Radio control BRICK and PAIL CONNECTION SETTING RxDIN Receiver Unit FREQUENCY CHANGE POWER SUPPLY FUNCTIONS SETTING...
- Page 12 Installation, start up and operating manual – Installation, start up and operating manual – version 5.6 Gen.16 version 5.6 Gen.16 Radio control BRICK and PAIL Radio control BRICK and PAIL CONNECTION SETTING IN1 Power Supply STOP IN2 Power Supply MARC...
- Page 13 Installation, start up and operating manual – Installation, start up and operating manual – version 5.6 Gen.16 version 5.6 Gen.16 Radio control BRICK and PAIL Radio control BRICK and PAIL Wiring of the receiver unit RxDIN TESTING THE RADIO CONTROL UNIT...
-
Page 14: Change Of Frequency
Installation, start up and operating manual – Installation, start up and operating manual – version 5.6 Gen.16 version 5.6 Gen.16 Radio control BRICK and PAIL Radio control BRICK and PAIL After having reactivated the transmitter unit press one button or CHANGE OF FREQUENCY on the transmitter move a joystick one at a time and check the machine is carrying out the manoeuvres as indicated by the symbol at its side. - Page 15 Installation, start up and operating manual – version 5.6 Gen.16 version 5.6 Gen.16 Radio control BRICK and PAIL Radio control BRICK and PAIL Switch off the transmitter unit and remove the screws. Remove the SEQUENTIAL CHANGE OF FREQUENCY: 11 Frequency channels...
- Page 16 Installation, start up and operating manual – Installation, start up and operating manual – version 5.6 Gen.16 version 5.6 Gen.16 Radio control BRICK and PAIL Radio control BRICK and PAIL PAIL • turn and disengage the EMERGENCY STOP button Band 869,700 – 870,000 MHz •...
- Page 17 Installation, start up and operating manual – Installation, start up and operating manual – version 5.6 Gen.16 version 5.6 Gen.16 Radio control BRICK and PAIL Radio control BRICK and PAIL CHANGE OF FREQUENCY on the receiver 869.700 MHz .725 MHz .750 MHz...
-
Page 18: Changing The Functions
PR25 and PR27 are self-held by PR17. PR26 and PR14 are self-held by PR23. pressing the buttons on the bottom row of the BRICK keypad (normally reserved for shifting) or activating the shifting commands on the PAIL transmitter unit all the other commands will be inhibited (lifting, rolling, rotating). -
Page 19: The Twin System
STOP button. machine without being realised by the operator. b) BRICK: press the following buttons at the same time; 3, 4, 5 In this case there is the possibility that a second operator in and the START button and then release. -
Page 20: Working Principles
Installation, start up and operating manual – Installation, start up and operating manual – version 5.6 Gen.16 version 5.6 Gen.16 Radio control BRICK and PAIL Radio control BRICK and PAIL ELECTRIC CIRCUITS BLOCK DIAGRAM Transmitter Receiver START STOP μP B... -
Page 21: Working Principles Of The Twin System
Installation, start up and operating manual – Installation, start up and operating manual – version 5.6 Gen.16 version 5.6 Gen.16 Radio control BRICK and PAIL Radio control BRICK and PAIL Working principles of the TWIN SYSTEM IDENTIFYING AND REPLACING FUSES Receiver Unit •... -
Page 22: Technical Features
External Receivers RxDIN-CL and CL Rubybox: REMdevice does not respond for any damage, loss or theft of new, repaired Protection degree IP55 , material PA6 FV, or to be repaired equipment during transportation.
Need help?
Do you have a question about the BRICK and is the answer not in the manual?
Questions and answers