Table of Contents
Advertisement
Quick Links
Advertisement
Table of Contents

Related Manuals for Virgin Musical Instruments HITMAN HD-3M

Summary of Contents for Virgin Musical Instruments HITMAN HD-3M
- Page 1 HD-3M Owner s Manual irgin usical nstruments...
- Page 2 Precaution Thank you for purchasing this electronic instrument.For perfect operation and security, please read the manual carefully and keep it for future reference. Safety Precautions CAUTION RISK OF ELECTRIC SHOCK DO NOT OPEN The lightning flash with arrowhead symbol within an equilateral triangle is intended to alert the user to the presence of uninsulated “dangerous voltage”within the product s enclosure that may be of sufficient magnitude to constitute a risk of electric shock to persons.
-
Page 3: Table Of Contents
Contents Assembly Instruction ....................Panel Controls ....................... Connect........................Connecting the Power Supply................Connecting an Amplifier..................Connecting a CD Player, etc.(AUX In jack)............USB MIDI/USB AUDIO ..................Using Headphones....................Begin Playing the Drums ..................Switch the Power On ..................Set the Main Volume ..................Select Drum Kits .................... -
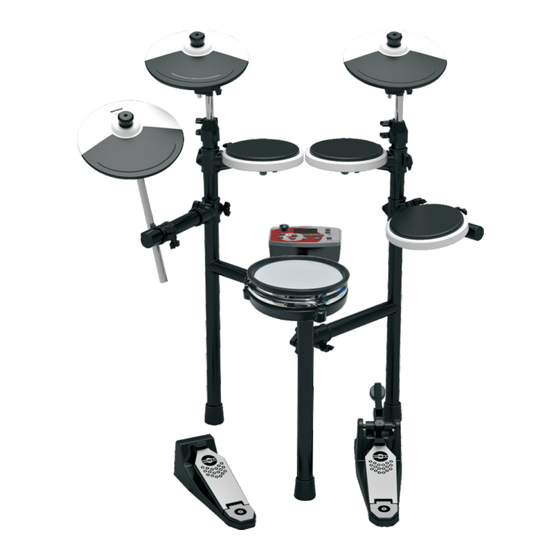
Page 4: Assembly Instruction
Assembly Instruction Attach the cymbal arms to the drum frame indicated positions Attach the cymbals to the cymbal arms as shown. Align the holes in Snare Drum Pad and the three Tom Drum Pads and insert into the pole on the Drum Frame as shown. - Page 5 Assembly Instruction Attach the Drum Pads in the positions shown below. Insert the rod of sound module stand into the Drum Frame clamp as shown, then tighten. Please put Hi-hat control pedal on the left and Kick pedal on the right. Kick pedal Hi-hat control pedal...
- Page 6 Assembly Instruction TO CRASH TO RIDE TO HH TO TOM1 TO TOM2 TO TOM3 TO SNARE TO KICK TO HHC Hi-Hat Foot Controller ---It can produce hi-hat closed sound if you hit hi-hat when pressing foot controller. ---It can produce hi-hat open sound if you hit hi-hat without pressing foot controller. ---Press foot controller directly to produce hi-hat pedal sound.
-
Page 7: Panel Controls
Panel Controls Top Panel HD-3M ENTER MASTER VOLUME BACK SETUP TRIGGER REC/PLAY TEMPO/TAP CLICK START/STOP SONG Rear Panel TO HOST RIDE CRASH MASTER OUT TOM3 TOM2 TOM1 SNARE KICK AUX IN Side Panel POWER PHONES DC 9V ON OFF... - Page 8 Panel Controls Top Panel 1.MASTER VOLUME This is used to adjust LINE OUT volume, headphone volume and LINE IN volume. 2.SETUP Button This button is used to set retrigger cancel, threshold, velocity curve, effect, etc of the pad. 3.KIT Button This button is used to set the volume and voice of the pad.
- Page 9 Panel Controls Real Panel 12.MASTER OUT This jack is used to connect the module to an external amplifier, mixer, etc. 13.AUX IN Connect the output of an external audio device, etc., to this jack (stereo mini jack). This is convenient for playing along with music from a CD or cassette player.
-
Page 10: Connect
Connect Connecting the Power Supply AC POWER Make sure the power is switch OFF and connect the power adaptor to the “DC 9V”jack on the rear panel. Connecting an Amplifier When you want to listen to the voices with an amplifier, connect amplifiers to the MASTER OUT jack on the rear panel. -
Page 11: Usb Midi/Usb Audio
Connect USB MIDI/USB AUDIO USB MIDI: Connect PC or other USB host devices that support USB audio with a standard USB cable. For devices with USB cable, after the driver is installed and initialization is finished, you can choose USB audio device in the device menu of the software to transfer midi data. -
Page 12: Begin Playing The Drums
Begin Playing the Drums Switch the Power On After confirming that all connecting cables are properly connected, it is time to turn the power on. The drum module is ready to play with the display shown below. This Figure depicts that the Drum Kit is ready to play in Drum Kit # 1. POWER Set the Main Volume MASTER VOLUME... -
Page 13: Kit Button
Begin Playing the Drums [BACK] Button BACK Press [BACK] button, LED display will quit the current page and return to the previous menu. [KIT] Button Press the [KIT] button then press the [ENTER] button, the LED will display “ ” (Instrument), now, you can use the [+/-] button to select “... - Page 14 Begin Playing the Drums B.Setting The Individual Drum Pad Volume Press the [KIT] button, then press the [ENTER] button, use [+/-] button to select “ ”, then press [ENTER] button again, use the [+/-] button to select the following pads: Bass Drum Ride Snare...
-
Page 15: Setup Button
Begin Playing the Drums Press [ENTER] button again, use [+/-] button to select user kit (U-1~U-5). Press [ENTER] button to confirm, copy the current kit to user kit. F. Resetting to Factory Default [KIT] This is used to reset ALL the [KIT] settings to the original factory settings. ”... - Page 16 Begin Playing the Drums When set to a low value, it will be difficult to play very quickly. Set this to as high a value as you can. Range: 001-008 This setting allows a trigger signal to be received only when the pad is above a determined force level (velocity).
- Page 17 Begin Playing the Drums C. Local On/Off The Local On/Off controls whether to send sound from your Drum Module sound to your internal speaker system. ” Press the [SETUP] button and use the [+/-] button to select“ Press the [ENTER] button and use the [+/-] button to select “ ”...
- Page 18 Begin Playing the Drums 1) Reverb When “rEv” selected, press [ENTER] button, use [+/-] button select 10 reverb types, “ ” means to turn the reverb off. Press the [ENTER] button to confirm your setting. ENTER 2) Chorus When “ ”...
- Page 19 Begin Playing the Drums F. Resetting This function can reset all settings of the [SETUP]. Press the [SETUP] button and use the [+/-] button to select “ ”, then press the [ENTER] button to reset all settings of the [SETUP] function. SETUP...
-
Page 20: Song Button
Begin Playing the Drums [SONG] Button Your drum provides 30 (001-030) preset songs, and 2 (d-1/d-2) song demos. Press the [SONG] button and use the [+/-] button select desired song. Press the [START/STOP] button to start or stop the song. SONG A. -
Page 21: Click Button
Begin Playing the Drums C. Accompaniment Volume Press the [SONG] button and the press the [ENTER] button and use the [+/-] button to select “ ”, press the [ENTER] again and use the [+/-] button to adjust the accompaniment volume. To confirm press the [ENTER] button. The Range is from 000-032. ENTER D. - Page 22 Begin Playing the Drums B. Click Type Press the [CLICK] button and use the [+/-] button to select “ ”, then press the [ENTER] button and use the [+/-] button again to select click type: 1/4, 2/4, 3/4, 4/4, 6/4, 3/8, 6/8, 12/8. Default: 4/4 Finally, press [ENTER] button to confirm.
-
Page 23: Tempo/Tap Button
Begin Playing the Drums [TEMPO/TAP] Button Tempo function, you can adjust click tempo and song's tempo by using [TEMPO/TAP] button. A. Adjusting Click Tempo Press the [TEMPO/TAP] button and the LED will display the current tempo, Then use the [+/-] button to change tempo value. -
Page 24: Start/Stop Button
Begin Playing the Drums [START/STOP] Button In the [SONG] mode, press the [START/STOP] to start or stop playing the song. In [REC/PLAY] mode, press the [START/STOP] to star or stop recording. In voice selection mode, press the [START/STOP] button to listen to the instrument voice. Recording Function Press the [REC/PLAY] button to enter the record mode. -
Page 25: Factory Set
Factory Set To Reset the HD-3M to its Factory Settings. Turn off the power. Hold down the [+/-] buttons and then turn the power on. It can restore all internal settings to its original factory settings. -
Page 26: Drum Kits List
Drum Kits List Name Name Kit # Kit # Acoustic 1 Latin Acoustic 2 Eight-oh Room Nine-oh Electro-pop Rock 1 Trash Dance Club Rock 2 Jazz Reggae-pop Rap-hop Brush Early R&B Modern R&B Drum Box 2 Electronic 1 Acoustic 1 Crunch (duplicate) Acoustic 2... -
Page 27: Voice List
Voice List 32 Crunch snare 1 Group 1: Kick Drums Group 2: Snare Drums 33 Electronic snare 2 34 Analog snare 2 Acoustic kick 1 01 Acoustic snare 1 35 Crunch snare 2 Acoustic kick 2 02 Piccolo snare 1 36 Drum box snare 3 Room kick 1 03 Piccolo snare 2... - Page 28 Voice List 65 Piccolo snare 3 30 D-dub tom (low) 66 Crunch tom (low) 66 Piccolo rimshot 2 31 Rock tom 3 (high) 67 Rap-hop tom (high) 67 Rock snare 6 32 Rock tom 3 (mid) 68 Rap-hop tom (mid) 68 Rock rimshot 3 33 Rock tom 3 (low) 69 Rap-hop tom (low)
- Page 29 Voice List Group 4: Cymbals 33 Cymbal ride plus bell 3 19 Rock hat 2 open 34 Latin ride & cowbell 20 Rock hat 2 splash 35 Cymbal ride plus bell 1 01 Crash cymbal 1 21 Small hat 1 closed 36 Cymbal ride plus bell 2 02 Crash cymbal 2 22 Small hat 1 foot...
- Page 30 Voice List 53 Rap-hop hat foot 84 Drum box hat 2 closed 54 Rap-hop hat open 85 Drum box hat 2 foot 55 Rap-hop hat splash 86 Drum box hat 2 open 56 Electronic hat 1 closed 87 Shaker hat closed 57 Electronic hat 1 foot 58 Electronic hat 1 open Group 6: Percussion...
-
Page 31: Style List
Style List Number Song Name/Style Number Song Name/Style Rock Shuffle Pop Ballad Surf Pop 8 Beat Dance Techno 8 Beat Modern 60's Rock 0's Disco Hard Rock Big Band Pop Bossa Country 8 Beat 80's Rock 3/4 Gospel 16 Beat Soul 8 Beat Two Pop Shuffle... -
Page 32: Midi Implementation Chart
MIDI Implementation Chart Function Transmitted Recognized Remarks Basic Default 1-16CH 1-16CH Channel Changed 1-16CH 1-16CH Mode Default Mode 3 Mode 3 Messages Altered ********** Note 0~127 0~127 Number :True voice ********** 0~127 Velocity Note ON O 9nH,v=1~127 O 9nH,v=1~127 Note OFF O 8nH,v=0 O 9nH,v=0 or 8nh Affter Key's... -
Page 33: Specifications
Specifications ☆ 1 Snare Mesh Pad with RIM Function, 3 TOM Pads, Drum Pads: 2 Cymbal Pads,1 Hi-Hat, 1 Hi-Hat Control, 1 Kick Trigger ☆ Display: Multi-Function LED Display. ☆ Polyphony: 64 Notes Max ☆ 349 drum instruments, 30 customizable kits Voice Control: ☆... - Page 34 10506324-V1.0...
Need help?
Do you have a question about the HITMAN HD-3M and is the answer not in the manual?
Questions and answers