Table of Contents
Advertisement
Online Reference
© 2017 ZOOM CORPORATION
Copying or reprinting this manual in part or in whole without permission is prohibited.
Product names, registered trademarks and company names in this document are the property of their
respective companies. All trademarks and registered trademarks in this document are for identification
purposes only and are not intended to infringe on the copyrights of their respective owners.
Advertisement
Table of Contents

Related Manuals for Zoom L-12


Summary of Contents for Zoom L-12
- Page 1 Online Reference © 2017 ZOOM CORPORATION Copying or reprinting this manual in part or in whole without permission is prohibited. Product names, registered trademarks and company names in this document are the property of their respective companies. All trademarks and registered trademarks in this document are for identification...
-
Page 2: Introduction
Introduction Thank you very much for purchasing a ZOOM LiveTrak L-12 ( ). The has the following features. 12-channel digital mixer & multitrack recorder combines a digital mixer with 12 total input channels (8 mono and 2 stereo), a multitrack recorder that can simultaneously record up to 14 tracks, and a 14-in/4-out USB audio interface. -
Page 3: Table Of Contents
Contents Introduction ………………………… 2 Selecting projects for playback Contents …………………………… 3 Using the metronome ………… 47 Names and functions of parts … 5 Enabling the metronome ……… 47 Top ………………………………… 5 Changing metronome settings ………………………… 48 Rear panel ……………………… 14 Using the slate mic ……………... - Page 4 Introduction Showing recording levels on level meters ………………………… 79 Enabling latency adjustment … 79 Changing the playback mode … 80 SD card settings ………………… 81 Checking the open space on SD cards …………………………… 81 Formatting SD cards ………… 81 Testing SD card performance … 82 Various settings …………………...
-
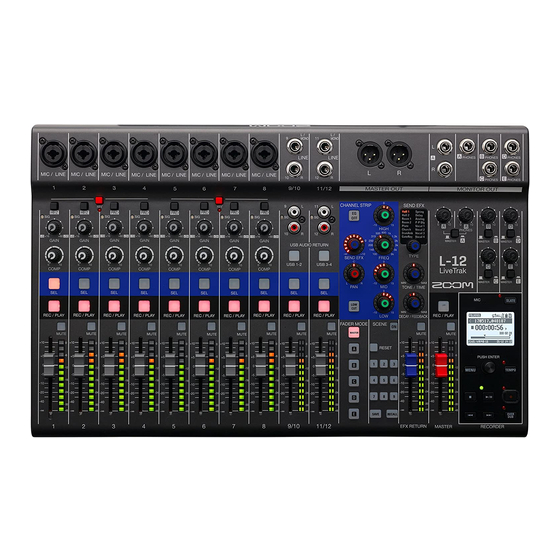
Page 5: Names And Functions Of Parts
Names and functions of parts Input channel section 1 MIC/LINE input jack These input jacks have built-in mic preamps. Connect mics, keyboards and guitars to them. These can be used with both XLR and 1/4-inch (balanced or unbalanced) phone plugs. ①... - Page 6 Names and functions of parts ! LINE input jacks (TS) Use these input jacks to connect line level equipment. For example, connect keyboards or audio devices. ① ⑩ These can be used with 1/4-inch (unbalanced) phone plugs. NOTE ② If only the left LINE input jack (TS) channel is connected, it will be handled as a mono channel.
- Page 7 Names and functions of parts CHANNEL STRIP section 1 EQ OFF button When this button is lit, HIGH, MID, LOW and ① ② LOW CUT are bypassed. 2 HIGH knob This adjusts the boost/cut of high-frequency ⑦ ③ equalization. Type: shelving Gain range: −15 db –...
- Page 8 Names and functions of parts FADER MODE section 1 MASTER and A–E buttons These switch between the mixes output from the MASTER OUT and MONITOR OUT A–E jacks. MASTER button: Use to show and adjust the mix output from the MASTER OUT jacks. A–E buttons: Use to show and adjust the mixes output from the MONITOR OUT A–E jacks.
- Page 9 Names and functions of parts SCENE section 1 ON button Press this button, lighting it, to use the scene ① function 2 RESET button ② Press this button to reset the current mixer set- tings to the factory defaults. 3 1–9 buttons Use these buttons to select the scene to use to save the current mixer state and to load saved scenes.
- Page 10 Names and functions of parts Send effect (SEND EFX) section 1 Effect type list This is the list of the built-in effects. The name of the currently selected effect lights. It blinks when being selected. ① If some time passes without a different effect being selected, the previously selected effect will remain selected.
- Page 11 Names and functions of parts Output section ① ② ③ ④ ⑤ ⑥ ⑧ ⑦ ⑨ ⑩ ⑪ ⑫ ⑬ 1 MASTER OUT jacks 2 MONITOR OUT A jacks These jacks output signals after volume adjust- These jacks output signals after volume adjust- ment by the master fader.
- Page 12 Names and functions of parts 9 MONITOR OUT B–E switches NOTE These switch the signals output from the MONI- The MONITOR OUT A jacks can be set to output TOR OUT B–E PHONES jacks. the same signals as the MASTER OUT jacks or the Status Explanation signals set separately in the fader mode section.
- Page 13 Names and functions of parts RECORDER section ① 6 TEMPO button/indicator This sets the tempo of the metronome built into the recorder. ② Press this button to make the recorder detect the tempo from the average value. ③ During recording and playback, the indicator blinks at a tempo of 40.0–250.0 bpm.
-
Page 14: Rear Panel
Projects and audio files can be saved on and loaded from connected USB flash drives. 9 CONTROL IN jack 4 MODE switch A footswitch (ZOOM FS01) can be connected Set whether to use as a USB HOST, card reader here. or audio interface. -
Page 15: Equipment Connection Example
Equipment connection example Live PA system Drums Electric guitar Keyboard Vocal/chorus mics Drum mics ×3 ×2 Electric acoustic guitar Powered speakers Performer (main) headphones×4 Bass Headphones Portable audio player... - Page 16 Portable audio player Equipment connection example Computer Footswitch (for recording and playback)
-
Page 17: Display Overview
Display overview Home Screen ⑤ ⑥ ⑦ ⑧ ⑫ ① ② ⑬ ③ ⑭ ④ ⑨ ⑩ ⑪ Item Explanation Project name This shows the project name. "<" appears if there is another project before this one in the folder. ">"... -
Page 18: Turning The Unit On/Off
Turning the unit on/off Turning the unit on POWER DC IN 12V switch AC adapter connector GAIN knob Input/Output jacks Channel faders Master fader EFX RETURN fader Confirm that the output devices connected to the are turned off. - Page 19 Turning the unit on/off Confirm that is set to OFF . Plug the AD-19 adapter designed for this unit into an outlet. Set all knobs and faders to their minimum values. Connect instruments, mics, speakers and other equipment. HINT See P .15 for connection examples. to ON.
-
Page 20: Turning The Power Off
Turning the unit on/off Turning the power off Minimize the volume of devices connected to the Turn off the power of output devices connected to the to OFF . The following screens appear and the power turns off. NOTE When the power is turned off, the current mixer settings are saved in the project on the SD card. If they can- not be saved to the SD card, they will be saved in the unit. -
Page 21: Using The Menu Screen
Using the MENU screen Recorder function settings, for example are made for the using the MENU screen. This is an explanation of the basic menu operations. Open the menu: Press This opens the MENU screen. Select menu items and parameters: Turn This moves the cursor. -
Page 22: Mixer
Mixer Outputting input sounds from output devices Outputting sound from speakers GAIN knob MUTE MUTE button button Channel faders Master fader to adjust the input signals while inputting sound from instru- ments and mics. NOTE Set them so that SIG indicators do not light red. SIG indicator Turn off (unlit) for the MASTER and the channels with sound you... - Page 23 Mixer Use the channel faders to adjust the volumes. Use the MASTER fader to adjust the overall volume. Outputting sound from headphones MONITOR OUT A PHONES jack MONITOR OUT A PHONES knob MONITOR OUT A switch Connect headphones to the MONITOR OUT PHONES A jack. to MASTER ( to adjust the volume.
-
Page 24: Adjusting The Tone And Panning
Mixer Adjusting the tone and panning CHANNEL STRIP section button Press to light it for the channel for which you want to adjust tone and panning. Use the knobs and buttons to adjust the tone and panning. Adjusting the tone: Adjusting the panning: NOTE •... -
Page 25: Using The Built-In Effects
Mixer Using the built-in effects has 16 types of send effects SEND EFX knob TYPE knob Parameters button 1 and 2 EFX RETURN MUTE button EFX RETURN fader Turn to select the effect type, and press to confirm. Lit: Effect selected Press to turn it off, unmuting the EFX RETURN. - Page 26 Mixer Press the for the channel that you want to use the effect on to light to adjust the amount for each channel. Use the SEND EFX RETURN fader to adjust the overall effect amount. to adjust the send effect parameters. NOTE See P .
-
Page 27: Using Scene Functions
Mixer Using scene functions The scene function can be used to save up to nine sets of current mixer set- tings as scenes and to recall these saved settings at any time. ON button RESET button 1–9 buttons RECALL button SAVE button Saving scenes Click... - Page 28 Mixer NOTE • Nine scenes are saved in the unit. ( → P .9) • If a button that already has a scene saved is selected, that scene will be overwritten. • The following items are saved with scenes. - Fader positions (each channel, SEND EFX, MASTER) - MUTE ON/OFF (each channel, SEND EFX, MASTER) - EQ OFF - LOW CUT ON/OFF...
- Page 29 Mixer Resetting mixer settings Click so that it lights. This enables the scene function. Press Buttons – will blink if they have saved scenes and be unlit if they do not. Press again if you do not want to reset the settings. Press The current mixer settings are reset to their factory defaults.
-
Page 30: Setting Signals Output From Monitor Out A-E
Mixer Setting signals output from MONITOR OUT A–E The MONITOR OUT A–E jacks can be set to output the same mix as the MAS- TER OUT or different mixes. MONITOR OUT switches MASTER button Channel faders A–E buttons Adjusting the MONITOR OUT A–E mixes Press an –... - Page 31 Mixer Selecting MONITOR OUT A–E output signals Use the MONITOR OUT switch for an output to select its output signal. To output a mix set using MONITOR OUT A–E: Set MONITOR OUT switch to A–E ( To output the same mix as the MASTER: Set MONITOR OUT switch to MASTER ( Output different mixes for MONITOR OUT A–E Output same mix as MASTER...
-
Page 32: Recording And Playback
Recording and playback Preparing to record Inserting SD cards POWER switch SD card slot to OFF . Open the SD card slot cover, and insert an SD card all the way into the slot. To remove an SD card, push it further into the slot and then pull it out. NOTE •... - Page 33 Recording and playback Creating new projects manages recording and playback data in units called projects. Select MENU > PROJECT > NEW PROJECT . to select YES, and press NOTE • See P .55 for information about projects. • When a new project is created, it will start with the current mixer settings. HINT •...
-
Page 34: Recording And Playing Tracks
Recording and playback Recording and playing tracks has recorder functions that enable simultaneous recording of up to 14 tracks and simultaneous playback of up to 12 tracks. The signals from every channel after they pass through their compressors and from the master fader output can be recorded. These recordings can also be played back. - Page 35 Recording and playback Press to start recording standby. HINT If a recorded file already exists, and is off, pressing will create a new project and then start re- cording standby. Press to start recording. Press to stop recording. NOTE • The signals for each channel are recorded after passing through their compressors. ( → P .5) •...
- Page 36 Recording and playback Playing recordings REC/PLAY button PLAY/PAUSE button STOP button Press for the channels you want to play, lighting these buttons green. Press to start playback. PLAY/PAUSE indicator Lit: Playing back Blinking: Paused Press to stop playback. NOTE • Playback signals are added before the equalizer section, so their EQ and panning settings can be adjusted during playback.
-
Page 37: Adding Marks
Recording and playback Adding marks Adding marks at desired positions with the recorder makes moving to those positions easy. Selection encoder >>| button |<< button Adding marks during recording and playback Press during recording/playback. Moving in mark order Use these buttons to move in mark order. Move to next mark: Press Move to previous mark: Press... -
Page 38: Redoing Parts Of Recordings
"Punching in" is switching track status from playback to record- ing. "Punching out" is switching track status from recording to playback. With the , punching in/out can be conducted using buttons on its top or a footswitch (ZOOM FS01). REC/PLAY button Selection... - Page 39 Press to end rerecording (punch out). NOTE • Punching in/out using a footswitch (ZOOM FS01) ( → P .85) • Punching in/out overwrites recordings. • Punching in/out can be done up to 99 times each time playback is started. Press...
-
Page 40: Mixing Down Tracks
Recording and playback Mixing down tracks A final stereo mix can be recorded to the master track. Signals are sent to the master track after passing through the master fader. Recording to the master track Click so that it lights. NOTE Adjust the volume and panning of each recorded track before starting. - Page 41 Recording and playback Playing the master track Press MASTER repeatedly until it lights green. Press NOTE • To stop master track playback, press MASTER repeatedly until it becomes unlit. • When the master track is playing, other tracks will not be played back. •...
-
Page 42: Recording Automatically
Recording and playback Recording automatically Recording can be started and stopped automatically in response to the level after passing through the master fader. Selection encoder MENU button REC button Master fader Select MENU > REC/PLAY > AUTO REC > ON/OFF . to select ON, and press NOTE Making additional settings for automatic recording ( →... - Page 43 Recording and playback Press repeatedly to return to the main recorder screen. The MASTER level meters will blink at the level that will cause automatic recording to start. Press The indicator will light and recording standby will start. HINT Recording starts automatically when the input exceeds the set level (shown by the MASTER level meters). You can also set recording to stop automatically when the input goes below a set level.
-
Page 44: Starts
Recording and playback Capturing audio before recording starts The input signal can be captured for up to 2 seconds before recording is start- ed (pre-recording). Setting this in advance can be useful when a performance starts suddenly, for example. Select MENU > REC/PLAY > PRE REC. to select ON, and press NOTE •... -
Page 45: Selecting The Folder Where Projects
Recording and playback Selecting the folder where projects are saved Choose one of ten folders as the folder where recorded projects will be saved. Select MENU > FOLDER. to select the folder where you want to save, and press NOTE •... -
Page 46: Selecting Projects For Playback
Recording and playback Selecting projects for playback Projects saved on SD cards can be loaded. Select MENU > PROJECT > SELECT. to select the project you want to load, and press NOTE • Projects in different folders cannot be selected. To select a project that is saved in a different folder, select that folder first. -
Page 47: Enabling The Metronome
Using the metronome metronome has adjustable volume, a selectable sound, and a pre- count function. The volume can also be adjusted separately for each output. Metronome settings are saved separately with each project. Enabling the metronome Select MENU > METRONOME > CLICK. to select when the metronome makes sound, and press Setting value Explanation...
Need help?
Do you have a question about the L-12 and is the answer not in the manual?
Questions and answers