Advertisement
TOOLPRO
18V compound Mitre saw
Instruction Manual
Important
- Please read these instructions fully before operating or maintaining your Mitre saw
These instructions contain important information that will help you get the best from your
Mitre saw, ensuring it remains safe to operate.
If you need help or have damaged or missing parts, call the Customer Helpline on 1300 889 028
After Sales Support
FREE CALL 1300 889 028
EMAIL:salesau@positecgroup.com
CMS18G
Advertisement

Related Manuals for ToolPRO CMS18G

Summary of Contents for ToolPRO CMS18G
- Page 1 TOOLPRO 18V compound Mitre saw CMS18G Instruction Manual After Sales Support FREE CALL 1300 889 028 EMAIL:salesau@positecgroup.com Important - Please read these instructions fully before operating or maintaining your Mitre saw These instructions contain important information that will help you get the best from your Mitre saw, ensuring it remains safe to operate.
-
Page 2: Table Of Contents
Contents Safety Information.....................3 In The Box........................10 Operating Instructions..................... 12 Maintenance......................21 Technical data......................21 Customer Helpline 1300 889 028... -
Page 3: Safety Information
Safety Information Important - Please read these instructions fully before starting assembly Warning Symbols To reduce the risk of injury, user must read instruction manual Warning Wear ear protection Wear eye protection Wear dust mask RCM marking Do not dispose of batteries, Return exhausted batteries to your local collection or recycling point. - Page 4 Safety Information Important - Please read these instructions fully before starting assembly General Power Tool Safety Warnings WARNING! Read all safety warnings and all instructions. Failure to follow the warnings and instructions may result in electric shock, fire and/or serious injury. Save all warnings and instructions for future reference.
- Page 5 Safety Information Important - Please read these instructions fully before starting assembly General Power Tool Safety Warnings d) Remove any adjusting key or wrench before turning the power tool on. A wrench or a key left attached to a rotating part of the power tool may result in personal injury. e) Do not overreach.
- Page 6 Safety Information Important - Please read these instructions fully before starting assembly General Power Tool Safety Warnings b) Use power tools only with specifically designated battery packs. Use of any other battery packs may create a risk of injury and fire. c) When battery pack is not in use, keep it away from other metal objects, like paper clips, coins, keys, nails, screws or other small metal objects, that can make a connection from one terminal to another.
- Page 7 Safety Information Important - Please read these instructions fully before starting assembly Safety instructions for mitre saws you may be seriously injured. g) Inspect your workpiece before cutting. If the workpiece is bowed or warped, clamp it with the outside bowed face toward the fence. Always make certain that there is no gap between the workpiece, fence and table along the line of the cut.
- Page 8 Safety Information Important - Please read these instructions fully before starting assembly General Safety Warnings for your Battery Charger WARNING! Read all safety warnings and all instructions. Failure to follow the warnings and instructions may result in electric shock, fire and/or serious injury. Save all warnings and instructions for future reference.
- Page 9 Safety Information Important - Please read these instructions fully before starting assembly Safety Warnings for battery pack d) Do not subject battery pack to mechanical shock. e) In the event of battery leaking, do not allow the liquid to come into contact with the skin or eyes.
-
Page 10: In The Box
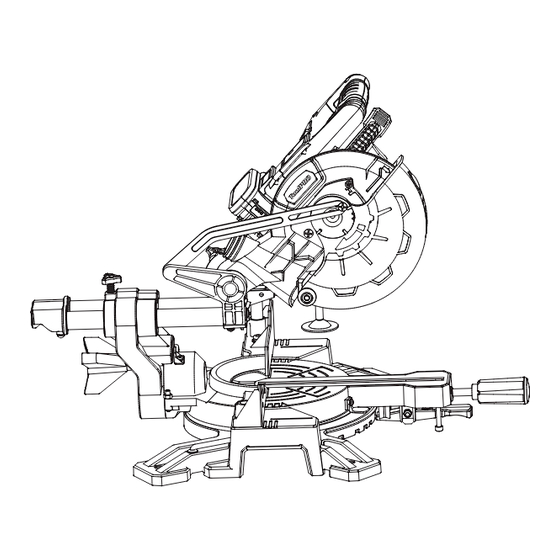
In The Box Parts Operating handle Motor housing Release latch Spindle lock button Upper fixed blade safety guard Trenching depth adjustment screw Blade bolt cover screw Trenching stop Lower rotating blade safety guard Trenching depth lock nut Laser light Mounting hole Fence Dust bag Table insert... - Page 11 In The Box Accessories Battery pack (ABP118L4) Charger (ACG18LD3) Work clamp Blade wrench Dust bag Customer Helpline 1300 889 028...
-
Page 12: Operating Instructions
Operating Instructions Assembly NOTE: Before using the tool, read the instruction book carefully. Intended Use The electro-tool is intended as a stationary machine for making straight lengthways and crossways cuts in wood. Horizontal mitre angles of 0~45 L&R as well as vertical bevel angles of 0°... - Page 13 Operating Instructions Assembly 3. WORK CLAMP (See Fig. C) 1) The work clamp (28) can be fitted on either side of the saw and is fully adjustable to suit the size of the workpiece. 2) Do not operate the saw without clamping the workpiece. 3) Make sure that the work clamp securing screws are tightened.
- Page 14 Operating Instructions Assembly CHARGING We strongly recommend to use ToolPRO battery & charger kit. Please contact you local Supercheap Auto store for more details or log onto www.supercheapauto.com.au for Australia or www.supercheapauto.co.nz for New Zealand customers to find out more details.
- Page 15 Operating Instructions Assembly 3. CHARGING INDICATOR a) Fast charger(See fig. D1) Light ON/OFF flash Status Red on Charging Red flash - - - - - Defective Battery Green on Fully Charged Green flash - - - - - - Hot/Cold Delay b) Slow charger(See fig.
- Page 16 Operating Instructions Operation 1. SWITCH TRIGGER (See Fig. E) Operating the switch trigger (19) with your forefinger and then squeeze on it to turn on the machine, when the blade has reached maximum speed, unlock the lower rotating blade safety guard (5) by operating the release latch (2) using your thumb. It will then be feasible to push the saw head down by the handle.
- Page 17 Operating Instructions Operation could grab the work-piece, causing it to slip and twist. 12) BEFORE turning on the saw, perform a dry run of the cutting operation just to make sure that no problems will occur when the cut is made. 13) Check position of the Trenching depth adjustment screw(32) and the Trenching stop(33), making sure that they are adjusted properly to a desired height, so after operating the blade cuts to a desired depth and would not harm to the base or table.
- Page 18 Operating Instructions Operation 4. COMPOUND MITRE CUTTING (See Fig. H) A compound mitre cut is a cut made using a mitre angle and a bevel angle at the same time. This type of cut is used for moldings, picture frames, and boxes with sloping sides. To make this type of cut, the control arm on the mitre table must be rotated to the correct angle and the blade must be tilted to the correct bevel angle.
- Page 19 Operating Instructions Operation 7) Place a set square (not provided) against the table and the flat part of the blade. 8) Rotate the blade by hand and check the blade-to-table alignment at several points. 9) The edge of the set square and the saw blade should be parallel. 10) If the saw blade angles away from the set square, adjust as follows.
- Page 20 Operating Instructions Operation 12) Lower the lower rotating blade safety guard (5), hold the lower rotating blade safety guard (5) and blade bolt cover (18) in position and tighten the fixing screw (4) to secure the blade bolt cover in position. WARNING! The blade bolt cover must be positioned correctly and the bolt cover screw must be screwed securely before you conduct the next move.
-
Page 21: Maintenance
Maintenance WARNING! Remove the battery pack from the tool before carrying out any adjustment, servicing or maintenance. There are no user serviceable parts in your power tool. Never use water or chemical cleaners to clean your power tool. Wipe clean with a dry cloth. Always store your power tool in a dry place.
Need help?
Do you have a question about the CMS18G and is the answer not in the manual?
Questions and answers