Advertisement
Quick Links
Advertisement

Related Manuals for quhwa VP-K


Summary of Contents for quhwa VP-K
- Page 1 User Manual Video Doorbell QUHWA VP-K...
- Page 2 Packing List A. Video door phone host: 1 B. Mounting wrench: 1 C. Manual: 1 D. Host support: 1 E. Hex screw: 2 F. Screw expansion plug: 5 G. Support screw: 5...
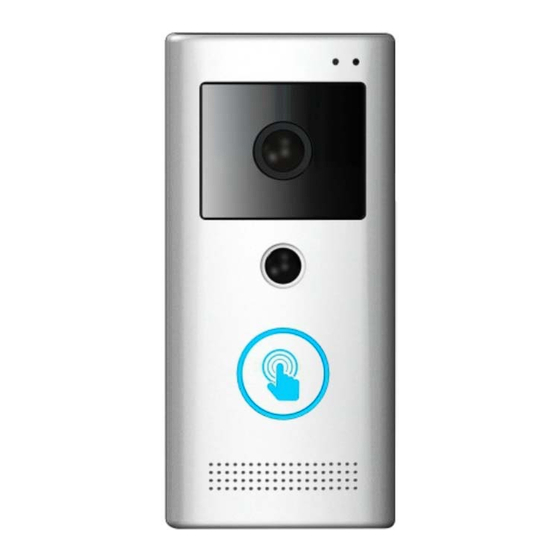
- Page 3 II. Product Diagram Front View 1: Microphone 2: Light sensation window 3: Wide-angle high-definition camera and infrared lamp 4: Human model sensing window 5: Indicator light 6: Touch key area 7: Loudspeaker...
- Page 4 2) Rear View A: Support fastener B: Reset button C: NO (normally open) D: GND (ground) E: NC (normally connected) FG: AC / DC H: Product Label I: Micro SD Connection instructions: (NO + GND): to magnetic lock (NC + GND): to electric lock AC/DC: to AC 8-16V or DC 9-24V, without polarity difference Micro SD: installed/removed in power off state, with a maximum of 64G supported.
- Page 5 settings. The device will restart with a prompt tone upon completion. 3) Host support 1: Screw fixing hole; 2: Cord hole 3: Fastener hole.
- Page 6 III. Installation Instructions...
- Page 7 IV. Downloading APP Search in application market for tilvision V. Registration and login...
- Page 8 VI. Adding equipment 1) Power on the device and wait for the system prompt tone. Device startup completed, before adding the device, make sure the mobile phone has been connected to the 2.4G WIFI network. 2)Open the tilvision app and click "+",Click the Setup device button and enter the Wi-Fi password.
- Page 9 3)Long press the doorbell indicator light, release after the "di-di-di…" tone 4) Warning tone two times will be presented during the configuration process: a) The first beep tone indicates success of the device to obtain wifi information; b) The second whistle indicates success of device configuration.
- Page 10 5) Search the configuration results. VII. Main function 1) Call answering When a visitor presses the call button, the indoor ding-dong machine (optional) ring out, and the mobile terminal receives the call information at the same time. Open the software, the call window is displayed against the background of a visitor picture. Operations available are the following: answer, talkback, video, photographing,...
- Page 11 unlock and reject. 2) PIR alarm mode When going out (or at night fortification) and the PRI monitoring mode is turned on, upon detection of someone stops at the doorway, the mobile terminal will receive the alarm screen with a screenshot of the visitor as the background, and at the same time the mobile terminal will emit audio warning to remind the owner to answer or monitor.
- Page 12 Main product parameters Product Name: WIFI Video Doorbell Product Model: VP-T10 Video angle range: 120° Video compression: H.264 Video pixels: HD720P Audio: Two-way voice intercom, comes with echo cancellation Loudspeaker: 1W PIR distance: 3 meters detection Day-night mode: Automatic switching between photosensitive sensors and between IR-CUT dual filtering Night infrared lamp: 5 Wireless connection: WIFI 2.4GHz, IEEE 802.11 b/g/n...
- Page 13 Working with auto-learning code wireless indoor chime Once the video doorbell and indoor chime are powered in 20seconds,press the call button to complete configuration. The indoor chime will sound if visitor rings the video doorbell in case the smart phone is not available. Names for Parts: ...
-
Page 14: Functions Instruction
Functions Instruction 1.Press the auto‐learning code button on the side of the Receiver and hold for 2 or 3 seconds, A “beep” sound comes out and the LED indication will light. Then press the call button on the video doorbell once. The Receiver will sound to indicate that new operation code is registered and memorized. Thus the video doorbell works successfully with the indoor chime. Maximum 60 codes can be matched and saved in the chime within 10 seconds. If there is no code matched and saved within the 10s, the chime will automatically exit and there will be two “beeps”. 2.There is a melody selector located on the side of the Receiver (see diagram). Selectable Tone: Total 36 melodies available. ... - Page 15 Note: You must select the desired ring first, then match the video doorbell. If you want to change ring tones, you must delete all the information saved in the chime and reset. Press the melody selector button and hold for 5 seconds, you can delete all the information within the chime. At the same time, the LED indicator light will light. 3.There is also a volume button on the side of the Receiver (see diagram). Press it to adjust the sound volume, total six levels. 4.There is a Sound and Flash Switch Button on the side of the receiver. Press this button for three options, working only with sound, only LED flash, sound and LED flash: A.If a “beep” sound comes out and the LED indicator does not light. the chime will work only with sound. B.If a “beep” sound comes out and the LED indicator lights, the chime will work with sound and LED flash. C.If the LED indicator lights without “beep” sound, the chime will work only with LED flash. Notes: If the chime sounds for no reason during the digital code setting, it is indicated that it has been interfered by other similar Doorbell nearby, reset the auto‐learning code as per point 1 above. ...
- Page 16 FCC Caution: This device complies with Part 15 of the FCC rules and Industry Canada license-exempt RSS standard(s). Operation is subject to the following two conditions: (1) this device may not cause harmful interference, and (2) this device must accept any interference received, including interference that may cause undesired operation.
Need help?
Do you have a question about the VP-K and is the answer not in the manual?
Questions and answers