Table of Contents
Advertisement
Advertisement
Table of Contents

Subscribe to Our Youtube Channel
Related Manuals for HTC 80 iD


Summary of Contents for HTC 80 iD
- Page 1 MANUAL HTC 80 iD Translation of manual in original language...
- Page 2 HTC 80 iD...
- Page 3 Always specify the model and serial number when asking questions about your product. Trademarks HTC is a trademark owned by HTC Sweden AB. Other names and products mentioned in this manual may be registered trademarks owned by the relevant companies.
- Page 4 Sweden +46 (0)121-29400 Type of equipment: Dust extractor Make: Model: HTC 80 iD Year of manufacture: See machine name plate Serial number: See machine name plate As the manufacturer, we hereby declare under our sole responsibility that the above product with serial numbers from 2011 onward conforms to the applicable regulations in directives MD 2006/42/EC and LVD 2006/95/EC.
-
Page 5: Table Of Contents
HTC 80 iD Table of contents Introduction 1.1 General Information ............1.2 Responsibility ..............1.3 Manual ................1.3.1 Safety instructions – Explanation of symbols ..1.4 Transportation ..............1.5 On delivery ..............1.6 Unpacking ............... 1.7 Machine name plate ............ - Page 6 Table of contents HTC 80 iD Maintenance 5.1 General Information ............5.2 Cleaning the dust extractor ..........5.3 Daily ................5.3.1 Check accessories ..........5.3.2 Check dust covers ..........5.3.3 Check the sock filters ......... 5.4 Every week ..............5.4.1 Check pre-separator ...........
- Page 7 HTC 80 iD Table of contents 10 Warranty and CE marking 10.1 Warranty ................10.2 CE marking ..............
- Page 8 Table of contents HTC 80 iD...
-
Page 9: Introduction
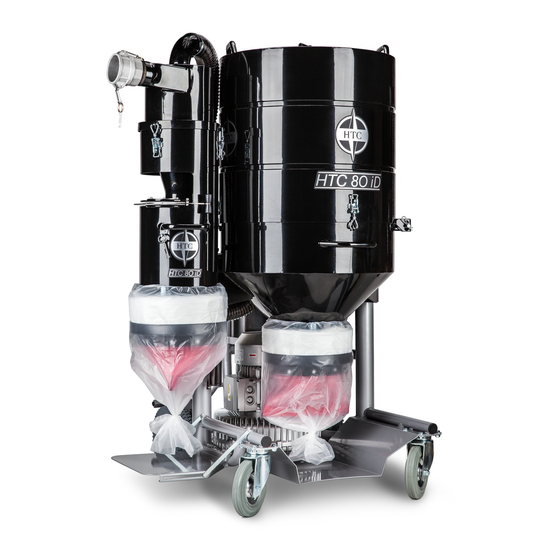
Introduction General Information HTC 80 iD is a dust extractor with an integrated pre-separator which is best used together with all HTC's larger grinding machines in connection with dry grinding of stone and concrete floors, and in accordance with HTC's recommendations. HTC 80 iD is constructed with sock filters as the main filter and HEPA filter. -
Page 10: Transportation
Introduction HTC 80 iD Warning! This symbol means Warning! and indicates a risk of personal injury or material damage in the event of incorrect use of the dust extractor. When you see this symbol, read the accompanying text extra carefully, and do nothing you are not sure about. -
Page 11: Unpacking
HTC 80 iD Introduction • Dust extractor with integrated pre-separator. • Manual disc • Suction hose with couplings • Cleaning kit (hose, cleaning pipe and cleaning nozzle) • Locking key for control cabinet • Remote start (option) Unpacking Warning! Read carefully through the safety instructions and user manual before using the equipment. -
Page 12: Handling And Storage
Introduction HTC 80 iD Serial number Year of manufacture Power (kW) Voltage (V) Current (A) Frequency (Hz) Weight (kg) Address field Handling and storage The dust extractor should be stored in a heated, dry area when not in use. Otherwise it may be damaged by condensation and cold. -
Page 13: Safety
HTC 80 iD Safety Safety General Information This chapter contains all the warnings and notes that have to be considered for the dust extractor. Warnings Warning! Read carefully through the safety instructions and user manual before using the equipment. Warning! Always use hearing protection when using the dust extractor. -
Page 14: Notes
Warning! Connect the dust extractor to an earth fault breaker. Notes Note! The dust extractor is best used together with HTC's grinding machines in connection with dry grinding of stone and concrete floors, and in accordance with HTC's recommendations. Note! Only use original spare parts from HTC for the dust extractor. -
Page 15: Machine Description
Machine description General Information HTC 80 iD is a dust extractor with an integrated pre-separator for industrial and building use intended for the dry vacuuming of dust particles, e.g. concrete, wood, stone etc. The dust extractor is equipped with a two-step filter, a sock filter as a main filter followed by a HEPA 13 filter. -
Page 16: Dust Extractor
Machine description HTC 80 iD Dust extractor When the air enters the vacuum tank (pos 2 Figure 3-1, page 8) the speed reduces, so the remaining dust in the airflow falls down into the Longopac. The airflow then passes a first filter step that consists of a number of sock filters that sit in the filter holder (pos 1 Figure 3-1, page 8). - Page 17 HTC 80 iD Machine description Upper cylinder section Lower cylinder section Longopac holder Vacuum Collection plate for Longopac Folding collection plate for Longopac Latch pre-separator Sliding valve, bypass Integrated pre-separator Inlet, Camlock female connector Figure 3-2. The back of the dust extractor...
- Page 18 Machine description HTC 80 iD Hinge for lowering upper cylinder section Handle, valve Figure 3-3. Dust extractor side view with HEPA filter holder and electrical connection Longopac holder pre-separator Side duct fan Inlet, electrical connection Keypad start and stop HEPA filter...
-
Page 19: Lifting The Machine
HTC 80 iD Machine description Lifting the machine When lifting the vacuum system, lifting straps are used that are fastened in the notches on the chassis, see Figure 3-4, page 11. Only use straps approved for lifting equipment. Figure 3-4. Lifting eyes... -
Page 20: Wheel Brake
Machine description HTC 80 iD Wheel brake To lock the back wheels, press the brake arm down with your foot, this keeps the wheels locked using spring power, see Figure 3-5, page 12. To release the brake, do the opposite and lift the brake arm using your foot. - Page 21 HTC 80 iD Machine description To start the dust extractor with the remote control (option), press the button marked with the number 1, and to switch it off, press the button marked with the number 2. Figure 3-7. Keypad remote start...
-
Page 22: Usage
Usage HTC 80 iD Usage General Information The following section describes the different positions for the dust extractor and how to change the Longopac. The section also deals with the operation of the dust extractor. Warning! The dust extractor may only be used or repaired by personnel who have received the requisite theoretical and practical training and who have read the user manual. -
Page 23: The Dust Extractor's Operating Position
HTC 80 iD Usage 4.2.1 The dust extractor's operating position When the dust extractor is in use, it must be in the operating position, see Figure 4-1, page 15. Figure 4-1. Operating position 4.2.2 Lower the dust extractor to the service position The dust extractor can be lowered to the service position by releasing the upper cylinder section from the lower cylinder section, see Figure 4-2, page 16. -
Page 24: The Positions For The Pre-Separator
Usage HTC 80 iD 1. Loosen the hose that sits on the bottom edge of the HEPA filter holder and runs down to the side duct fan from the HEPA filter holder. 2. Loosen all quick fasteners holding the upper and lower cylinder sections together, and then carefully tip the upper section towards the handle, see Figure 4-2, page 16. - Page 25 HTC 80 iD Usage The lowered operating positions for the pre-separator are use for handling a full Longopac on the collection plate (pos 5 Figure 3-1, page 8), stool or similar resting place. Figure 4-3. Locking pin for the pre-separator Figure 4-4. Transport position...
- Page 26 Usage HTC 80 iD Figure 4-5. Operating position 1 pre-separator...
-
Page 27: Connection Of Hoses To The Dust Extractor
Figure 4-7. Folding collection plate for Longopac Connection of hoses to the dust extractor HTC 80 iD is equipped with a 3" Camlock femal connector, se pos 9 Figure 3-1, page 8, for quick, easy and safe connection of the suction hose between the grinding machine and dust extractor or other accessory that is to be used for dust collection. -
Page 28: Installing Extra Ventilation Hose
Usage HTC 80 iD To connect two camlock adaptors, push the male and female adaptors into each other and tighten both of the tensioning arms. Installing extra ventilation hose To improve the air while grinding, an extra ventilation hose can be installed on the dust extractor. -
Page 29: Disengaging The Pre-Separator Using The Bypass Valve
HTC 80 iD Usage 4. Stop the dust extractor, by pressing button "O" or button "2" on the transmitter, if the dust extractor is equipped with the Remote Start option. For a more detailed description of the controls, see Description of controls - Keypad, page 12. -
Page 30: Manual Cleaning Of The Filter Using The Slide Gate
Usage HTC 80 iD Note! The bypass valve should not be closed for more than a short interval, because the risk of dust build-up and blockage in the pre-separator increases significantly. Figure 4-9. Close bypass valve Figure 4-10. Open bypass valve... - Page 31 HTC 80 iD Usage 1. Pull out the sliding valve to its end position, seeFigure 4-11, page 23. Then wait approx. 3 seconds. Figure 4-11. Sliding valve out 2. Quickly press the valve handle in towards the upper cylinder section, so the valve cover opens for about 1 second.
-
Page 32: Handling Longopac
The dust extractor is equipped with a sack system that makes it possible to minimise dust exposure when changing waste bags, the so-called Longopac. This sack system can be ordered. Please contact your HTC retailer. Warning! Use protective equipment such as safety shoes, safety goggles, protective... -
Page 33: Removing Full Longopac
HTC 80 iD Usage 4.9.1 Removing full Longopac... -
Page 34: Fitting Longopac
Usage HTC 80 iD Tip! Pull out a new length of empty Longopac, down to the collection plate. This is to create the best conditions for the waste to fall into the Longopac. 4.9.2 Fitting Longopac When fitting Longopac bags, it is recommended that the pre-separator be in the... - Page 35 HTC 80 iD Usage Tip! The Longopac holders are attached by a bayonet fitting to the dust extractor.
- Page 36 Usage HTC 80 iD...
- Page 37 HTC 80 iD Usage...
- Page 38 Usage HTC 80 iD Tip! Pull out a new length of empty Longopac, down to the collection plate. This is to create the best conditions for the waste to fall into the Longopac.
-
Page 39: Maintenance
HTC 80 iD Maintenance Maintenance General Information We recommend regular inspection of the dust extractor. Warning! During maintenance and repairs, the power to the dust extractor must be disconnected. Warning! Use protective equipment such as safety shoes, safety goggles, protective gloves, breathing mask and hearing protection. - Page 40 Maintenance HTC 80 iD 5.3.2 Check dust covers Check that the dust covers in the dust extractor and pre-separator can move freely without jamming. Check that rubber cloth is undamaged; clean the surface if needed. Check that the dust covers seal against the seal surface on the cylinder wall.
-
Page 41: Every Week
HTC 80 iD Maintenance 5. If the filter is torn or defective, it should be replaced. In this case, go to Replace sock filters, page 37 for further instructions. Otherwise, the filter should be fitted back in place. Every week Tip! - Page 42 Maintenance HTC 80 iD Warning! The dust that is sucked up is harmful if inhaled. Follow local regulations and use breathing protection. 1. Undo the quick-release holding the HEPA filter holder in position, see Figure 5-1, page 34. Figure 5-1. Open HEPA filter holder...
- Page 43 HTC 80 iD Maintenance 3. Lift out both HEPA filters, see Figure 5-2, page 35 Figure 5-2. Lift out the HEPA filters 4. Note how the filters fit into the dust separator. Tip! An arrow on the HEPA filters indicates the correct orientation for installing the filters in the dust extractor so the flow will be in the right direction through the filters.
-
Page 44: Check For Leaks
Maintenance HTC 80 iD 5.4.5 Check for leaks To obtain the maximum performance from your dust extractor, you should at regular intervals, or on the suspicion of leaks, check the entire vacuum system's air tightness. The greatest risk for leaks are by the Longopac, the Longopac holder's sealing strips, sliding valve, HEPA filters and negative pressure limit valve. -
Page 45: Every Year
HTC 80 iD Maintenance 5.4.9 Check the side duct fan • When required, vacuum clean any dust from visible parts of the side duct fan. • Also listen to see if there is any jarring sound coming from the side duct fan. -
Page 46: Service
Service HTC 80 iD Service General Information We recommend regular inspection of the dust extractor. Warning! During maintenance and repairs, the power to the dust extractor must be disconnected. Warning! Use protective equipment such as safety shoes, safety goggles, protective gloves, breathing mask and hearing protection. - Page 47 HTC 80 iD Service 1. Take hold of the sock filter cassette and turn it slightly anticlockwise, see Figure 6-1, page 39. 2. Pull the whole cassette straight out, see Figure 6-1, page 39. Figure 6-1. Change the sock filter cassette 3. Inspect the gaskets on the lower and upper cylinder section. In the case of damage, replace with new gaskets.
-
Page 48: Servicing The Sock Filter
Service HTC 80 iD 9. Replace the hose that sits on the bottom edge of the HEPA filter holder and runs down to the side duct fan on the HEPA filter holder. Servicing the sock filter The sock filter must be replaced annually; however, if the daily inspection of the sock filter shows that the filter should be replaced, the following points must be done: 1. -
Page 49: Service Of The Hepa Filters
HTC 80 iD Service 4. Install a new sock filter. Check that the fastening in the top of the sock filter lies along the mounting ring to guarantee that the sock filter ends up in the right position and does not become twisted after assembly. -
Page 50: Control Cabinet
Service HTC 80 iD Control cabinet Figure 6-4. Control cabinet Note! The dust extractor must not be connected to the mains supply when carrying out the points below. 6.5.1 Resetting the motor protection 1. Cut the power to the dust extractor by pulling the plug out of the electrical socket, see Figure 3-3, page 10. -
Page 51: Changing The Fuse
HTC 80 iD Service 6.5.2 Changing the fuse 1. Cut the power to the dust extractor by pulling the plug out of the electrical socket, see Figure 3-3, page 10. 2. Open the electrical cabinet. 3. Raise the fuse holder, see position 3 in Figure 6-4, page 42. - Page 52 Service HTC 80 iD 1. Open the battery case by screwing out the three screws on the back of the transmitter's case (see Figure 6-5, page 44). Figure 6-5. Battery case 2. Carefully remove the back piece. 3. Remove the battery.
-
Page 53: The Receiver
HTC 80 iD Service 4. Put in new battery (see Figure 6-6, page 45 and Figure 6-7, page 45). Figure 6-6. The battery placed in the transmitter Figure 6-7. The battery in its correct position 5. Close the back piece 6. Tighten the 3 screws with a Philips screwdriver PH00 (torque 0.14 Nm). -
Page 54: Basic Configuration
Service HTC 80 iD 1. Light emitting diode 5 Squelch: Indicates whether there is a radio signal for the actual frequency band or not. 2. Light emitting diode 6 Status: Indicates that the receiver has received information from an encoded transmitter. -
Page 55: Erase All Transmitters In The Receiver
4. Replace the receiver's cover. Repairs Any repairs that may be required must be carried out by an HTC Service Centre that has trained service personnel and uses HTC original parts and accessories. Contact your retailer if your machine requires servicing. For contact information, see Contact Information at the start of the manual. -
Page 56: Faultfinding
Faultfinding HTC 80 iD Faultfinding This chapter describes some of the faults that may occur and how to deal with them. If the error cannot be corrected, or if errors arise other than those described here, contact your nearest retailer. See Contact Information at the front of the manual. - Page 57 HTC 80 iD Faultfinding Symptoms Cause/Action Dirt in HEPA filters - Faulty sock filters. - Leak at filter cleaning valve or HEPA filter cover. - Old HEPA filter. Time for replacement? Dust ends up in the vacuum system - The bypass valve is closed...
-
Page 58: Technical Data
Technical data HTC 80 iD Technical data The tables and pictures below show the technical data and dimensions for the dust extractor. HTC 80 iD HTC 80 iD 3 x 400 V 3 x 460 V Part number Prod. no. 501909 Item no. - Page 59 HTC 80 iD Technical data Figure 8-1. Height and length of the dust extractor, in the operating position, in millimetres Figure 8-2. Width of the dust extractor in millimetres...
-
Page 60: Environment
Environment HTC 80 iD Environment HTC products are constructed mainly of recyclable metal and plastic. The main materials used are listed below. Machine part Material Waste management Chassis Frame Metal, powder-coated Metal recycling Front wheels Metal, plastic and rubber Metal recycling... -
Page 61: Warranty And Ce Marking
Warranty and CE marking 10.1 Warranty This warranty only covers manufacturing defects. HTC bears no responsibility for damage that arises or occurs during transportation, unpacking or use. In no instance and under no circumstances shall the manufacturer be held responsible for damage and defects caused by incorrect use, corrosion or use outside the prescribed specifications.
Need help?
Do you have a question about the 80 iD and is the answer not in the manual?
Questions and answers