Table of Contents
Advertisement
Quick Links
Advertisement
Table of Contents

Summary of Contents for Hive HEV-1000
- Page 1 HEV-1000 User Manual VER.1.0.0 HEV-1000 User Manual...
- Page 2 Introduction Thank you for purchasing our UV Camera (HEV-1000).. It is a device to detect an area of ultraviolet rays and to display and record that detected area after overlaying with an area of visible rays. This user manual was made to help users to easily understand the functions of the device and its maintenance method.
- Page 3 Periodic format and maintenance are required. • We are not reliable for any data loss regardless of its cause. • We are not reliable for any incidental damage or loss incurred by use of or unavailable time of the device. HEV-1000 User Manual...
- Page 4 Battery connecting cable 1 ea HDMI cable 1 ea SD card 1 ea User manual LCD board is not enclosed as components (sold separately). USB supplementary battery is also not enclosed as components (sold separately). HEV-1000 User Manual...
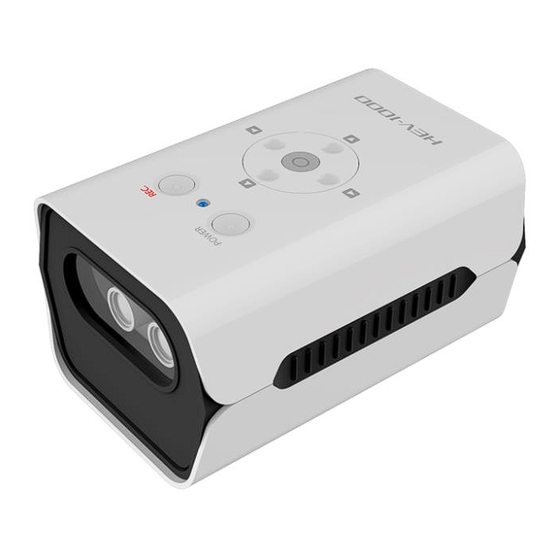
- Page 5 Component Names and Functions Front/Top The front of HEV-1000 is configured by the visible camera and the UV camera. On its top, there is an interface where users can use and set the device, which is composed by the button users can apply/stop applying the power to HEV-1000, the button to start/finish recording, and 5-direction buttons to use the device when the LCD touch screen is not linked.
- Page 6 Rear On the rear side of HEV-1000, there are the power terminal, the LCB connecting terminal, the HDMI terminal, the LAN terminal, the USB slot and SD Card slot where users can save their recordings. Power terminal Connect the power adaptor enclosed. You can apply/stop applying the power to the device.
- Page 7 You can connect a USB Keyboard (SETTING > FTP Item is to be set for use of this keyboard). When HEV-1000 is powered, you can see the blue light beaming around the buttons. Then, the product logo will be displayed on the touch screen and HDMI.
-
Page 8: Video Select
Users can select which live video to display on the display. Visible Image UV Image Visible + UV Image 2) UV PHOTON COLOR Users can select the color of UV image that is to be overlaid on the Visible image. Blue Green HEV-1000 User Manual... -
Page 9: Gain Adjust
Users can adjust the overlay location according to the size of and the distance to the subject. 5) TRIGGER THRESHOLD Users can set the Threshold Level, where recording of ESD Event begins, from 0.7KV to 6.0KV. This function works only after going through ESD CALIBRATION. HEV-1000 User Manual... - Page 10 - Change the recording file name: SERIALNO_YYMMDD_HHMMSS_Event.avi - Log file: Save the photon count and voltage value at the moment of the event in a file. - Change the log file name: SERIALNO_YYMMDD_HHMMSS_Event.log HEV-1000 User Manual...
- Page 11 You may lose your recording if you separate the storage device without pressing “Stop” button to finish your recording. This also can lead to fatal error or damage to your storage device (USB or SD card). Must finish your recording or turn off the power of HEV-1000 before you remove the storage device.
- Page 12 4) Storage Device File System HEV-1000 is using FAT32 file system. If any device not formatted in FAT32 is connected to the device, the warning message will appear as the device recognizes the file system as unsupported file system. Also, the window asking if you want to format the device will appear.
- Page 13 Recordings will be organized by date in dated folders. : You can move to the previous/next page. 2) List of saved recording files When you select any dated folder, you will see recordings of that day organized by their recording method, Manual and Event. HEV-1000 User Manual...
- Page 14 You can check video of ESD by playing your recording file. : Users can Play/Pause video. : Go back to 30 seconds earlier : Go to 30 seconds after. : Fast forward. : Rewind. : Go back to the video file list. HEV-1000 User Manual...
- Page 15 Setting Screen (environment setting) Setting mode is to set subordinate functions of HEV-1000, including, ESD EVENT RECORDING ON/OFF, UV FRAMES Setting, DATE & TIME Setting, Selection of Storage Devices, etc. 1) ESD EVENT RECORDING ON/OFF Users can enable/disable the automatic recording function in the event of ESD.
- Page 16 Users can set how long they want to display the max detect level. It can be set from 1 to 5 seconds. 5) ESD CALIBRATION This function is to collect the photon count info by ESD level to assume ESD voltage. This ESD calibration is performed in three different levels: 1KV, 3KV, and 6KV. HEV-1000 User Manual...
- Page 17 Execute “VLC Media Player” after installing it and select “Manu > Media(M) > Open Network Stream(N)…”. Then, access to URL below so that you can receive video and stream it. rtsp://192.168.10.105:8557/videoCodec=H.264 • Here, the IP address (192.168.10.105) is the one set for the camera. HEV-1000 User Manual...
- Page 18 Users can format their storage device that is connected to the USB slot or the SD card slot of HEV-1000. To use this device’s save function, the file system of storage device to be used should be formatted in FAT32. If your storage device is using another file system, format it in FAT32 by using this FORMAT function.
-
Page 19: Video Frequency
Doing so may result in the device’s or storage device’s malfunction. • HEV-1000’s format function supports up to 2TB-sized storage device. 9) VIDEO ROTATE Users can enable/disable left/right or up/down reversing function that reverses the image shoot by camera. -
Page 20: Buzzer On/Off
Users can set the date and time of RTC (Real Time Clock). The date and time set here will be used later to name the recording files. Available date setting is from January 1, 2000 to December 31, 2037. When smaller than 2000 HEV-1000 User Manual... - Page 21 - for other BYTES, you can select any numbers from 0 to 255. 14) FTP SETTING HEV-1000 provides a function to transmit event recordings and log files thereof to the remote FTP server. To use this function, set the Host address, ID, and PW to access the remote FTP server here in this menu.
-
Page 22: Touch Calibration
When connection with the FTP server was lost due to network problem or other reasons, event recording video and log file transmitted to the FTP server will be kept by HEV-1000 and it will start transmitting again when connection is back (Save/Transmit maximum 100 recordings) (Caution) Such re-transmission of the files is not made if you turn off the HEV-1000 and turn it on. -
Page 23: Factory Reset
Users can initialize their setting to as-received status which is specified in the following table: Item Value UV PHOTON COLOR GAIN ADJUST UV OVERLAY POSITION center TRIGGER THRESHOLD 1000 DETECT LEVEL ESD EVENT RECORDING PHOTON COUNT DISPLAY UV FRAMES 15 Frames HEV-1000 User Manual... -
Page 24: About Device
REMOTE MONITORING TARGET STORAGE SD Card VIDEO FREQUENCY 59.94Hz BUZZER IP ADDRESS 192.168.0.2 SUBNET MASK 255.255.255.0 GATEWAY 192.168.0.1 FTP HOST ADDRESS 192.168.0.3 17) ABOUT DEVICE Users can view S/N, Mac address, F/W version info of their HEV-1000. HEV-1000 User Manual... - Page 25 2) Directly connect the LAN cable to the LAN port of computer. 3) Execute “HEV-1000 Intranet search and settings” program. 4) Click “Search” button. 5) Every HEV-1000 that is connected to the same network will be displayed as below. HEV-1000 User Manual...
- Page 26 In your HEV-1000, you will see the following message displayed. 5) Select the HEV-1000 you want, change its setting, and click “Save” button so that you can save your recent setting to your selected HEV-1000. 6) When closing “HEV-1000 Intranet search and settings” program, your HEV-100 will go back to the Main screen.
- Page 27 3) Connect the SD card to the SD card slot on the rear of HEV-1000. 4) Apply the power by pressing the power button while the REC button on the top of HEV-1000 is being pressed. You can also upgrade the software by using 5-direction buttons instead of the REC button.
- Page 28 6) When upgrading is completed, check if Main Screen is on. 7) Check the F/W Version of your device at Setting > About Device. Servicing IF your HEV-1000 has some problem, please check the following before you request for servicing. Such check may save your time and money. Symptom...
Need help?
Do you have a question about the HEV-1000 and is the answer not in the manual?
Questions and answers