
Related Manuals for Hanna Instruments HI 902 Color


Summary of Contents for Hanna Instruments HI 902 Color
- Page 1 QUICK START GUIDE HI 902 Color AUTOMATIC POTENTIOMETRIC TITRATOR Revision 2.00 www.ponpe.com sale@ponpe.com...
- Page 2 Instruction Manual. © 2010 Hanna Instruments All rights are reserved. Reproduction in whole or in part is prohibited without the written consent of the copyright owner, Hanna Instruments Inc., 584 Park East Drive, Woonsocket, Rhode Island 02895, USA. www.ponpe.com sale@ponpe.com...
-
Page 3: Table Of Contents
QUICK START GUIDE Contents INTRODUCTION ......................4 SAFETY MEASURES.....................5 TITRATOR CONNECTIONS ..................6 USER INTERFACE ......................7 HOW TO SELECT YOUR LANGUAGE ................8 HOW TO USE THE CONTEXTUAL HELP ...............8 METHODS ........................8 HOW TO CALIBRATE A pH ELECTRODE ..............9 HOW TO PERFORM A TITRATION ..............10 www.ponpe.com sale@ponpe.com... -
Page 4: Introduction
QUICK START GUIDE INTRODUCTION The HI 902 automatic titrator is designed to perform a wide variety of potentiometric titrations with high accuracy, flexibility and reproducibility, allowing the user to obtain both accurate results and high-speed analysis. The titrators can perform fixed endpoint or equivalence point titrations by measuring the pH/ mV and temperature of the sample. -
Page 5: Safety Measures
QUICK START GUIDE SAFETY MEASURES The following safety measures must be followed: 1. Always ensure that the power supply cable is connected to a grounded main power plug. 2. Never connect or disconnect the pump assembly with the titrator turned on. 3. -
Page 6: Titrator Connections
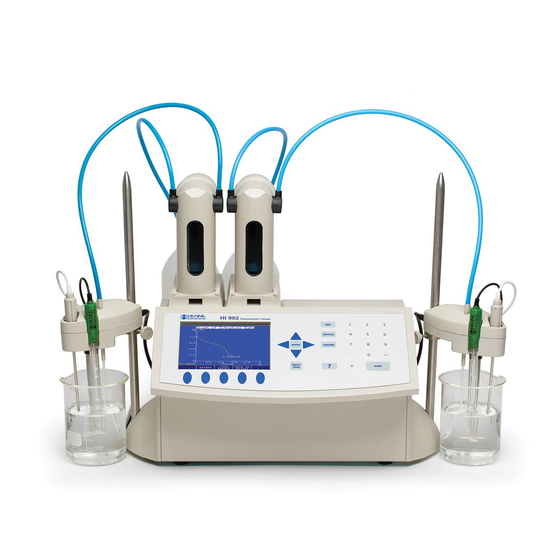
QUICK START GUIDE TITRATOR CONNECTIONS Front View Rear View www.ponpe.com sale@ponpe.com... -
Page 7: User Interface
QUICK START GUIDE USER INTERFACE Keypad The titrator keypad has 29 keys grouped in five categories, as follows: Display The titrator has a 7.5’’ graphical backlit display. The main screen is shown below with short explanations. The user interface contains several screens. In each screen, many information fields are present at the same time. -
Page 8: How To Select Your Language
The HI 902 titrator can store up to 100 methods. Standard Methods Each titrator is supplied with a package of standard methods. Standard method packs are developed at Hanna Instruments laboratories to meet analysis requirements of specific industries (e.g., water treatment, wine, dairy, etc.). User Defined Methods User defined methods allow the user to create and save their own methods. -
Page 9: How To Calibrate A Ph Electrode
QUICK START GUIDE HOW TO CALIBRATE A pH ELECTRODE To enter pH calibration mode, press then to enter pH mode. Once in pH mode, press to enter pH calibration mode. PREPARATION Pour small quantities pH 4.01, pH 7.01 and pH 10.01 buffer solutions into clean beakers. If possible, use plastic beakers to minimize any EMC interferences. -
Page 10: How To Perform A Titration
QUICK START GUIDE HOW TO PERFORM A TITRATION Required Solutions • Titrant - 500 mL of 0.1 M (mol/L) Sodium Hydroxide (NaOH) in a titrant bottle. • Sample - 0.1 mol/L Hydrochloric Acid (HCl). • Distilled or deionized water. Note: Analytical grade reagents and water should be used for accurate results. Priming the Burette •... - Page 11 QUICK START GUIDE Setting Method Parameters To display the method parameters, press . The View/Modify Method screen will be displayed. Only certain parameters can be changed. For this titration, the NaOH titrant concentration and the size of the HCl sample need to be entered.
- Page 12 QUICK START GUIDE Preparing the Sample • Add 50 to 65 mL of distilled / deionized water to the titration beaker. • Use a pipette or burette to add 5.0 mL of the sample (0.1M Hydrochloric Acid (HCl)) into the same beaker. •...
- Page 13 QUICK START GUIDE Viewing Graph During Titration After a few doses are dispensed will become active. Press to display the real-time titration graph. The curves displayed are plots of the pH and the 1 derivative versus Titrant Volume (for details, see the Instruction Manual). The two graphs are scaled to fit in the same screen window.
- Page 14 QUICK START GUIDE Results The results obtained from a titration are stored in a report file that can be viewed, transferred to a USB Storage Device or PC, or printed. Viewing the last titration data • From the main screen, press .
- Page 15 10:23 Apr 16, 2010 10.040pH -178.6mV 96.5% 21.9 10:25 Apr 16, 2010 GLP & Instrumentation Data Sample Name: Sample HCl-1 Company Name: Hanna Instruments Operator Name: Electrode Name: HI 1131 NO -2 Field 1: Any text Field 2: Any text Field 3:...
- Page 16 QUICK START GUIDE Stirrer Configuration: Stirrer 1 Dosing Type: D y n a m i c min Vol: 0.050 mL max Vol: 0.500 mL delta E: 20.000 mV End Point Mode: pH 1EQ point, 1st Der Recognition Options: Threshold: 50 mV/mL Range: Filtered Derivatives: Pre-Titration Volume:...
- Page 17 QUICK START GUIDE 1.590 223.0 3.066 -4.3 1 9 . 1 0 0 : 0 1 : 5 5 1.790 222.1 3.082 -4.6 1 9 . 1 0 0 : 0 2 : 0 1 1.990 221.2 3.098 -4.6 1 9 . 1 0 0 : 0 2 : 0 6 2.190 220.1...
- Page 18 QUICK START GUIDE www.ponpe.com sale@ponpe.com...
- Page 19 INSTRUCTION MANUAL HI 902 Color AUTOMATIC POTENTIOMETRIC TITRATOR Revision 2.00 www.ponpe.com sale@ponpe.com...
- Page 20 2.00 or later. © 2010 Hanna Instruments All rights are reserved. Reproduction in whole or in part is prohibited without the written consent of the copyright owner, Hanna Instruments Inc., 584 Park East Drive, Woonsocket, Rhode Island 02895, USA. www.ponpe.com sale@ponpe.com...
- Page 21 TABLE OF CONTENTS Chapter 1. INTRODUCTION Chapter 2. SETUP Chapter 3. USER INTERFACE Chapter 4. GENERAL OPTIONS Chapter 5. METHODS Chapter 6. TITRATION MODE Chapter 7. pH, mV and ISE MODE Chapter 8. AUXILIARY FUNCTIONS Chapter 9. MAINTENANCE, PERIPHERALS Appendix 1. TECHNICAL SPECIFICATIONS Appendix 2.
- Page 22 INTRODUCTION www.ponpe.com sale@ponpe.com...
- Page 23 INTRODUCTION INTRODUCTION HI 902 is an automatic potentiometric titrator with high accuracy, great flexibility and repeatability. The titrator is designed to perform a variety of potentiometric titrations, allowing the user to obtain both good results and high-speed analysis. The main attributes of this titrator are: Flexibility Support up to 100 titration methods (standard and user defined).
- Page 24 INTRODUCTION www.ponpe.com sale@ponpe.com...
- Page 25 SETUP Chapter 2. Contents SETUP ....................2 - 3 Unpacking ..................... 2 - 3 Safety Measures ................... 2 - 4 Installation ................... 2 - 5 2.3.1 Titrator Front View ................... 2 - 5 2.3.2 Titrator Rear View ..................2 - 5 2.3.3 Titrator Left-side View ................
-
Page 26: Setup
SETUP www.ponpe.com sale@ponpe.com... - Page 27 SETUP SETUP Unpacking The titrator and the accessories are shipped in a single box containing: ITEM QUANTITY Titrator ................1 pcs Pump Assembly ..............1 pcs Burette Assembly ..............1 pcs • Burette (with 25-mL syringe) • Aspiration Tube with Fitting and Protection Tube •...
-
Page 28: Safety Measures
SETUP Safety Measures The following safety measures must be followed: 1. Always ensure that the power supply cable is connected to a grounded main power plug. 2. Never connect or disconnect the pump assembly with the titrator turned on. 3. Verify that the burette and the attached tubing are assembled correctly (see Section 9.1, Burette Maintenance for more details). -
Page 29: Installation
SETUP Installation 2.3.1 Titrator Front View 2.3.2 Titrator Rear View www.ponpe.com sale@ponpe.com... -
Page 30: Titrator Left-Side View
SETUP 2.3.3 Titrator Left-side View 2.3.4 Titrator Assembly Note: Assembly operations must be completed before connecting the titrator to the power supply! 2.3.4.1 Assembling Stirrer Stand and Support To assemble the stirrer stand and support: • Remove the screws (B) from the titrator base (A). •... -
Page 31: Attaching Stirrer
SETUP 2.3.4.2 Attaching Stirrer To attach the stirrer to the titrator, follow these steps: • Attach the propeller (B) to the stirrer (A) by pressing it onto the stirrer shaft. • Insert the electrode (C) and temperature sensor (D) into the dedicated holes on the stirrer. -
Page 32: Connecting The Pump
SETUP 2.3.4.3 Connecting the Pump To connect the pump, follow these steps: • Retrieve the pump cable from inside the bay. The pump 1 connector is located in the left bay. • Connect the cable (A) to the pump as shown below. The pump connector (B) is located in the lower part of the pump, near the motor. -
Page 33: Attaching The Burette
SETUP 2.3.4.5 Attaching Burette Make sure that the mark from the valve actuating cap and from the burette body are aligned as shown in Figure 2. Figure 2 While ensuring the correct coupling between the syringe plunge (1) and the pump piston (2) (Figure 3), slide the burette into the support on the burette pump (Figure 4). -
Page 34: Electrical Connections
SETUP 2.3.4.6 Electrical Connections • Connect the electrode to the BNC connector (K). • Connect the temperature sensor to the RCA connector (C). • Connect the stirrer to the MINI-DIN connector (D). • Connect the power-supply cable to the power supply connector (B). Nr Function Type of Connector Power switch... - Page 35 USER INTERFACE Chapter 3. Contents USER INTERFACE ..................3-3 Start Up ....................3-3 Description ....................3-4 3.2.1 Keypad ......................3 - 4 3.2.1.1 Function Keys ....................3 - 4 3.2.1.2 Option Keys ....................... 3 - 4 3.2.1.3 Arrow Keys ....................... 3 - 5 3.2.1.4 Numeric Keys ....................
-
Page 36: User Interface
USER INTERFACE www.ponpe.com sale@ponpe.com... -
Page 37: Start Up
USER INTERFACE USER INTERFACE Start Up Once the instrument is assembled and installed, follow the steps below to start the titrator: • Connect the instrument to an outlet equipped with a ground wire. Make sure that the voltage of the main power matches that specified by the titrator. •... -
Page 38: Description
USER INTERFACE Description This chapter describes the basic principles of navigating through the user interface, selecting fields and entering values from the keypad. 3.2.1 Keypad The titrator’s keypad is grouped into five categories, as follows: 3.2.1.1 Function Keys If one of these keys is pressed, the associated function is immediately performed. Some of the keys are active only in specific screens: Starts or stops a titration Turns the stirrer ON and OFF... -
Page 39: Arrow Keys
USER INTERFACE 3.2.1.3 Arrow Keys These keys have the following functions: • Move the on-screen cursor. • Increase and decrease the stirrer speed and other settings. • In the alphanumeric screen, to select a character. • Navigate through menu options. 3.2.1.4 Numeric Keys Keys... -
Page 40: The Main Screen
USER INTERFACE The user interface contains several screens. For each titrator function, one or more screens are used. 3.2.3 The Main Screen After start up and initialization, the first screen displayed is the main screen. Main screen fields: Method name: Displays the name of the selected method. -
Page 41: Menu Navigation
USER INTERFACE 3.3 Menu navigation 3.3.1 Selecting an Option To select an option, simply press the option key below the virtual key. For example, to access the Method Options screen press the option key below it. 3.3.2 Selecting a Menu Item To select an item from the menu screen use the arrow keys to move the cursor. -
Page 42: Saving Modifications
USER INTERFACE 3.3.4 Saving Modifications The Saving Method screen allows the user to save the modifications. To exit from Saving Method screen without saving, press or highlight the Exit Without Saving Method option and then press . To save the modifications highlight the Save Method option and then press Note: To access the contextual help menu, press at any time. - Page 43 GENERAL OPTIONS Chapter 4. Contents GENERAL OPTIONS ................4 - 3 Temperature ..................4 - 3 4.1.1 Temperature Source ..................4 - 4 4.1.2 Manual Temperature Setting ...............4 - 4 4.1.3 Temperature Units ..................4 - 5 Date and Time Setting ................. 4 - 5 Display Settings ..................
-
Page 44: General Options
GENERAL OPTIONS www.ponpe.com sale@ponpe.com... -
Page 45: Temperature
GENERAL OPTIONS GENERAL OPTIONS The General Options screen gives access to options that are not directly related to the titration process or pH / mV / ISE measurement. To access this screen, press from the main screen. The available menus are described below: Temperature The Temperature Menu allows access to all of the settings related to temperature. -
Page 46: Temperature Source
GENERAL OPTIONS 4.1.1 Temperature Source Select the temperature source used for temperature compensation. When Automatic Temperature Compensation is selected “ATC” is displayed on the main screen and the temperature is read by the temperature probe. When Manual Temperature is selected “Manual” is displayed on the main screen and a preset temperature value is used for temperature compensation. -
Page 47: Temperature Units
GENERAL OPTIONS 4.1.3 Temperature Units The following temperature units can be selected. The temperature ranges are as displayed in the Temperature Units screen. Date and Time Setting This screen allows the user to set the date and time. Use the keys or the numeric keys to modify the date and time. -
Page 48: Display Settings
GENERAL OPTIONS Display Settings This screen allows the user to customize the display settings. Option Keys: Increases the backlight saver time interval Decreases the backlight saver time interval The backlight intensity can be adjusted using keys. There are 8 levels of backlight intensity, ranging from 0 to 7. A color palette is displayed in the center of the screen allowing an easy selection of the appropriate backlight intensity. -
Page 49: Beeper
GENERAL OPTIONS Beeper This screen allows the user to be turn the Beeper On (Enable) or Off (Disable). The beeper will sound after a titration is completed, when an invalid key is pressed or when a critical error occurs during titration. Stirrer This screen allows the stirrer to be enabled or disabled. -
Page 50: Language
GENERAL OPTIONS Language Select an available language. Total Volume Alert This screen allows a programmable reminder to appear when the titrant reservoir is below 100 mL. The titrant volume will decrease as the titrant is used. The “Low Titrant Volume” reminder message will appear when the available titrant volume is under 100 mL. -
Page 51: Titrant Age Reminder
GENERAL OPTIONS Titrant Age Reminder A programmable reminder will appear when it is time to verify the titrant concentration or to change the titrant. The “Check Titrant Concentration” reminder will appear when the set number of days has passed since the total volume alert was set or since the timer was started. The reminder can be disabled by pressing The range is from 0 to 31 days. -
Page 52: Restore Files From Usb Storage Device
GENERAL OPTIONS The option keys allow the following operations: Deletes the highlighted file Deletes all currently displayed files Copies the highlighted file from titrator to a USB storage device Copies all currently displayed files from titrator to a USB storage device Returns to the General Options screen The status of the transfer (“successful”... -
Page 53: Usb Link With Pc
GENERAL OPTIONS The file types that can be transferred are: Standard Method Files - HIXXXXYY.MTD (e.g.: HI0001EN.MTD, HI1004EN.MTD) User Method Files - USERXXXX.MTD (e.g.: USER0001.MTD) Report Files - Ti_XXXXX.RPT, mV_XXXXX.RPT, pH_XXXXX.RPT, ISEXXXXX.RPT, mVrXXXXX.RPT (e.g.: Ti_00001.RPT, mV_00001.RPT, pH_00001.RPT, ISE00001.RPT, mVr00001.RPT Use the keys to select the file type. -
Page 54: Setup Balance Interface
GENERAL OPTIONS 4.12 Setup Balance Interface This screen allows the users to connect an analytical balance for automatic acquisition of sample mass prior to titration or standardization. The balance is connected to the titrator via RS 232 interface. Press to add a new balance to the list. Press to enable the balance interface feature. -
Page 55: Printer Mode
GENERAL OPTIONS 4.13 Printer Mode This screen allows the users to select the printing mode: Ansi (default), Ascii and Text mode. Ansi mode: Use this mode when your printer is set as Ansi. In this case all the accented characters / symbols available in titrator will be printed on your printer. -
Page 56: Update Software
GENERAL OPTIONS 4.15 Update Software This screen allows the user to update the titrator software from a USB storage device containing a software setup kit. 4-14 www.ponpe.com sale@ponpe.com... - Page 57 METHODS Chapter 5. Contents METHODS ....................5 - 3 Selecting Methods ................5 - 3 Standard Methods ................. 5 - 4 5.2.1 Upgrading Standard Methods ..............5 - 4 5.2.2 Deleting Standard Methods ................ 5 - 4 5.2.3 Restore the Standard Methods to the Manufacturer Settings ......5 - 5 User Methods ..................
- Page 58 METHODS 5.5.10 Measurement Mode .................. 5 - 22 5.5.10.1 Signal Stability ..................5 - 22 5.5.10.2 Timed Increment ................5 - 24 5.5.11 Electrode Type .................... 5 - 25 5.5.12 Blank Option ....................5 - 25 5.5.13 Calculations .................... 5 - 26 5.5.13.1 No Formula (mL only) ................
-
Page 59: Methods
METHODS METHODS All of the parameters required to complete an analysis are grouped into a method. The titrator is supplied with a pack of standard methods. Standard and user methods can be upgraded, saved or deleted by connecting the titrator to a PC using the HI900 PC application or a USB storage device. -
Page 60: Standard Methods
METHODS Standard Methods The standard methods are developed for the most common types of analysis. Only specific method parameters can be modified by the user (see section 5.5 Method Options ). Also, standard methods can be used as models to create new user methods. 5.2.1 Upgrading Standard Methods To upgrade the titrator with new standard methods, follow the steps below:... -
Page 61: Restore The Standard Methods To The Manufacturer Settings
METHODS 5.2.3 Restore the Standard Methods to the Manufacturer Settings You can restore the standard methods to the manufacturer setting by highlighting a standard method and pressing User Methods These methods are defined by the user (usually by modifying a standard method). The user methods can be developed in accordance with the requirements of the user. -
Page 62: Deleting User Methods
METHODS Note: Only a limited number of user methods can be generated. The titrator can hold 100 methods (standard and user). When it is reached a warning message will be displayed. 5.3.2 Deleting User Methods To remove a user method, press from the main screen. -
Page 63: Method Options
METHODS To exit the View / Modify Method screen, press You can choose to save the modifications or to discard them. Method Options 5.5.1 Naming the User Method This option allows you to enter a name for the new method (up to 24 characters). Use the arrow keys to navigate through the character table. -
Page 64: Method Revision
METHODS 5.5.2 Method Revision This option allows you to enter a string representing the current method revision. The revision string format should be “X.Y”, where X and Y are numerical digits. 5.5.3 Titration Type In order to perform an analysis you have to choose the type of titration: Standard Titration •... -
Page 65: Pump Configuration
METHODS If the Back Titration option is chosen, the following option must be set: Note: Selecting “YES” will stop titration temporarily between the first and the second phase of the back titration. A break in the titrant will allow you to perform a task related to the analysis (e.g.: boiling the sample to remove carbon dioxide). -
Page 66: Dosing Type
METHODS 5.5.5 Dosing Type The Titrator has two dosing types: Linear Dosing and Dynamic Dosing . 5.5.5.1 Linear Dosing Linear dosing dispenses a pre-defined volume of titrant with every addition (see graph). Linear Dosing The Linear Dosing option is recommended for titrations with a slower reaction rate, difficult nonaqueous titrations, and specific applications. -
Page 67: Dynamic Dosing
METHODS To set the dosing volume, select Linear Dosing and enter the optimum dose. Dosing volume ranges are: 5 mL burette 0.001 4.500 mL 10 mL burette 0.001 9.000 mL 25 mL burette 0.005 22.500 mL 5.5.5.2 Dynamic Dosing The titrator determines the titrant dose by trying to maintain a certain potential change (delta E) with each addition. - Page 68 METHODS Dynamic dosing allows for larger doses far from the endpoint, reducing the total titration time. Closer to the end point, smaller doses are made, providing more data and improved accuracy. The following parameters must be set: min Vol: The smallest dose to be dispensed during a titration. The min Vol must be greater than or equal to: 0.001 mL for a 5 mL burette...
-
Page 69: End Point Mode
METHODS 5.5.6 End Point Mode 5.5.6.1 Fixed End Point (pH or mv) Fixed End Point (pH): The titration is terminated when the preset pH value has been exceeded. The end point volume is a calculated value based on the dispensed volume when pH is under the preset value and the dispensed volume when pH exceeded the preset value. -
Page 70: Equivalence End Point (Ph Or Mv)
METHODS Fixed End Point (mV): The end point detection algorithm is the same as for pH, but the threshold value is expressed in mV. The range is from - 2000.0 to 2000.0 mV. 5.5.6.2 Equivalence End Point (pH or mV) The titration is normally terminated when the equivalence point is detected (the point where the added quantity of titrant equals the quantity of analyte present in the sample). - Page 71 METHODS Number of Equivalence Points Up to 5 equivalence points can be detected. End Point Determination The first and the second derivative of the S-shaped titration curve can be used to detect the equivalence point. The equivalence point detection algorithm requires three additional titrant doses to be dispensed after the equivalence point is reached.
- Page 72 METHODS 1st Derivative: When first derivative is used to recognize the equivalence point, the titration curve inflection point (EQP) is the point where the first derivative reaches its maximum value. The detection algorithm looks for the maximum value of the first derivative. The first derivative must be greater than the threshold value at the maximum point (see Recognition Options on page 5-17).
-
Page 73: Recognition Options (Equivalence End Point (Ph Or Mv) Only)
METHODS 2nd Derivative: When second derivative is used to recognize the equivalence point, the titration curve inflec- tion point (EQP) is the point where the second derivative crosses zero. The detection algorithm looks for the point where the second derivative changes sign. The checked point, or first derivative, must be greater than the threshold value (see Recogni- tion Options on page 5-17). -
Page 74: Threshold
METHODS 5.5.7.1 Threshold This parameter must be set by the user according to the analysis. The threshold represents the absolute value of the first derivative, expressed in mV/mL, below which the detection algorithm does not search for the equivalence point. Range is between 1 and 9999 mV/mL. -
Page 75: Range
METHODS 5.5.7.2 Range Range is an optional feature for equivalence point recognition. The titrator will only look for an equivalence point between the set values. The Range option can be enabled by selecting YES in the Range Options screen. pH Range -2.000 to 20.000 mV Range -2000.0 to 2000.0... -
Page 76: Filtered Derivatives
METHODS 5.5.7.3 Filtered Derivatives This option adds a filtering procedure in the 1 and 2 derivative computation algorithm that reduces the influence of pH or mV noise. The Filtered Derivatives option can be enabled by selecting YES in the Filtered Derivatives Option screen. -
Page 77: Pre-Titration Stir Time
METHODS To disable a pre-titration volume, enter 0.000 mL. Note: A pre-titration volume is highly recommended whenever possible. Fewer doses will considerably shorten the overall titration duration. 5.5.9 Pre-Titration Stir Time When enabled, the sample is mixed for a set period of time before any titrant is added. This allows the sample to become homogeneous. -
Page 78: Measurement Mode
METHODS 5.5.10 Measurement Mode During titration, the acquisition of the potential (mV) value of the solution can be done in two ways: by using either Signal Stability or Timed Increment option. 5.5.10.1 Signal Stability When Signal Stability is selected, the titrator acquires the potential (mV) only when stable conditions are reached. - Page 79 METHODS If the stability condition is not reached and the maximum (t max) wait time has elapsed, the potential is acquired. delta E - maximum change in potential during delta t The range is from 0.1 to 99.9 mV. delta t - the time interval during which the potential is measured.
-
Page 80: Timed Increment
METHODS 5.5.10.2 Timed Increment When Timed Increment is selected, the titrator acquires the potential (mV) at a fixed time interval (no signal stability check). The time period between two acquisitions must be set according to the reaction and the response time of the electrode. The range is from 2 to 180 seconds. -
Page 81: Electrode Type
METHODS 5.5.11 Electrode Type Enter the type of the electrode, up to 24 characters. The electrode type will appear in the titration report. 5.5.12 Blank Option This feature allows the user to select the procedure for the blank calculations (where V is the volume of titrant dispensed during the titration and Blank is the volume of titrant consumed by the blank sample). -
Page 82: Calculations
METHODS 5.5.13 Calculations The final result is computed using the end point volume (titrant volume at the equivalence point or at the fixed end point), and a formula selected by the user. Edit Variable Values This option allows the user to edit the variables in a previously selected calculation. For each formula, selected variables can be changed. -
Page 83: Sample Calculation By Weight
METHODS 5.5.13.3 Sample Calculations by Weight This calculation is used when the concentration of an analyte is determined by the weight of the sample. The results are based on the initial sample weight (in grams). When you choose this formula, select the Titrant Unit first and then the Final Result Unit . The titrator will calculate the results based on the selected units. -
Page 84: Sample Calculation By Volume
METHODS A formula example is shown below using M (mol/L) as the titrant unit and g/kg as the final result unit: Variables can be set according to the amount of sample and titrant used. 5.5.13.4 Sample Calculations by Volume This calculation is used when the concentration of an analyte is determined in terms of the volume of sample. - Page 85 METHODS Final Result Units: ppt (g/L) parts per thousand (grams/liter) ppm (mg/L) parts per million (milligrams/liter) ppb (µg/L) parts per billion (micrograms/liter) M (mol/L) Molarity (moles/liter) N (eq/L) Normality (equivalents/liter) mg/L milligrams/liter µg/L micrograms/liter mmol/L millimoles/liter mg/mL milligrams/milliliter mg/100 mL milligrams/100 milliliters g/100 mL grams/100 milliliters...
-
Page 86: Standardize Titrant By Weight
METHODS 5.5.13.5 Standardize Titrant by Weight This calculation is used when the concentration of the titrant is determined using a solid standard. Determination of the titrant concentration is based on the primary standard weight (in grams). The calculation is based on the selected titrant unit. If the titrant unit is M (mol/L), the formula used to calculate the result is displayed below: 5.5.13.6 Standardize Titrant by Volume This calculation is used when the concentration of the titrant is determined using a primary... - Page 87 METHODS Final Result Units: ppt (g/kg) parts per thousand (grams/kilogram) ppt (g/L) parts per thousand (grams/liter) parts per million (milligrams/kilogram) ppm (mg/L) parts per million (milligrams/liter) parts per billion (micrograms/kilogram) ppb (µg/L) parts per billion (micrograms/liter) % (g/100 g) percentage in weight (grams/100 grams) M (mol/L) Molarity (moles/liter) mg/g...
- Page 88 METHODS Where: C = the concentration of the titrant F1 = general factor F2 = general factor F3 = general factor = sample size, in grams or milliliters V = the volume delivered, in liters, to reach the preset or equivalence end point (determined by the titrator) General factors: Weight Conversion:...
-
Page 89: Back Titrations
METHODS 5.5.13.8 Back Titrations 5.5.13.8.1 Sample Calculations by Weight Select the titrant 1 unit, the titrant 2 unit, and the final result unit. 5-33 www.ponpe.com sale@ponpe.com... - Page 90 METHODS A formula example is shown below using M (mol/L) as the titrant 1 units, M (mol/L) as the titrant 2 units, mg/g and the final result units. This formula is used to calculate the amount of titrant 1 to dispense: The formula is based on the assumption that the sample concentration is 100% w/w.
-
Page 91: Sample Calculation By Volume
METHODS When all of the variables are set, press to proceed with the “Calculating Sample Concentration” formula: 5.5.13.8.2 Sample Calculations by Volume Select the titrant 1 unit, titrant 2 unit, and the final result unit. 5-35 www.ponpe.com sale@ponpe.com... - Page 92 METHODS After you have selected the titrant 1, titrant 2, and the final result units, the titrator will display a screen with a formula used to calculate the amount of titrant 1 (used in the first stage of back titration) to be dispensed. The formula is based on the assumption that the sample concentration is 100% v/v.
-
Page 93: Generic Formula
METHODS When all the variables are set, press to proceed with the “Calculating Sample Concentration” formula: 5.5.13.8.3 Generic Formula This option allows the user to define their calculation formula for the “Direct Titration Volume”, “Calculating Excess Volume of Titrant 1” and “Final Sample Concentration” in a solid or liquid sample. -
Page 94: Titrant Name
METHODS The sample size used in the calculations: Analyte size to be diluted * Aliquot Volume Final Dilution Volume 5.5.15 Titrant Name Enter the name of the titrant (up to 24 characters). This name will appear in the titration report. 5.5.16 Titrant Concentration Enter the concentration of the titrant to be used. -
Page 95: Fixed Weight Or Volume
METHODS 5.5.18.1 Fixed Weight or Volume Each titration will use a set weight or volume in the calculations. 5.5.18.2 Manual Weight or Volume Each titration the exact weight or volume can be entered. The titrator will prompt for the analyte weight volume at the beginning of each titration. 5.5.18.3 Same as previous (Linked Method Only) The same weight or volume is used for both methods. -
Page 96: Maximum Titrant Volume
METHODS 5.5.20 Maximum Titrant Volume The maximum titrant volume used in the titration must be set according to the analysis. If the titration end point (fixed or equivalence End Point) is not reached, the titration will be terminated after the maximum titrant volume has been dispensed. The error message (“Lim- its Exceeded”) will appear on the display. -
Page 97: Potential Range
METHODS 5.5.22 Potential Range The input potential range can be set by the user. The titration will be terminated and an error message will appear if the potential is outside these limits. These limits provide protection against a titration that does not generate an end point due to potential over-range. -
Page 98: Signal Averaging
METHODS 5.5.24 Signal Averaging This option enables filtering on the mV/pH reading. If 1 Reading is selected, the filtering is disabled. The titrator will take the last reading and place it into a “moving window” along with the last 2, 3 or 4 readings (depending on the selected option). -
Page 99: Linked Method
METHODS Linked Method 5.5.26 This option allows the user to link two titration methods. If No Link is selected only the current method will run. If a method is selected it will run after the current method. See Appendix 4 for additional information. 5.6 Printing To print method parameters, press from the main screen. - Page 100 METHODS 5-44 www.ponpe.com sale@ponpe.com...
- Page 101 TITRATION MODE Chapter 6. Contents TITRATION MODE .................6 - 3 Running a Titration ................6 - 3 6.1.1 Starting a Titration ................... 6 - 3 6.1.2 Suspending a Titration ................6 - 3 6.1.3 Viewing the Titration Curve ................. 6 - 3 Stopping a Titration ................
- Page 102 TITRATION MODE www.ponpe.com sale@ponpe.com...
- Page 103 TITRATION MODE TITRATION MODE Running a Titration Before beginning a titration, make sure that the following conditions are met: • At least one pump is properly installed. • A burette is inserted in the pump and filled with titrant. • The aspiration tube is inserted in the titrant bottle and primed. The dispensing tube is over the titration beaker.
- Page 104 TITRATION MODE The potentiometric curve and the derivative curve are scaled to fit simultaneously inside the display. When a titration end point is successfully detected, the volume is displayed on the graph and marked with an “x”: The contents of the graph as related to an end point type are as follows: Equivalence End Point (pH) - the pH readings and the selected derivative vs.
- Page 105 TITRATION MODE - changes the y-axis scale to either the mV (or pH) readings or the selected derivative values (of mV or pH). Available only for titrations with equivalence endpoints. - allows you to save the graph as a bitmap file. Available only when the titration is finished.
- Page 106 TITRATION MODE www.ponpe.com sale@ponpe.com...
- Page 107 pH, mV & ISE MODE pH, mV & ISE MODE Chapter 7. Contents pH, mV & ISE MODE ................7 - 3 pH Mode ....................7 - 4 7.1.1 Display ....................7 - 4 7.1.2 pH Setup....................7 - 5 7.1.2.1 Buffer Entry Type ..................7 - 5 7.1.2.2 First Calibration Point ..................7 - 6 7.1.2.3 Edit Custom Buffers ................
- Page 108 pH, mV & ISE MODE 7.3.2.4 Edit Custom Standards .................. 7 - 22 7.3.2.5 Edit Standard Group ..................7 - 22 7.3.2.6 Calibration Reminder ..................7 - 23 7.3.2.7 Set Reminder Period ..................7 - 23 7.3.2.8 Clear Calibration .....................7 - 24 7.3.2.9 ISE GLP Data ....................7 - 24 7.3.2.10 Electrode Type ....................7 - 25 7.3.2.11 Concentration Unit ..................7 - 26 7.3.2.12 Logging Interval ....................7 - 26...
-
Page 109: Ph, Mv & Ise Mode
pH, mV & ISE MODE pH, mV & ISE MODE 7 pH, mV & ISE MODE By pressing from the main screen, the titrator can be switched to Titrator, pH, mV or ISE modes. One Analog Board Switches to Titrator mode. Switches to pH mode. -
Page 110: Ph Mode
pH MODE pH, mV & ISE MODE pH Mode 7.1.1 Display The pH screen is shown below with short explanations of the screen segments. pH Mode Option keys: The General Options screen gives access to options that are not directly related to the measurement process (see chapter 4 General Options for more information). -
Page 111: Ph Setup
pH, mV & ISE MODE 7.1.2 pH Setup To access the pH Setup, press option key while in pH mode. keys to highlight the desired option. Press to access the selected option. 7.1.2.1 Buffer Entry Type Select the pH buffer entry mode used for calibration: Automatic - the instrument automatically selects the pH calibration point as the closest buffer from the predefined Buffer Group (see section 7.1.2.4 Edit Buffer Group ). -
Page 112: First Calibration Point
pH, mV & ISE MODE 7.1.2.2 First Calibration Point Two options are available for the First Calibration Point: Point and Offset . If Point option is selected, the slope values adjacent to the calibration points will be reevaluated (normal calibration). If at least a two-point calibration has been performed and an offset correction is needed, perform a one-point calibration using the Offset option. -
Page 113: Edit Buffer Group
pH, mV & ISE MODE • Use keys to select the desired buffer. • Press to invalidate the selected buffer. • Press to edit the selected buffer; use the numeric keys to edit the buffer values. • Press to save the value. •... -
Page 114: Calibration Reminder
pH, mV & ISE MODE 7.1.2.5 Calibration reminder In order to have accurate readings, the electrode must be calibrated frequently. Three options are available for calibration reminder: Daily - the calibration reminder will appear daily at specified time. Periodic - the calibration reminder will appear after the set time has elapsed since the last calibration. -
Page 115: Clear Calibration
pH, mV & ISE MODE • Press to move the cursor to the next field. • Press to save the changes or to return to the previous screen. • Press to disable the calibration reminder and return to pH setup. 7.1.2.7 Clear Calibration This option clears the existing pH calibration for the selected channel. -
Page 116: Logging Interval
pH, mV & ISE MODE 7.1.2.9 Logging Interval Set the logging interval to be used for automatic logging. 7.1.2.10 Stability Criteria Select the signal stability criteria: Fast quicker results with less accuracy Medium medium speed results with medium accuracy Accurate slower results with high accuracy 7-10 www.ponpe.com... -
Page 117: Ph Resolution
pH, mV & ISE MODE 7.1.2.11 pH Resolution Set the desired pH resolution: one(x.x), two (x.xx) or three (x.xxx) decimals. 7.1.2.12 Stirrer Configuration Set the stirrer configuration: Stirrer 1, Stirrer 2, or Disabled. 7-11 www.ponpe.com sale@ponpe.com... -
Page 118: Stirring Speed
pH, mV & ISE MODE 7.1.2.13 Stirring Speed The stirring speed for the selected stirrer can be set. 7.1.3 pH Calibration Calibrate the instrument often, especially if high accuracy is required. The instrument should be recalibrated: • Whenever the pH electrode is replaced. •... - Page 119 pH, mV & ISE MODE buffer solution: one for rinsing the electrode and one for calibration. If you are measuring in the acidic range, use pH 7.01 or 6.86 as the first buffer and pH 4.01/3.00 or 1.68 as the second buffer.
- Page 120 pH, mV & ISE MODE In ATC mode, the pH value can be modified by pressing If the Automatic buffer entry type was selected for the calibration procedure, the instrument will automatically select the closest buffer to the measured pH value from the edit buffer group (see section 7.1.2.4 Buffer Group Edit).
-
Page 121: Mv Mode
pH, mV & ISE MODE mV Mode 7.2.1 Display The mV screen is shown below. mV Mode Option Keys: The General Options screen gives you access to options that are not directly related to the measurement process (See chapter 4 General Options for more information). Stores the current mV reading (see section 7.4.2 Manual Logging ). -
Page 122: Clear Relative Mv Offset
pH, mV & ISE MODE 7.2.2.1 Clear Relative mV Offset Clear the relative mV offset and return to absolute mV measurement. • Press to clear the relative mV offset or to return to the previous screen. 7.2.2.2 Logging Interval Set the logging interval. 7-16 www.ponpe.com sale@ponpe.com... -
Page 123: Stability Criteria
pH, mV & ISE MODE 7.2.2.3 Stability Criteria Select the signal stability criteria: Fast quicker results with less accuracy Medium medium speed results with medium accuracy Accurate slower results with high accuracy 7.2.2.4 Stirrer Configuration Set the stirrer configuration: Stirrer 1, Stirrer 2, or Disabled. 7-17 www.ponpe.com sale@ponpe.com... -
Page 124: Stirring Speed
pH, mV & ISE MODE 7.2.2.5 Stirring Speed The stirring speed for the selected stirrer can be set. 7.2.3 mV Rel Calibration • Press to accept the value. • Press to delete the last digit. • Press to cancel this operation and return to the previous screen. 7-18 www.ponpe.com sale@ponpe.com... -
Page 125: Ise Mode
pH, mV & ISE MODE ISE Mode 7.3.1 Display The ISE screen is shown below. ISE Mode option keys: The General Options screen gives access to options that are not directly re- lated to the measurement process (see chapter 4 General Options for more information). -
Page 126: Ise Setup
pH, mV & ISE MODE 7.3.2 ISE Setup To access the ISE Setup, press option key in ISE mode. 7.3.2.1 Calibration Group Selecting the set of available standards to be used in calibration: All standards: the set of available standards includes the Standard Solutions and Custom Solutions. -
Page 127: Temperature Compensation
pH, mV & ISE MODE 7.3.2.2 Temperature Compensation Enable or disable temperature compensation for ISE measurements. Note: If you enabled Temperature Compensation, then the isopotential point must be set. 7.3.2.3 Isopotential Point This option is available only if temperature compensation is enabled. This option allows the user to set an isopotential point for the selected electrode. -
Page 128: Edit Custom Standards
pH, mV & ISE MODE 7.3.2.4 Edit Custom Standards Edit the custom standard list. Up to five can be used in calibration. • Use the keys to select the standard. • Press to invalidate the standard. • Press to edit the selected custom standard; use the numeric keys to edit the standard. -
Page 129: Calibration Reminder
pH, mV & ISE MODE • Press to add/remove the selected standard to/from standard Group. • Press to return to ISE Setup menu. 7.3.2.6. Calibration Reminder In order to have accurate readings, the electrode must be calibrated frequently. Three op- tions are available for the calibration reminder: Daily - the calibration reminder will appear daily at specified time. -
Page 130: Clear Calibration
pH, mV & ISE MODE • Press to move the cursor to the next field. • Press to save the changes or to return to the previous screen. • Press to disable the calibration reminder and return to pH setup. 7.3.2.8 Clear Calibration This option clears the existing ISE calibration. -
Page 131: Electrode Type
pH, mV & ISE MODE 7.3.2.10 Electrode Type Select the Ion Selective Electrode used for measurements from a list: Ammonia, Bromide, Cadmium, Calcium, Carbon Dioxide, Chloride, Cupric, Cyanide, Fluoride, Iodide, Lead, Ni- trate, Potassium, Silver, Sodium, Sulfate, Sulfide or five custom ISEs. For the standard ISE it is possible to view the ion constants (Name, Molar Weight and Electric Charge/Slope), while for the custom ISE all these constants must be manually set. -
Page 132: Concentration Unit
pH, mV & ISE MODE 7.3.2.11 Concentration Unit Select the desired concentration unit for the measured ion or chemical compound. The available concentration units are: ppt (g/L), ppm (mg/L), ppb (µg/L), mg/mL, M (mol/L), mmol/L, %w/v or user defined. 7.3.3.12 Logging Interval Set the logging interval to be used. -
Page 133: Stability Criteria
pH, mV & ISE MODE 7.3.3.13 Stability Criteria This option allows the user to select the signal stability criteria for the measured parameters: Fast quicker results with less accuracy Medium medium speed results with medium accuracy Accurate slower results with high accuracy 7.3.3.14 ISE Significant Digits Select the number of significant digits to be displayed: one(x), two(xx) or three(xxx). -
Page 134: Stirrer Configuration
pH, mV & ISE MODE 7.3.2.15 Stirrer Configuration Set the stirrer configuration: Stirrer 1, Stirrer 2 or Disabled. 7.3.2.16 Stirring Speed The stirring speed for the selected stirrer can be set. 7.3.3 ISE Calibration It is recommended to calibrate the instruments frequently if high accuracy is required. The instrument should also be recalibrated whenever the “Calibrate Electrode”... - Page 135 pH, mV & ISE MODE For accurate calibration and to minimize cross-contamination, use two beakers for each standard solution: one for rinsing the electrode and one for calibration. Note: For accurate measurements, add the appropriate ISA (Ionic Strength Adjustment) to the calibration standards.
-
Page 136: Logging
pH, mV & ISE MODE Logging Data logging is available in pH, mV or ISE mode. It can be a single data point or a continuous timed log. To customize the logging report: to display the Data Parameters screen. • Press •... - Page 137 AUXILIARY FUNCTIONS Chapter 8. Contents AUXILIARY FUNCTIONS ................ 8 - 3 Burette ....................8 - 3 8.1.1 Prime Burette ....................8 - 4 8.1.2 Rinse Tip ....................8 - 5 8.1.3 Manual Dispense ..................8 - 5 8.1.4 Purge Burette ....................8 - 5 Stirrer .....................
-
Page 138: Auxiliary Functions
AUXILIARY FUNCTIONS www.ponpe.com sale@ponpe.com... -
Page 139: Burette
AUXILIARY FUNCTIONS AUXILIARY FUNCTIONS Burette To access the Burette screen, press from the main titration screen. Highlight the desired option and then press allows you to select the desired pump for burette operations (it is only active if two pumps are connected). www.ponpe.com sale@ponpe.com... -
Page 140: Prime Burette
AUXILIARY FUNCTIONS 8.1.1 Prime Burette The Prime Burette option is used to mechanically fill the burette before starting a set of titrations. The priming process consists of several cycles of filling and emptying the burette with titrant. Two rinse cycles of burette are shown in the figure below. The dispensing tube is connected on the right side and the aspiration tube on the left side. -
Page 141: Rinse Tip
AUXILIARY FUNCTIONS 8.1.2 Rinse Tip A 2 mL dose of titrant will be dispensed from the burette when this operation is selected. This operation will eliminate the air from the dispensing tip. 8.1.3 Manual Dispense Manual Dispense option allows a defined titrant volume to be dosed. Select the Manual Dispense option and press . -
Page 142: Stirrer
AUXILIARY FUNCTIONS The figures below show the steps in a purge burette operation. Stirrer The stirrer can be turned on and off by pressing The stirring speed is set within the method parameters (see section 5.5.17 Stirring Speed ). During the titration process, the stirring speed can be manually adjusted by using the keys. -
Page 143: Review Last Titration Report
AUXILIARY FUNCTIONS 8.3.1 Review Last Titration Report The last titration report can be reviewed. The titration graph can be reviewed by selecting The information seen in the report is based on the selections made in the Setup Titration Report screen. The following option keys are available: Review the titration graph. -
Page 144: Review Available Reports
AUXILIARY FUNCTIONS 8.3.2 Review Available Reports Up to 100 reports can be saved on the titrator. To view one of the saved reports, highlight a report and then press Report All of the saved reports can be reviewed and printed. The report contains only the information selected in the Setup Titration Report and Setup pH/mV/ISE Report screens during report configuration. -
Page 145: Instrumentation Data
AUXILIARY FUNCTIONS Sample Name Allows the sample name to be recorded in each report. The sample name will increase by one, with each new titration or logging report, if the last character is a number. Company Name Allows the company name to be recorded in each report. Operator Name Allows the operator name to be recorded in each report. -
Page 146: Logging Interval - Ph/Mv/Ise
AUXILIARY FUNCTIONS 8.3.5 Logging Interval – pH/mV/ISE Allows the user to setup a time interval for auto-logging while in pH, mV, or ISE mode (see section 7.3 Logging ). 8.3.6 Setup pH/mV/ISE Report Customize a unique report to record the pH, mV, and ISE measurements. An asterisk means that it will be included in the report. - Page 147 MAINTENANCE, PERIPHERALS Chapter 9. Contents MAINTENANCE, PERIPHERALS ............9 - 3 Burette Maintenance ................9 - 3 9.1.1 Burette Assembly ..................9 - 3 9.1.2 Changing the Burette .................. 9 - 3 9.1.3 Disassembling the Burette ................9 - 4 9.1.4 Assembling the Burette ................
-
Page 148: Maintenance, Peripherals
MAINTENANCE, PERIPHERALS www.ponpe.com sale@ponpe.com... -
Page 149: Burette Maintenance
MAINTENANCE, PERIPHERALS MAINTENANCE, PERIPHERALS The 25 mL burette included with the titrator exceeds the ISO 8655 standard for accurate delivery of liquids by a motor-driven piston burette. Burette Maintenance 9.1.1 Burette Assembly The burette is delivered with a 25 mL syringe inside and with all of the accessories mounted (see section 2.1 Unpacking for burette assembly details). -
Page 150: Disassembling The Burette
MAINTENANCE, PERIPHERALS 9.1.3 Disassembling the Burette The aspiration and the dispensing tubes have fittings and tube protectors. The aspiration tube will be mounted in the left side and the dispensing tube will be mounted in the right side of the burette. To remove the dispensing tube and the aspiration tube follow these steps: •... -
Page 151: Cleaning The Burette
MAINTENANCE, PERIPHERALS 9.1.5 Cleaning the Burette To clean the burette, follow these steps: • If the burette is filled with titrant, remove the aspiration tube from the titrant bottle and purge burette (see section 8.1.4 Purge Burette ). • Insert the aspiration tube into cleaning solution, deionized water or titrant solvent. •... - Page 152 MAINTENANCE, PERIPHERALS Warning: Avoid contacting the titrant with bare hands. Avoid spilling titrant. Clean the external side of the syringe and piston to remove aggressive chemicals. Do not touch the Teflon part of the piston or internal walls of the burette with bare hands or greasy materials.
- Page 153 MAINTENANCE, PERIPHERALS 9.1.6 Burette Preparation (Titrant Filling) Before starting a titration, the burette must be properly filled with titrant in order to obtain an accurate and repeatable result. To fill the burette, follow the next steps and recommenda- tions: • If necessary, clean the burette and make sure it is empty. •...
-
Page 154: Peripherals
MAINTENANCE, PERIPHERALS Fuse Replacement To replace the fuses, follow these steps: • Turn off the titrator. • Remove the power cord from the power connector located on the rear side of the titrator case. • With a screw driver open the fuse holder lid. •... -
Page 155: Connecting An External Display
MAINTENANCE, PERIPHERALS 9.3.1 Connecting an External Display The information shown on the titrator display can be viewed also on a Standard VGA display connected with a 15-pin cable, as presented below. Connect the external display to the display socket. Turn on the titrator and then the external display. 9.3.2 Connecting an External PC Keyboard This connection allows you to use an external PS/2 PC Keyboard in addition to the titrator’s... - Page 156 MAINTENANCE, PERIPHERALS The correspondence between the Titrator’s Keypad and the United States 101-type external keyboard are: External PC Keyboard (United States 101) Titrator Keypad Function Key F-1 Function Key F-2 Function Key F-3 Function Key F-4 Function Key F-5 Option Key 1 (from left to right) Function Key F-6 Option Key 2 (from left to right) Function Key F-7...
-
Page 157: Connecting A Printer
MAINTENANCE, PERIPHERALS 9.3.3 Connecting a Printer A variety of parallel printers can be connected to the parallel port of the titrator using a standard DB25–pin cable. Warning:The titrator and the external printer must be both turned OFF before they are connected. - Page 158 MAINTENANCE, PERIPHERALS Connect the cable to the USB port on the rear panel of the titrator. Connect the cable to the USB port on the PC. Select the USB Communication screen on the titrator following the path: General Options - USB Link with PC Launch the HI 900 PC application and then select the appropriate USB Port on the PC.
- Page 159 APPENDIX 1 Appendix 1. Contents TECHNICAL SPECIFICATIONS .............. A1-3 A1-1 www.ponpe.com sale@ponpe.com...
- Page 160 APPENDIX 1 A1-2 www.ponpe.com sale@ponpe.com...
- Page 161 APPENDIX 1 TECHNICAL SPECIFICATIONS Range - 2000.0 to 2000.0 mV Resolution 0.1 mV Accuracy ±0.1 mV Range - 2.000 to 20.000 pH Resolution 0.1 / 0.01 / 0.001 pH Accuracy ±0.001 pH Range 1x10 to 9.99x10 Resolution 1 / 0.1 / 0.01 Accuracy ±0.5% (monovalent ion) ±1.0% (divalent ion)
- Page 162 APPENDIX 1 Potentiometric Titrations: Acid-Base (pH or mV-Mode), Redox, Precipitation, Complexometric, Non-Aqueous, Ion-Selective, Argentometric. Titer Determination. Fixed mV or pH End Point Detection. Single Equivalence Point Detection, with the 1 or 2 Derivatives of the titration curve. Multiple Equivalence Point Detection Flexible Concentration Calculations, with many concentration units.
- Page 163 APPENDIX 2 Appendix 2. Back Titration BACK TITRATION ................A2-3 A2.1 Applicability Domain ................A2-3 A2.2 Method Principles ................A2-3 A2.3 Example of a Back Titration ............... A2-3 A2.3.1 Introduction ................... A 2 - 3 A2.3.2 Setting Up the Method Parameters ............A 2 - 4 A2.3.3 Preparing the Sample ................
- Page 164 APPENDIX 2 A2-2 www.ponpe.com sale@ponpe.com...
-
Page 165: Appendix 2. Back Titration
APPENDIX 2 BACK TITRATION A2.1 Applicability Domain Back titrations are generally used for one of the following reasons: • Reaction kinetics are too slow for the direct titration of the analyte; • The metal precipitates at the desired pH (complexometric titrations); •... -
Page 166: A2.3.2 Setting Up The Method Parameters
APPENDIX 2 A2.3.2 Setting Up the Method Parameters Use the following settings to program the method (see section 5.5 Method Options section): Name: Antacid Power Method Revision: Titration Type: Back-Titration Break at titrant change: Analog Board: Analog 1 Stirrer Configuration: Stirrer 1 Pump Configuration: Titrant 1 pump:... -
Page 167: A2.3.3 Preparing The Sample
APPENDIX 2 • Pump 2 - a burette filled with 1 M NaOH. A2.3.3 Preparing the Sample For this example commercial antacid pills were used. • Crush several pills with a mortar and pestle. From the crushed pills weight roughly 0.5 g into a 150 mL sample beaker. - Page 168 APPENDIX 2 • When this phase is completed, the titrator will stop and the Continue Back Titration screen is displayed. • Slide the stirrer assembly up. • Put the beaker on a hotplate. • Heat gently until all of the effervescence has ceased, then boil it for 1-2 minutes. Some of the inactive tablet material may not dissolve;...
- Page 169 APPENDIX 3 Appendix 3. Multiple Equivalence Point Titration MULTIPLE EQUIVALENCE POINTS ............A3-3 A3.1 Applicability Domain ................A3-3 A3.2 Performing a Titration ................. A3-3 A3.3 Example of a Multiple Equivalence Point Titration ......A3-4 A3-1 www.ponpe.com sale@ponpe.com...
- Page 170 APPENDIX 3 A3-2 www.ponpe.com sale@ponpe.com...
-
Page 171: Appendix 3. Multiple Equivalence Point Titration
APPENDIX 3 MULTIPLE EQUIVALENCE POINTS A3.1 Applicability Domain Multiple equivalence point titrations can be used to determine: • the component concentrations from a synthetic mixture (e.g.: Mixture of HCl, COOH, NH Cl); • the concentration of a polyprotic acid in its titratable ionization stages (e.g. H two equivalence points in aqueous medium). -
Page 172: A3.3 Example Of A Multiple Equivalence Point Titration
APPENDIX 3 A3.3 Example of a Multiple Equivalence Point Titration An example of a multi-equivalence point titrations is titrating a mixture of HCl, CH COOH and NH Cl with Sodium Hydroxide. During this type of titration the user is able to view the following information: •... - Page 173 APPENDIX 3 • On the graph, the equivalence points are marked with an “x” and titrant volume is displayed. • For the first equivalence point the volume of titrant is equal to the volume of titrant dispensed. • The volumes of each additional point (marked with an “x”) are calculated as the difference between the total volume dispensed to reach the current equivalence point and the sum of the previously detected equivalence points.
- Page 174 APPENDIX 3 A3-6 www.ponpe.com sale@ponpe.com...
- Page 175 APPENDIX 4 Appendix 4. Linked Method LINKED METHOD .................. A4-3 A4.1 Creating a Linked Method ..............A4-3 A4.2 Selecting a Linked Method ..............A4-6 A4.3 Running a Linked Titration Method ............. A4-7 A4-1 www.ponpe.com sale@ponpe.com...
- Page 176 APPENDIX 4 A4-2 www.ponpe.com sale@ponpe.com...
-
Page 177: Appendix 4. Linked Method
APPENDIX 4 LINKED METHOD A linked method allows two titrations to run sequentially. Note: Only user methods can be linked. A4.1 Creating a Linked Method To create a linked method use the following procedure: • From the main screen press and use the arrow keys to highlight the first method. - Page 178 APPENDIX 4 • Press to link the highlighted method to the current method or return to the previous screen. • The second titration can be started either “automatically” or “manually”. If Automatically is selected, the second titration will start immediately after the first titration has completed. No user input is required.
- Page 179 APPENDIX 4 • To access the method options for the second method, press • The analyte entry for Method 2 depends on the type of calculation. If both methods are using the same type of calculation (sample calculation by volume or by weight), the option for Same as Previous is available for Method 2.
-
Page 180: A4.2 Selecting A Linked Method
APPENDIX 4 • Once the linked method has been set up, press to save the new method and to return to the main screen. A4.2 Selecting a linked method All linked methods are moved to the top of the user method list and are noted with “*” next to the method number. -
Page 181: A4.3 Running A Linked Titration Method
APPENDIX 4 Use the arrow keys to highlight the method to be activated and press A4.3 Running a Linked Titration Method Press to begin the linked titration. After the completion of the first titration, the selected pump will return to the home position before the second titration is started. - Page 182 APPENDIX 4 When the second titration has finished, the results for both titrations will be shown on the screen. To start a new titration, press to return to the main screen. A4-8 www.ponpe.com sale@ponpe.com...
- Page 183 APPENDIX 5 Appendix 5. Contents ACCESSORIES ...................A5-3 A5.1 Solutions ...................A5-3 A5.1.1 pH Calibration Solutions ................A 5 - 3 A5.1.2 pH Calibration Solutions in FDA Approved Bottle ........A 5 - 3 A5.1.3 pH Technical Calibration Solutions ............A 5 - 3 A5.1.4 pH Millesimal Calibration Solutions ............A 5 - 3 A5.1.5...
- Page 184 APPENDIX 5 A5-2 www.ponpe.com sale@ponpe.com...
-
Page 185: A5 Accessories
APPENDIX 5 ACCESSORIES A5.1 Solutions A5.1.1 pH Calibration Solutions HI 7001M —> pH 1.68 Buffer Solution, 230 mL HI 7001L —> pH 1.68 Buffer Solution, 500 mL HI 7004M —> pH 4.01 Buffer Solution, 230 mL HI 7004L —> pH 4.01 Buffer Solution, 500 mL HI 7006M —>... -
Page 186: A5.1.6 Electrode Cleaning Solutions In Fda Approved Bottle
APPENDIX 5 HI 6004-01 —> pH 4.010 Buffer Solution, 1 L HI 6068 —> pH 6.862 Buffer Solution, 500 mL HI 6068-01 —> pH 6.862 Buffer Solution, 1 L HI 6007 —> pH 7.010 Buffer Solution, 500 mL HI 6007-01 —> pH 7.010 Buffer Solution, 1 L HI 6091 —>... -
Page 187: A5.1.10 Refilling Electrolyte Solutions In Fda Approved Bottle
APPENDIX 5 HI 7076 —> 1M NaCl Electrolyte, 30 mL HI 7078 —> Electrolyte, 30 mL HI 7082 —> 3.5M KCl Electrolyte, 30 mL, for double junction electrodes A5.1.10 Refilling Electrolyte Solutions in FDA Approved Bottle HI 8071 —> 3.5M KCl + AgCl Electrolyte, 30 mL, for single junction electrodes HI 8072 —>... -
Page 188: A5.2 Sensors
APPENDIX 5 HI 4007-02 —> 100 ppm Chloride Standard HI 4007-03 —> 1000 ppm Chloride Standard HI 4008-01 —> 0.1 M Cupric Standard HI 4010-01 —> 0.1 M Fluoride Standard HI 4010-02 —> 100 ppm Fluoride Standard HI 4010-03 —> 1000 ppm Fluoride Standard HI 4011-01 —>... -
Page 189: A5.2.2 Orp Electrodes
APPENDIX 5 HI 2031B Glass-body, semimicro, conic, refillable, combination pH electrode. Use: semisolid products HI 1332B Plastic-body (PEI), double junction, refillable, combination pH electrode. Use: general purpose. FC 100B Plastic-body (PVDF), double junction, refillable, combination pH electrode. Use: cheese FC 200B Plastic-body (PVDF), single junction, conic, Viscolene, non-refillable, combination pH electrode. -
Page 190: A5.2.3 Half-Cell Electrodes
APPENDIX 5 A5.2.3 Half-cell Electrodes HI 2110B Glass-body, single half-cell pH electrode. Use: general purpose HI 5311 Glass-body, Ag/AgCl reference half-cell electrode, double junction, refillable with 4mm banana plug with 1m (3.3') cable. Use: general purpose with wide temperature range HI 5315 Plastic-body (PEI), double junction, Ag/AgCl reference half-cell electrode, refillable with 4mm plug with 1 m (3.3’) cable. -
Page 191: A5.3 Titrator Components
APPENDIX 5 A5.3 Titrator components Pump assembly Propeller Stirrer support with positioning Burette (25 mL syringe) collar and positioning screw Aspiration tube with fitting Stirrer stand and protection tube Dispensing tube with normal Burette blank support dispensing tip, fitting, protec- tion tube and tube guide Pump Assembly and Burette Tube locks... - Page 192 APPENDIX 5 USB Storage Device Shorting cap Instruction Manual Binder A5-10 www.ponpe.com sale@ponpe.com...
- Page 193 APPENDIX 5 A5-11...
- Page 194 APPENDIX 5 A5-12...
- Page 195 General Titration Applications Brochure HI 902 Color AUTOMATIC POTENTIOMETRIC TITRATOR Revision 2.3 www.ponpe.com sale@ponpe.com...
- Page 196 INTRODUCTION...
- Page 197 Method ID: HI0001EN 0.1N Sodium Hydroxide Titrant Concentration Remove the beaker from the balance and add Description: Method for the standardization (titer determination) distilled water to the 50-mL mark on the beaker. Place the beaker under the stirrer assembly and of 0.1N Sodium Hydroxide (NaOH) titrant solution against Potassium Hydrogen Phthalate (KHP).
- Page 198 Method ID: HI0001EN 0.1N Sodium Hydroxide Titrant Concentration Pre-Titration Stir Time: 60 sec Measurement Mode: Signal Stability delta E: 0.3 mV delta t: 5 sec t-min wait: 3 sec t-max wait: 30 sec Electrode Type: Blank Option: No Blank Calculations: Stdz.
- Page 199 Method ID: HI0002EN 0.1N Hydrochloric Acid Titrant Concentration At the end of the titration, after detection of the Description: equivalence point, 'titration completed‟ will appear Method for the standardization (titer determination) of 0.1N Hydrochloric Acid (HCl) titrant solution with the titrant concentration. The result is against standardized 0.1N...
- Page 200 Method ID: HI0002EN 0.1N Hydrochloric Acid Titrant Concentration Significant Figures: XXXXX Calculations: Calculations: Stdz. Titrant by Volume Titrant units: N (eq/L) Titrant volume dosed: V (L) Standard volume: 10.000 mL Standard conc. 0.100 eq/L Results: Titration Report Method Name: 0.1N HCl Titr. Conc. Time &...
- Page 201 Method ID: HI0003EN 0.1M Sodium Thiosulfate Titrant Concentration Description: 5-6 mm below the surface. If necessary add extra Method for the standardization (titer determination) distilled water. Press “Start”. You will be prompted to enter the of 0.1M Sodium Thiosulfate (Na ) titrant solution, against Potassium Iodate (KIO ).
- Page 202 Method ID: HI0003EN 0.1M Sodium Thiosulfate Titrant Concentration Analyte size to be diluted: 0.350 g Titrant Name: 0.1M Na2S2O3 Analyte Size: 0.350 g Analyte Entry: Manual Maximum Titrant Volume: 15.000 mL Stirring Speed: 1400 rpm Potential Range: -2000.0 to 2000.0 mV Volume/Flow Rate: 25 mL/50 mL/min Signal Averaging:...
- Page 203 Method ID: HI0010EN 0.1M Ferrous Ammonium Sulfate Titrant Concentration (Ferrous Ammonium Sulfate – FAS) Use a class-A volumetric pipette to transfer Description: Method for the standardization (titer determination) exactly 10.00 mL of prepared standard solution to 0.1M Ferrous Ammonium Sulfate a clean 100-mL plastic beaker and 25 mL of 25% [Fe(NH...
- Page 204 Method ID: HI0010EN 0.1M Ferrous Ammonium Sulfate Titrant Concentration (Ferrous Ammonium Sulfate – FAS) Range: Filtered Derivatives: Pre-Titration Volume: 5.000 mL Pre-Titration Stir Time: 0 sec Measurement Mode: Signal Stability delta E: 0.5 mV delta t: 3.0 sec t-min wait: 2 sec t-max wait: 20 sec...
- Page 205 Method ID: HI0200EN 0.02 M Silver Nitrate Titrant Concentration Place the beaker under the stirrer assembly and Description: Method for the standardization (titer determination) immerse the electrodes and stirrer. Ensure that of 0.02M Silver Nitrate (AgNO ) titrant solution the reference junction of the ORP electrode is 5-6 against Sodium Chloride (NaCl).
- Page 206 Method ID: HI0200EN 0.02 M Silver Nitrate Titrant Concentration Dilution Option: Enabled Final Dilution Volume: 100.000 mL Aliquot Volume: 5.000 mL Analyte size to be diluted: 0.200 g Titrant Name: 0.02M AgNO3 Analyte Size: 0.200 g Analyte Entry: Manual Maximum Titrant Volume: 15.000 mL Stirring Speed: 1400 rpm...
- Page 207 Method ID: HI1004EN Alkalinity of Water 0-2500 mg/L CaCO , pH 4.5 Endpoint Description: concentration. The result is expressed in mg/L of Method for the determination of Total (Methyl Red) calcium carbonate. Remove the electrodes and stirrer from the Alkalinity in water by titration of a sample to pH 4.5.
- Page 208 Method ID: HI1004EN Alkalinity of Water 0-2500 mg/L CaCO , pH 4.5 Endpoint Results: Titration Report Method Name: Alkalinity of Water Time & Date: 09:04 April 18, 2010 Titration ID: Ti_00004 Titration Results Method Name: Alkalinity of Water Time & Date: 09:04 April 18, 2010 Analyte size: 50.000 mL...
- Page 209 Method ID: HI1005EN Acidity of Water 0-2500 mg/L CaCO , pH 8.3 Endpoint Description: concentration. The result is expressed in mg/L of Method determination Total calcium carbonate. Remove the electrodes and stirrer from the (Phenolphthalein) Acidity in water by titration of a sample to pH 8.3.
- Page 210 Method ID: HI1005EN Acidity of Water 0-2500 mg/L CaCO , pH 8.3 Endpoint Results: Titration Report Method Name: Acidity of Water Time & Date: 09:15 April 22, 2010 Titration ID: Ti_00005 Titration Results Method Name: Acidity of Water Time & Date: 09:15 April 22, 2010 Analyte size: 50.000 mL...
- Page 211 Method ID: HI1007EN Chloride in Water 0.00-150.00 mg/L Remove the electrodes and stirrer from the Description: Method for the determination of chloride in water. sample and rinse thoroughly with distilled water. The results are expressed in mg/L (ppm) as Chloride.
- Page 212 Method ID: HI1007EN Chloride in Water 0.00-150.00 mg/L Results: Titration Report Method Name: Chloride in Water Time & Date: 09:20 April 23, 2010 Titration ID: Ti_00029 Titration Results Method Name: Chloride in Water Time & Date: 09:20 April 23, 2010 Analyte size: 100.00 mL End Point Volume:...
- Page 213 Method ID: HI1008EN Neutralization with Sulfuric Acid 0.00-200.00 meq/L Remove the electrodes and stirrer from the Description: Method for the determination of concentration of sample and rinse them thoroughly with distilled strong or weak bases by titration of a sample to the water.
- Page 214 Method ID: HI1008EN Neutralization with Sulfuric Acid 0.00-200.00 meq/L Results: Titration Report Method Name: Neutralization w/ H2SO4 Time & Date: 13:04 April 23, 2010 Titration ID: Ti_00008 Titration Results Method Name: Neutralization w/ H2SO4 Time & Date: 13:04 April 23, 2010 Analyte size: 10.000 mL End Point Volume:...
- Page 215 Method ID: HI1009EN Neutralization with Sodium Hydroxide 0.00-200.00 meq/L Remove the electrodes and stirrer from the Description: Method for the determination of concentration of sample and rinse them thoroughly with distilled strong or weak acids, by titration of a sample to the water.
- Page 216 Method ID: HI1009EN Neutralization with Sodium Hydroxide 0.00-200.00 meq/L Results: Titration Report Method Name: Neutralization w/ NaOH Time & Date: 13:04 April 23, 2010 Titration ID: Ti_00009 Titration Results Method Name: Neutralization w/ NaOH Time & Date: 13:04 April 23, 2010 Analyte size: 10.000 mL End Point Volume:...
- Page 217 Method ID: HI1011EN Troubleshooting 1 Description: Method Parameters: Name: Troubleshooting 1 A method for verifying the dosing accuracy of the Method Revision: titrator. This method should be used to troubleshoot Titration Type: Standard Titration a titrator equipped with a 25-mL burette. The titrator Analog Board: Analog 1 dispenses a 20.000-mL pre-titration volume, waits...
- Page 218 Method ID: HI1011EN Troubleshooting 1 Temperature & mV Channel Logging Procedure: Temperature (°C) FACTOR Connect the shorting cap to the BNC socket on 17.0 1.002290 Analog Board 1. 18.0 1.002467 Connect the HI 762000C 0°C temperature key to 19.0 1.002654 20.0...
- Page 219 Method ID: HI1012EN Troubleshooting 2 Description: Method Parameters: Name: Troubleshooting 2 A method for verifying the dosing accuracy of the Method Revision: titrator. This method should be used troubleshoot a Titration Type: Standard Titration titrator equipped with a 25-mL burette. The titrator Analog Board: Analog 1 dispenses a 10.000-mL pre-titration volume, waits...
- Page 220 Method ID: HI1012EN Troubleshooting 2 Temperature (°C) FACTOR 17.0 1.002290 18.0 1.002467 19.0 1.002654 20.0 1.002853 21.0 1.003061 22.0 1.003282 23.0 1.003512 24.0 1.003752 25.0 1.004002 26.0 1.004261 27.0 1.004531 28.0 1.004809 29.0 1.005097 30.0 1.005395 The specifications of the dosing accuracy is 0.1% of full burette volume (...
- Page 221 Method ID: HI1014EN Concentration of Phosphoric Acid 0.00000–1.0000 mol/L Description: stirrer. Ensure that the reference junction of the Method for the determination of phosphoric acid pH probe is 5-6 mm below the surface. Press “Start”. The titrator will start the analysis. ), by titration of a sample to the point of ...
- Page 222 Method ID: HI1014EN Concentration of Phosphoric Acid 0.00000–1.0000 mol/L Calculations: Calculations: Sample Calc. by Volume Titrant units: N (eq/L) Titrant volume dosed: V (L) Final result units: M (mol/L) Titrant conc.: 0.1000 eq/L (sample/titrant): 1.000 mol/eq Sample volume: 100.000 mL Results: Titration Report Method Name:...
- Page 223 TITRATION THEORY TITRATION THEORY HI 901 and HI 902 AUTOMATIC POTENTIOMETRIC TITRATOR www.ponpe.com sale@ponpe.com...
- Page 224 TITRATION THEORY www.ponpe.com sale@ponpe.com...
- Page 225 TITRATION THEORY Contents GENERAL REVIEW OF TITRATION THEORY ..........5 Introduction to Titrations ................. 5 Uses of Titrations ..................5 Advantages and Disadvantages of Titrations .......... 6 TYPES OF TITRATION ................7 Titrations According to The Measurement Method ........7 2.1.1 Amperometric Titrations ...................
- Page 226 TITRATION THEORY Sources of Error ..................17 4.3.1 Sampling Errors ..................... 17 4.3.2 Errors with Titrant and Standard ..............17 4.3.2.1 Preparation Errors ....................17 4.3.2.2 Dispensing Errors ....................18 4.3.3 Chemical Reaction Errors ................. 18 4.3.4 Endpoint Determination Errors ................. 18 CALCULATIONS ..................
-
Page 227: General Review Of Titration Theory
TITRATION THEORY GENERAL REVIEW OF TITRATION THEORY Introduction to Titrations A titration is a quantitative, volumetric procedure used in analytical chemistry to determine the concentration of an analyte (the species being measured) in solution. The concentration of the analyte is determined by slowly adding a titrant (reagent) to the solution. As the titrant is added, a chemical reaction occurs between the titrant and the analyte. -
Page 228: Advantages And Disadvantages Of Titrations
TITRATION THEORY Advantages and Disadvantages of Titrations Some advantages of titrations as an analytical technique are: • More precise results than many instrumental methods, such as measurement by electrode, the accuracy of the measurement is up to 0.1% • Simple methods, reasonable capital costs, and easy training •... -
Page 229: Types Of Titration
TITRATION THEORY TYPES OF TITRATIONS Titrations According to The Measurement Method 2.1.1 Amperometric Titrations An amperometric titration is performed by placing two electrodes (often a metal ISE and a reference electrode) into the sample solution and holding the potential of the metal electrode at a selected voltage. -
Page 230: Spectrophotometric Titrations
TITRATION THEORY measured potential can then be used to determine the analytical quantity of interest, generally a component concentration of the analyte solution. The potential that develops in the electrochemical cell is the result of the free energy change that would occur if the chemical phenomena were to proceed until the equilibrium condition has been satisfied. -
Page 231: Titrations According To The Reaction Type
TITRATION THEORY Figure 3 Titrations According to The Reaction Type 2.2.1 Acid-Base Titrations Acid–base titrations are the most common type of titrations. They are based upon a reaction between an acid and a base, a stoichiometric neutralization, or the exchange of protons. Virtually all acid-base titrations are carried out using a strong acid or a strong base as the titrant. -
Page 232: Argentometric Titrations
TITRATION THEORY Figure 4 volume of NaOH added to an acidic solution and the resulting pH of the solution. Note the abrupt change in the pH at the equivalence point. 2.2.2 Argentometric Titrations Argentometric titrations use silver (nitrate) as the titrant and are generally precipitation titrations, as many silver salts are insoluble. -
Page 233: Ion Selective Titrations
TITRATION THEORY Figure 6 An indicator electrode that responds to the metal ion can be used to monitor the titration progress. The titration curve will appear similar to a usual potentiometric titration. Complexation indicators change color at the endpoint as all metal ions are “consumed”, or complexed, by the titrant. -
Page 234: Precipitation Titrations
TITRATION THEORY alcohol, dimethylformamide, isopropanol and pyridine have been found to work well for acid-base titrations of strong, medium and weak acids/bases. Titrants include alcoholic potassium hydroxide and various sodium or potassium alkoxides in a 10:1 mixture of benzene/methanol. The best titrants are quaternary ammonium hydroxides (such as tetrabutylammonium hydroxide) due to good solubility of tetraalkylammonium salts of the titrated acids and the clean potentiometric titration curve obtained (see Figure 7). -
Page 235: Karl Fischer Titration
TITRATION THEORY Figure 8 As with Acid-Base titrations the potential changes dramatically at the equivalence point. 2.2.8 Karl Fischer Titrations This method is based on a well-defined chemical reaction between water and the Karl Fischer reagent. The chemistry provides excellent specificity for water determination. The method can be used to determine free and bound water in a sample matrix. -
Page 236: Multiple Endpoint Titrations
TITRATION THEORY 2.3.2 Multiple Endpoint Titrations Under certain conditions, some titrations can exhibit more than one equivalence point and be titratable to the individual endpoints to determine the concentration of each individual component. Examples of these types of titrations include acid-base (where different strength acid or bases are in a mixture), redox (where each species has a different reduction potential), complexometric (where different species are separately titratable), and acid-base using polyprotic acids (the pK a of the different protons varies enough to separate them). -
Page 237: Introduction To Titration Apparatus And Typical Titration Procedure
TITRATION THEORY INTRODUCTION TO TITRATION APPARATUS AND TYPICAL TITRATION PROCEDURE Manual Titration Apparatus required for manual titration include: • Volumetric Burette, for precisely controlled delivery of titrant to the reaction vessel • An Erlenmeyer, or similar flask, that facilitates constant mixing or swirling required to ensure solution homogeneity •... -
Page 238: Automatic Titration
TITRATION THEORY Automatic Titration Automatic titrators are high-precision analytical instruments that deliver the titrant, monitor the physical change associated with the titration reaction, automatically stop at the endpoint and calculates the concentration of the analyte. Automatic titrators are best for repetitive titrations and high-accuracy analyses. -
Page 239: Titration Results
TITRATION THEORY TITRATION RESULTS Accuracy The factors most critical to achieving accurate results with the HI 900 titration systems are the concentration of the sample, size of the sample and having an optimized set of method parameters. Repeatability Repeatability, or the agreement between replicate determinations, is expressed quantitatively as the relative standard deviation (RSD). -
Page 240: Dispensing Errors
TITRATION THEORY 4.3.2.2 Dispensing Errors Incorrect dispensing due to: • Dead valve volume and leaking valve • Inaccuracy in motor drive and gear lash/ backlash • Poor burette/ piston seal • Non-uniform diameter of burette glass cylinder • Chemical incompatibility with tubing or bubble generation •... -
Page 241: Calculations
TITRATION THEORY CALCULATIONS The main variables used in calculating a result from a titration are the sample volume, the concentration of the titrant, and the volume of titrant required to reach the equivalence point. At the equivalence point, an equal number of equivalents of the analyte and titrant has been added. -
Page 242: Blank Titration
TITRATION THEORY By Volume C titrant Concentration of titrant (N) V standard Volume of Standard (mL) C standard Concentration of standard (eq/L) V titrant Volume of Titrant (L) Blank Titration In a blank titration a pre-titration is performed, often times on the solvent to be used for the sample titration, and the titrant volume required to reach the endpoint is noted. -
Page 243: Back Titration
TITRATION THEORY C sample1 Sample 1 Concentration (g/100g) C sample2 Sample 2 Concentration (g/100g) C sample3 Sample 3 Concentration (g/100g) V titrant 1 Volume of titrant required to reach the first end point (L) V titrant 2 Volume of titrant required to reach the second end point (L) V titrant 3 Volume of titrant required to reach the third end point (L) C titrant... -
Page 244: Glossary
TITRATION THEORY GLOSSARY Acid A chemical species that can donate one or more protons (hydrogen ions). Acid-Base Titration Stoichiometric neutralization titrations, based upon the reaction that occurs between an acid and base. Activity A physical property corresponding to the concentration of all ions in a solution. Electrodes respond to activity. - Page 245 TITRATION THEORY Endpoint The point were a titration is stopped because a physical change in the solution has indicated a completed titration. Titration endpoints typically coincide with the equiva- lence point. A fixed value endpoint (pH or mV) can be used as well. The titration will stop at the desired point regardless if the titration is complete.
- Page 246 TITRATION THEORY Neutralization A chemical reaction where an acid and a base react to form a neutral salt and water. Non-aqueous A solution that does not contain water. Non-aqueous Titration A titration that is preformed in non-aqueous solutions, typically used to titrate very weak acids and bases to eliminate the leveling effect water has on all acids and bases dissolved in it.
- Page 247 TITRATION THEORY Repeatability The variation in sample measurements taken by a single person or instrument under the same conditions. Spectrophotometric Titration A titration in which the endpoint is marked by a change in the color and/or color intensity. Stoichiometry The quantitative relationship of the reactants and products in a chemical reaction. Titrant The chemical added in a titration that causes the given reaction to occur.
- Page 248 TITRATION THEORY...
Need help?
Do you have a question about the HI 902 Color and is the answer not in the manual?
Questions and answers