Table of Contents
Advertisement
Advertisement
Table of Contents

Related Manuals for Heat Link 46645

Summary of Contents for Heat Link 46645
- Page 1 ® Heat Link Wired Digital Timer Thermostat #46645 Installer Manual...
-
Page 2: Contents Of The Box
Contents of the Box Mounting Hardware ® Heat Link Wired Digital Timer Thermostat #46645 46645 Thermostat Installer Manual Installer Manual... - Page 3 Product Compliance & Safety Information This equipment has been tested and found to comply with the limits for a Class B digital device, pursuant to Part 15 of the FCC Rules. These limits are designed to provide reasonable protection against harmful interference in a residential installation.
- Page 4 Product Compliance & Safety Information (continued) Changes or modifications not expressly approved by the party responsible for compliance could void the user’s authority to operate the equipment. This device complies with part 15 of the FCC Rules. Operation is subject to the following two conditions: (1) This device may not cause harmful interference, and (2) this device must accept any interference received, including interference that may cause undesired operation.
- Page 5 Product Compliance & Safety Information (continued) Safety Information Use in compliance with safety regulations. The unit is to be used for the control of room temperature inside the house. Installation This accessory must be fitted by a competent person, and installation must comply with the guidance, standards and regulations applicable to the city, country or state where the product is installed.
-
Page 6: Product Description
Product Description Thank you for purchasing the HeatLink #46645 Thermostat. This thermostat is a device that lets you customize the heating and cooling of your home as needed. This device is a stylish and accurate digital room thermostat that is fitted with a large easy to read LCD screen and one touch buttons. -
Page 7: Mounting The Thermostat
1. Mounting the Thermostat Install the digital room thermostat roughly 5 ft (1.5 m) above floor level. It should be mounted in a location where the thermostat is easily accessible and away from direct sunlight. You can mount the thermostat directly on the wall or you can install it on top of a wall-box. -
Page 8: Terminal Connection
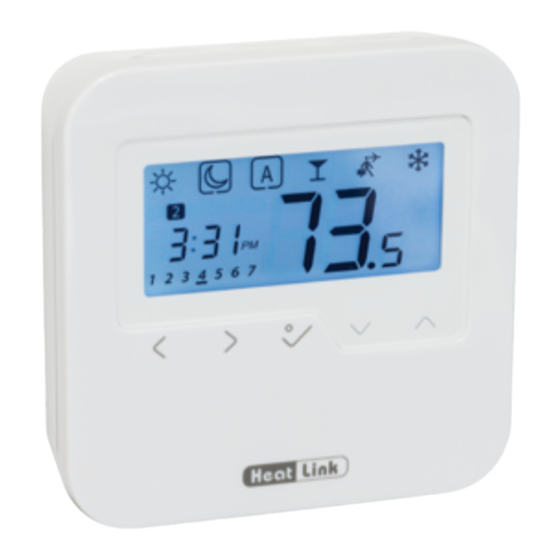
2. Terminal Connection 46645 You can wire the thermostat directly to the #40318 StatLink® 8 Zone Wired Module or to an actuator (purchased separately). Remote 10 kΩ NTC 46645 Sensor (optional) 40318 Heat/Cool Changeover (optional) Setback Signal Output (optional) Remote 10 kΩ NTC Sensor... - Page 9 3. Thermostat Icons BOX means to select mode. e.g. means Hi temp is selected means the Hi temp is not selected. Sun: High comfortable temperature Moon: Low comfortable temperature (setback) Indicates AUTO ON or AUTO OFF Indicates that the Party Mode is active Indicates that the Holiday Mode is ON.
- Page 10 3. Thermostat Icons (continued) Cool Mode indicator: The icon is flashing when cooling mode is active. Temperature indicator • Display the room temperature • Display the set temp To change the temperature display from °C to °F, go to Installer Mode and change d00 value to 1 (page 21). Temporary override indicator: The hand will appear until the next programs starting time.
-
Page 11: Button Functions
4. Button Functions Press any key to activate the backlight and wake up the thermostat. Mode selection. Long press to return home without saving. OK key. Short press to confirm selection. Long press to save and return home. Long press to enter Temperature offset Heat/Cool. Decrease or increase value (e.g. -
Page 12: Setting Date And Time
5. Setting Date and Time When you first power up your device you will have to set up the date and time. You can also access the date and hour by long pressing . After that press to confirm. 1 2 3 4 5 6 7 Press Press confirm. - Page 13 5. Setting Date and Time (continued) Set the hour Set the by using minutes by using Press confirm. Press confirm. Set the date To change the by using temperature display from °C to °F, go to 1 2 3 4 5 6 7 Press Installer Mode confirm.
- Page 14 6. Setting the High Comfortable Setpoint This setpoint is also used for the Auto mode programs. Press Press to select to select the setpoint Sun Mode 1 2 3 4 5 6 7 1 2 3 4 5 6 7 Mode.
- Page 15 7. Setting the Low Comfortable (Setback) Setpoint This setpoint is also used for the Auto mode programs. Press Press to select to select the setpoint Moon Mode. Moon 1 2 3 4 5 6 7 1 2 3 4 5 6 7 Mode.
-
Page 16: Setting Your Programs
8. Setting Your Programs You can customize your programs by long pressing when on the program screen. If you want to select another Program Profile (from the available 5), please enter in Installer Mode, choose option d17 and after that select the desired program. 1 2 3 4 5 Set the hour Select the... -
Page 17: Program Profile
8. Setting Your Programs (continued) You can select and customize any of the following programs: Program Profile 1 5 days (Monday to Friday) 2 days (Saturday to Sunday) Program Program Heat set Cool set Program Program Heat set Cool set Time point point... - Page 18 8. Setting Your Programs (continued) Program Profile 3 5 days (Monday to Friday) 2 days (Saturday to Sunday) Program Program Heat set Cool set Program Program Heat set Cool set Time point point Time point point 5:00 7:30 8:00 Moon Moon 22:30 Moon...
- Page 19 8. Setting Your Programs (continued) Program Profile 5 5 days (Monday to Friday) 2 days (Saturday to Sunday) Program Program Heat set Cool set Program Program Heat set Cool set Time point point Time point point 6:00 7:30 10:00 Moon Moon 23:30 Moon...
- Page 20 9. How to reset the thermostat 1 2 3 4 5 6 7 Press the indicated keys Select P47 if you want to Press to confirm. together for 3 seconds. reset to factory settings. 1 2 3 4 5 6 7 Press to confirm.
-
Page 21: Installer Mode
10. Installer Mode This function allows you to customize your thermostat as you desire. In order to do this please consult the tables on the next pages. Press the left Select P49 if and up keys you want to together for enter Installer 3 seconds. - Page 22 11. Functions explained Function Values Definition Default °C Select °C/°F °F PWM (pulse width modulation) On-Off 0.9°F (±0.45°F) Heating Control On-Off: 0.5°C (±0.25°C) On-Off 1.8°F (±0.9°F) On-Off: 1.0°C (±0.5°C) 26.5°F to 37.5°F 32°F Offset room temp measuring error (in 0.9°F / Room Temp Offset (-5.5°F to 5.5°F) (0°F)
- Page 23 11. Functions explained (continued) Function Values Definition Default Disable Valve Protection Enable 41.0–62.5°F 41.0°F Frost Setpoint 5.0–17.0°C 5.0°C 12hr 12/24 Hour Format 24hr Daylight Savings Time (DST) 41.0–95.0°F 95.0°F Max. Heating Setpoint 5.0–35.0°C 35.0°C 41.0–104°F (A4) 41°F Min. Cooling Setpoint 5.0–40.0°C 5.0°C Floor Sensor...
- Page 24 11. Functions explained (continued) Function Values Definition Default Select one of the five default programs. Once selected, the default program will overwrite the Preset program selection 1–5 present program. Selected default program can be edited by the user in the User Setting Mode. No Connection Heating/Cooling Mode Connection...
- Page 25 12. Cooling Blocked When the thermostat is set on Cooling Disabled (d19-->1) it will block the cooling function for single rooms until the device will receive the heating command. During the periods of cooling blocked no special indicator will be displayed on the LCD screen.
-
Page 26: Party Mode
13. Party Mode Press Press to select to select the time for Party Mode. Party Mode. 1 2 3 4 5 6 7 1 2 3 4 5 6 7 If you want to exit Party Mode, press to move the (box) maximum to a different program. -
Page 27: Vacation Mode
14. Vacation Mode Press Press to select to select the number Vacation of vacation Mode. 1 2 3 4 5 6 7 1 2 3 4 5 6 7 days. Vacation Mode ends when it reaches day 0. After that the device goes back to Auto Mode. -
Page 28: Frost Mode
15. Frost Mode Press Press to select you want Frost Mode. to change Press 1 2 3 4 5 6 7 1 2 3 4 5 6 7 the Frost confirm. Mode temp. Press confirm. -
Page 29: Temperature Offset
16. Temperature Offset 1 2 3 4 5 6 7 Press 2 times. Press to adjust. Long press to order Press to select. Press to confirm. to enter Setting Mode. The Temperature Offset can be set at Value Shown °F offset any value between 26.5 (-5.5°F) and 26.5 -5.5°F... - Page 30 17. Heat or Cool Mode 1 2 3 4 5 6 7 Press three times. Long press to order Press to select. Press to select. to enter Setting Mode. Press to confirm.
- Page 31 18. Setup Remote Sensor Use these steps to set up the remote sensor for your thermostat. For the sensor wiring diagram see Section 2. Enter Installer Use the right Mode as arrow described in select d03. Section 10. 1 2 3 4 5 6 7 Use the up Press arrow...
- Page 32 18. Setup Remote Sensor (continued) Press Press confirm. select d04. To use the remote sensor as an air or floor sensor, press to confirm “0”. The thermostat’s internal sensor will no longer operate. Skip to step 10. To use the remote sensor for floor protection, press the up arrow to select “1”.
- Page 33 18. Setup Remote Sensor (continued) Press to confirm and set the remote sensor for floor protection. The air temperature will be measured by the thermostat’s internal sensor. To set the Once floor sensor you have protection completed limits use your changes, functions d14, hold d15, and d16...
-
Page 34: Thermostat Error Codes
19. Thermostat Error Codes Settings Error Screen Meaning d03 = 1 Remote sensor open d04 = 1 1 2 3 4 5 6 7 d03 = 1 Remote sensor short d04 = 1 1 2 3 4 5 6 7 d03 = 1 Temperature showing Remote sensor open or short... -
Page 35: Technical Data
20. Technical Data Model: 46645 Voltage 24 VAC, ±10 %, 50/60 Hz Operating performance 24 V, 18 W Temperature Moon Adjustable Temperature range 41–95°F (5–35°C) Span ±0.9°F or ±0.45°F (±0.5°C or ±0.25°C) Storage temperature -4°F to 140°F (-20°C to +60°C) Ambient temperature 32°F up to 113°F... - Page 36 www.heatlink.com Printed in China L646645 Wired Digital Timer Thermostat Instructions November 26, 2018...
Need help?
Do you have a question about the 46645 and is the answer not in the manual?
Questions and answers