Table of Contents
Advertisement
Quick Links
Advertisement
Table of Contents

Related Manuals for R2TECK DVLM-100

Summary of Contents for R2TECK DVLM-100
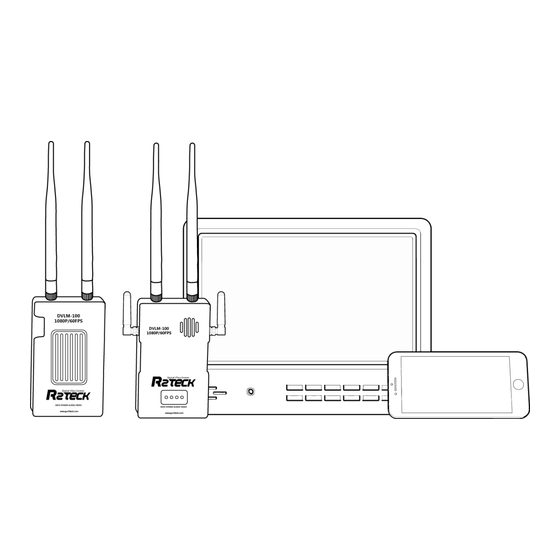
- Page 1 Digital Video Transmission System DVLM-100 USER MANUAL Wuxi R2TECK Co.,Ltd.
-
Page 2: Table Of Contents
Wuxi R2TECK Co.,Ltd Content 1. EASY WAY TO START THE DEVICE ........... 1 1.1 Operating steps and instructions ....................... 1 1.1.1 Monitor ............................1 1.1.2 Transmitter ..........................1 1.1.3 Receiver ............................. 1 1.1.4 Mobile ............................1 2. SPECIFICATION ............3 3 INTRODUCTION ............ -
Page 3: Easy Way To Start The Device
LINK light turn-on if the receiver connect to transmitter. HDMI monitor instruction (if installed the HDMI monitor): The monitor shows logo "R2TECK" after receiver connect to the power. After that, the monitor shows progress bar: Start-up / Selfcheck / Link. - Page 4 Android installation: Refer to http://www.gor2teck.com/download/ ->DVLX android mobile client (apply for DVLM-100/DVL-1/DVL-C). 1.1.3.1...
-
Page 5: Specification
2. Specification Here list the detailed specification about DVLM-100 Function specification 100mw transmission distance ≥ 800m Communication distance 800mw transmission distance ≥ 1500m (outdoor, no obstruction) Wall Penetration ability 3 cement walls; 1 ferroconcrete wall Output Power 25mw-800mw adjustable -95dbm±2dbm... -
Page 6: Introduction
Thanks for purchasing the DVLM-100 from Wuxi R2TECK. Everyone need to read and understand this disclaimer before using the DVLM-100. You are supposed to be accepted the disclaimer once the product is started to use. Please comply with the installation and using process indicated in this use manual. - Page 7 DVLM-1 may not be reached the defined function if it works in the improper temperature, improper humidity and improver air pressure. DVLM-100 should not work when it is wet. Have to make sure it is dry when you use it. DVLM-100 is the high precise product, it is forbid to beat and clash.
-
Page 8: Product Overview
DVLM-100 is the 1080p full-HD Digital Video transmission system which including transmitter and receiver, it transmit the video, audio, image and more information by the wireless communication mode. DVLM-100 is perfect for all fields video transmission because of the light weight, low power, long distance, low latency. -
Page 9: Interface Definition
4.2.3 Receiver cable Hot shoes 5. Port definition 5.1 Transmitter port 5.1.1 Back side 5.1.1.1 [1]: For frequency switch setting Press the button more than 5 seconds, 3 lights (HDMI, LINK, WORK) are all turn-off, release the key, 3 lights flash as 0.5Hz frequency, and then 3 lights back to normal state, that means channel change is finished. - Page 10 5.1.2 Right side port 5.1.2.1 HDMI port: for connecting with the camera. Power port: Power button. Work light: for monitoring the Transmitter working status. Light status Description Action Flash Transmitter works well regularly Connect the system to the other status Transmitter does not work power again, or contact with the customer service.
- Page 11 5.1.3 Left side port 5.1.3.1 DC-12V port: 12V-DC power. 5.1.4 Front side port 5.1.4.1 Cooling fan: Pay attention to not cover the cooling fan.
-
Page 12: Receiver Port
5.2 Receiver port 5.2.1 Left side port 5.2.1.1 [1]:For frequency switch setting Press the button more than 5 seconds, 4 lights (HDMI, LINK, WORK, MOBILE) are all turn-off, release the key, 4 lights flash as 0.5Hz frequency, and then 4 lights back to normal state, that means channel change is finished. - Page 13 position [6]: Monitor mobile connect status. Light status Description Action Turn-on Mobile connect well Make sure the mobile connect Turn-off No mobile connect with the network, turn off the software then turn on again. 5.2.3 Right side port 5.2.3.1 [1]: DC-12V power button [2]: HDMI port, for connect with the monitor.
-
Page 14: Installation
6. Installation 6.1 Transmitter installation 6.1.1 Antenna installation Take out two pcs Transmitter antenna and fix them on the transmitter. 6.1.2 HDMI cable installation One end of cable connect to the camera, another end of cable connect to the Transmitter. 6.1.3 power cable installation Both of DC and AC power are supported by the receiver. - Page 15 Connect to the power according to the requirement. Suggest use AC power. 6.2.4 Mobile APP installation iOS App installation: In App store, search the key word “DVLx” and download. Android installation: Refer to http://www.gor2teck.com/download/ ->DVLX android mobile client (apply for DVLM-100/DVL-1/DVL-C).
-
Page 16: Bind And Frequency Switch
7. Bind and Frequency switch 7.1 Frequency switch This feature is implemented at the transmitter or receiver, there is not required to implemented it at the same time. Please make sure the transmitter and receiver connection status is well when implemented at the receiver. -
Page 17: Software Upgrade Instructions
1PC of monitor for monitoring the processes. Ø Prepare 1 PC of U-disk which is FAT32 format. Ø Copy the software upgrade package (uograde.des3) which is provided by R2TECK to U-disk Ø Connect the monitor with Receiver and charge the monitor. Ø... -
Page 18: App Instruction
9. APP instruction 9.1 INFO setting Click OSD button, select "Turn-on" or "Turn off", match to the "Display" or "Not display" 8.1.1 9.2 Power setting Click "setting" button to adjust the power, if click 100mw, then the video top right corner shows "PW: 100 OK", means output power setting is succeed. -
Page 19: Troubles Solution
10. Troubles solution Below is the device maintenances about DVLM-100, to help the users whom don't have professional testing equipments and technology to solve the simply troubles. 10.1 Trouble symptoms / diagnosis / solution Symptoms Diagnosis Solution Follow the process as chapter Did not follow the process 1.Confirm the power process is correct. -
Page 20: Appendix
11. Appendix 11.1 Video input/Output format requirement Video input/ format requirement Signal Video Video Input Resolution Remark type format IF want to change the 1080p@60/50/30/25/24fps; PAL, resolution, you have to HDMI 1080i@60/50fps; NTSC re-start the both of the 720p@60/50/30/25/24fps; Transmitter and receiver. Video Output format requirement Video Signal type... -
Page 21: Contact Info
Thanks for purchasing our device again. If you have any suggestion or need technical support, please visit our website or send us the email, also welcome to call us. Wuxi R2TECK Co., Ltd Address:Room307,Building of Cetus,Wuxi software park,111th Linghu avenue,new district ,Wuxi city,Jiangsu Province P.C.:214000...
Need help?
Do you have a question about the DVLM-100 and is the answer not in the manual?
Questions and answers