
Subscribe to Our Youtube Channel
Related Manuals for Chattanooga Intelect Advanced 2766


Summary of Contents for Chattanooga Intelect Advanced 2766
- Page 1 Moving Rehabilitation Forward™ User Manual Model 2766 Intelect ® Advanced Laser Module DJO is an ISO 13485 Certified Company...
-
Page 2: Table Of Contents
TABLE OF CONTENTS Intelect ® Advanced Laser Module FOREWORD ..........1 Attaching the Module to the Unit . -
Page 3: Foreword
FOREWORD Intelect ® Advanced Laser Module This manual has been written for the operators of the Intelect Advanced Laser Module. It contains general instructions for operation, precautionary instructions, and maintenance recommendations. For all other information (i.e., stim, battery pack, remote, ultrasound, etc.) concerning your Intelect Advanced Therapy Systems, consult the user manual shipped with those products. - Page 4 FOREWORD Intelect ® Advanced Laser Module The following features are available on the Intelect Advanced Laser Module: • Clinical Indications An efficient approach for setting up a treatment using preset parameters. • Real Time Feedback This feature provides a continuously measured and monitored output system that adjusts the dosage delivered to the patient.
-
Page 5: About Laser Therapy
CAUTION • Do not operate this unit when connected to any unit other than Chattanooga devices. • Do not operate this unit in an environment where other devices are being used that intentionally radiate electromagnetic energy Text with a “CAUTION”... -
Page 6: Warnings
CAUTION CAUTION the receiving device, increase the separation between the • Use of parts or materials other than Chattanooga's can equipment, connect the equipment to an outlet on a different degrade minimum safety. circuit from that to which the other device(s) are connected •... - Page 7 ABOUT LASER THERAPY Intelect ® Advanced Laser Module WARNING • This device should be kept out of the reach of children. • This device should be used only under the continued supervision of a licensed practitioner. • Care must be taken when operating this equipment around other equipment.
-
Page 8: Dangers
ABOUT LASER THERAPY Intelect ® Advanced Laser Module DANGER DANGER • This unit is considered to be a Class IIIB laser product and • Equipment not suitable for use in the presence of a thus emits visible and invisible laser radiation (IR). Avoid direct flammable anesthetic mixture with air, oxygen, or exposure to the laser beam. -
Page 9: Overview Of Laser Therapy
ABOUT LASER THERAPY Intelect ® Advanced Laser Module OVERVIEW OF LASER THERAPY In short, the light energy absorbed into the patient’s tissue triggers biological changes at a cellular level to provide the temporary increase in local blood circulation; temporary relief of minor muscle and joint aches, pains, and stiffness;... -
Page 10: Common Terms
ABOUT LASER THERAPY Intelect ® Advanced Laser Module OVERVIEW OF LASER THERAPY– COMMON TERMS Common Terms Applicator - The hand held assembly used to deliver laser energy. The applicator includes the laser head, transducer, and related electronics. Collimating - The shape of the laser beam. While neither focused nor dispersed, this laser beam resembles a column when applied from the unit through the applicator. - Page 11 ABOUT LASER THERAPY Intelect ® Advanced Laser Module OVERVIEW OF LASER THERAPY– COMMON TERMS Power Density - Ratio of power divided by treatment time. Pulsed Mode – This is the ratio of the “On” time to “Total” time of the cycle, expressed as a percentage. The lower the percentage, the lower temporal average intensity.
-
Page 12: Indications
ABOUT LASER THERAPY Intelect ® Advanced Laser Module Indications Contraindications The Intelect Advanced Laser Module is indicated The Intelect Advanced Laser Module should NOT be used: for the following: • where analgesia may mask progressive pathology, and • increasing local blood circulation. where the practitioner would normally avoid the use of any other analgesia in order to retain the beneficial aspects of •... -
Page 13: Additional Precautions
ABOUT LASER THERAPY Intelect ® Advanced Laser Module • over or near bone growth centers until bone growth is complete. • over the thoracic area if the patient is using a cardiac pacemaker. • over or applied to the eye. •... -
Page 14: Preventing Overheating Of The Applicators
ABOUT LASER THERAPY Intelect ® Advanced Laser Module DANGER Be sure to inspect the treatment area during and following treatment, and discontinue if an adverse Patients with an implanted neurostimulation device must not be treated reaction does occur. with or be in close proximity to any shortwave diathermy, microwave diathermy, therapeutic laser diathermy or laser diathermy anywhere on Output Power their body. -
Page 15: Nomenclature
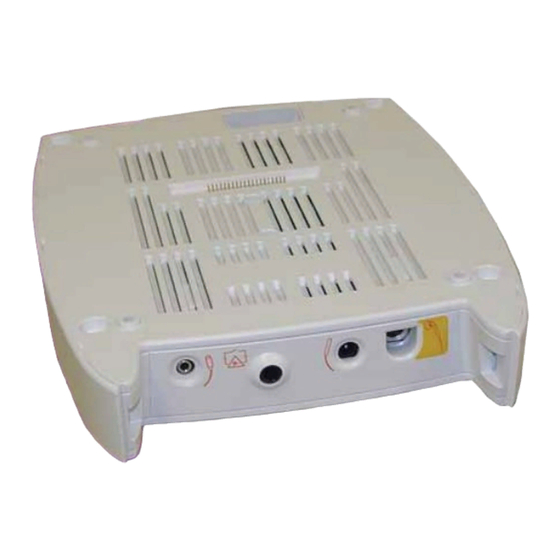
NOMENCLATURE Intelect ® Advanced Laser Module MODULE APPLICATOR Feet Indentions Laser Lens Diode Power Cord Routing Area LED’s Laser Head Pause/Resume Button Ribbon Cable Connection Applicator Connection LED Indicator (Output Power) Patient Interrupt Switch Connection Door Interrupt Acupuncture Point Switch Connection Locator Connection... - Page 16 NOMENCLATURE Intelect ® Advanced Laser Module Feet Indentions These indentions retain the rubber feet of the unit. This allows the module to align and rest directly underneath the unit. Ribbon Cable Connection A ribbon cable connects the unit to the module at this location on the module in order to transfer data from the laser module to the unit.
- Page 17 NOMENCLATURE Intelect ® Advanced Laser Module Applicator Connection This port serves as the connection point between the module and the applicator. Power Cord Routing Area This hollow area on the back of the module allows you to feed the power cord from the unit through the module and out to the electrical outlet.
-
Page 18: Specifications
SPECIFICATIONS Intelect ® Advanced Laser Module MODULE SPECIFICATIONS POWER Input ....120 - 240 V - 1.0 A, 50/60 Hz 75 W Max Fuses ..... 1.0A Time Lag (not user serviceable) Electrical Class ............ CLASS 1 Electrical Type ........... TYPE B Output Type ........ -
Page 19: Laser Technical Specifications
SPECIFICATIONS Intelect ® Advanced Laser Module LASER TECHNICAL SPECIFICATIONS DESCRIPTION OF DEVICE MARKINGS Duty Cycles The markings on the unit are assurance of its conformity to the highest applicable standards of medical Pulsed ................90% equipment safety and electromagnetic compatibility. One Continuous .............. -
Page 20: Laser Applicator Technical Specifications
SPECIFICATIONS Intelect ® Advanced Laser Module LASER APPLICATOR TECHNICAL SPECIFICATIONS For all single diode and cluster laser and LED applicators, the expected increase in the measured quantities after manufacture added to the values measured at the time of manufacture is ±20%. The new software incorporates a cooling function that forces the user to cool the laser clusters prior to the next treatment. -
Page 21: Cluster Diode Applicators
SPECIFICATIONS Intelect ® Advanced Laser Module LASER APPLICATOR TECHNICAL SPECIFICATIONS continued Cluster Diode Applicators Applicator Output Power Treatment Diode Diode Nominal Ocular Divergence Divergence Spot Power Density Area Type Specifications Hazard Distance Size (mW) (NOHD-in (rad) (rad) meters) 9 Diode Cluster Laser 0.038 7.55 GaAlAs... - Page 22 SPECIFICATIONS Intelect ® Advanced Laser Module LASER APPLICATOR TECHNICAL SPECIFICATIONS continued Cluster Diode Applicators Applicator Output Power Treatment Diode Diode Nominal Ocular Spot Divergence Divergence Power Density Area Type Specifications Hazard Distance Size (mW) (NOHD-in (rad) (rad) meters) 19 Diode Cluster LED 0.043 7.55 0.386308...
-
Page 23: Laser Protective Eyewear Technical Specifications
SPECIFICATIONS Intelect ® Advanced Laser Module LASER PROTECTIVE EYEWEAR TECHNICAL SPECIFICATIONS OPTICAL DENSITY vs. WAVELENGTH Wavelength Useful Range Optical Density 5+ ..........190-400 nm Optical Density 3+ ........... 625-830 nm Optical Density 3+ ..........815-1050 nm Each Intelect Advanced Laser Module is shipped with Laser Protective Eyewear. The eyewear is L3 rated and approved and EN207 compliant and approved for international sales. -
Page 24: Setup
SETUP Intelect ® Advanced Laser Module ATTACHING THE MODULE TO THE UNIT WARNING Disconnect the unit from the power source (electrical outlet or battery module) before attempting any maintenance, removal, or replacement procedures to prevent possible electrical shock and equipment damage. - Page 25 SETUP Intelect ® Advanced Laser Module ATTACHING THE MODULE TO THE UNIT continued Using a #1 Phillips Screwdriver, remove the screw securing the plastic lanyard to the front access panel. Turn the unit upside down and lay it flat on your lap or a covered surface so as not to scratch the plastic display lens.
- Page 26 SETUP Intelect ® Advanced Laser Module ATTACHING THE MODULE TO THE UNIT continued next step. If you are disconnecting another module, make certain you leave the ribbon cable plugged into the main unit. NOTE: If the unit is equipped with an sEMG Module, leave it in place to maintain sEMG functions for Channels 1 and 2.
- Page 27 SETUP Intelect ® Advanced Laser Module ATTACHING THE MODULE TO THE UNIT continued Using only your fingers, gently fit the female end of the ribbon cable to the connector pins of the module. Make sure the fit is snug. Fit the rubber feet of the unit into the feet indentions on the module, and allow the unit to rest flush on the module.
- Page 28 SETUP Intelect ® Advanced Laser Module ATTACHING THE MODULE TO THE UNIT continued Using a #1 Phillips Head screwdriver, secure the new extended front access panel to the lanyard. NOTE: When securing the front access panel, make certain the lanyard does not become kinked.
- Page 29 SETUP Intelect ® Advanced Laser Module ATTACHING THE MODULE TO THE UNIT continued Replace all cables and wires on the original unit. If applicable, insert the patient interrupt switch, door interrupt switch, microcurrent point locator, or laser applicator in the proper connection. For more information about the symbols used for the connections, see pages 14-15.
-
Page 30: Removing The Module From The Unit
SETUP Intelect ® Advanced Laser Module REMOVING THE MODULE To remove a module from the main unit, do the following: Disconnect the unit from the electrical outlet. Leave the ribbon cable plugged into the main unit. Remove the rear access panel and disconnect the power cord from the main unit. Remove the extended front access panel and disconnect all cables and wires. -
Page 31: Operation
OPERATION Intelect ® Advanced Laser Module PREPARING THE PATIENT’S SKIN FOR LASER THERAPY Before applying laser therapy to the patient, you must first prepare the patient’s skin. By properly preparing the patient’s skin for laser therapy, you will allow more laser energy to reach the targeted areas and reduce the risk of skin irritation. -
Page 32: Starting, Stopping, & Interrupting Therapy
OPERATION Intelect ® Advanced Laser Module STARTING, STOPPING, AND INTERRUPTING THERAPY The Operator Interface consists of buttons with a liquid crystal display (LCD). The operator is able to view parameter options on the display and make selections by pressing the buttons on the Operator Interface. The LCD will provide continuous information during the treatments concerning dosage and elapsed time. - Page 33 OPERATION Intelect ® Advanced Laser Module STARTING, STOPPING, AND INTERRUPTING THERAPY continued 1 1 1 1 is the default PIN. Press the button next to the number 1 four times so that * * * * displays briefly. Then, the Laser Therapy window displays. If you begin to enter the wrong PIN, you can press the button next to Clear PIN to try again.
- Page 34 OPERATION Intelect ® Advanced Laser Module STARTING, STOPPING, AND INTERRUPTING THERAPY continued Press the button next to Frequency. The Frequency window displays. Press the button next to the icon to increase the frequency in 1 Hz increments. Hold the button down to quickly display higher frequencies. Press the button next to the icon to decrease the frequency in 1 Hz increments.
- Page 35 OPERATION Intelect ® Advanced Laser Module STARTING, STOPPING, AND INTERRUPTING THERAPY continued Press the button next to Toggle Preset Frequencies repeatedly to scroll through commonly used frequencies. Press the button next to the icon to accept the frequency you selected. You are returned to the Laser Parameter window with the new Frequency displayed.
- Page 36 OPERATION Intelect ® Advanced Laser Module STARTING, STOPPING, AND INTERRUPTING THERAPY continued Press the button next to Treatment Time. The Treatment Time window displays. Press the button next to the icon to increase the number of seconds for the treatment time. Hold the button down to quickly increase the treatment time.
- Page 37 OPERATION Intelect ® Advanced Laser Module STARTING, STOPPING, AND INTERRUPTING THERAPY continued Press the button next to the icon to accept the treatment time you selected. You are returned to the Laser Parameters window. Notice that if you changed the Calculated Dosage, the Treatment Time automatically changed. Press the button next to Calculated Dosage.
- Page 38 OPERATION Intelect ® Advanced Laser Module STARTING, STOPPING, AND INTERRUPTING THERAPY continued You are returned to the Laser Parameters window. Notice that if you changed the Calculated Dosage, the Treatment Time automatically changed. If you are using a cluster diode applicator, press the button next to Select Diodes repeatedly to select either Laser Only, LED Only, or Laser and LED.
- Page 39 OPERATION Intelect ® Advanced Laser Module STARTING, STOPPING, AND INTERRUPTING THERAPY continued Press the START button. A message displays to alert you to the fact that the laser is armed. The unit will beep two times to count down the number of seconds left until the applicator is ready.
- Page 40 OPERATION Intelect ® Advanced Laser Module STARTING, STOPPING, AND INTERRUPTING THERAPY continued When either the PAUSE button on the Operator Interface or the Pause button on the back of the applicator are pressed, the following occurs: • the timer pauses •...
-
Page 41: Using The Acupuncture Point Locator
OPERATION Intelect ® Advanced Laser Module USING THE ACUPUNCTURE POINT LOCATOR The Acupuncture Point Locator allows the user to locate the optimum treatment areas (GSR’s) on the patient’s body, then treat those areas. NOTE: You must have a single diode applicator plugged into the laser module before attempting acupuncture therapy. - Page 42 OPERATION Intelect ® Advanced Laser Module USING THE ACUPUNCTURE POINT LOCATOR (continued) Allow the patient to hold the Acupuncture Point Locator firmly in either hand. Hold the applicator over an area in which you intend to locate an acupuncture point. Press the START button.
- Page 43 OPERATION Intelect ® Advanced Laser Module USING THE ACUPUNCTURE POINT LOCATOR (continued) Press the button next to the icon to increase the sensitivity of the applicator. The highest sensitivity level is 9. Press the button next to the icon to decrease the sensitivity of the applicator.
- Page 44 OPERATION Intelect ® Advanced Laser Module USING THE ACUPUNCTURE POINT LOCATOR (continued) When the timer reaches zero, repeat steps 6 through 11 until the therapy time runs out, or you have treated all necessary acupuncture points. NOTE: When treatment time has expired, a tone will sound. The therapy can be interrupted at any time by pressing the Pause/Resume button on the back of the applicator, the STOP button (on the Operator Interface), or the PAUSE button (on the Operator Interface).
-
Page 45: Using Clinical Indications
OPERATION Intelect ® Advanced Laser Module USING CLINICAL INDICATIONS The indications contained in this section are to be used only as guidelines. Each patient should be individually assessed to determine the appropriateness of the parameter setting prior to use. To select an indication for a patient, do the following: On the Laser Therapy window, press the button next to Laser Indication. - Page 46 OPERATION Intelect ® Advanced Laser Module USING CLINICAL INDICATIONS (continued) If the applicator you are using has additional clinical indications associated with it, press the button next to Next Page to display another list of indications. The next Laser Indications window displays. If the indication you require has an available severity, select either Acute or Chronic.
- Page 47 OPERATION Intelect ® Advanced Laser Module USING CLINICAL INDICATIONS (continued) The parameters of the indication are displayed on the window. If necessary, make any parameter changes or adjustments. The Laser Therapy window displays. To begin therapy, continue with the instructions outlined in the section entitled “Preparing the Patient’s Skin for Laser Therapy”...
-
Page 48: Saving User Protocols
OPERATION Intelect ® Advanced Laser Module SAVING USER PROTOCOLS The Intelect Advanced Laser Module allows you to tailor a protocol according to the requirements of a patient. To save a laser indication, do the following: Complete steps 1 through 6 of the previous section entitled “Using Laser Indications. - Page 49 OPERATION Intelect ® Advanced Laser Module SAVING USER PROTOCOLS (continued) When you have finished entering the name of the indication, press the button next to The message “Saving Protocol Please Wait” displays. You are returned to the Laser Therapy window with the parameters of the indication you just saved displayed, as well as the name of the indication.
-
Page 50: System Utilities
OPERATION Intelect ® Advanced Laser Module SYSTEM UTILITIES Changing the Laser PIN To change the PIN, do the following: On the Main window, press the button next to Laser Therapy. The Laser PIN window displays. 1 1 1 1 is the default PIN. Press the button next to the number 1 four times so that * * * * displays briefly. - Page 51 OPERATION Intelect ® Advanced Laser Module SYSTEM UTILITIES continued Press the button next to Change Laser PIN. The Change Laser PIN window displays. Press the buttons next to the numbers to which you want to change the PIN. Once you enter four numbers, a message displays to inform you of the new PIN.
-
Page 52: Changing The Display
OPERATION Intelect ® Advanced Laser Module SYSTEM UTILITIES (continued) Press any button to continue. You are returned to the Laser Therapy window. Changing the Display The laser module can display either Joules (J) or Joules per centimeters squared (J/cm ). To change the display, simply press the button next to Display on the Laser Parameters window. -
Page 53: Treatment Tips
OPERATION Intelect ® Advanced Laser Module TREATMENT TIPS Contact To obtain the most effective results, the applicator should be in contact with the patient’s skin. Applicator Position Due to the characteristics of laser light, the angle at which the light enters the patient’s skin is very important. Therefore, the applicator lens should always be parallel to the treatment area. -
Page 54: Accessories
ACCESSORIES Intelect ® Advanced Laser Module Standard Accessories Optional Accessories Ref. Description Ref. Description 27455 User Manual CD 27799 Single Diode 670 nm LED 10 mW Applicator [26 AWG, 68.89 in (174.143 cm), Shielded] 27525 Laser Protective Eyewear 27805 Single Diode 820 nm Laser 300 mW Applicator [26 AWG, 68.89 in (174.143 cm), Shielded] 27842 Acupuncture Point Locator 27803... -
Page 55: Troubleshooting
TROUBLESHOOTING Intelect ® Advanced Laser Module ERROR MESSAGES CODE TYPE PROBABLE CAUSES POSSIBLE REMEDIES NUMBER MESSAGE Another treatment is running A. Allow existing treatment to complete before starting Laser Therapy. while attempting to set up Warning B. If no other treatment is running, reset Therapy System by turning main and perform a Laser Therapy power switch Off and On. - Page 56 TROUBLESHOOTING Intelect ® Advanced Laser Module ERROR MESSAGES continued CODE TYPE PROBABLE CAUSES POSSIBLE REMEDIES NUMBER MESSAGE Warning Laser Applicator became A. Connect desired Laser Applicator to the system. unplugged while performing a B. If Laser Applicator is connected, reset Therapy System by turning laser treatment main power switch Off and On.
- Page 57 TROUBLESHOOTING Intelect ® Advanced Laser Module ERROR MESSAGES continued CODE TYPE PROBABLE CAUSES POSSIBLE REMEDIES NUMBER MESSAGE Warning Wrong Laser Applicator A. Connect correct Laser Applicator to the system. connected to system for the B. If Applicator is connected, reset Therapy System by turning main power switch Off and On.
-
Page 58: Maintenance
MAINTENANCE Intelect ® Advanced Laser Module Maintaining the Intelect Advanced Laser Module The following items should be checked at least monthly to ensure proper operation of this unit: • Power cord and plug: Check to make sure the cord is not frayed, kinked, and does not have torn or cut insulation. -
Page 59: Service
Advanced Laser Module Service The Intelect Advanced Laser Applicator must be recalibrated annually. Chattanooga laser products must be returned to the factory or an authorized servicing dealer for repairs or recalibration. Should the unit require service, warranty, or repair, please contact the selling dealer or your local DJO customer service. -
Page 60: Warranty
WARRANTY Intelect ® Advanced Laser Module DJO, LLC ("Company") warrants that the Intelect Advanced Laser Module ("Product") is free of defects in material and workmanship. This ® warranty shall remain in effect for two years (24 months) from the date of original consumer purchase. If this Product fails to function during the two years warranty period due to a defect in material or workmanship, Company or the selling dealer will repair or replace this Product without charge within a period of thirty (30) days from the date on which the Product is returned to the Company or the dealer. - Page 61 DJO is an ISO 13485 Certified Company DJO France SAS Centre Europeen de Fret 3 rue de Bethar 64990 Mouguerre, France T: + 33 (0) 5 59 52 86 90 F: + 33 (0) 5 59 52 86 91 djoglobal.eu/fr_FR ©...
Need help?
Do you have a question about the Intelect Advanced 2766 and is the answer not in the manual?
Questions and answers