
Related Manuals for Inovalley HP32-CD

Summary of Contents for Inovalley HP32-CD
- Page 1 SOUND TOWER CD PLAYER BLUETOOTH CONNECTED Ref: HP32‐CD + HP32‐CD‐W ‐ USER MANUAL ‐ ...
-
Page 2: Important Safety Instructions
IMPORTANT SAFETY INSTRUCTIONS Please read this user manual carefully before you use this product. Please reserve it properly for reference in the future. Please do not expose the unit in the raining or moist environment to avoid fire hazard or electric shock. On the machine should not receive the water drop or the water splashes, on the machine could not lay object filled with liquid, like vase. THE AC MUST REMAIN EASILY ACCESSIBLE IN ORDER TO BE ABLE TO DISCONNECT THE DEVICE IN CASE OF EMERGENCY. 1. Read through the manual before operating. 2. Heed the instructions. 3. Follow all instructions in the manual. 4. Keep the manual for future reference. 5. Do not use the apparatus in places that are extremely hot, cold, dusty or humid. 6. Do not keep the apparatus in a high humidity area such as a bathroom, kitchen sink or pool. Keep the apparatus away from heaters, stoves, etc. Never leave the apparatus in an area exposed to direct sunlight where there could be a considerable rise in temperature. 7. The apparatus should not be exposed to dripping or splashing, and no objects filled with liquids such as vases, should be placed on the apparatus. 8. Do not block any ventilation openings. The ventilation should not be impeded by covering the ventilation openings with items such as newspapers, table‐cloths, curtains and the like. 9. - Page 3 solution. Do not use strong solvents which may cause unpredictable damage to the apparatus. 11. Do not use attachments/accessories not recommended by the product manufacturer as they may be hazardous. 12. Power‐supply cords should be routed so that they are not likely to be trapped in any way. Also protect the power cord from being walked on or pinched, particularly at plugs, convenience receptacles and the pointers where they exist from the apparatus. 13. This product should be operated only from the type of power source indicated on the marking label. If you are not sure of the type of power supply to your home, consult your product dealer or local power company. For products intended to operate from battery power, or other sources, refer to the operation instructions. 14. The mains plug is used as disconnect device. The mains plug of apparatus should not be obstructed OR should be easily accessed during intended use. To be completely disconnect the power input, the mains plug of apparatus should be disconnected from the mains. 15. An outside antenna system should not be located in the vicinity of overhead power lines or other electric light or power circuits, or where it can fall into such power lines or circuits. When installing an outside antenna system, extreme care should be taken to keep from touching such power lines or circuits as contact with them might be fatal. 16. If the apparatus is not used for a period of time, unplug the power cord. 17. If the remote control unit is not used for a period of time, remove batteries from the remote control unit and store them in a cool dry area. 18. If it is lightening, unplug the power cord to prevent the unit from unnecessary damages. 19. This product should be moved with care to avoid damage or injury. 20. Never try to disassemble batteries. Neither put batteries under the direct sunlight nor throw them into fire or heater. As all of these may cause unnecessary damages ...
-
Page 4: Electric Supply
power cord or plug is damaged, liquids spilled into the apparatus, any hard object fallen on the apparatus, the apparatus has been dropped, the apparatus has been exposed to rain or moisture. 22. The marking information is located at the back of the apparatus. 23. Minimum distance 5 cm around the apparatus for sufficient ventilations 24. Do not place any flame sources such lighted candles on top of the apparatus. 25. Attentions should be drawn to the environmental aspects of batteries disposal. 26. Use the apparatus in moderate climates. This set employs an optical laser beam system in the CD mechanism designed with built‐in safeguards. Do not attempt to disassemble. Exposure to this invisible laser light beam may be harmful a the human eye. This is a Class 1 laser product. Use of controls, adjustments or procedures other than those specified here in may result in hazardous laser light beam exposure. This compact disc player should not be adjusted or repaired by anyone except qualified service personnel. The laser mechanism in the set corresponds to the stylus (needle) of a record player. Although this product uses a laser pick‐up lens, it is completely safe when operated according to directions. ELECTRIC SUPPLY 1. Please unplug the product in case of prolonged non‐use. 2. If the supply cable is damaged, it must be replaced by the manufacturer or qualified after‐sales personnel to avoid any danger. 3. This product must be connected to an electrical supply 100‐240V ~ 50/60Hz. 4. The plus must be accessible after installation. 5. Hold the plug well when you plug the power cord in or out. 6. Please do not put the AC power cord near any heat source equipment. 7. Please do not place any heavy objects on the AC power cord. 8. -
Page 5: Before Use
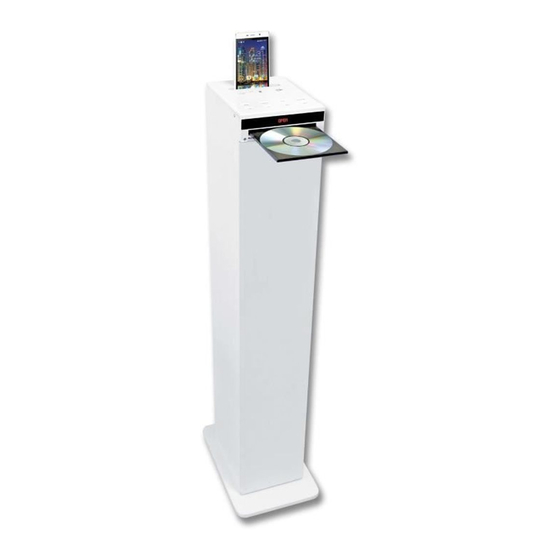
repaired, please let the professional people check and repair it. CAUTION 1. Use of controls and adjustments or performance of procedures other than those specified herein may result in hazardous radiation exposure. 2. If this product develops trouble, contact qualified service centers, and do not use the product in defective states. BEFORE USE 1. Choose unit installation location carefully. Avoid placing it in direct sunlight or close to a source of heat. Also avoid locations subject to vibrations and excessive dust, cold or moisture. Keep away from sources that hum, such as transformers or motors. 2. Do not open the cabinet as this might result in damage to the circuitry or electrical shock. If a foreign object should get into the set, contact your dealer. 3. When removing the power plug from the wall outlet, always pull directly on the plug, never pull the cord. 4. Do not attempt to clean the unit with chemical solvents as this might damage the finish. Use a clean, dry cloth. 5. In order to shut off the power to this product completely, unplug the power cord from the wall outlet. Be sure to unplug the unit if you do not intend to use it for an extended period of time, such as while on vacation. 6. Keep this manual in a safe place for future reference. FEATURES Built‐In 4 x 15 Watts Works with smartphones, tables, music devices. Bluetooth V2.1 (Bluetooth operating range: 10 meters) CD player Compatible CD/MP3/CD‐R/CD‐RW etc FM Radio USB2.0 port 5 ... -
Page 6: Installation Instruction
Micro SD card slot Function to play MP3 music AUX‐IN port LED display Cradle on top to hold mobile phones Remote control and jack 3.55 cable included Power cord INSTALLATION INSTRUCTION 6 ... -
Page 7: Micro Sd Card Reader
DESCRIPTION FOR THE FRONT PANEL 1. USB PORT 2. MICRO SD CARD PORT 3. PLAY/PAUSE/SCAN 4. MODE 5. VOL+ 6. VOL‐ 7. AUX 8. STOP 9. OPEN/CLOSE 10. NEXT 11. PREV 12. LED display 13. CD door USB PORT Input USB device. MICRO SD CARD READER Input memory card MICRO SD. ... - Page 8 ‐ Under FM status, press this key to search FM programs automatically. MODE ‐To switch functions between Bluetooth/USB/MICRO SD/FM/AUX. VOL+ ‐ Short/Long press to add the volume. VOL‐ ‐Short/Long press to subtract the volume. AUX PORT ‐Input Audio cable(included) and connect to the audio devices. OPEN/CLOSE Press to open/close the CD door NEXT ‐ Short press to choose next song. PREV ‐ Short press to choose previous song. DESCRIPTION FOR THE REAR PANEL A. FM ANTENNA B. POWER CORD C. POWER ON/OFF 8 ...
-
Page 9: Battery Installation Remote Control
BATTERY INSTALLATION REMOTE CONTROL Method for installing the batteries of the remote control. 1. Turn to the back side of the remote control and remove the small cover 2. Install 2 x AAA batteries (not included) properly 3. Fit on the small cover. Notes: 1. Please do not use the rechargeable battery 2. Does not mix use the battery with different brand and type for the remote control. Please do not use the new and old batteries together. 3. When the remote control’s function is not so strong or the control range becomes smaller, please change the 2pcs x AAA batteries together. 4. If the unit will not be used for a long time, please take out the batteries from the remote control so as not lead to battery liquid leak, corrosion and unit damaged. 5. -
Page 10: Description Of The Remote Control
DESCRIPTION OF THE REMOTE CONTROL 1.STANDBY 2.MUTE 3.NUMBER KEYS 4.SLEEP 5.CH+ 6.VOL‐ 7.PLAY/PAUSE 8. STOP 9.OPEN/CLOSE 10.FUNCTION 11.BASS/TREBLE 12.PROG 13.ST/MO 14.REPEAT 15.NEXT 16.PREV 17.REV 18.VOL+ 19.FWD 20.CH‐ NOTE: batteries 2 x AAA 1.5V NOT INCLUDED. FUNCTION INSTRUCTION FOR REMOTE CONTROL 1.STANDBY Press this key to choose the unit POWER ON or STANDBY status. 2.MUTE Press it will make sound off; press it again will make sound on. 3.NUMBER KEYS It includes 0‐10 number keys and 10+/10‐ keys. You can press them to select the file 10 ... - Page 11 which you want directly. 4.SLEEP When pressing this key, there are several options for setting the sleeping time. That means the unit will be power off automatically after playing the music for times which you choose. This function is suitable for listening the music before sleep. 5.CH+ Press this key, it will choose the next FM station. 6.VOL ‐ Press this key to decrease the volume. 7.PLAY/PAUSE Press this key to make the music play or pause. 8.STOP Press it to stop the file playing. 9.OPEN/ CLOSE Open or Close the disc tray. 10.FUNC Press this key repeatedly; you can switch among CD, USB, SD,AUX IN, FM RADIO and BLUETOOTH playing. ...
-
Page 12: Basic Operation
13.ST/MO Press this button to choose FM stereo or Mono sound. 14.REPEAT Press this key, it will repeat the file playing. 15.NEXT Press this key to select the next file or channel. 16.PREV Press this key to select the last file or channel. 17.REV Press this key to enter into the fast backward status, press it repeatedly, it will be played at the different speed of fast backward. 18.VOL+ Press this key, it will increase the volume. 19.FWD Press this key to enter into the fast forward status, press it repeatedly, it will be played at the different speed of fast forward. 20.CH‐ Press this key, it will choose the last FM station. BASIC OPERATION 1. FUNCTION CHOOSE Press the MODE key (on the product) or FUNC key (on the remote control), you can choose to play CD, USB,SD CARD, AUX IN,FM RADIO and BLUETOOTH as you like. 2. CD PLAYING 12 ... - Page 13 Press the ON/OFF power button the unit, press MODE or FUNC key to enter into CD mode . 3. USB PLAYING Insert USB flash driver, and then press the MODE/FUNC key to choose USB status, and then press PLAY key, it will begin to playing the file from USB flash driver. 4. MICRO SD PLAYING Insert Micro SD card, and then press the MODE/ FUNC key to choose Card status, and then press PLAY key, it will begin to playing the file from Micro SD card. 5. FM RADIO ‐ Pressing MODE/FUNC key to choose FM status, and then please press SCAN (on the ll product) or key (on the remote control) , it will search the FM channels and save the stations automatically. ‐ Press CH+ or CH‐, you can choose the last or next FM station. You can also revise the stored FM channel’s position by using PROG key. ‐ Press ST/MO key, you can choose or cancel the stereo FM radio receiving. 6. BLUETOOTH ‐ Press MODE/FUNC key to choose BLUETOOTH status, it will enter into the Bluetooth status automatically. And then please open the Bluetooth function on your mobile phone or others Bluetooth device, it will begin to search for the Bluetooth device. ...
-
Page 14: Specifications
SPECIFICATIONS Output Power …………. 4 x 15 WATTS Frequency Response …………. 60Hz‐18kHz Power …………. 100‐240V~50/60Hz 20W INPUT AUX‐IN Micro SD card slot USB port Bluetooth …………. V2.1 Bluetooth range …………. 10 meters FM Radio …………. 87.5Hz‐108KHz S/N ratio …………. ≥78db Dimensions (W x H x D) …………. 1020x200x150mm Weight …………. 3.40Kg Accessories …………. Remote Control JAUX‐IN cable Jack 3.5mm ... - Page 15 Failed when connect to the To connect the Bluetooth Bluetooth device device properly, and make sure it was connected successfully. Volume was set at 0 degree To add the volume at the or at Mute status. proper degree or press the MUTE key again on the remote If the problem exists after checking related procedures above, please refer to the service agent's professional technician to fix it. Do not attempt to open the back cover, otherwise DETAILS AND PRECAUTIONS ON THE USE OF BATTERIES ‐ Discard a used battery in nature or garbage pollutes and prevents the recovery of recyclable materials. It is therefore important to limit consumption of batteries and follow these guidelines: ‐ focus on alkaline batteries (that last longer than the saline batteries) and when possible, rechargeable batteries ‐ deposit ...
- Page 16 ‐ Also, remove the batteries from your device if you do not use it for a long time, if the batteries may leak and cause damage. ‐ Never try to short‐circuit the battery terminals ‐ Never dispose of batteries in fire, they might explode ‐ Charging of batteries is to be performed by an adult. ‐ Remove batteries from the device before reloading. ‐ We recommend an adult to supervise children when they change the batteries so that these instructions are complied with or to make himself the replacement of batteries. ‐ If a battery is swallowed, immediately consult a doctor or poison control center nearest you. Do not forget to carry the product with you. We certify that the power supply is used as a device for disconnecting the power distribution network, which should stay easily accessible. ...
- Page 17 17 ...
Need help?
Do you have a question about the HP32-CD and is the answer not in the manual?
Questions and answers