Table of Contents
Advertisement
Quick Links
Advertisement
Table of Contents

Related Manuals for Tense RGT-MT18

Summary of Contents for Tense RGT-MT18
- Page 1 RGT-MT18 USER GUIDE www.tense.com.tr...
-
Page 2: Table Of Contents
Contents About RGT-MT18 Features About RGT-MT Warnings Considerations in Compensation What to Look Out for in the Selection and Connection of Current Transformer? How to Connect the NTC to the Panel Temperature? Maintenance of the Device Screen Intro 1 Measurements Page 1 1.1 Voltage Page... - Page 3 Contents 3.3 Current Harmonic Protection 3.4 Generator Compensation Setting 3.5 Voltage Protection 3.6 Inductive and Capacitive Alarm 3.7 Compensation Target Setting 3.8 Temperature Control 3.9 ModBus Settings 3.10 Step Settings Page 3.10.1 Step Times 3.10.2 Entering the Manual Step Value 3.10.3 Automatic Step Measurement 3.10.4 PFC Setting 3.10.5 Step Test...
- Page 4 Contents Calculation Chart of Capacitor According to Connection Step Creation According to Power Analysis Examples? Dimensions Factory Default Values Technical Specifications Contact Information User Notes...
-
Page 5: Features
Thus it endeavors to reduce the inductive/active and capacitive/active rates of the system. It is designed to make more sensible compensation at the unbalanced inductive and capacitive systems with RGT-MT18 TCR(SVC) step. Features 5 "Easy to install and use with touch (resistive) display... -
Page 6: About Rgt-Mt
Warnings Use the device according to our instructions. Avoid direct sun light in order not to harm the LCD screen. Leave at least 10 cm of space behind the device after mounting. Fix the device with apparatus which comes within the device by avoiding any kind of shake on the front cover of the board. -
Page 7: Considerations In Compensation
It is recommended that class of the current transformers (it can be also mentioned class, klas, kl, cl ) should be 0,5 which will be used at the compensations. Only X5A current transformers can be connected to the RGT-MT18. Be careful about the absence of any load before the current transformers. Otherwise there can be differences between reactive and counter. -
Page 8: How To Connect The Ntc To The Panel Temperature
-40 ºC, "NC" is written in the value display. It has no touch feature. 4- Remote Communication Indicator: It displays for 1 second when remote communication with RGT-MT18. Active The passive image is displayed when no remote communication is made. -
Page 9: Measurements
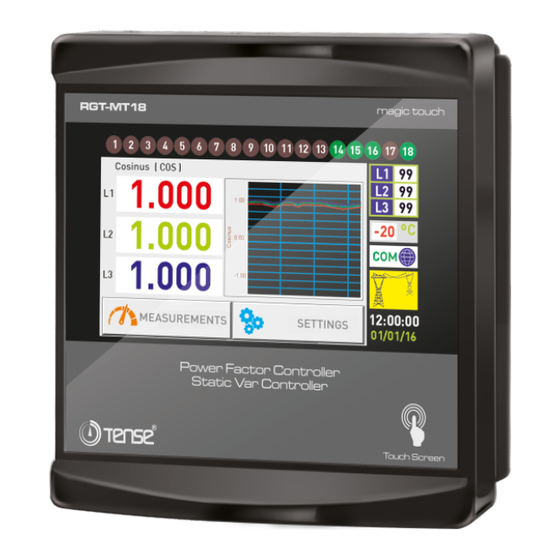
1. Measurements Page 1 Measurements MEASUREMENT PAGE-I When the Measurements button is pressed, & & the measurements page-1 comes to the Voltage Voltage&Current Voltage&Freq. dynamic area. From this page you can switch between Voltage, Voltage & Current, Voltage & Frequency, Instantaneous Power, Ratios, Instant Powers Reactive Ratios Power Factor... -
Page 10: Voltage & Frequency Page
1.3 Voltage & Frequency Page Measurements Page 1 Measurements Voltage L-N Frequency 220.0 50.00 In this page, the phase-neutral voltage values of each phase and the frequency values of each phase are displayed. 220.0 50.00 On this page, the "Measurements 1" page is displayed 220.0 50.00 when the "Measurements"... -
Page 11: Thd-V Thd-I Page
1.8 THD-V THD-I Page Measurements Page 1 Measurements THD-V THD-I 0.000 0.000 In this page, THD-V (Voltage total harmonic distortion) and THD-I (Current total harmonic distortion) values of each 0.000 0.000 phase are displayed. 0.000 0.000 On this page, the "Measurements 1" page is displayed when the "Measurements"... -
Page 12: Step Values Page
2.2 Step Values Page Measurements Page 2 Measurements In this page, the values of capacitor (sign (-) or shunt Step Values reactor value (each phase separately), connection type and Connection Counter -0.33 -0.33 -0.33 L1-2-3 number of steps usage are displayed. -0,25 0.00 0.00... -
Page 13: Demand Page
2.6 Demand Page Measurements Page 2 Measurements In this page, the total current, active power, reactive power Current Demand (15min.) Current (A) Date Time and apparent power demand values are displayed with the 0.000 00/00/0000 00:00 date and Times. 0.000 00/00/0000 00:00 0.000... -
Page 14: Current Transformer Settings
3.1 Current Transformer Settings Settings In this page you can start the current transformer test and L1 - Harmonik Distorsiyon Gerilim Current Transformer Settings change the current transformer value. On this page, when the "Start Current Transformer Test" TEST button is pressed, the current transformer test is started. Back Change Current Start... -
Page 15: Current Harmonic Protection
3.3 Current Harmonic Protection Settings THDI Protection Settings In this page current harmonic control mode can be made active or passive, harmonic of current and delay can be set. THDI Control Mode Active When the setting is active color of the button's writing THDI Set (%) Delay (sn.) becomes green, when it is passive it becomes red. -
Page 16: Inductive And Capacitive Alarm
3.6 Inductive and Capacitive Alarm Settings In this page inductive/active and capacitive/active Alarm Select the Alarm You Want to Set! mode can be made passive or active and inductive/active and Cap.Alarm Passive Ind. Alarm Active capacitive/active ratio can be set. When the setting is active Inductive Alarm % Capacitive Alarm % color of the button's writing becomes green, when it is... -
Page 17: Modbus Settings
3.9 Modbus Settings Settings In this page remote communication settings can be done to the device. Addresses of Baudrate and Modbus can be ModBus Settings - 8 N 1 Baudrate Modbus Address changed. Databits=8, Stopbits=1 and Parity=none values are 19200 fixed. -
Page 18: Entering The Manual Step Value
3.10.2 Entering the Manual Step Value Settings Step Settings In this page, manual step value can be entered. Mono and Enter the Step Value! three phase capacitor or shunt reactor values can be entered. Step Phase Value (kVar) -01.00 Step, Phase and Values are set to help with the up and down arrow buttons. -
Page 19: Pfc Setting
3.10.4 PFC Setting Settings Step Settings In this page PFC(compensation) and TCR(SVC) are made Choose the PFC Mode! active or passive ,from the Step Counter part,the setting of the device on how many steps can be included is done. The Step Counter PFC Active device can disable PFC (compensation) in necessary (like... -
Page 20: Device Installation
3.11.1 Device Setup Settings Step Settings Current 1. Step (kVAr) Step Measurement Enter the CT Ratio Current Transformer Test 380.0 -01.50 CT Test was Started Step Test Was Started 380.0 -01.50 0150 380.0 -01.50 Cancel Confirm CANCEL TURN BACK CT Test CT Connection In order to set the device press the ''up'' and ''down'' buttons, enter the current transformer value. -
Page 21: Delete Registration
3.11.4 Delete The Recording Settings Step Settings When the "Delete Registration" button is pressed, the dynamic area screen displays the Select the Record You Want to Delete Register Delete page. In this page, the total SN: 12345678 energy values, power analysis examples, kVArh Ver: 1.09 Ratio and Demand values that the device... -
Page 22: How To Select A Home Page
How to Choose a Main Page? The home page is the page that will appear on the dynamic display when the device is energized and will remain visible without pushing the buttons. You can define the main page you want to see continuously from the following measurement pages. To select the voltage page as the home page, after the Voltage L-N Voltage L-L... -
Page 23: How To Install The Device
How to Install the Device? To access the device setup page, enter the following Enter the CT Ratio menus, respectively; Ayarlar Device Settings Device Setup 0150 After reaching the device setup page, press the up or down buttons to enter the current transformer value. When the TURN BACK "Confirm"... -
Page 24: How Is The Current Transformer Test Done
How is the Current Transformer Test Done ? In order to reach current transformer test page, enter Current Current Transformer Test 380.0 these menus subsequently; CT Test was Started 380.0 Settings Current Transformer Start CT Test 380.0 After reaching the current transformer page, when the ''Start Current Transformer Test'' button is pressed, the test Cancel Confirm... -
Page 25: How To Enter The Manual Step Value
How is the Step Value Entered Manually? In order to reach ''Enter Step Value'' page, enter these menus subsequently; Enter the Step Value! Step Phase Value (kVar) Settings Enter the Steps Value Step Settings -1.00 After reaching the Enter Step Value page; Step, Phase, and Values are set pressing ''up'' and ''down'' buttons. -
Page 26: How To Return To Factory Settings
How to Return to Factory Settings? In order to return Factory Settings page, enter these Factory Settings menus subsequently; Settings Device Settings Factory Settings MENU Back Load Menu Load Factory After reaching the Factory Settings page when Settings Page Settings Settings ''Load Factory Settings'' button is pressed;... -
Page 27: Three Phase (3P4W) Connection Scheme
Three Phase (3P4W) Connection Scheme... -
Page 28: Single Phase Connection Scheme In Three Phase System
Single Phase Connection Scheme in Three Phase Systems It is not recommended to use single-phase compensation for three-phase systems. The device intervenes only with single phase. It is not known how this intervention will result in the other two phase This connection should be preferred after ensuring that the three-phase system is balanced. -
Page 29: Remote Communication With Rs485 (Gsm-Mod)
Remote Communication with RS485 (GSM-MOD) Internet Operatör / Server GSM-MOD PC - Computer A1 A2 B 5V TX RX 220V Relay RS485 Only reactive relay or together with counter and energy analyzer can be connected with GSM-MOD on remote communication. Using a 100MB (recommended) data line from GSM operators, remote communication is made with reactive relay via www.tenseenerji.com (server). -
Page 30: Calculation Chart Of Capacitor According To Connection
Capacitor Account Table according to Connection Type 2 Phase Phase-Neutral 3 Phase 2 Phase Phase-Neutral Capacitor Connection Bridging Connection Connection Connection Power Bridge Connection (Q/3) (Q/4) (Q/6) (2xQ/9) (Q/3) 0,5 KVAR 0,16 KVAR 0,16 KVAR 0,12 KVAR 0,11 KVAR 0,08 KVAR 0,33 KVAR 0,33 KVAR 0,25 KVAR... -
Page 31: Step Creation According To Power Analysis Examples
Step Creation According to Power Analysis Examples? Table1 Table2 (L1) (L2) (L3) Threephase Monophase Monophase Monophase Time Capacitor Capacitor Capacitor Capacitor (min.) (kvar) (kvar) (kvar) (kvar) 0.00 0.00 1.50 1.50 1.Sample 0.00 1.00 1.50 1.00 1.50 2.Sample 2.00 1.50 0.50 1.50 1.50 1.00... -
Page 32: Dimensions
Dimensions Left Side View Front view 22mm 43mm 147mm Screwed side ear (apparatus) 45mm 34mm Rear view Side ear (apparatus) 114.5mm 138mm 147mm... -
Page 33: Factory Default Values
Factory Defaults Factory Minimum Maximum Setting Name Unit Value Value Value Current Transformer Ratio 5000/5 Harmonic Voltage ( / ) Passive Harmonic Voltage Delay Harmonic Current ( / ) Passive Harmonic Current Delay High Voltage ( / ) Passive Passive Low Voltage ( / ) Inductive Alarm ( / ) Passive... -
Page 34: Technical Specifications
Protection Class IP41 (Front Panel), IP00 (Body) Panel Hole Dimensions 140mm x 140mm Contact Informations Web: www.tense.com.tr Merkez Mah. Akalar Sok. No:39A Mail: info@tense.com.tr GAZİOSMANPAŞA / İSTANBUL / TÜRKİYE Tel: +90212 578 04 38 - 48 Fax: +90212 578 04 36... -
Page 35: User Notes
User Notes... - Page 36 QUALITY SOLUTIONS MADE IN TURKEY ELECTRICITY – ELECTRONIC SAN.TİC.A.Ş Rev:1.10_160713 Document number: DK-048-1...
Need help?
Do you have a question about the RGT-MT18 and is the answer not in the manual?
Questions and answers
How To single phase cT connection & selection
To connect and select a single-phase current transformer (CT) for the Tense RGT-MT18:
1. Use the "up" and "down" buttons to enter the CT ratio (e.g., 150/5A).
2. Press the "confirm" button to start the CT test automatically.
3. If connections are correct, the device completes the CT test and starts step measurement.
4. Press "confirm" again to record the steps, or "cancel" to discard.
Note: Single-phase compensation is not recommended for three-phase systems; ensure the system is balanced before connecting the CT.
This answer is automatically generated