Table of Contents
Advertisement
Operator's Manual
TROLL™ MP Handheld Instrument for Android
SMAR
Information subject to change without notice. In-Situ, In-Situ logo, Baro Merge, BaroTROLL, HERMIT, HydroVu™, iSitu, Pocket-Situ, RDO,
©
RuggedCable, RuggedReader, SmarTROLL™, TROLL, VuSitu, and Win-Situ are trademarks or registered trademarks of In-Situ Inc.
2013-
0099552 | Rev. 002 | 02/2016
2016. All rights reserved. This product may be covered by patents identified at www.in-situ.com/patents
Advertisement
Table of Contents

Subscribe to Our Youtube Channel
Related Manuals for In-situ SmarTROLL MP

Summary of Contents for In-situ SmarTROLL MP
- Page 1 TROLL™ MP Handheld Instrument for Android SMAR Information subject to change without notice. In-Situ, In-Situ logo, Baro Merge, BaroTROLL, HERMIT, HydroVu™, iSitu, Pocket-Situ, RDO, © RuggedCable, RuggedReader, SmarTROLL™, TROLL, VuSitu, and Win-Situ are trademarks or registered trademarks of In-Situ Inc.
-
Page 2: Cleaning Procedure
Apple Inc., registered in the U.S. and other countries. The Bluetooth word mark and logos are registered trademarks owned by the Bluetooth SIG, Inc. and any use of such marks by In-Situ Inc. is under license. NIST is a registered trademark of the National Institute of Standards and Technology, U.S.A. -
Page 3: Table Of Contents
About Calibration and Settings Quick-Cal Multiple Sensor Calibration Calibrate the Rugged Dissolved Oxygen Sensor (1-Point) Calibrate the Rugged Dissolved Oxygen Sensor (2-Point) Calibrating the Rugged Dissolved Oxygen Sensor Using Concentration RDO Salinity Setting Calibrate the Conductivity Sensor Calibrate the Level Sensor 1-800-446-7488 www.in-situ.com... - Page 4 Remove Oily or Greasy Residue Remove Protein-Like Material or Slimy Film Cleaning the RDO Sensor Clean the Sensor Cap Clean the Optical Window Cleaning the Conductivity Sensor Cleaning Procedure 1 Cleaning Procedure 2 Cleaning Procedure 3 Cleaning Procedure 4 1-800-446-7488 www.in-situ.com...
-
Page 5: Introduction
Ensure that the RDO Sensor Cap is pressed firmly over the sensor lens and is flush with the instrument before submerging in liquid. Replace the cable if insulation or connectors are damaged. Make sure the probe and sensor O-rings are clean and free of damage. 1-800-446-7488 www.in-situ.com... -
Page 6: General Specifications
4.6 m, 9.1 m, 30.5 m, 76.2 m (5 ft, 15 ft, 30 ft, 100 ft, 250 ft) Warranty 2-years Specifications are subject to change without notice. Bluetooth is a registered trademark of Bluetooth SIG, Notes Inc. Viton is a registered trademark of DuPont Performance Elastomers L.L.C. 1-800-446-7488 www.in-situ.com... -
Page 7: Level, Depth, Pressure Sensor Specifications
Barometric Pressure Sensor Specifications (Power Pack) Accuracy ±3 mbar max. Range 300 to 1100 mbar Resolution 0.01 mbar Sensor Type Fixed Response Instantaneous in thermal equilibrium Time Units of psi, kPa, bar, mbar, mmHg, inHg, Torr, atm Measure Methodology Piezoresistive pressure sensor 1-800-446-7488 www.in-situ.com... -
Page 8: Conductivity Sensor Specifications
0 to 50 mg/L Resolution 0.01 mg/L Sensor Type Fixed with replaceable RDO Fast Cap (life: 1 year typical) Response T90: <30 sec. T95: <45 sec. Time Units of mg/L, % saturation, ppm Measure EPA-approved In-Situ Methods 1002-8-2009 1003-8-2009 Methodology 1004-8-2009 1-800-446-7488 www.in-situ.com... -
Page 9: Orp Sensor Specifications
±0.1 pH unit from 0 to 12 pH units Range 0 to 14 pH units Resolution 0.01 pH unit Sensor Type Replaceable pH/ORP combo sensor Response <15 sec., pH 7 to pH 4 Time Units of pH units Measure Methodology Std. Methods 4500-H+ EPA 150.2 1-800-446-7488 www.in-situ.com... -
Page 10: Air Temperature Sensor Specifications (Power Pack)
14.4 x 4.3 x 3 cm (5.7 x 1.7 x 1.2 in.) Weight 145 g (0.32 lb) PC / ABS blend, Silicon, Urethane, Stainless steel, ® ® Materials Brass, Santoprene, Poron , Polyethylene, Versapor ® Titanium, PEEK, Viton 1-800-446-7488 www.in-situ.com... - Page 11 300 to 1100 mbar Resolution 0.1° C 0.01 mbar Sensor type Fixed Fixed Response time < 30 seconds Instantaneous in thermal equilibrium psi, kPa, bar, mbar, mmHg, inHg, Torr, Units of measure Celsius or Fahrenheit Method EPA 170.1 Piezoresistive 1-800-446-7488 www.in-situ.com...
-
Page 12: Instrument Overview
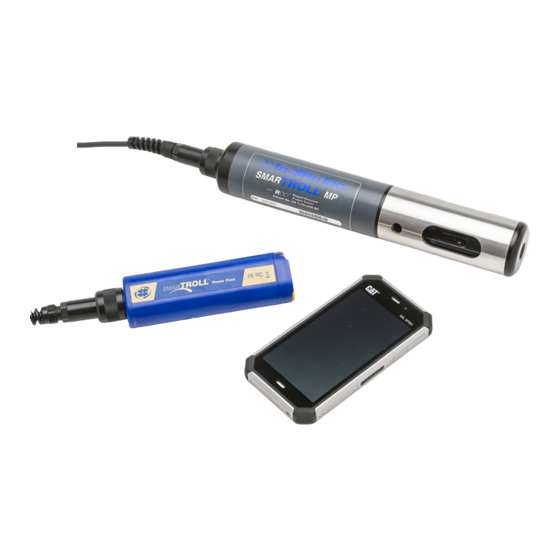
Instrument Overview Instrument Description The smarTROLL MP Handheld Instrument is comprised of a mobile display, Power Pack, cable, and multiparameter water ® quality probe. The optical Rugged Dissolved Oxygen (RDO ), conductivity, pressure, and temperature sensors are integrated into the probe. The pH/ORP and the RDO Sensor Cap are replaceable. -
Page 13: Probe Dimensions With Restrictor Off
Total length with connector 281.81 mm (11.1 in.) Total length without connector 269.11 mm (10.6 in.) Restrictor length 118.24 mm (4.7 in.) Diameter 47 mm (1.85 in.) Probe Dimensions with Restrictor Off Sensor length 81.09 mm (3.2 in.) 1-800-446-7488 www.in-situ.com... -
Page 14: Sensors
The probe is shipped with a storage plug and protective dust caps in place. Dust cap protector on the RDO Sensor. (Install the RDO Cap before deploying the instrument.) pH/ORP storage plug. (Remove the storage plug and install the pH/ORP sensor before deploying the instrument.) 1-800-446-7488 www.in-situ.com... -
Page 15: Power Pack Description
The communication device is connected via USB cable. Green (flashing) = The communication device is connected to the Bluetooth-enabled device, but is not connected to the instrument. Green (continuous) = The communication device, instrument, and Bluetooth-enabled device are connected. On/Off button 1-800-446-7488 www.in-situ.com... - Page 16 Battery charge status: 100% -90% 90% - 75% 75% - 50% 50% - 25% Less than 25% Cable connector to the instrument Lanyard connector USB connection to a power source for charging the internal battery 1-800-446-7488 www.in-situ.com...
-
Page 17: Installing The Sensors
9. Align the pins on the cable with the pins on the probe, then twist the outer portion of the connector until the connection is secure. 10. Align the pins on the cable with the pins on the Power Pack, then twist the outer portion of the connector until the connection is secure. 1-800-446-7488 www.in-situ.com... -
Page 18: Connecting To Vusitu
3. Go to Bluetooth settings on the phone. 4. From the Bluetooth section, search for devices. 5. Tap the In-Situ Power PackWireless TROLL Com name to pair with the phone. 6. Tap the back arrow to return to the app. -
Page 19: Vusitu Overview
About VuSitu VuSitu is the mobile user interface and control application for In-Situ water quality instruments. You can use VuSitu on mobile devices with Android operating system 4.4, Bluetooth 2.0 and newer. Download the latest version of the app from the Google Play Store at play.google.com. -
Page 20: Taking Live Readings In Vusitu
Snapshot Mode Live Readings Mode Take a single reading Take readings at two- and save to Snapshot file. second intervals. View Snapshot file from View readings from Menu > Data Files. Menu > Data Files. Check Snapshot option. Check Live option. 1-800-446-7488 www.in-situ.com... -
Page 21: Vusitu Locations
5. It is optional to add notes to the Location. Tap the Notes field to enter additional information about the Location. 6. It is optional to associate latitude and longitude coordinates with the Location. Tap the map to activate the mapping feature. 1-800-446-7488 www.in-situ.com... - Page 22 9. To manually set a Location, tap and hold to drop a pin on a specific area of the map. This associates latitude and longitude with your Location. As an alternative, you can manually enter latitude and longitude values and tap Apply. 10. Tap Save. 1-800-446-7488 www.in-situ.com...
-
Page 23: Select A Location
1. To Select a Location, tap the current Location displayed on the Live Readings screen. The list of Locations appears. 2. The active Location is marked with a green check mark. If no Location has been selected data will be associated with the Default Location. 3. Tap the desired location in the list. 1-800-446-7488 www.in-situ.com... -
Page 24: Edit Or Delete A Location
Location that was active when the data was recorded. You can view data on the device, delete the data, send the data through email, or save the data to the VuSitu Folder so that it can be downloaded to your computer via USB connection. 1-800-446-7488 www.in-situ.com... -
Page 25: View, Send, Delete Data
Tap View to see the data on the mobile device. Tap Send CSV to send an Excel-compatible file to email or the VuSitu Folder. (When you send the report to the VuSitu Folder, you can later download the data to a computer via USB cable.) 1-800-446-7488 www.in-situ.com... -
Page 26: Vusitu Calibration & Settings
Quick-Cal allows you to perform a one-point calibration on up to three sensors with one setup and stabilization process. 1. From the main menu, select Connected Instrument. 2. Select Calibrations. 3. From the Calibration Menu, select Quick-Cal (multi-sensor). 1-800-446-7488 www.in-situ.com... - Page 27 4. All of the sensors available for the Quick-Cal calibration are selected by default. Tap the checked box if you want to exclude a sensor from the calibration. 5. Select Next. If one or more sensors is not installed, an error message will pop up. 6. Make sure the restrictor is in calibration mode. 1-800-446-7488 www.in-situ.com...
-
Page 28: Calibrate The Rugged Dissolved Oxygen Sensor (1-Point)
The optical Rugged Dissolved Oxygen sensor is very stable. The factory calibration should produce readings within 3% accuracy. If you require readings with greater accuracy we recommend that you perform a 1-point, 100% water-saturated air calibration as described below. 1-800-446-7488 www.in-situ.com... -
Page 29: Calibrate The Rugged Dissolved Oxygen Sensor (2-Point)
5. After the calibration is stable, a prompt to prepare for the next calibration point appears. 0-point Calibration 1. Remove the sponge from the calibration cup. 2. Fill the calibration cup to the fill line with sodium sulfite. Place the instrument in the calibration cup. 1-800-446-7488 www.in-situ.com... -
Page 30: Calibrating The Rugged Dissolved Oxygen Sensor Using Concentration
The SmarTROLL RDO does not include automatic salinity compensation, so you must set it manually. 1. From the main menu, select Connected Instrument. 2. Select Instrument Settings. 3. From the Instrument Settings menu select Salinity Setting. 4. Select the appropriate setting for your sampling environment. 1-800-446-7488 www.in-situ.com... -
Page 31: Calibrate The Conductivity Sensor
3. From the Calibration Menu, select Conductivity. 4. Make sure the restrictor is in calibration mode. 5. Take the calibration solution and pour 10-20 mL (1/2” above the sensor face) on top of the sensors to perform the first rinse. 1-800-446-7488 www.in-situ.com... - Page 32 11. The app attempts to automatically detect the calibration solution and stabilize the measurements. 12. Check your bottle of calibration standard to determine the reference temperature. If necessary, tap the drop down list and select the appropriate reference temperature for the calibration. 1-800-446-7488 www.in-situ.com...
-
Page 33: Calibrate The Level Sensor
15. Rinse the sensors and restrictor with DI water. Calibrate the Level Sensor The factory calibration of the level sensor is very accurate. In-Situ does not recommend calibrating the Level sensor unless your SOP specifically requires you to do so. - Page 34 7. Ensure the sensor face and inside of restrictor / calibration cell are thoroughly cleaned and free of debris. Rinse the sensor face and inside of the restrictor with DI or tap water. 8. Take the calibration solution and pour 10-20 mL (1/2” above the sensor face) on top of the sensors to perform the first rinse. 1-800-446-7488 www.in-situ.com...
-
Page 35: Calibrate The Orp Sensor
Calibrate the ORP Sensor The ORP sensor can be calibrated using Zobell's standard, Quick-Cal or a custom ORP solution. 1. From the main menu, select Connected Instrument. 2. Select Calibrations. 3. From the Calibrations menu select ORP. 1-800-446-7488 www.in-situ.com... - Page 36 6. Ensure the sensor face and inside of restrictor / calibration cell are thoroughly cleaned and free of debris. Rinse the sensor face and inside of the restrictor with DI or tap water. 7. Take the calibration solution and pour 10-20 mL (1/2” above the sensor face) on top of the sensors to perform the first rinse. 1-800-446-7488 www.in-situ.com...
- Page 37 Rinse twice with calibration standard. Not removing all of the previous calibration solution can contaminate the next solution thus impacting the accuracy of the next calibration or cause much slower sensor response. 1-800-446-7488 www.in-situ.com...
-
Page 38: Care And Maintenance
The RDO Fast Sensor Cap has a 1-year typical life (15 months of total usage) after the sensor takes its first reading, or 36 months from the date of manufacture. Follow the instructions included in the RDO Sensor Cap Replacement Kit. Replacement caps are available from In-Situ Inc. or your authorized In-Situ distributor. pH/ORP Sensor Replacement To replace the pH/ORP sensor or to refill the reference junction, follow the instructions in the pH/ORP Sensor Instruction Sheet that is included with the replacement sensor. -
Page 39: Instrument Storage
1. Clean the sensor with warm water and mild soap. 2. Methanol or isopropyl alcohol may be used for short soaking periods, up to 1 hour. 3. Do not soak the sensor in strong solvents, such as chlorinated solvents, ethers, or ketones, including acetone. 1-800-446-7488 www.in-situ.com... -
Page 40: Remove Protein-Like Material Or Slimy Film
Avoid damaging the plastic material of the conductivity cell. Gently scrub the conductivity cell with a foam swab and an aggressive soap such as Alconox cleaner. If debris is still present, continue to Cleaning Procedure 3. If the sensor is clean, 1-800-446-7488 www.in-situ.com... -
Page 41: Cleaning Procedure 3
Process 3. Do not allow the cleaner to be in contact with the sensor for more than 10 minutes. Rinse well with clean water and continue to the last step. Check the sensor calibration before redeployment. Recalibrate the sensor when necessary. 1-800-446-7488 www.in-situ.com...
Need help?
Do you have a question about the SmarTROLL MP and is the answer not in the manual?
Questions and answers