
Related Manuals for felfil Evo

Summary of Contents for felfil Evo
- Page 1 User Manual...
- Page 2 Felfil Spooler is a plastic filament extruder, able to produce filaments for 3D printers starting from industrial pellets or plastics wastes. This guide is designed to allow you a good experience with Felfil Spooler, please read this manual in all its parts before connecting and operating.
- Page 3 - Some polymers can undergo thermal decomposition resulting in potentially toxic fumes. So always use the Felfil Spooler in a well ventilated area, or inprecence of a suction hood (not your bedroom or inside your house), and understand the thermal decomposition properties of the polymer you are extruding.
- Page 4 User Manual Electronic Cover/Connection Input / Output Interface Misuring System Pulling System Distributing System Spool Holder / Spinner Fan Array Fan Array Connection Spooler Manual...
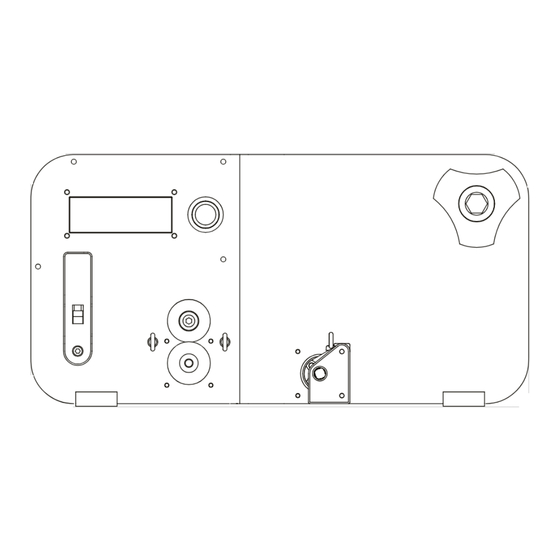
- Page 5 Connection Before using Felfil Spooler some steps are required. Please use the following in Insert the leadscrew shaft stepper 5A into its place. And fix it using two M3 screws, only the left side. The connector must be on the top.
- Page 6 Connections Insert the two slideguide 5C into 5B component. Then screw them to the rigt side of the leadscrew shaft stepper. Insert the sliding part 5D in the shaft turning the shaft by hand. Spooler Manual...
- Page 7 Connections Fix the 5E component using 2 M3 screws. Connect the leadscrew shaft stepper to its wires connector. Spooler Manual...
- Page 8 Connections Connect Felfil Spooler to the fan array using the DC jack to jack cable. Connect the power supply. Spooler Side Fan Array Side Spooler Back AC/DC Power Supply Plug Spooler Manual...
- Page 9 User Manual Insert your empty spool in its support and lock it. Please note that max size of the spool is 10cm width and 22cm diameter. Spooler Manual...
- Page 10 3cm to 10cm to 10cm Place Felfil Evo, Fan Array and Felfil Spooler on a table and arrange them like in the pictures. All the machines must be alligned: allign the Felfil Evo nozzle with the filament support placed on the Fan Array and Felfil Spooler.
- Page 11 Connections Turn on the main switch placed on the back of the spooler, near the DC Jack connector. Main Switch The measuring system must be empty! Otherwise the measure read will be compromised. Check it, please. Spooler Manual...
- Page 12 User Manual The first screenshot shows a calibration. During this step, you will see the distribution reset. Indeed, every spooling session will start from the left side of the distribution. Felfil Spooler Felfil Spooler Do not click anything during the calibration Calibrating...
- Page 13 If you are working in “Manual Mode” this parameter indicates the puller whells constant speed (meter per minute). Adjust it according to your extrusion flow. Set PullSpeed: This parameter is settable only in “Manual Mode” 1.18 Felfil Spooler is ready to be used. Spooler ready! > Diameter: 1.75 Spooler Manual...
- Page 14 User Manual Insert the filament through the proper supports placed on the fan array. Use gloves to do this operation. The filament is still hot. Do not stretch the filament, do this operation slowly. Insert the filament into the measuring system sliding up the little lever. Once the filament is in position the puller wheels will start rotating.
- Page 15 User Manual Once the filament is pushed in the measuring system the puller wheels will start to rotat- ing and the following information will appear. This is the main working interface of Felfil Spooler. This is the read This is the extrusion 1.74...
- Page 16 User Manual The filament must pass under the empty spool. Let it go until the diameter will remain quite constant. Then you can fix the filament to the spool. Spooler Manual...
-
Page 17: Set Mode
Powering On Use the following gestrures to navigate into the menu. 1.74 0.69 > Diameter: 1.75 Rotate to navigate 1.74 0.69 between menu items > Mode: Soft 1.74 0.69 > Travel: 80 Push to enter in 1.74 0.69 menu item >... - Page 18 User Interface Listed below there are all the parameters (menu items) that you can modify every time you need during the extruding session. 1.74 0.69 Filament diameter desired. > Diameter: 1.75 From 0.5mm to 3mm 1.74 0.69 Preset for auto measuring and calibration. >...
- Page 19 - Place it on a flat and stable surface before operating (a table is quite good); - Do not place anything near Felfil Spooler, it requires unrestricted airflow, for cooling, proper operation and to protect the electronic components from overheating;...
- Page 20 Polymers Guide In this section you can find some information about the plastics you can extrude with Felfil System. When using commercial pellets, rely on the maker’s identification of the type of plastic. When using recycled plastic, check the markings on the item(s) to determine which type of plastic you are using.
- Page 21 Spooler Manual...
- Page 22 Contacts Spooler Manual...
Need help?
Do you have a question about the Evo and is the answer not in the manual?
Questions and answers