Table of Contents
Advertisement
Quick Links
Advertisement
Table of Contents
Troubleshooting

Subscribe to Our Youtube Channel
Related Manuals for Freefly FRX Pro

Summary of Contents for Freefly FRX Pro
- Page 1 FRX Pro Overview Introduction...
- Page 2 FRX Pro was designed to increase the performance of Freefly's family of gimbal controllers by allowing users to achieve increased range and better connections in even the harshest RF environments. FRX Pro is perfect for professionals who are looking to push their Freefly gear further to get shots that were previously unattainable.
- Page 3 In the Box FRX Pro Kit Contents...
- Page 4 Item Quantity FRX Pro Module COM Cable 300mm USB Cable (A-C) D-Tap Power Cable (DTAP - Molex) 1 5dBi Antenna (RP-SMA) 2dBi Antenna (RP-SMA) Zipties 200mm Additional Optional Accessories...
- Page 5 Replace the 5dBi antennas provided in the FRX Pro Kit 2dBi Spare Antenna Set* Replace the 2dBi antennas provided in the FRX Pro Kit *Note: These items are not yet available in the Freefly store but will be added soon. System Diagram FRX Pro Overview...
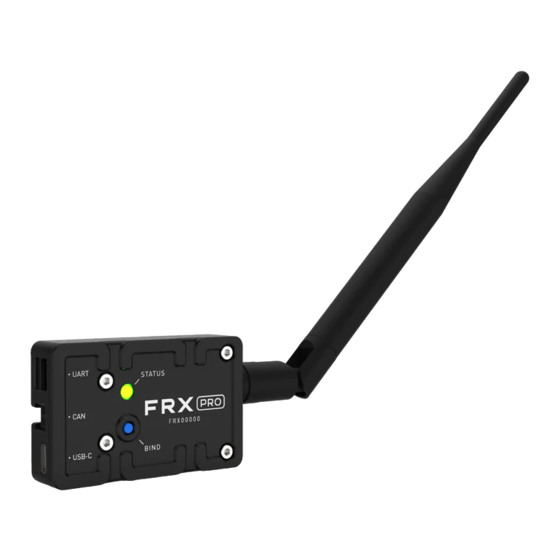
- Page 6 1. Status LED Communicates FRX Pro status to the user 2. Bind Button Binds FRX Pro units to one another 3. UART Port Connects to FRX Pro to Freefly products with UART communication ports 4. CAN Port Connects to FRX Pro to Freefly products with CAN communication ports 5.
- Page 7 Status Light Overview...
- Page 8 Connectors and Pinouts...
- Page 9 Specifications Dimensions + Mounting Patterns...
- Page 10 Item Dimensions Length 15.6mm Height 67.0mm Width 42.4mm Mounting Pattern M3 - 15mm x 15mm Grid Specifications Item Specification Weight 62.2g Input Voltage 5 V - 30V...
- Page 11 1700m [5600ft] (Based on testing) ** Antenna Connector RP-SMA Operational Temperature Range -20 to 50C *FRX Pro's alternative frequencies to be released in the near future **Range is dependent on Signal power settings, RF environment, and line of sight Using FRX Pro Mounting...
- Page 12 Install a FRX Pro module to your gimbal using the Pop-n-Lock dovetail and a Pop-n- Lock mounted to the pan axis of your gimbal. See the diagram below for suggested mounting areas on your gimbal. If necessary you can update the orientation of the Pop-n-Lock dovetail to make adjust the orientation of the FRX Pro module.
- Page 13 Mount the other FRX Pro module to your MōVI Controller setup. We suggest using a Screw Mount Pop-n-Lock kit to utilize one of the many 1/4- 20" mounting location on the MōVI Controller and most monitors.
- Page 14 When using FRX Pro you will no longer need the older MC-RX's. These can be removed from the gimbal. Use one of the COM Cables provided in the kit to connect the FRX Pro's UART port to the COM1 port of your gimbal.
- Page 15 Controller Side For power, connect the other FRX Pro module to an external power supply, such as a V- Lock battery using the FRX Pro D-Tap Power cable. For signal, connect the FRX to the MōVI Controller using the USB Cable provided in the kit.
- Page 16 Binding and Setup FRX Pro Binding...
- Page 17 If the status light remains white, press the bind button of the FRX Pro connected to the controller, wait one second, then press the bind button of the other FRX Pro.
- Page 18 Use of FRX Pro requires a MoVI Controller that is updat Use of FRX Pro requires a MoVI gimbal that is updated to [v2 Running dual MōVI Controllers using FRX Pro is not possible, due to the FRX Pro's large...
- Page 19 power draw it consumes the power from both COM ports on the GCU. Please use the MōVI Controller Receivers when attempting to use two MōVI Controllers. Updating and Configuration Configurator Latest FW + Configurator Item 1. COM Port Drop down Menu 2.
- Page 20 FRX Pro's ship with the latest stable FW preloaded onto each module so no updating is necessary before use! To update the FRX Pro module you will need to download the latest FRX Pro FW to a You can find the latest FW packages on the FRX Pro's support page.
- Page 21 With the COM port selected, press the Start Configuration Mode button. The Power Level and Aux Baud Rate can now be adjusted and written to the FRX Pro module using the Write Configuration button.
- Page 22 For additional troubleshooting help please contact Freefly Support or visit the FRX Pro Support page.
Need help?
Do you have a question about the FRX Pro and is the answer not in the manual?
Questions and answers