Table of Contents
Advertisement
Quick Links
Advertisement
Table of Contents

Related Manuals for Telegärtner DoorLine TM4

Summary of Contents for Telegärtner DoorLine TM4
- Page 1 Operating and Assembly Instructions Door Intercom System DoorLine TM4...
-
Page 2: Copyright
This applies to electronic, mechanical, optical, chemical and all other media. Product designations and company names used in this documentation are subject to the rights of the companies in ques- tion. 2 / 52 DoorLine TM4... -
Page 3: Table Of Contents
Information on the entry of call numbers .......... 19 Entry to configuration mode .............. 19 Automatic adjustment to the PBX system.......... 20 Defining microphone sensitivity and volume ........ 21 Change the PIN Code ................ 22 DoorLine TM4 3 / 52... - Page 4 Direct commands during voice communication ........ 44 8 Malfunctions and fault elimination.............. 46 9 Maintenance, care and disposal.............. 47 Storage ..................... 47 Disassembly ..................... 47 Disposal .................... 47 9.3.1 Disposing of packaging material ............ 47 9.3.2 Disposing of old device ................ 47 4 / 52 DoorLine TM4...
-
Page 5: Safety Instructions
Do not install your product near heat sources or other electrical devices. ▪ Do not permit liquid to penetrate the interior of the product. This may result in electric shock or short-circuits. ▪ Route connecting lines and cables such that there is no risk of accidents! DoorLine TM4 5 / 52... -
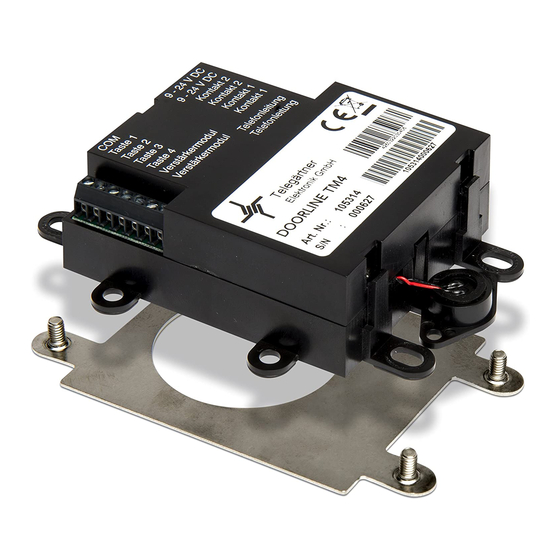
Page 6: Product Information And Description
Securing tabs Connecting terminal 1 (for bell and buttons and amplifier module) Connecting terminal 2 (for voltage supply, switching contacts and tele- phone line) Loudspeaker Adhesive pad Predetermined breaking point for split installation of the microphone 6 / 52 DoorLine TM4... -
Page 7: Nameplate
▪ for remote-controlled opening of doors or gates ▪ for relaying door conversations to telephones ▪ for connection to other control systems DoorLine has been developed for private as well as commercial use. DoorLine TM4 7 / 52... -
Page 8: Notes On The Use Of An Electronic Door Opener
The installation of your PBX system and its operation require the use of tele- phone plugs (e.g. TAE or RJ11), cables and lines that are not included in the scope of supply. ▪ Your PBX system and end devices (telephones) must support touch-tone di- alling (DTMF). 8 / 52 DoorLine TM4... -
Page 9: Technical Data
Wall power supply SNG DL article number 105248 (For use as bell transformer, door opener current supply, etc. Cannot be used for power supply to the DoorLine TM4!) ▪ Power unit for carrier rail assembly (DIN rail), article number 114651 (for voltage supply to the DoorLine TM4). -
Page 10: Assembly And Connection
In this manner, you can install the wiring and configure the bell pushbutton quickly and easily. After the DoorLine functions perfectly in this test setup with your PBX system and telephones, you can install the DoorLine in its final place of usage. 10 / 52 DoorLine TM4... -
Page 11: Place Of Installation
In the area of the installation location, no supply lines or similar must be in- stalled. Installing device The device is installed via the existing securing tabs or via the adhesive pad in a letterbox system. DoorLine TM4 11 / 52... -
Page 12: Connecting Device
Observe a minimum distance of 10 cm between both types of lines. If one of the connected lines is routed out-of-doors, you will have to provide sufficient lightning protection. 12 / 52 DoorLine TM4... - Page 13 On modern PBX systems such as the AVM Fritz!Box or Telekom Speedport, the two inner wires of the RJ 11 connection should be used. On older PBX systems (before 2005), the two outer wires are also used. DoorLine TM4 13 / 52...
-
Page 14: Terminal Assignment
9 - 24 V DC Supply voltage (neutral polarity) Contact 2 potential-free contact Contact 1 potential-free contact Telephone line The two wires for the analogue tele- phone line are connected here 14 / 52 DoorLine TM4... -
Page 15: Wiring Diagram
Assembly and connection 4.6.4 Wiring diagram Item Description DoorLine TM4 Power unit connection (neutral polarity) Connection to telephone system (neutral polarity) Inputs for bell pushbutton 1-4 Output for amplifier module Output for potential-free contact 2 Output for potential-free contact 1... -
Page 16: Connection Example For A Door Opener And A Door Bell
Assembly and connection 4.6.5 Connection example for a door opener and a door bell Item Description DoorLine TM4 Power unit Door bell at contact 1 Door opener at contact 2 Bell transformer 16 / 52 DoorLine TM4... -
Page 17: Checking Connection
If the device does not react, disconnect it immediately from the power-supply system. Then check the connection to the power unit for a wiring fault. If installation was successful, start the configuration of the device as described in the following chapters. DoorLine TM4 17 / 52... -
Page 18: Configuration
Actuate the hashtag button and star button on the tele- phone Enter configuration command "99" at the telephone A melody rings out. After approx. 3 seconds you hear the positive acknowledgement tone. The device is now in delivery status. 18 / 52 DoorLine TM4... -
Page 19: Acknowledgement Tones
For configuration, you have to call your DoorLine with a touch-tone dialling telephone. The way you can call the DoorLine depends on the configuration of your PBX system. When the connection to the device has been established, you can start with the configuration. DoorLine TM4 19 / 52... -
Page 20: Automatic Adjustment To The Pbx System
The adjustment takes around 3 seconds. An adjustment tone sounds during this procedure. During this period, you should not talk into the receiver because this can interfere with the automatic adjustment. 20 / 52 DoorLine TM4... -
Page 21: Defining Microphone Sensitivity And Volume
The following code numbers are possible: Code number 2 reduces the microphone sensitivity Code number 3 increases the microphone sensitivity Code number 5 reduces the loudspeaker sensitivity Code number 6 increases the loudspeaker sensitivity DoorLine TM4 21 / 52... -
Page 22: Change The Pin Code
DoorLine until the end of the complete procedure. Changes to the configuration are only possible with knowledge of your PIN Code. For security reasons, enter your new PIN Code in the config- uration table (see Overview of programming table [} 37]). 22 / 52 DoorLine TM4... -
Page 23: Call Numbers For Bell Pushbuttons
Enter call number (max. 20 digits) that is to be assigned to the bell pushbutton (see Information on the entry of call numbers [} 19]) If no input is made for 5 seconds, you will hear the acknow- ledgement tone and the call number will be saved DoorLine TM4 23 / 52... -
Page 24: 5.10.2 Deleting Call Numbers
Enter configuration command for call number bell push- button 1 "11" at the telephone Neutral acknowledgement tone If no input is made for 5 seconds, you will hear the positive acknowledgement tone and the call number will be de- leted 24 / 52 DoorLine TM4... -
Page 25: Enabling Door Opener Function
As confirmation, you will hear a neutral acknowledgement tone Enter digit 1 to enable the door opener function or digit 0 to block the door opener function Finally, you will hear the positive acknowledgement tone DoorLine TM4 25 / 52... -
Page 26: Defining Door Opener Time
Enter the configuration mode (see Entry to configuration mode [} 19]) Actuate the hashtag button and star button on the tele- phone Enter configuration command "03" at the telephone As confirmation, you will hear a neutral acknowledgement tone 26 / 52 DoorLine TM4... -
Page 27: Defining Call Duration
As confirmation, you will hear a neutral acknowledgement tone Define the call duration by entering the digits 1 to 9 (digit corresponds to the duration in minutes, 0=without limita- tion) Finally, you will hear the positive acknowledgement tone DoorLine TM4 27 / 52... -
Page 28: Defining Call Duration To Extension Line
The input must have two digits Finally, you will hear the acknowledgement tone 5.15 Defining type of call reception Determines the way a call is received at the telephone after a bell pushbutton is pressed at the DoorLine. 28 / 52 DoorLine TM4... -
Page 29: 5.15.1 Call Reception By Button Redial
Enter the configuration mode (see chapter Entry to con- figuration mode [} 19]) Actuate the hashtag button and star button on the tele- phone Enter configuration command "71" at the telephone You will hear the acknowledgement tone DoorLine TM4 29 / 52... -
Page 30: Preparing Call Forwarding
Enter target call number (max. 20 digits) (see Information on the entry of call numbers [} 19]) If no input is made for 5 seconds, you will hear the acknow- ledgement tone and the call number will be saved 30 / 52 DoorLine TM4... -
Page 31: 5.16.2 Deleting Call Numbers For Call Forwarding
Delete the alternative number: enter configuration com- mand "52" at the telephone Neutral acknowledgement tone If no input is made for 5 seconds, you will hear the positive acknowledgement tone and the call number will be de- leted DoorLine TM4 31 / 52... -
Page 32: Configuring Relay Contacts
Actuate the hashtag button and star button on the tele- phone Enter configuration command "61" at the telephone Neutral acknowledgement tone Enter switching command in accordance with the following table with two digits You will hear the acknowledgement tone as confirmation 32 / 52 DoorLine TM4... - Page 33 Example: you wish to assign a door gong to relay contact 1. The door gong is to sound when bell pushbutton 2 is pushed. After entry to configuration mode, enter the following: #à6102 DoorLine TM4 33 / 52...
-
Page 34: Configuration Of Relay Contact 2
Actuate the hashtag button and star button on the tele- phone Enter configuration command "62" at the telephone Neutral acknowledgement tone Enter switching command in accordance with the follow- ing table You will hear the acknowledgement tone as confirmation 34 / 52 DoorLine TM4... - Page 35 Configuration Switching Bell pushbuttons Redial Comments command Relay contact 2 switches with redial of #9 during voice communication (door opener). Factory setting Switching contact 2 is ac- tivated if voice communic- ation is established. DoorLine TM4 35 / 52...
-
Page 36: End Of Call After Door Opening
"End of call after door opening" can be activated. Enter the configuration mode (see chapter Entry to con- figuration mode [} 19]) Actuate the hashtag button and star button on the tele- phone Deactivated (factory setting) activated Neutral acknowledgement tone 36 / 52 DoorLine TM4... -
Page 37: Overview Of Programming Table
#à11 <Call number> Call number to be called from bell pushbutton 1 #à12 <Call number> Alternative number to be called from bell pushbutton 1 #à21 <Call number> Call number to be called from bell pushbutton 2 DoorLine TM4 37 / 52... - Page 38 Call reception by pushbutton (factory setting) #à71 Call reception in direct mode #à88 <PIN><PIN> Enter new PIN Code twice #à99 Reset to factory setting Reduce microphone sensitiv- Increase microphone sensitiv- Reduce loudspeaker volume Increase loudspeaker volume 38 / 52 DoorLine TM4...
- Page 39 Overview of programming table Ending programming Hang up the receiver or enter #0. DoorLine TM4 39 / 52...
-
Page 40: Everyday Use
Actuate a random numeric key Voice communication is established Simply hang up the receiver to end the voice communic- ation enter digits #0 (disconnects the connection immediately) the maximum call duration is reached. The connection is then disconnected automatically 40 / 52 DoorLine TM4... -
Page 41: Opening A Door
If this security measure is not required, it can be cancelled by a corresponding configuration (see chapter Enabling door opener function [} 25]). ▪ The time duration for the electric door opener can be set from 1-9 seconds (see chapter Defining door opener time [} 26]). DoorLine TM4 41 / 52... -
Page 42: Calling The Doorline
Activating/deactivating call forwarding Example: You leave the house and are expecting a parcel service or important visitor. When you leave your house, you can now simply forward the door call to your mobile telephone or another telephone. 42 / 52 DoorLine TM4... - Page 43 You will hear the acknowledgement tone Press the hashtag button Enter digit (1-4) for the relevant bell pushbutton Enter digit 0 for deactivation You will hear the acknowledgement tone. Forwarding is de- activated Hang up the receiver DoorLine TM4 43 / 52...
-
Page 44: Direct Commands During Voice Communication
– the door opener function was enabled in the config- uration of the DoorLine automatic door opening deactivated (factory setting). automatic door opening with actuation of bell pushbutton 1, without call signalling automatic door opening with actuation of bell pushbutton 1, with call signalling. 44 / 52 DoorLine TM4... - Page 45 2 is set as a door opener (factory set- ting). if switching contact 1 is set as a door opener. Important: The contacts can only be switched via these direct commands if they have been assigned the function "Redial" in the configuration. DoorLine TM4 45 / 52...
-
Page 46: Malfunctions And Fault Elimination
No dialling the bell pushbuttons cessary Voice communication is Call reception by button Activate "Direct mode" not established after is programmed (factory is desired picking up the tele- setting) phone 46 / 52 DoorLine TM4... -
Page 47: Maintenance, Care And Disposal
The product belongs to the category electrical and electronic equipment. In accordance with the EC Directive 2012/96/EC, it must not be disposed of together with household waste but must be de- livered to the local return system for electrical and electronic equip- ment. DoorLine TM4 47 / 52... - Page 48 48 / 52 DoorLine TM4...
- Page 49 DoorLine TM4 49 / 52...
- Page 50 50 / 52 DoorLine TM4...
- Page 51 DoorLine TM4 51 / 52...
- Page 52 Technical Hotline If you have questions on the operation or configuration of your DoorLine that cannot be answered in these Operating Instructions, please contact your spe- cialist dealer. If your specialist dealer cannot help, our Hotline is at your disposal. Usage of the Hotline incurs the normal connection costs.
Need help?
Do you have a question about the DoorLine TM4 and is the answer not in the manual?
Questions and answers