
Related Manuals for HSF EcoAdvance Instant II

Summary of Contents for HSF EcoAdvance Instant II
- Page 1 EcoAdvance Instant II Tap Water Unit Installation & user manual Store this manual at your unit...
- Page 2 Explanation symbols and abbreviations Symbols CAUTION, general safety remark CAUTION, risk of electrical shock CAUTION, hot surfaces, risk of burns Important note Requirement of 230 Volt Alternating Current 230 V Dispose component Recycle component if possible Wrench, manual tool Drill, motorized tool Manual operation, no tools needed Abbreviations District Heating...
-
Page 3: Table Of Contents
Contents Overview Dimensions Schematic Technical data Application General plumbing requirements General wiring requirements Installation Commissioning Service and inspection Troubleshoot (end-user) Troubleshoot (technician) EC decleration Note... -
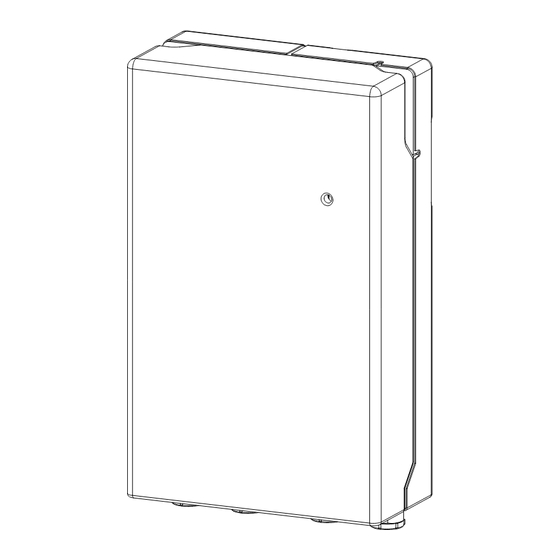
Page 4: Overview
Overview supply return 1 Heat exchanger 5 Temperature sensor DHW 2 Power plug 6 Electronic regulator 3 Temperature sensor DH return 7 Control valve DHW 4 Temperature sensor DH supply 8 Flow sensor DCW... -
Page 5: Dimensions
Dimensions 255mm 125mm 27,5 27,5... -
Page 6: Schematic
Schematic... -
Page 7: Technical Data
Technical data Description Model Nominal primary supply temperature 800C Maximum primary supply temperature 900C Nominal DHW supply temperature 550C Minimum primary supply temperature 650C * Primary connections ¾” Female / 18mm DHW connections ¾” Female / 18mm Maximal differential pressure 250 kPa Minimal primary differential pressure DH 30 - 50 kPa **... -
Page 8: Application
Application The EcoAdvance Instant is used to provide hot water in properties connected to a district heating system. Status indicator LED Green blinking: Normal condition Blue blinking: Tapping condition Red blinking: Error White continuous: Service mode (installer only) No LED: Machine is switched off Status indicator LED Operation... -
Page 9: General Plumbing Requirements
General Plumbing Requirements The appliance must be installed in accordance with, and comply to, the current: IEE Regulations, Building Regulations, Building Standards (Scotland) (Consolidation), Building Regulations (Northern Ireland), local water by-laws, Health & Safety Document 635 (The Electricity at Work Regulations 1989) and any other local requirements. British and Irish standards Where no specific instruction is given, reference should be made to the relevant British and/or Irish Standard codes of Practice. -
Page 10: General Wiring Requirements
General wiring requirements These instructions apply in the UK and Ireland only and must be followed except for any statutory obligations Component specific electrical information may also be supplied in support of these instructions. FAILURE TO INSTALL APPLIANCES CORRECTLY COULD LEAD TO PROSECUTION. CAUTION! Be sure to remove the power supply to the unit before starting any work and observe all relevant safety precautions. -
Page 11: Installation
Installation Delivery range Requirements Example 230 V 10, 30 mm note: First fix bracket is sold seperately. Different types available. Situation 1 Domestic cold water 2 Domestic hot water 3 District heating supply 4 District heating return... - Page 12 Fix rail positioning 128mm 128mm 10 mm EcoAdvance Instant Mounting to a plywood wall: Minimal plywood thickness must be 18 mm. Make sure that the back wall is at least 50 mm wider than the unit to ensure a proper support.
- Page 13 Installation 10 mm note: Make sure the valves on the fix rail bracket are in the closed position. note: Please use the enclosed screws and plugs to mount the unit. Connections 30 mm...
-
Page 14: Commissioning
Commissioning Follow the steps shown below to commission the unit. If leakage or other faults should occur, go to chapter TROUBLESHOOT. CAUTION! Parts and components may be hot or energized. Contact may lead to shock, burn or electrocution. 1. Close all tapping valves in the residence. 2. -
Page 15: Service And Inspection
Service and inspection To ensure proper functioning of the unit, it is advised to periodically inspect the installment. Contact your heat distribution company about the possibilities for service and inspection. Maintenance and repairs can be performed by recognized personnel only. •... -
Page 16: Troubleshoot (End-User)
Troubleshoot (end-user) LED indicator Green blinking: Normal conditi on Blue blinking: Domesti c hot water delivery conditi on Red blinking: Error White conti nuous: Service mode (installer only) No LED: No power / switched off What can you do? CAUTION! Always take in account the safety of yourself and others when performing a troubleshoot. -
Page 17: Troubleshoot (Technician)
Troubleshoot (technician) Complaint LED indication light Cause Solution Leakage postscript: Close all valves and close the main water supply valve. Coupling nut shows leakage Coupling nut is loose Fasten coupling nut Place gasket Gasket is missing Temperature sensor shows O ring is missing Replace temperature sensor leakage O ring is damaged... -
Page 18: Ec Decleration
3) EC Declaration of Conformity Number: EC267 4) Equipment or protective system: Electronic DHW system, Model: EcoAdvance Instant 5) Manufacturer: HSF B.V. 6) Address: Marketing 23, Duiven, The Netherlands 7) This equipment or protective system and any acceptable variation thereto is specified in the schedule to this declaration and the documents therein referred to. -
Page 19: Note
Note...
Need help?
Do you have a question about the EcoAdvance Instant II and is the answer not in the manual?
Questions and answers