
Related Manuals for Promate AuraBoom


Summary of Contents for Promate AuraBoom
- Page 1 AuraBoom Wireless Multi-Function Speaker with Integrated Qi Charging Station FM Radio Function • LED Alarm Clock...
- Page 2 Introduction Set yourself free of wires with AuraBoom. No more fumbling with charging cables late at night or knocking things off your bedside table. AuraBoom features a Qi standard wireless charger to effortlessly recharge your phone simply by placing your phone on the induction charging surface.
- Page 3 Precautions Please read all safety instructions and warnings thoroughly before using this product. Improper use of this product may result in damage to this or attached products. 1. Do not disassemble the product or attempt to fix it. 2. Kindly use an original charging cable provided to charge the product. 3.
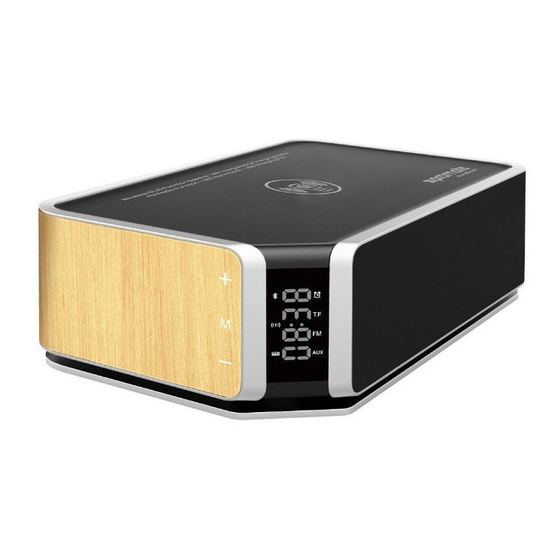
- Page 4 Appearance & Interface Description 1. Volume + Button 2. Multifunction Button 3. LED Display 4. Volume – Button 5. Power Button 6. AUX Port 7. MicroSD Card Slot 8. Charging Input Operation Instructions Charging The Speaker • Use the provided cable to charge the Speaker. •...
- Page 5 Set an Alarm • Long press Multifunction button to enter into Alarm mode and the hour digit wll blink. • Set hour by pressing – or + button. • Short press Multifunction button again to make the minute blink. • Set minute by pressing – or + button. •...
- Page 6 Call Management • While in Bluetooth mode, press Multifunction button to accept a call. • Press Multifunction icon again to hang up the call. • Long press the Multifunction button to reject an incoming call. Troubleshooting The Speaker does not pair with a Bluetooth device: •...
- Page 8 Aspecto y descripción de la interfaz 1. Botón de Volumen 2. Botón multifunción 3. Pantalla LED 4. Botón de Volumen 5. Botón de encendido 6. Puerto AUX 7. Ranura para tarjeta micro SD 8. Entrada de carga Instrucciones de operación: Encienda/Apague el Altavoz •...
- Page 9 Ajustar la alarma • Mantenga presionado el botón Multifunción para ingresar al modo de alarma y el dígito de la hora parpadeará. • Ajuste la hora presionando el botón - o +. • Nuevamente, presione brevemente el botón Multifunción para hacer que los dígitos de los minutos parpadeen •...
- Page 10 Gestión de llamadas • Mientras está en modo Bluetooth, presione el botón Multifunción para aceptar una llamada. • Presione el ícono multifunción nuevamente para colgar la llamada. • Mantenga presionado el botón Multifunción para rechazar una llamada entrante Solución de problemas Presione el botón Multifunción para reproducir/pausar la música •...
- Page 11 Aspect & Description Interface 1. Bouton Volume + 2. Bouton Multifonction 3. Affichage LED 4. Bouton Volume – 5. Bouton Mise en Marche 6. Port AUX 7. Fente pour Carte MicroSD 8. Entrée Charge Chargement de l’Enceinte • Utilisez le câble fourni pour charger l’Enceinte. •...
-
Page 12: Lecture Bluetooth
Réglage de l’Heure : • Appuyez brièvement sur le bouton Multifonction pour faire clignoter les chi res des heures. • Réglez l’heure en appuyant sur le bouton – ou +. • Appuyez brièvement à nouveau sur le bouton Multifonction pour faire clignoter les chi res des minutes. - Page 13 Fonction AUX • Insérez le câble Line-in dans la prise à l’arrière de l'enceinte pour connecter le périphérique lecteur externe ou un ordinateur. • L’enceinte se mettra automatiquement en mode AUX. Contrôle de la Lecture de la Musique • Appuyez sur le Bouton Multifonction pour faire lecture/pause pendant la reproduction de la musique.
- Page 14 Aparência e descrição da interface 1. Botão de Volume + 2. Botão multifunções 3. Visor LED 4. Botão de Volume – 5. Botão de alimentação 6. Porta AUX 7. Ranhura de cartão Micro SD 8. Entrada de carregamento Instruções de funcionamento Carregar o altifalante •...
- Page 15 Ligar/desligar o altifalante • Quando o altifalante estiver desligado, prima e mantenha premido o botão de alimentação durante cerca de 3 segundos para o ligar • Prima novamente o botão de alimentação para desligar o altifalante Acertar a hora • Prima brevemente o botão multifunções para fazer com que os dígitos das horas quem intermitentes.
- Page 16 Controlar a reprodução de música • Prima o botão multifunções para reproduzir ou colocar a música em pausa. • Prima longamente – ou + para controlar o volume. • Prima brevemente – ou + para controlar a reprodução de música. Modo de rádio FM •...
- Page 17 1. Buton Volum + 2. Buton multifunc ional 3. A aj LED 4. Buton Volum – 5. Butonul de Alimentare 6. Port AUX 7. Slot Card MicroSD 8. Input de Încărcare Instruc iuni de Utlizare Încărcarea Difuzorului • Utiliza i cablul furnizat pentru a încărca Difuzorul. •...
- Page 18 Pornirea/Oprirea Difuzorului • Când difuzorul este oprit, apăsa i i men ine i apăsat butonul de alimentare timp de aproximativ 3 secunde pentru a porni difuzorul • Apăsa i din nou butonul de alimentare pentru a opri difuzorul Seta i Ora •...
- Page 19 Controlul Redării muzicii • Apăsa i butonul Multifunc ional pentru a reda/întrerupe muzica. • Apăsa i Lung - sau + pentru a controla volumul. • Apăsa i Scurt - sau + pentru a controla redarea muzicii. Modul Radio FM • Apăsa i lung butonul Multifunc ional pentru a intra in mod FM. •...
- Page 21 microSD • • – USB 5 /2 . •...
- Page 22 • • • • – • • – • • • – • • – • • Bluetooth • Bluetooth. • Bluetooth • Bluetooth "0000" "Submit".
- Page 23 • Line-in • AUX. • • – • – • • • • • • • Bluetooth • • Bluetooth • Bluetooth A2DP, Bluetooth.
- Page 24 1. Ses + Düğmesi 2. Çoklu Fonksiyon Düğmesi 3. LED Ekran 4. Ses – Düğmesi 5. Güç Düğmesi 6. AUX Çıkı ı 7. MicroSD Kart Giri i 8. arj Giri i Hoparlörü arj Etme • Hoparlörü arj etmek için, verilen kabloyu kullanın. •...
- Page 25 Saati Ayarlama • Saat hanelerinin yanıp sönmesini sağlamak için Çoklu Fonksiyon Düğmesine kısa süreyle basın. • - veya + düğmesine basarak saati ayarlayın. • Dakika hanesinin yanıp sönmesini sağlamak için kısa süreli Çoklu Fonksiyon Düğmesine basın. • - veya + düğmesine basarak dakikayı ayarlayın. •...
- Page 26 FM Radyo Modu • FM moduna girmek için Çoklu Fonksiyon Düğmesine uzun basın. • FM İstasyonlarını aramak ve saklamak için Çoklu Fonksiyon Düğmesine kısa basın. • Radyo istasyonunu seçmek için - veya + tu larına basın. • Sesi deği tirmek için - veya + tu unu basılı tutun. •...
- Page 27 Beschreibung von Aussehen & Interface 1. Taste Lautstärke + 2. Multifunktionstaste 3. LED-Anzeige 4. Taste Lautstärke – 5. Netztaste 6. AUX-Anschluss 7. MicroSD-Kartenschlitz 8. Ladeeingang Bedienungsanleitung Den Lautsprecher au aden • Benutzen Sie das mitgelieferte Kabel, um den Lautsprecher aufzuladen. •...
-
Page 28: Bluetooth-Wiedergabe
Den Lautsprecher ein-/ ausschalten • Wenn der Lautsprecher ausgeschaltet ist, halten Sie die Betriebstaste ungefähr 3 Sekunden lang eingedrückt, um den Lautsprecher einzuschalten. • Halten Sie die Betriebstaste erneut eingedrückt, um den Lautsprecher auszuschalten. Die Uhrzeit einstellen • Drücken Sie kurz auf die Multifunktionstaste, damit die Stundenanzeige zu blinken beginnt. - Page 29 AUX-Funktion • Stecken Sie das Line-in-Kabel in die AUX-Buchse an der Rückseite Ihres Lautsprechers, um ein externes Abspielgerät oder einen externen Computer anzuschließen. • Der Lautsprecher wechselt automatisch in den AUX-Modus. Die Musikwiedergabe kontrollieren • Drücken Sie auf die Multifunktionstaste, um Musik abzuspielen/ die Wiedergabe kurz zu unterbrechen.
- Page 30 外观和接口说明 1. 音量+按钮 2. 多功能按钮 3. LED显示 4. 音量-按钮 5. 电源按钮 6. AUX端口 7. MicroSD卡插槽 8. 充电输入 操作说明 为扬声器充电 ・ 使用提供的数据线为扬声器充电。 ・ 将扬声器自带的USB数据线的一端连接到任何5伏/ 2安的USB电源插座。 ・ LED充电指示灯在充电时变为红色,充满电后熄灭...
- Page 31 打开/关闭扬声器 ・关闭扬声器时,按住电源按钮约3秒即可打开扬声器 ・再次按电源按钮即可关闭扬声器 设置时间: ・短按多功能按钮使小时数字闪烁。 ・按-或+按钮设置小时。 ・再次短按多功能按钮使分钟数字闪烁。 ・按-或+按钮设置分钟。 ・不按任何其他按钮5秒以设定时间。 设置闹钟: ・长按多功能按钮进入闹铃模式,小时数字将会闪烁。 ・按-或+按钮设置小时。 ・再次短按多功能按钮使分钟闪烁。 ・按-或+按钮设置分钟。 ・不按任何其他按钮3秒以设定闹钟。 关闭闹钟 ・要关闭闹钟,请按住多功能按钮几秒,直到闹钟图标关闭 蓝牙播放 ・扬声器开机时,短按电源按钮进入蓝牙模式。 ・打开设备上的蓝牙功能,并在可用设备列表中选择扬声器名称。 ・某些蓝牙设备可能会要求您输入密码以将设备与扬声器配对。输入 “0000”,然后按提交。 AUX功能 ・将线路输入数据线插入扬声器背面的AUX插孔以连接外接播放器设备或电脑。 ・扬声器将自动进入AUX模式。...
- Page 32 控制音乐播放 ・按多功能按钮播放/暂停音乐。 ・长按-或+来控制音量。 ・短按-或+可控制音乐播放。 FM收音机模式 ・长按多功能按钮进入FM模式。 ・短按多功能按钮搜索和存储FM电台 ・按-或+选择电台 ・按住-或+更改音量。 ・再次按FM按钮退出FM模式 ・给智能手机进行无线充电时,FM收音机模式可能无法正常工作。 通话管理 ・在蓝牙模式下,按多功能按钮接听电话。 ・再次按多功能图标挂断电话。 ・长按多功能按钮拒绝来电。 故障排除 扬声器无法与蓝牙设备配对: ・检查设备上的蓝牙硬件是否支持A2DP配置文件, 这对于通过蓝牙进行声音传输是必需的。...
- Page 33 (ﺧﺎﻣﻮش ﮐﺮدن زﻧﮓ ﺑﯿﺪاری )ھﺸﺪار • ﺑﺮای ﺧﺎﻣﻮش ﮐﺮدن زﻧﮓ ﺑﯿﺪاری )ھﺸﺪار(، دﮐﻤﻪ ﭼﻨﺪ ﻣﻨﻈﻮره را ﺑﺮای ﭼﻨﺪ ﺛﺎﻧﯿﻪ ﻓﺸﺎر .دھﯿﺪ ﺗﺎ آﯾﮑﻮن زﻧﮓ ﺑﯿﺪاری )ھﺸﺪار( ﺧﺎﻣﻮش ﺷﻮد ﭘﺨﺶ ﻣﻮﺳﯿﻘﯽ ﺑﻪ روش ﺑﻠﻮﺗﻮث • ھﻨﮕﺎﻣﯽ ﮐﻪ دﺳﺘﮕﺎه روﺷﻦ ﻣﯽ ﺑﺎﺷﺪ، دﮐﻤﻪ روﺷﻦ و ﺧﺎﻣﻮش ﮐﺮدن دﺳﺘﮕﺎه را ﺑﺮای ﻣﺪت .ﮐﻮﺗﺎھﯽ...
- Page 34 دﺳﺘﻮراﻟﻌﻤﻞ ﻧﺤﻮه ﮐﺎر ﺑﺎ دﺳﺘﮕﺎه :ﺷﺎرژ ﮐﺮدن ﺑﻠﻨﺪﮔﻮ .• ﺑﺮای ﺷﺎرژ ﮐﺮدن ﺑﻠﻨﺪﮔﻮ از ﮐﺎﺑﻞ اراﺋﻪ ﺷﺪه ﺑﻪ ھﻤﺮاه آن اﺳﺘﻔﺎده ﮐﻨﯿﺪ را ﺑﻪ ﺑﻠﻨﺪﮔﻮ و ﺳﺮ دﯾﮕﺮ آن را ﺑﻪ ھﺮ ﮔﻮﻧﻪ ﭘﺮﯾﺰ ﺑﺮقUSB • ﯾﮏ ﺳﺮ ﮐﺎﺑﻞ ....
- Page 35 ﺷﮑﻞ ظﺎھﺮی و ﺗﻮﺻﯿﻒ راﺑﻂ ﮐﺎرﺑﺮی 1. دﮐﻤﻪ اﻓﺰاﯾﺶ ﺻﺪا 2. دﮐﻤﻪ ﭼﻨﺪ ﻣﻨﻈﻮره LED 3. ﺻﻔﺤﻪ ﻧﻤﺎﯾﺶ 4. دﮐﻤﻪ ﮐﺎھﺶ ﺻﺪا 5. دﮐﻤﻪ ﻣﺨﺼﻮص روﺷﻦ و ﺧﺎﻣﻮش ﮐﺮدن دﺳﺘﮕﺎه AUX 6. ورودی MicroSD 7. ورودی ﮐﺎرت 8. ورودی ﺷﺎرژ...
- Page 36 AUX وظﯿﻔﺔ •ادﺧﻞ ﻛﺒﻞ اﻹدﺧﺎل إﻟﻰ ﻣﻨﻔﺬ اﻟﺘﻮﺻﯿﻞ اﻟﻤﺒﺎﺷﺮ ﻓﻲ اﻟﺠﺰء اﻟﺨﻠﻔﻲ ﻣﻦ ﻣﻜﺒﺮ اﻟﺼﻮت .ﻟﺘﻮﺻﯿﻞ ﺟﮭﺎز اﻟﻤﺸﻐﻞ اﻟﺨﺎرﺟﻲ أو اﻟﻜﻤﺒﯿﻮﺗﺮ .AUX •ﺳﻮف ﺗﺪﺧﻞ اﻟﺴﻤﺎﻋﺔ ﺗﻠﻘﺎﺋﯿﺎ ﺑﻮﺿﻊ اﻟﺘﺤﻜﻢ ﻓﻲ ﺗﺸﻐﯿﻞ اﻟﻤﻮﺳﯿﻘﻲ .•اﺿﻐﻂ ﻋﻠﻲ زر ﻣﺘﻌﺪد اﻟﻮظﺎﺋﻒ ﻟﺘﺸﻐﯿﻞ/وإﻳﻘﺎف اﻟﻤﻮﺳﯿﻘﻲ .•أﺿﻐﻂ ﺿﻐﻄﺔ طﻮﻳﻠﺔ ﻋﻠﻰ --أو + ﻟﻠﺘﺤﻜﻢ ﻓﻲ وﺣﺪه اﻟﺼﻮت .•أﺿﻐﻂ...
- Page 37 ﺗﺸﻐﯿﻞ/إﻳﻘﺎف ﺗﺸﻐﯿﻞ ﻣﻜﺒﺮ اﻟﺼﻮت •ﻋﻨﺪﻣﺎ ﻳﻜﻮن ﻣﻜﺒﺮ اﻟﺼﻮت ﻣﺘﻮﻗﻒ، اﺿﻐﻂ ﺑﺎﺳﺘﻤﺮار ﻋﻠﻲ زر اﻟﻄﺎﻗﺔ ﻟﻤﺪه 3 ﺛﻮان ﺗﻘﺮﻳﺒﺎ ﻟﺘﺸﻐﯿﻞ ﻣﻜﺒﺮ اﻟﺼﻮت •اﺿﻐﻂ ﻣﺮه أﺧﺮى ﻋﻠﻲ زر اﻟﻄﺎﻗﺔ ﻣﺮه أﺧﺮى ﻹﻳﻘﺎف ﺗﺸﻐﯿﻞ ﻣﻜﺒﺮ اﻟﺼﻮت :ﺿﺒﻂ اﻟﻮﻗﺖ .•اﺿﻐﻂ ﻟﻔﺘﺮة ﻗﺼﯿﺮة ﻋﻠﻲ زر ﻣﺘﻌﺪد اﻟﻮظﺎﺋﻒ ﻟﺠﻌﻞ أرﻗﺎم اﻟﺴﺎﻋﺔ ﺗﻮﻣﺾ .•أﺿﺒﻂ...
- Page 38 وﺻﻒ اﻟﻤﻈﮭﺮ واﻟﻮاﺟﮭﺔ 1.ﻣﻔﺘﺎح + اﻟﺼﻮت 2.زر ﻣﺘﻌﺪد اﻟﻮظﺎﺋﻒ LED 3.ﺷﺎﺷﺔ 4.ﻣﻔﺘﺎح - اﻟﺼﻮت 5.ﻣﻔﺘﺎح اﻟﻄﺎﻗﺔ AUX 6.ﻣﻨﻔﺬ MicroSD 7.ﻓﺘﺤﺔ ﺑﻄﺎﻗﺔ 8.ﻣﺪﺧﻞ اﻟﺸﺤﻦ ﺗﻌﻠﯿﻤﺎت اﻟﺘﺸﻐﯿﻞ ﺷﺤﻦ ﻣﻜﺒﺮ اﻟﺼﻮت .•اﺳﺘﺨﺪم اﻟﻜﺒﻞ اﻟﻤﺘﻮﻓﺮ ﻟﺸﺤﻦ ﻣﻜﺒﺮ اﻟﺼﻮت اﻟﺬي ﺗﻢ ﺗﻮﻓﯿﺮه ﻟﻤﻜﺒﺮ اﻟﺼﻮت واﻟﻄﺮف اﻵﺧﺮUSB •ﻗﻢ ﺑﺘﻮﺻﯿﻞ طﺮف واﺣﺪ ﻣﻦ ﻛﺒﻞ .USB 5V/2a ﺑﻤﺄﺧﺬ...
Need help?
Do you have a question about the AuraBoom and is the answer not in the manual?
Questions and answers