Biowave GO User Manual
Hide thumbs
Also See for GO:
- Quick start (2 pages) ,
- Quick reference manual (12 pages) ,
- Quick reference manual (12 pages)
Table of Contents
Advertisement
Quick Links
Advertisement
Table of Contents

Related Manuals for Biowave GO


Summary of Contents for Biowave GO
- Page 1 user’s manual Designed to Block Pain at the Source ™...
- Page 2 BioWaveGO User’s Manual Rev: 190314 - rev 7 BioWave Corporation...
-
Page 3: Table Of Contents
3.1 When the Stimulator Should Not Be Used (Contraindications) ......16 3.2 Risks/Benefits ......................17 3.3 Warnings ........................18 3.4 Precautions .......................19 3.5 Adverse Reactions ....................20 User Instructions ...................... 21 4.1 First Time Set Up and Quick Operating Steps............21 4.2 Rationale for Pain Relief Pad Placements ..............22 BioWave Corporation... - Page 4 4.6 Body Position During the Treatment ................70 4.7 Motion During the Treatment...................71 4.8 Using the BioWaveGO Stimulator ................73 Starting Treatment ....................73 During Treatment .....................73 End of Treatment ......................74 4.9 Importance of Monitoring the Activity of the Stimulator .........74 BioWave Corporation...
- Page 5 Leadwire Cable Connection to the Stimulator ............83 Pain Relief Pad Connection to the Leadwire Cable ..........83 Pain Relief Pad Connection to the Patient ...............83 8.2 Use of Non-BioWave Pain Relief Pads ..............85 8.3 Muscle Twitching ......................86 8.4 Automatic Safety Function ..................86 8.5 Pain Relief Pad Spacing ...................87...
- Page 6 BioWaveGO User’s Manual IMPORTANT! Before using this product, read the following information thoroughly. BioWave Corporation...
-
Page 7: Indications For Use
Neck and Cervical Shoulder Shoulder Biceps Triceps Elbow Mid Torso Forearm Lower Back Buttock Wrist, Hand and Fingers Hamstring Quadriceps IT Band Knee Calf Shin Ankle, Foot and Toes See Section 4.4 for examples of Pain Relief Pad placements. BioWave Corporation... -
Page 8: Device Description
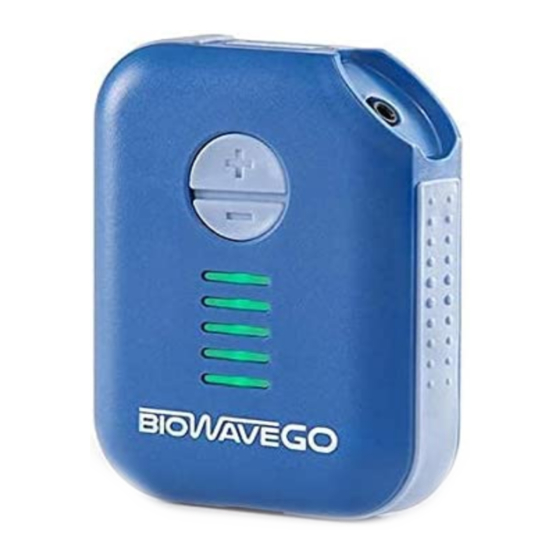
There are 3 buttons that control the BioWaveGO ® stimulator: Neurostimulator 1. Power ON/OFF button 2. PLUS (+) button to increase intensity 3. MINUS ( – ) button to decrease intensity BioWave Corporation... -
Page 9: Device Accessories
Pain Relief Pads to the BioWaveGO stimulator. ® The single end of the leadwire cable plugs into a connector at the top right of the stimulator as shown in the photo to the right below. Leadwire Cable Plugs into Stimulator Leadwire Cable Lever BioWave Corporation... - Page 10 Removing the Pain Relief Pads from the Leadwire Cable To remove the Pain Relief Pads from the leadwire cable, grasp each side of the blue connector with your thumb and index finger and pull them straight apart. You do not need to squeeze the prongs on the Pain Relief Pad connector to insert or remove them. BioWave Corporation...
-
Page 11: Ac Charger
One end of the cord from the AC Charger is plugged into the receptacle on the bottom of the stimulator as shown in the photo to the right. The other end is plugged into a standard electrical outlet. (100-240 Volts at 50-60 Hz). BioWave Corporation... -
Page 12: Biowavego Reusable Pain Relief Pads
Only BioWaveGO Pain Relief Pads work with the BioWaveGO stimulator. WARNING! Pain Relief Pads MUST NEVER TOUCH EACH OTHER • 1.0 inch is the minimum spacing between Pain Relief Pads • There is NO maximum spacing between Pain Relief Pads BioWave Corporation... - Page 13 If not, please use a new set of Pain relief Pads. BioWaveGO Pain Relief Pads must not touch each other when the unit is turned on. One inch is the minimum spacing. BioWave Corporation...
-
Page 14: Device Controls
2.3 Controls via the App Using Bluetooth (Recommended) Using the BioWaveGO App will greatly enhance your BioWave experience. You can start, stop and adjust the intensity of your treatment using the app. You can also track your pain relief progress over time. The treatment can also be controlled simultaneously directly from the PLUS/MINUS button on the device. - Page 15 - you can continue to control the treatment using the buttons on the device. Radio frequency transmitters may affect the quality of the bluetooth connection. If you are using the app, make sure to perform the treatment at least 50 feet away from any radio frequency transmitter. BioWave Corporation...
-
Page 16: Led Bar Graph Indicator
Signal Intensity - BLUE Indicator Displaying The intensity of the treatment is displayed in Signal Intensity BLUE for 3 seconds after the PLUS or MINUS button is pressed. The higher the intensity, the more bars that are displayed in BLUE. BioWave Corporation... - Page 17 Pain Relief Pads. The LED bar graph will change to show WHITE bars if at the beginning of a new treatment, or if the error occurs mid treatment, the WHITE bars will be flashing on and off indicating the device is paused. To continue treatment, press the PLUS button to manually increase the intensity from zero to a strong but comfortable treatment level. BioWave Corporation...
-
Page 18: When The Stimulator Should Not Be Used (Contraindications)
• DO NOT place the Pain Relief Pads on the front or side of the neck. • DO NOT place the Pain Relief Pads on the top of the head. • DO NOT place the Pain Relief Pads over open wounds, broken skin, rashy skin or sensitive skin areas like sunburned skin. BioWave Corporation... -
Page 19: Risks/Benefits
Pain Relief Pads on intact skin. Pain Relief Pads may be placed over healed scar tissue or over tatoos. Benefits • Customers report that BioWave treatments may provide significant pain relief. • BioWaveGO is an easy to use 30-minute treatment. -
Page 20: Warnings
3.3 Warnings • BioWave Pain Relief Pads must never touch each other during a treatment. Pain Relief Pads that touch each other during an active treatment will cause a burn. One inch is the minimum spacing between Pain Relief Pads on the back. -
Page 21: Precautions
• It is important to keep this manual handy. It should be studied and reviewed periodically by users of BioWaveGO ® • The stimulator should be maintained and serviced by BioWave personnel, or other qualified personnel approved in writing by BioWave. Use this stimulator while following the safety precautions and operating instructions in this manual. -
Page 22: Adverse Reactions
• Avoid use of Pain Relief Pads, conductive gels, leadwires, or accessories other than those supplied with the system or recommended by BioWave. The safety of other products has not been established and their use may result in skin irritations and burns beneath the Pain Relief Pads. -
Page 23: User Instructions
Start the treatment by pressing the PLUS (+) button to increase intensity so the sensation felt is strong but still comfortable. As you press the PLUS Button the LED Bar Graph will glow BLUE for 3 seconds after each press indicating the BioWave Corporation... -
Page 24: Rationale For Pain Relief Pad Placements
Pad locations simultaneously. The Pain Relief Pads are independent of each other and each one can treat a distinct volume of tissue under and surrounding each Pain Relief Pad. The sensation felt at each location is a deep smooth tingling and pressure sensation. BioWave Corporation... -
Page 25: Pad Placements For Different Pain Conditions
Pain Relief Pad may be placed on your low back or buttock over a location of pain. For radiating pain from your neck, the second Pain Relief Pad for example may be placed on your trapezius muscle over a location of pain. BioWave Corporation... -
Page 26: Large Area Of Pain
With this placement, both Pain Relief Pads can be used to treat one larger volume of tissue up to 6 inches long by about 3 inches wide. See PHOTOS for examples of optimal Pain Relief Pad placements in Section 4.4. BioWave Corporation... -
Page 27: Biowavego Pain Relief Pad Placement Examples
• 1.0 inch is the minimum spacing between Pain Relief Pads • There is NO maximum spacing between any Pain Relief Pads. The following section shows photos of Pain Relief Pad placement examples. QUESTIONS? Call or email technical support: 1-877-BioWave ext 1 (1-877-246-9283 ext 1) support@BioWave.com BioWave Corporation... -
Page 28: Low Back Pain
Place each Pain Relief Pad directly over a pain site as shown in the photo to the right. One inch is the minimum spacing between the Pain Relief Pads. Body Position: Sitting is the best position during the treatment. BioWave Corporation... - Page 29 Place Pain Relief Pads over one or two locations of pain directly on either side of the lower spine. One inch is the minimum spacing between Pain Relief Pads. Body Position: Sitting is the best position during the treatment. BioWave Corporation...
- Page 30 Place second Pain Relief Pad over the first location that pain presents that is closest to the origin (for example on the buttock). Pain Relief Pads must be placed on skin. Body Position: Sitting is the best position during the treatment. BioWave Corporation...
- Page 31 One inch is the minimum spacing between Pain Relief Pads. Body Position: Sitting is the best position during the treatment. BioWave Corporation...
- Page 32 Pain Relief Pads of approximately 6 inches by 3 inches. Body Position: Sitting is the best position during the treatment. BioWave Corporation...
-
Page 33: Mid Back Pain
Place each Pain Relief Pad directly over a pain site as shown in the photo to the right. One inch is the minimum spacing between the Pain Relief Pads. Body Position: Sitting is the best position during the treatment. BioWave Corporation... -
Page 34: Hip Pain
Place each round Pain Relief Pad on the hip directly over each painful area. One inch is the minimum spacing between Pain Relief Pads. Body Position: Sitting in a reclined position or lying down is the most desirable position during the treatment. BioWave Corporation... -
Page 35: Rib Or Oblique Pain
Place each Pain Relief Pad on the rib or oblique directly over each painful area. One inch is the minimum spacing between Pain Relief Pads. Body Position: Sitting in a reclined position or lying down is the most desirable position during the treatment. BioWave Corporation... -
Page 36: Quadriceps Pain
Place each round Pain Site Pain Relief Pad on the quadriceps directly over each painful area. One inch is the minimum spacing between Pain Relief Pads. Body Position: Sitting upright with the knee bent at 90 degrees is the best position during the treatment. BioWave Corporation... -
Page 37: Hamstring Pain
Place each round Pain Site Pain Relief Pad on the quadriceps directly over each painful area. One inch is the minimum spacing between Pain Relief Pads. Body Position: Sitting upright with the leg straight is the best position during the treatment. BioWave Corporation... -
Page 38: Knee Pain
Relief Pad should be placed touching the bottom part of the kneecap. One inch is the minimum spacing between Pain Relief Pads. Body Position: Sitting upright with the knee bent at 90 degrees is the best position during the treatment. BioWave Corporation... - Page 39 Relief Pad should be placed touching the bottom part of the kneecap. One inch is the minimum spacing between Pain Relief Pads. Body Position: Sitting upright with the knee bent at 90 degrees is the best position during the treatment. BioWave Corporation...
- Page 40 Pain Relief Pad should be placed on the outside of the knee at the same level as the first pad over the pain site. One inch is the minimum spacing between Pain Relief Pads. Body Position: Sitting upright with the knee bent at 90 degrees is the best position during the treatment. BioWave Corporation...
- Page 41 Pain Relief Pad should be placed touching the bottom part of the kneecap. One inch is the minimum spacing between Pain Relief Pads. Body Position: Sitting upright with the knee bent at 90 degrees is the best position during the treatment. BioWave Corporation...
- Page 42 One inch is the minimum spacing between Pain Relief Pads. There is no maximum spacing between the Pain Relief Pads. Body Position: Sitting upright with the knee bent at 90 degrees is the best position during the treatment. BioWave Corporation...
- Page 43 One inch is the minimum spacing between Pain Relief Pads. There is no maximum spacing between the Pain Relief Pads. Body Position: Sitting upright with the knee bent at 90 degrees is the best position during the treatment. BioWave Corporation...
- Page 44 One inch is the minimum spacing between Pain Relief Pads. Body Position: Sitting with the knee bent at 90 degrees is the best position during the treatment. BioWave Corporation...
- Page 45 For this example the other Pain Relief Pad should be placed touching the bottom part of the kneecap. One inch is the minimum spacing between Pain Relief Pads. Body Position: Sitting with the knee straight is the best position during the treatment. BioWave Corporation...
-
Page 46: Lower Leg Pain
Pain Relief Pad will overlap internally allowing the entire region beneath both Pain Relief Pads of approximately 6 inches by 3 inches to be stimulated and treated. Body Position: Sitting with the knee bent is the best position during the treatment. BioWave Corporation... - Page 47 One inch is the minimum spacing between Pain Relief Pads. There is no maximum distance between Pain Relief Pads. Body Position: Sitting with the knee straight or slightly bent is the best position during the treatment. BioWave Corporation...
-
Page 48: Ankle And Foot Pain
The example here shows the pad is placed on the outside of the heel and across the back of the heel and achilles tendon. One inch is the minimum spacing between the Pain Relief Pads. Body Position: Sitting with the foot flat on the floor is the best position during the treatment. BioWave Corporation... - Page 49 The two Pain Relief Pads should be placed directly over each respective pain site on the top, side, back and/or bottom of the foot or ankle as shown in the photo to the right. Body Position: Sitting with the foot flat on the floor is the best position during the treatment. BioWave Corporation...
- Page 50 (comfortable location to receive stimulation). The ideal location is across the inside of the ankle as shown in the photo to the right. One inch is the minimum spacing between the Pain Relief Pads. Body Position: Sitting with the foot flat on the floor is the best position during the treatment. BioWave Corporation...
- Page 51 Place the other Pain Relief Pad on the back lower part of the heel, also as shown in the photo to the right. One inch is the minimum spacing between the Pain Relief Pads. Body Position: Sitting with the foot flat on the floor is the best position during the treatment. BioWave Corporation...
- Page 52 Place the other Pain Relief Pad over a bony area (comfortable location to receive stimulation). The ideal location is across the outside of the heel and ankle as shown in the photo to the right. Body Position: Sitting with the foot flat on the floor is the best position during the treatment. BioWave Corporation...
- Page 53 Place the other Pain Relief Pad in an opposing position on the bottom of the foot. Body Position: Sitting with the foot flat on the floor is the best position during the treatment. BioWave Corporation...
-
Page 54: Neck Pain
Body Position: Sitting in a comfortable position with the head bent forward is the best position during the treatment. BioWave Corporation... - Page 55 Body Position: Sitting in a comfortable position with the head bent forward is the best position during the treatment. BioWave Corporation...
- Page 56 Body Position: Sitting in a comfortable position with the head bent forward is the best position during the treatment. BioWave Corporation...
-
Page 57: Shoulder Pain
One inch is the minimum spacing between the Pain Relief Pads. Body Position: Sitting in a comfortable position is the best position during the treatment. BioWave Corporation... - Page 58 (this is the pad that is above and to the right of the first pad). One inch is the minimum spacing between the Pain Relief Pads. Body Position: Sitting in a comfortable position is the best position during the treatment. BioWave Corporation...
- Page 59 One inch is the minimum spacing between the Pain Relief Pads. Body Position: Sitting in a comfortable position is the best position during the treatment. BioWave Corporation...
- Page 60 Pain Relief Pads can be closer together than shown as in the photo on the previous page, however, one inch is the minimum spacing. Body Position: Sitting in a comfortable position is the best position during the treatment. BioWave Corporation...
- Page 61 One inch is the minimum spacing between the Pain Relief Pads. Body Position: Sitting in a comfortable position is the best position during the treatment. BioWave Corporation...
- Page 62 One inch is the minimum spacing between the Pain Relief Pads. Body Position: Sitting in a comfortable position is the best position during the treatment. BioWave Corporation...
- Page 63 Pain Relief Pads can be closer together or further apart than shown. One inch is the minimum spacing between the Pain Relief Pads. Body Position: Sitting in a comfortable position is the best position during the treatment. BioWave Corporation...
-
Page 64: Elbow Pain
Pain Relief Pads. Body Position: Roll up a washcloth and grip it with your hand or hold a tennis ball on the same side the elbow is being treated. This will keep your fingers in a comfortable position during the treatment. BioWave Corporation... - Page 65 Pain Relief Pads. Body Position: Roll up a washcloth and grip it with your hand or hold a tennis ball on the same side the elbow is being treated. This will keep your fingers in a comfortable position during the treatment. BioWave Corporation...
- Page 66 Pain Relief Pads. Body Position: Roll up a washcloth and grip it with your hand or hold a tennis ball on the same side the elbow is being treated. This will keep your fingers in a comfortable position during the treatment. BioWave Corporation...
-
Page 67: Wrist Pain
One inch is the minimum spacing between the Pain Relief Pads. Body Position: Roll up a washcloth and grip it with your hand or hold a tennis ball in the same hand that the wrist is being treated. This will keep your fingers in a comfortable position during the treatment. BioWave Corporation... - Page 68 One inch is the minimum spacing between the Pain Relief Pads. Body Position: Roll up a washcloth and grip it with your hand or hold a tennis ball in the same hand that the wrist is being treated. This will keep your fingers in a comfortable position during the treatment. BioWave Corporation...
-
Page 69: Hand And Finger Pain
One inch is the minimum spacing between the Pain Relief Pads. Body Position: Roll up a washcloth and grip it with your hand or hold a tennis ball in the same hand that the wrist is being treated. This will keep your fingers in a comfortable position during the treatment. BioWave Corporation... - Page 70 One inch is the minimum spacing between the Pain Relief Pads. Body Position: Roll up a washcloth and grip it with your hand or hold a tennis ball in the same hand that the wrist is being treated. This will keep your fingers in a comfortable position during the treatment. BioWave Corporation...
-
Page 71: Pain Relief Pad Placement Tips
Pain Relief Pads may be placed back on one side of the plastic liner. 5. Pain Relief Pads are reusable but must be tacky to the touch. If not, please use a new set of Pain Relief Pads BioWave Corporation... -
Page 72: Body Position During The Treatment
Quadriceps - Sitting with the knee bent at 90 degrees. Hips - Lying on your back with your legs straight. Placing a pillow under your buttock can help provide a little more of a stretch in the area being treated. BioWave Corporation... -
Page 73: Motion During The Treatment
Adjusting your body position to direct and focus the electrical field to surround the pain site is a fine tuning of the treatment that will provide the best treatment result. The ideal treatment location is when you feel like saying, “wow, that’s hitting the spot!” BioWave Corporation... - Page 74 You need to be aware that you may experience an increase in the treatment sensation if you move the part of the body being treated. Gentle or slow movement during the treatment is encouraged because moving the joint or area of your body being treated will cause a slight change in location of the sensation from the electrical field that is forming inside your body. This slight shifting of the location of the electrical field is most noticable when treating the shoulder, elbow, wrist, hand, finger, ankle or foot. BioWave Corporation...
-
Page 75: Using The Biowavego Stimulator
To slightly increase the intensity level, you should press the Plus (+) Button 1 to 5 times. If the sensation becomes too strong, you can always press the Minus ( – ) Button to reduce the intensity. BioWave Corporation... -
Page 76: End Of Treatment
If everything is properly connected, the LED Bar Graph will display 5 WHITE bars which ishte remaining treatment time. This means the stimulator is ready for the treatment to be started. If there is a problem, all 5 bars on the LED Bar Graph will flash ORANGE indicating there is an error condition that needs to be corrected (see Section 8 - Troubleshooting). BioWave Corporation... -
Page 77: Treatment Regimen Protocols
5.1 Treatment Regimen for Chronic Pain For treating chronic pain the recomended treatment time with BioWave Noninvasive Pain Relief Pads is 30 minutes. Multiple treatments using BioWave Noninvasive Pain Relief Pads with about 2 to 3 hours of spacing between treatments may produce the most effective cumulative benefit and may knock down your pain to a new lower level. -
Page 78: Treatment Regimen For Acute Pain (For Example As Part Of An Athletic Training Regimen)
(ice) if so desired. A barrier like a towel, an Ace bandage or another type of wrap should be placed over the BioWave Pain Relief Pads before placing ice on top of them. For use with cold and compression devices, the Pain Relief Pads should first be placed on the skin and then the cold/compression cuff may be placed over the Pain Relief Pads. -
Page 79: Adjunct Treatment Regimen For Postoperative Pain And During Physical Therapy And Rehabilitation
Pain Relief Pads may be placed immediately next to an incision, but should not be placed over incisions that have not yet healed. Pain Relief Pads may be placed over scar tissue. Please consult with your physician/surgeon prior to use as an adjunct treatment for postoperative pain. BioWave Corporation... - Page 80 BioWaveGO facilitates the ® ability of you to perform the exercise portion of physical therapy. In addition, because of BioWaveGO’s long carryover effect, you may experience little or no post-exercise soreness. BioWave Corporation...
-
Page 81: Battery Indicator And Charging The Battery
BioWave Corporation. Contact Customer Service at 1-877-BIOWAVE x2 (1-877-246-9283 x2) if the battery is not holding a charge and needs to be replaced. BioWave Corporation... -
Page 82: Maintenance, Cleaning And Storage Instructions
The user should ensure that the stimulator, leadwires, Pain Relief Pads and AC Charger are dry prior to using them. If the stimulator, leadwires, Pain Relief Pads or AC Charger do become wet, DO NOT USE them. Please contact BioWave for technical support at 1-877-BIOWAVE ext 2. - Page 83 7. Maintenance, Cleaning and Storage Instructions • Cleaning the skin prior to treatment and proper care of the BioWave Pain Relief Pads will ensure that the patient can obtain up to 10 treatments from one set of Pain Relief Pads. Following a treatment, remove both Pain Relief Pads from your skin, place them back onto their respective plastic release liners, and return the Pain Relief Pads into and reseal the resealable bag.
-
Page 84: Troubleshooting
When there is a connection problem all 5 LEDs will blink ORANGE, and the device will not allow you to start the treatment. If you are mid-treatment, and a connection problem occurs, the intensity is immediately reduced to zero and the treatment time is paused. BioWave Corporation... -
Page 85: Leadwire Cable Connection To The Stimulator
If the stimulator, cables and Pain Relief Pads are all properly connected to each other and to the patient’s body yet the 5 LEDs are still blinking ORANGE, then there are four conditions to check that can cause this error to occur: BioWave Corporation... - Page 86 Excessive hair on skin. Excessive hair on the skin can prevent the Pain Relief Pads from having adequate adhesion and electrical contact with the skin. As a result, the stimulator may not BioWave Corporation...
-
Page 87: Use Of Non-Biowave Pain Relief Pads
Pain Relief Pad(s) pull off of the skin. If during the procedure, either Pain Relief Pad or both Pain Relief Pads get pulled off of your skin, the intensity will go to zero (0.0%), the treatment will pause and the 5 LEDs will blink ORANGE. -
Page 88: Muscle Twitching
If you are connected to the BioWave app on a smartphone, a triangle with an exclamation mark will flash and appear briefly toward the bottom of the smartphone display. -
Page 89: Pain Relief Pad Spacing
Minimum Pain Relief Pad Spacing The minimum spacing between Pain Relief Pads is one inch (1”). Maximum Pain Relief Pad Spacing There is NO maximum spacing distance between the two Pain Relief Pads. The Pain Relief Pads are independent of one another. BioWave Corporation... -
Page 90: Technical Specifications
Provides 3 hours of power at 100% output into 500 Ohms Battery cannot be changed by the user. Life Expectancy Expected life of the device is 3 – 5 years. When exhausted, dispose of device properly and in accordance with local codes and regulations. BioWave Corporation... - Page 91 BioWave Noninvasive Pain Relief Pads are of a silver/carbon construction with a pre-applied hydrogel and are cleared for marketing under 510(k) numbers K052289, K072123 and K152437. BioWave Noninvasive Pain Relief Pads are a type BF applied part complying with IEC 60601-1.
- Page 92 Le présent appareil est conforme aux CNR d’Industrie Canada applicables aux appareils radio exempts de licence. L’exploitation est autorisée aux deux conditions suivantes : (1) l’appareil ne doit pas produire de brouillage, et (2) l’utilisateur de l’appareil doit accepter tout brouillage radioélectrique subi, même si le brouillage est susceptible d’en compromettre le fonctionnement. BioWave Corporation...
- Page 93 The BioWaveGO is suitable for use in all establishments, including domestic establishments Harmonic emissions IEC 61000-3-2 and those directly connected to the public low-voltage (IEC 61000-3-2) power supply network that supplies buildings used for Class domestic purposes. Voltage Fluctuations/ Complies Flicker Emissions (IEC 61000-3-3) BioWave Corporation...
- Page 94 Power frequency magnetic fields (50/60 Hz) should be at levels characteristic IEC 61000-4-8 of a typical location in a typical commercial or hospital environment. NOTE: U is the A.C. mains voltage prior to application of the test level. BioWave Corporation...
- Page 95 (m). Field strengths from fixed RF transmitters, as determined by an electromagnetic site survey should be less than the compliance level in each frequency range Interference may occur in the vicinity of equipment marked with the following symbol: BioWave Corporation...
- Page 96 Neurostimulator should be observed to verify normal operation. If abnormal performance is observed, additional measures may be necessary, such as re-orienting or relocating the BioWaveGO Neurostimulator. 2. For frequency ranges above 150 kHz to 80 MHz, field strengths should be less than 10 V/m. BioWave Corporation...
- Page 97 • At 80 MHz and 800 MHz, the separation distance for the higher frequency range applies. • These guidelines may not apply in all situations. Electromagnetic propagation is affected by absorption and reflection from structures, objects and people. BioWave Corporation...
-
Page 98: Contact Information And Warranty
10. Contact Information and Warranty 10.1 Reorder Information and Technical Support To reorder BioWave Pain Relief Pads, or for Technical Support, please contact BioWave at: toll free: 1 - 877 - BIOWAVE ext 1 (1-877-246-9283 ext 1) email: info@biowave.com web: biowave.com 10.2 Limited Warranty... - Page 100 Manufactured by BioWave Corporation Norwalk, CT 1-877-BIOWAVE biowave.com MADE IN Stimulator must only be used with power supply provided. ©2018-2019 BioWave Corporation...
Need help?
Do you have a question about the GO and is the answer not in the manual?
Questions and answers