Table of Contents
Advertisement
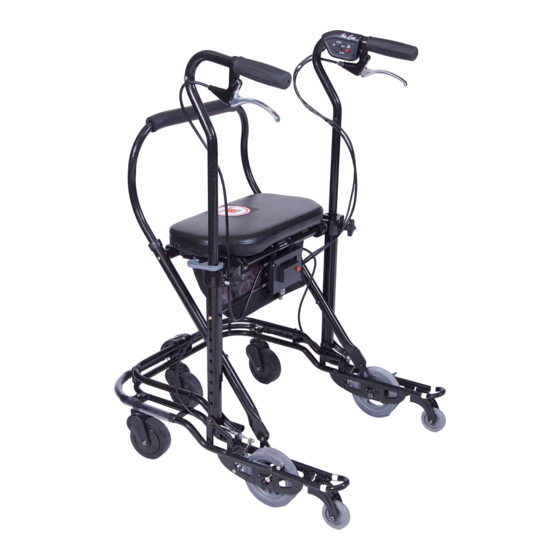
Step-by-Step Guide to Using Your
U-Step II Walking Stabilizer
Adjustable
backrest
Removable
basket
Spring-loaded
front wheel
4-inch
non-marking
Tension
casters
control
In-Step Mobility Products Corp.
Available in Canada:
Special Needs Computers | 1-877-724-4922
Hand brake
Padded
seat
Comfort grips
Ergonomically
positioned
handlebars
Height
adjustable
Place to step for
going up curbs
Laser
projected
red line –
optional
Glow-in-the-Dark
tabs
Advertisement
Table of Contents

Subscribe to Our Youtube Channel
Related Manuals for In-Step Mobility U-Step II


Summary of Contents for In-Step Mobility U-Step II
- Page 1 Step-by-Step Guide to Using Your U-Step II Walking Stabilizer Hand brake Adjustable backrest Comfort grips Ergonomically positioned handlebars Padded seat Height adjustable Removable basket Spring-loaded Place to step for front wheel going up curbs Laser 4-inch projected non-marking red line –...
-
Page 2: Table Of Contents
— 2 — Guide for Setting Up & Using Your U-Step II CONTENTS: A. Assembly Instructions B. Braking C. Tension Control Adjustment D. Sitting Down E. Walking Over Obstacles F. Transporting G. Setup After Transporting H. Optional Accessories 1. Laser & Sound Cueing Module Replacing the Cueing Module Batteries 2. -
Page 3: Assembly Instructions
— 3 — A. Assembly Instructions 1) After opening the box, cut the plastic ties that secured the U-Step II in transit. 2) Lift up on the tube at the top near the seat so that the seat becomes horizontal with ground. - Page 4 — 4 — You will need to push in the height adjustment button to slide the handle bar into the lower height adjustment tube. Left) Also, when you insert the handlebars make sure that the cables are routed to the inside of the handlebars, rather than the out- side.
- Page 5 — 5 — 6) Assembling the Backrest There are three adjustment holes for the backrest. (Left) Choose the one most com- fortable you when you sit down. Insert the two bolts and wing nuts provided to secure the back- rest into place. Slide the bolt through the top side of the tube and secure with the wing nut below.
-
Page 6: Braking
C. Tension Control Adjustment (Optional) 1) Not everyone needs to adjust the tension control to be safe. However, if you feel that the U-Step II rolls too easily for you, use the tension control to add resistance. Place your U-Step II on the surface where you walk most often. -
Page 7: Sitting Down
Tension Indicator (sticker) D. Sitting Down To sit down, you can either turn around while holding the han- dlebar, or pivot the U-Step II around so that it is positioned behind you and then sit down on the seat. When you are sitting on the... -
Page 8: Walking Over Obstacles
— 8 — E. Walking Over Obstacles The U-Step II has a patented spring-loaded front caster that enables it to roll over obsta- cles, such as door molding strips and cracks in the side- walk. It will help you ride over obstacles as high as one half- inch. - Page 9 — 9 — F. Transporting Your U-Step II 1) With the U-Step II in front of you, raise the release lever in front of the seat and tilt the seat upward. Release Lever 2) Reach down and pull up on the horizontal bar that has a sticker on it reading “Lift Here to...
-
Page 10: Setup After Transporting
1) Release the Velcro strap hold- ing the U-Step II in the folded position. 2) Allow the U-Step II to open – with the base on the ground. 3) Press the seat down in the middle until the Release Lever snaps into place. -
Page 11: Optional Accessories
— 11 — H. Optional Accessories 1) Laser and Sound Cueing Module — Operating the Unit The module primarily helps those with Parkinson’s freezing but also helps anyone with an irregular gait pattern. The Laser and Sound Cueing Module can help you get started, normalize your walking, and increase your stride. -
Page 12: Alternative Brake Accessory
— 12 — mode, the two black buttons increase or decrease the cadence (speed) with each brief press. The cadence varies from 59 to 130 beats per minute over 15 increments. The Sound Cueing only operates while the Laser Cueing is on. When Sound Cueing is activated, both the sound and laser remain on indefinitely. -
Page 13: Weights
U-Step II from the front. 3) Weights — Although the U-Step II is very stable, we do offer weights as an accessory to increase the stability of the walker. -
Page 14: Maintenance
Clean your U-Step II with a clean, damp cloth when necessary. Periodically check some of the moving components for wear. On a daily basis, check over the U-Step II by trying the brakes. Please call your U-Step II representative or call 1-800-558-7837 if you experience any problems with the tension of the wheels or with braking. - Page 15 — 15 — My Notes –...
- Page 16 — 16 — In-Step Mobility Products Corp. 1.800.558.7837 8027 Monticello Ave., Skokie, IL 60076 walkers@ustep.com www.ustep.com U-Step II Walking Stabilizer Passive Control Specifications (Model US-PC2) Model number ........US-PC2 Medicare code (HCPC) ......#E0147 Weight capacity ........375 lbs Height adjustment range............accommodates users 4’10” to 6’2”...
Need help?
Do you have a question about the U-Step II and is the answer not in the manual?
Questions and answers