Table of Contents
Advertisement
Quick Links
Advertisement
Table of Contents

Related Manuals for Nox Medical A1


Summary of Contents for Nox Medical A1
- Page 1 MANUAL Copyright 2016 Nox Medical...
- Page 2 Users must accept all responsibility for any results obtained by or concluded from data obtained by the products including software from Nox Medical. All clinical conclusions and decisions that are based on the use of this product are the responsibility of the user.
-
Page 3: Table Of Contents
Signal and Status Checks ........................14 Patient Hookup ............................15 Inserting a Battery to the A1 Device ....................15 Attaching the A1 Device and the RIP Belts ..................16 Attaching the Nasal Cannula ......................18 Measuring EEG Signals ........................19 Measuring EMG/ECG Signals ...................... - Page 4 Nox A1 Manual Maintenance............................28 Compatible Sensors and Devices ......................31 Specifications ............................36 A1 Device ............................36 Material Information ......................... 38 Battery Information ........................... 39 Regulatory Information .......................... 40 Performance Testing and Validation Summary ................. 40 Classifications............................. 40 Description of Symbols and Abbreviations ..................40 Bluetooth®...
-
Page 5: Introduction
Scope This manual covers the A1 device and its components along with external sensors and devices that have been validated with the A1 system. It does not cover the software application needed for device configuration, data download, review and/or analysis. - Page 6 CISPR emission requirements, causing possible patient harm. Caution: The A1 device is designed to be safe for use for pacemaker patients as long as the pacemakers comply with the EN 50061 standard of electrical safety of medical devices. Using non-compliant pacemakers may result in the operation of the pacemaker being affected by the use of A1 device and lead to possible recoverable patient harm.
- Page 7 Warning: Remove batteries from the A1 device if the device is not used within 30 days to prevent damage from possible battery leakage and prevent possible minor burns to the operator/patient.
- Page 8 Nox A1 Manual patients. Warning: The Nox 5 Lead EEG Electrode Cables are not certified to be used for electrical stimulation purposes. Using the product for electrical stimulation purposes might create burns and cause injuries to the patient. Caution: The device should always be transported in its accompanying carrying case to ensure adequate protection and prevent damage.
-
Page 9: Device Description
Noxturnal application. The A1 recorder is also capable of communicating over Bluetooth® via the Nox C1 access point for the purpose of device control. The A1 recorder is finally capable of communicating over Bluetooth® with the Nox app running on a mobile platform for the purpose of device control and review of signals. -
Page 10: A1 Interface
Nox A1 Manual A1 Interface The A1 device interface consists of a display, buttons, sensor inputs/connections and a USB connector. The USB connector is placed under the battery lid and connects to a mini USB cable for device configuration and data download. See the figures and tables below for detailed description. - Page 11 Nox A1 Manual Battery lid pin Metal snaps – Connects to thorax RIP belt Metal snaps – Connects to abdomen cable ~ 11 ~...
-
Page 12: Operating The Device
To connect an A1 device to a computer you need to access the USB connector on the device. The USB connector is placed under the battery lid making it inaccessible and tamper proof for children. To open the battery lid, press with a pen or a similar tool, available from Nox Medical, on the battery lid pin and slide the battery lid down, towards the bottom of the device. -
Page 13: Manually Starting/Stopping A Recording
Nox A1 Manual Manually Starting/Stopping a Recording If the device has been configured to start the recording manually, you can use the Middle button to manually start a recording. Pressing the middle button turns on the display. The device will instruct you to “Hold middle button down to start recording”. -
Page 14: Starting A Recording At A Scheduled Time
Nox A1 Manual Starting a Recording at a Scheduled Time If the device has been configured to automatically start a recording at a scheduled time there are no actions required for the recording to start. Pressing the Middle button before the recording has started will display a countdown to the specified start time of the recording. -
Page 15: Patient Hookup
Note: All lithium batteries used with the A1 device shall be according to the standard IEC 60086-4 Primary batteries - Part 4: Safety of lithium batteries. -
Page 16: Attaching The A1 Device And The Rip Belts
Nox A1 Manual Attaching the A1 Device and the RIP Belts Caution: The A1 device and RIP belts should be worn over clothing to prevent allergic reaction to the equipment materials. Warning: The disposable RIP belts are single use and single patient use. Re-using the disposable RIP belts may affect the quality of recorded signals and lead to possible incorrect treatment. - Page 17 Refer to the “Compatible Sensors and Devices” section regarding the types of Nox RIP belts that have been validated with the A1 device. NOTE: For most patients the disposable RIP belts do not need to be adjusted if the correct belt size is chosen based on the patient’s abdomen circumference and/or body mass index (BMI).
-
Page 18: Attaching The Nasal Cannula
A1 device. If it is preferred to use a non-filtered Luer-lock cannula, it is necessary to use a filter tube connector from Nox Medical to interface with the A1 device. -
Page 19: Measuring Eeg Signals
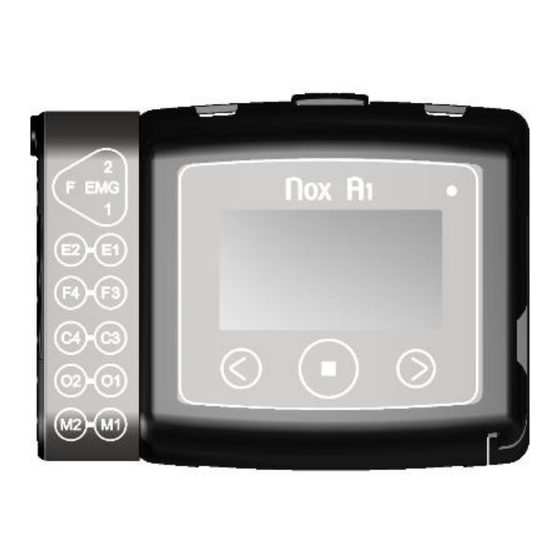
Note: The Nox EEG Head Cable is available in both pediatric and adult lengths. Connect the Nox EEG Head Cable to the E2-E1, F4-F3, C4-C3, O2-O1, M2-M1 unipolar and ground inputs of the A1 device. ~ 19 ~... - Page 20 Nox A1 Manual Place a snap-on electrode on the middle of the patient’s forehead. Route the head cable behind the patients head and snap the cable to the electrode. Connect two Nox 5 Lead EEG Electrode Cables to the head cable, one on each side.
-
Page 21: Measuring Emg/Ecg Signals
The A1 device is equipped with 4 bipolar channels suitable for recording of ECG and EMG signals such as leg EMG or masseter EMG for bruxism detection. The device’s bipolar channels are labeled with GP1, ECG, LM1, and LM2 and connect to bipolar electrode leads with keyhole connectors. -
Page 22: Measuring Mask Pressure
A1 device by using the Nox filter tube connector. A mask pressure tube is used for connection to CPAP masks for measuring mask pressure. The pressure tube connects to the pressure lock on the A1 device via a filter tube connector from Nox Medical. -
Page 23: Measuring Data From Auxiliary Devices
The A1 device is able to communicate with auxiliary devices over a Bluetooth® link with the Nox W7 link. Refer to the user instructions accompanying the Nox W7 link package regarding the types of auxiliary devices that have been validated with the A1 device. -
Page 24: Inserting Batteries Into The Oximeter
Nox A1 Manual electrosurgical interference blood flow restrictors (arterial catheter, blood pressure cuffs, infusion lines, etc.) moisture in the sensor improperly applied sensor incorrect sensor type poor pulse quality venous pulsations anemia or low hemoglobin concentrations ... -
Page 25: Selecting Oximeter Sensor Size
Nox A1 Manual Selecting Oximeter Sensor Size Soft Sensor Soft sensor size recommendations are based on digit height (thickness). The digit height (H) is measured as shown in the figure below. For digit height from 7.5 mm (0.3 in) to 12.5 mm (0.5 in), size small should be selected. -
Page 26: Attaching The Pulse Oximeter Module And Sensor
Nox A1 Manual Attaching the Pulse Oximeter Module and Sensor Nonin 3150 Pulse Oximeter Step 1 to Step 4 1. Separate the short end of the wristband from the long end. 2. Insert the short end in the loops on the oximeter. -
Page 27: Configuring The Oximeter Setup
Establish Connection between the Nonin 3150 Oximeter and A1 R ecorder Use the Noxturnal software or Noxturnal App to establish the connection between the Nonin 3150 oximeter and A1 Recorder. The connection is established by entering the Bluetooth (BDA) address of the oximeter in the recording configuration. -
Page 28: Maintenance
No regular testing of the A1 device or accessories, including patient cables, is needed. The service life of the A1 device is 5 years. The service life of reusable accessories is 1 year. Warning: Remove batteries from the A1 device if the device is not used within 30 days to prevent damage from possible battery leakage and prevent possible minor burns to the operator/patient. - Page 29 Allow the unit to dry thoroughly before use. All Nox cables used with the A1 device are reusable. Clean the cables with a moist cloth using hospital grade cleaner. Do not immerse the cables in liquid and avoid contact of the cleaning solution with the connectors.
- Page 30 Nox A1 Manual Disposal Follow local governing ordinances and recycling instructions regarding disposal or recycling of this device and accessories, including batteries. According to the regulation in Europe on Waste of Electrical and Electronic Equipment (WEEE) the components labeled with this symbol may not be disposed of as unsorted municipal waste.
-
Page 31: Compatible Sensors And Devices
Note: To ensure patient safety and effective use of the A1 device, only use accessories that have been validated for use by Nox Medical. The items listed below are Nox products and have been validated for use with the A1 device: NOX RIP BELTS... - Page 32 Nox A1 Manual Nox Clip Strap 569013 Nox Lid Key 569014 UNIPOLAR SNAP-ON LEADS Type Catalogue Number Nox Snap-on Lead 50 cm, white, 1.5mm connector, 2 units 554020 Nox Snap On Lead 30 cm, beige-white, 1.5 mm connector, 2 units 554021 Nox Snap On Lead 100 cm, green, 1.5 mm connector, 1 unit...
- Page 33 MOBILE APP Type Catalogue Number Noxturnal Mobile App, available from Google Play Store 536210 The items listed below are 3 party products and have been validated for use with the A1 device: PULSE OXIMETERS Type Catalogue Number NONIN 3150 541010...
- Page 34 Nox A1 Manual DIFFERENTIAL PRESSURE SENSOR Type Catalogue Number Differential Pressure Sensor Kit 547010 FLOW SENSORS Type Catalogue Number Thermal Flow Sensor - Adult 552230 Thermal Flow Sensor – Pediatric 552231 MASK PRESSURE TUBING Type Catalogue Number Mask tubing 183cm (72in) Male x Male, 50 units...
- Page 35 Nox A1 Manual CLEANING Type Catalogue Number Super Sani-Cloth Plus Disinfection Wipes 559010 ~ 35 ~...
-
Page 36: Specifications
Nox A1 Manual Specifications A1 Device DESCRIPTION PROPERTIES FUNCTION Storage Capacity 1GByte Recording Time 8 hours Internal Channels Two RIP Respiratory Effort Pressure Respiratory sound/snoring Four bipolar Thirteen unipolar Position Activity External Channels ... - Page 37 Nox A1 Manual EEG Head Cable Head-end connector: Black overmolded female snap and dual USB Micro receptacles Device-end connector: 11 pin touchproof connectors 1.5 mm (0.060") female EEG 5 Lead Electrode Cables USB micro connector 10 mm diameter cup electrodes Abdomen Cable Length ...
-
Page 38: Material Information
Nox A1 Manual Material Information COMPONENT MATERIAL CONTENT A1 Device Enclosure: 10% glass filled PC/ABS Proxy: PC/ABS Snaps: Gold plated stainless steel Display/Keypad: PET Clips: Nickel-plated steel clip , nylon rope, brass crimp Cable Jacket: PVC Abdomen Cable ... -
Page 39: Battery Information
Battery Information The list below is provided to assist the user in selecting the appropriate battery type for the A1 study: Lithium batteries and Powerex 2700 mAh rechargeable batteries should be used to record a minimum of 8 hours. -
Page 40: Regulatory Information
Regulatory Information Performance Testing and Validation Summary The Nox A1 system has been tested and verified in various phases to include internal testing, verification and validation as well as external testing to assure product safety, effectiveness and reliability. The design was verified and validated, including clinical evaluation, throughout the design process, according to requirement specifications and intended use. - Page 41 Nox A1 Manual Serial number Batch code / Lot number Catalogue number / Reference number Unique Device Identifier (UDI); (01) represents the device identifier (DI) (“1569431111XXXX”), (11) the (01)1569431111XXXX(11)YYMMDD production date/date of manufacture (“YYMMDD”, with (21)WWWWWWWWW “YY”...
- Page 42 Nox A1 Manual General purpose bipolar input connector E2-E1 F4-F3 Electroencephalography (EEG) and electrooculography C4-C3 (EOG) input connectors O2-O1 M2-M1 Electrocardiography (ECG) input connector EMG: F, 1, 2 Electromyography (EMG) input connectors Leg electromyography (EMG) for limb movement (LM) detection input connectors ...
-
Page 43: Bluetooth® Wireless Technology
“Specifications” section for details on RF specifications for the A1 device. The Bluetooth® word mark and logos are registered trademarks owned by the Bluetooth SIG, Inc. and any use of such marks by Nox Medical is under license. Other trademarks and trade names are those of their respective owners. - Page 44 RF field in excess of Health Canada limits for the general population; consult Safety Code 6, obtainable from Health Canada’s website: http://www.hc-sc.gc.ca/ewh- semt/pubs/radiation/radio_guide-lignes_direct/index-eng.php. MODIFICATION STATEMENT Any changes or modifications not expressly approved by Nox Medical could void the user’s authority to operate the equipment. ~ 44 ~...
- Page 45 Guidance and Manufacturer’s Declaration – Electromagnetic Emissions Guidance and manufacturer’s declaration – electromagnetic emissions The A1 device is intended for use in the electromagnetic environment specified below. The customer or the user of the A1 device should assure that it is used in such an environment.
- Page 46 Guidance and Manufacturer’s Declaration – Electromagnetic Immunity Guidance and manufacturer’s declaration – electromagnetic immunity The A1 device is intended for use in the electromagnetic environment specified below. The customer or the user of the A1 device should assure that it is used in such an environment.
- Page 47 To assess the electromagnetic environment due to fixed RF transmitters, an electromagnetic site survey should be considered. If the measured field strength in the location in which the A1 device is used exceeds the applicable RF compliance level above, the A1 device should be observed to verify normal operation. If abnormal performance is observed, additional measures may be necessary, such as reorienting or relocating the A1 device.
- Page 48 Recommended separation distance between portable and mobile RF communications equipment and the A1 device The A1 device is intended for use in an electromagnetic environment in which radiated RF disturbances are controlled. The customer or the user of the A1 device can help prevent electromagnetic interference by...
-
Page 49: About
9 March 2012 on electronic instructions for use of medical devices. This manual is provided as a pdf document. PDF readers are commonly available at no cost for users. This manual is also available on Nox Medical’s website: support.noxmedical.com/hc/en- us/articles/200478429-Nox-A1-Device-Manuals.
Need help?
Do you have a question about the A1 and is the answer not in the manual?
Questions and answers