Table of Contents
Advertisement
Quick Links
Advertisement
Table of Contents

Related Manuals for Ozone Forza


Summary of Contents for Ozone Forza
- Page 1 Pilots Manual...
-
Page 2: Table Of Contents
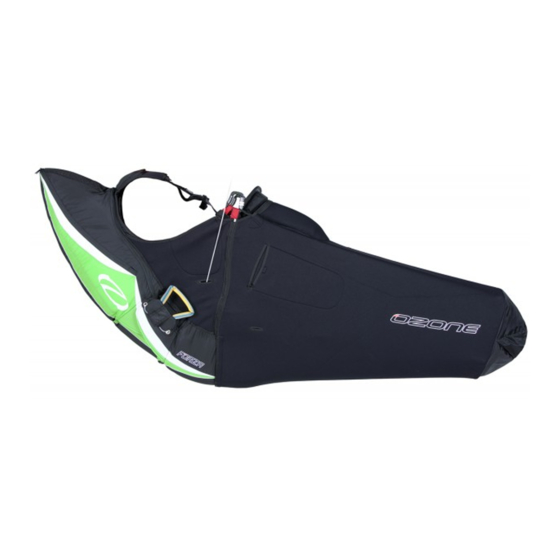
CONTENTS Thank You Warning Team Ozone Your Forza Preparation Underseat Mousse Speed System Reserve Parachute Installation 07 Fitting Adjustments Shoulder Straps Lumbar Support Leg/Chest Straps Fine Tuning of the Pod Features Integrated Cockpit Anti-G Pocket Hydration Access System Velcro Shoulder Mounting Pullet Attachment Loop Pod Catcher Radio Pocket Pen Holder Care and Maintenance Inspection Changing the Pod Technical Specifications Sizing Materials Towing Ozone Quality Guarantee... -
Page 3: Thank You
• Paragliding is a potentially dangerous sport that can cause serious injury including bodily harm, paralysis and death. Flying an Ozone harness is undertaken with the full knowledge that paragliding involves such risks. As the owner of an Ozone harness you Thank you for choosing Ozone. -
Page 4: Team Ozone
TEAM OZONE YOUR FORZA Everyone at Ozone continues to be driven by our passion for flying, our love of adventure and our quest to see Ozone’s Shoulder adjustment straps paraglider development create better, safer and higher performing paragliders. Main Hangpoints The paraglider design team is led by David Dagault;... -
Page 5: Preparation
Always double-check lengths and symmetry whilst on the ground before flying. To attach the speed bar to the Forza, first route the free end of one of the accelerator system lines down through the small reinforced slit found on the side panel of the harness. -
Page 6: Reserve Parachute Installation
WARNING: Ozone strongly recommends that the reserve parachute system is installed by a qualified professional. Always seek experienced advice if you have any doubts. Please note, the Forza is only suitable for reserve parachutes with a short bridle. Make sure you perform a practice throw from a static hang point. Not only does this ensure the correct functioning of your deployment system it also allows you to become more familiar with the installation process. - Page 7 Close the left hand flap, white loop 1 should be pulled through eyelet 2, and white loop A through eyelet B The container can be closed by running both zips forward towards the reserve parachute opening, all the way to the eyelets, and then back again underneath the harness to secure the zips The right hand flap can now be closed. White loop 1 should be pulled through eyelet 3 and white loop A through eyelet C Gently pull the parachute handle and top flap out of the way so they are clear of the bottom flaps Now the top flap can be pulled into position. The handle sits behind the exterior material of the top flap. Pass the nylon pins of the reserve handle through the gaps in the material just above the top flap eyelets. Pull the white loops through both top flap eyelets and push the pins through the white loops. The magnetic section can be wrapped around the handle and secured behind it to keep it neatly in place. Using suitable pieces of magic string or plastic pull the white loops through the parachute container eyelets. Finally the ends of the nylon pins can be neatened into the available tunnel as shown.
-
Page 8: Fitting
FITTING Before your first flight, we recommend to suspend the harness from a suitably strong point to check that Next pass the red loop of the anti-forget system through it fits you correctly and to become familiar with the features and adjustments. You can set the shoulder the eyelet on the right hand pod next to the instrument panel. adjustment-straps to find the best fit, and adjust the lumber support so that they leave you in a comfortably reclined position. To put the harness on first place the shoulder straps over your shoulders and bring the leg/chest strap through your legs. The red ball found under the left hand maillon should now be passed through the loop of the anti-forget system. Fasten the leg/chest strap with the orange buckles. Ensure that the buckles are closed properly and that both the upper and lower buttons click into place. The automatic pod closing system should now be connected. First attach the red loop of the left hand pod The shoulder strap retainer clip should now be fastened. flap to the red ball situated under the maillon on the right hand side of the harness. The red ball goes through the red loop. -
Page 9: Adjustments
ADJUSTMENTS LEG SUPPORT ANGLE The angle of the leg support can be adjusted using with the knots on the short purple line. Using the higher SHOULDER STRAPS knot increases the support under your thighs. The length of the Shoulder straps can be modified using the adjustment straps. Adjust the shoulders whilst standing up with the harness on so that they are comfortably snug. Whilst suspended in the seated position ensure the straps are comfortable and supportive, they should not be too tight nor too loose. FINE TUNING OF THE POD The harness has been set up so that it will suite the majority of pilots and further adjustments should not be necessary, however if you wish to make changes it is possible to do so. This must be done on the ground and is not possible in the air. The foot plate at the end of the pod is supported by 4 lines (purple), these control the overall length of the pod and the angle of the foot plate. LUMBER SUPPORT Minor adjustments to the overall length of the pod can be made by moving the position of the knots on the The Lumber support should be adjusted for a comfortable flying position. Precise adjustments can be made upper anti-forget lines (grey) and the lower (purple) knots. in the air so that your lower back is completely supported and there is no tension in your stomach muscles. Be sure to adjust the lumber supports carefully, setting them too loose will result in a very reclined position in the air. The angle of the foot plate can also be changed by moving the position of the bottom (purple) lines on the knots. LEG STRAPS/CHEST STRAP The length of the leg straps and chest strap affects the overall stability of the harness. For maximum weightshift the chest strap and leg straps should be left in their longest position. For greater roll stability the straps can be tightened. It is important to test fly and adjust to find the position that is best for your style of IMPORTANT:... -
Page 10: Features
The magnets used to close the cockpit may interfere with traditional magnetic compasses causing The Forza comes equipped with a removable radio pocket, it is situated on the inside of the right hand side hang point. inaccurate readings. It is therefore recommended to NOT use magnetic compasses with the Forza harness, if your flight instrument has an integrated magnetic compass then this option should be disabled. The magnets have no detrimental effect on GPS reception or accuracy. -
Page 11: Care And Maintenance
CARE AND MAINTENANCE 1. Red pod loops on carabiners The Forza will last you many flights and many years if looked after correctly. To keep your harness clean and airworthy, please note the following: • Avoid excessive exposure to UV, heat and humidity. • Pack the harness dry and store in a cool dry place. • Never drag your harness. • Keep you harness clean of dirt, oils and any corrosive substance. • Use water and a cloth to clean. 2. Zips INSPECTION For safety, routine inspection of all of your equipment is vitally important. Ozone recommends a service interval of 12 months in addition to the usual pre flight checks. For inspection, visually check the stitching, webbing and all structurally important areas. Pay particular attention to the webbing around the hang point area under the karabiner, as this is where abrasion is most likely. IMPORTANT: Ensure the red If you find any damage or if you are in any doubt make sure the harness checked by a professional. pod loops (1) are attached to the carabiners. Failure REPLACING THE POD to do so will put excessive Replacement pods are available from your Ozone dealer. It is possible after many hours of use, or after an incident that results in damage that the... -
Page 12: Technical Specifications
OZONE QUALITY GUARANTEE TECHNICAL SPECIFICATIONS SIZING At Ozone we take the quality of our products very seriously, all our harnesses are made to the highest standards in our own manufactur- ing facility. Every harness manufactured goes through a stringent series of quality control procedures and all the components used are The harnesses structure is available in three different sizes; S, M, and L which can be combined with three different pod sizes; S, M, and L suitable traceable. We always welcome customer feedback and are committed to customer service. Ozone guarantees all of its products against for a wide range of pilot heights and body configurations. We recommend the following harness and pod combinations: manufacturer’s defects or faults. Ozone will repair or replace any defective product free of charge. Ozone and its distributors provide the highest quality service and repair, any damage to products due to wear and tear will be repaired at a reasonable charge. Pilot height Harness Weight If you are unable to contact your dealer then you can contact us directly at info@flyozone.com. Summary 5.00 155 - 165 cm Safety is paramount in our sport. To be safe, we must be trained, practised and alert to the dangers around us. To achieve this we must 165 - 175 cm 5.20 fly as regularly as we can, ground handle as much as possible and take a continuous interest in the weather. If you are lacking in any of 175 - 185 cm 5.35 these areas you will be exposing yourself to more danger than is necessary. 185 - 195 cm 5.50... - Page 13 1258 Route de Grasse Le Bar sur Loup 06620 France...
Need help?
Do you have a question about the Forza and is the answer not in the manual?
Questions and answers