Table of Contents
Advertisement
Quick Links
Advertisement
Table of Contents

Related Manuals for Evoqua WALLACE & TIERNAN S10k


Summary of Contents for Evoqua WALLACE & TIERNAN S10k
- Page 1 ® WALLACE & TIERNAN GAS FEEDER S10k INSTRUCTION MANUAL...
- Page 2 S10k Please note Original manual! WT.025.200.000.DE.IM.0517...
-
Page 3: Table Of Contents
S10k Contents Contents Introduction Documentation 1.1.1 Target groups Conventions Safety Intended use General safety instructions Safety instructions specific to the S10k system Description Design Principle of operation Vacuum demand valve 3.3.1 Operating knob 3.3.2 Heater (optional) 3.3.3 Pressure relief valve 3.3.4 Flowmeter assembly Injector... - Page 4 S10k Contents Point-of-application Water supply 4.10 Gas supply line 4.10.1 Gas suction line 4.11 Commissioning 4.11.1 Preparation 4.11.2 General check 4.11.3 Injector vacuum and leak check 4.11.4 Check for gas leaks 4.11.5 Check of the vacuum demand valve 4.12 Commissioning 4.13 Training the operator Operation...
- Page 5 S10k Contents Two-yearly maintenance Preventive maintenance kits Necessary tools Service Notes 6.8.1 Servicing the main components 6.8.2 Cleaning the flowmeter 6.8.3 Cleaning the V-notch plug 6.8.4 Cleaning the injector 6.8.5 Injector W3T171369 (3/4") 6.8.6 Injector W3T171370 (3/4") 6.8.7 Injector W3T171367 (1") 6.8.8 Antisyphon-injector W3T171368 (1") 6.8.9...
- Page 6 S10k Contents WT.025.200.000.DE.IM.0517...
-
Page 7: Introduction
The entitled „Installation“, „Commissioning“ and „Maintenance by specialists“ chapters are intended exclusively for Evoqua-authori- zed technicians or specialists trained and authorized by Evoqua. These sections contain important information on assembling, con- figuring, and commissioning the system and on maintenance and repair work. -
Page 8: Conventions
S10k Introduction Conventions Notes This Instruction manual contains a number of notes with different priorities marked with symbols. Picto- Note Meaning gram Warning! Danger to life and limb! If the situation is not handled properly, death or serious injury may be the result. -
Page 9: Safety
Other use is prohibited without permission from Evoqua. The vacuum demand valve is designed to fit directly to a chlorine or sulphure dioxide gas cylinder. For the use with carbon dioxide the gas pressure must be reduced to 13.5 bar. -
Page 10: General Safety Instructions
S10k Safety General safety instructions Evoqua attaches great importance to the safety of all work relating to the system. This was already taken into account in the design of the system, by the integration of safety features. Safety instructions The safety instructions in this documentation must always be observed. -
Page 11: Safety Instructions Specific To The S10K System
S10k Safety Safety instructions specific to the S10k system Warning! Chlorine gas or sulphur dioxide gas irritates the respiratory tracts. Contact with chlorine or sulphur dioxide gas in high concentrations irritates and damages the membranes, respiratory system and the skin. In extreme cases death can result due to suffocation. Note In this manual the use of the S10k system with chorine gas is de- scribed. - Page 12 • Only use original spare parts. Employment of non-specified parts can cause faults which can have dangerous conse- quences. Evoqua does not accept any liability in such cases. • After installation always keep this instruction manual in a safe, easily accessible place. It is important for safe operation and correct servicing.
-
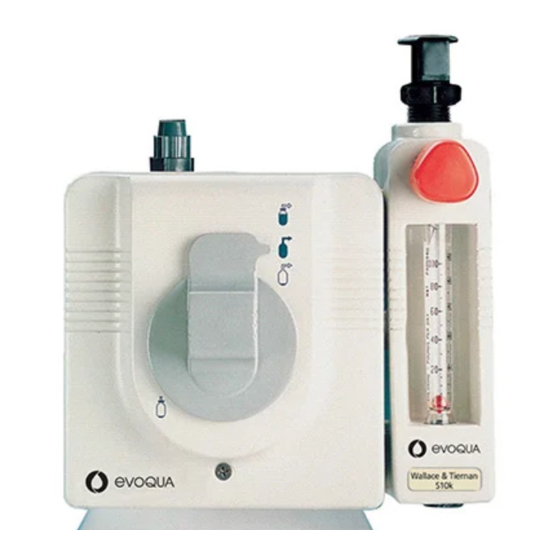
Page 13: Description
S10k Description 3. Description Design The system consists of the following main components: • The separately mounted injector (6) for the generation of the operating vacuum and for the mixing of the gas with the water. • The vacuum demand valve (1) is connected directly to the Cl or SO gas cylinder or to the gas manifold. -
Page 14: Principle Of Operation
S10k Description 1 Vacuum demand valve 2 Gas dosing unit 3 Gas cylinder with bracket 4 Activated carbon filter (recommended for chlorine) 5 Operating water supply 6 Injector 7 Point of application 8 Support Principle of operation Operating water passes through an injector (6) and creates a va- cuum. -
Page 15: Vacuum Demand Valve
S10k Description If the operating water is shut off, the vacuum breakes down and the vacuum demand valve interrupts the chlorine flow. The check valve in the injector prevents water from entering the gas line. In case of a leak in the tubing from the regulating valve to the injector or in the chlorinator, only air can enter into the system, but no chlo- rine can escape. - Page 16 S10k Description Automatic switchover capability is provided (when ordered) by two vacuum demand valves fitted with mechanical detents machined into the operating lever. One valve feeds gas until its cylinder is de- pleted (down to approximately 1 bar). The resulting rise in vacuum to a higher than normal level provides sufficient force to unlatch the operating lever in the second unit which then takes over the gas supply function.
-
Page 17: Operating Knob
S10k Description 3.3.1 Operating knob The front cover houses the control mechanism and the front face is provided with symbols, which indicate the operating condition of the unit as follows. Standard version closed operating empty (non switch-over) Operation: To close the valve: To open the valve: Move the knob downwards Turn the knob anti-clockwise... - Page 18 S10k Description Switch-over version Closed standby (The valve is closed. It opens when the other gas cylinder is empty and the vacuum rises. Operating One cylinder empty or valve closed. The pressure gauge shows 0 bars. Both gas cylinders are empty. The pressure gauge of both gas cylinders show 0 bars.
-
Page 19: Heater (Optional)
S10k Description 3.3.2 Heater (optional) An optional heater unit (W3T162239) is available for installations where reliquefaction of the gas within the valve is a problem due to low external temperatures. Reliquefaction can occur if the tem- perature in the vacuum demand valve is below the temperature in the gas cylinder. -
Page 20: Injector
S10k Description Control of the gas feedrate is achieved by by turning the control knob • in the anti-clockwise direction to increase the flowrate or • in the clockwise direction to decrease the flowrate. If the float touches the upper stop, the range is exceeded and the reading is not valid. -
Page 21: Technical Data
S10k Description Technical Data Dosing accuracy class 4 (according to VDI/VDE 3513 Bl. 2) Flowmeters for chlorine 3" version: 24 g/h to 4 kg/h 5" version: 60 g/h to 10 kg/h also refer to chapter 7.3 V notch plug 24 g/h to 10 kg/h Cl Control range 20 : 1 Operating water... - Page 22 S10k Description WT.025.200.000.DE.IM 0517...
-
Page 23: Installation
S10k Installation 4. Installation Warning! To avoid possible severe personal injury or damage to plant this equipment should be installed, operated and serviced only by trained qualified personnel who are thoroughly familiar with the en- tire contents of this instruction book. Piping for the chlorine (or sulphur dioxide) gas supply, where the gas is under pressure, should conform to Chlorine Institute (or Compressed Gas Association) recommendations. -
Page 24: Flowmeter Assembly
S10k Installation In case of a CO2 dosing plant the vacuum demand valve is con- nected to the pressure reducing valve via a pressure hose and mounted to a wall. Also refer to „Typical installations“. • Unauthorized persons must be excluded from the installation. •... -
Page 25: Mounting The Flowmeter
S10k Installation If the flowmeter assembly is bolted to an uneven wall, shims must be added to prevent the flowmeter assembly from twisting when the bolts are tightened. The axis of the flowmeter assembly must be vertical when mounted. Use a spirit level to check this. 4.3.1 Mounting the flowmeter Note... -
Page 26: Connection To A Gas Cylinder
S10k Installation bars g to prevent overpressurization of the vacuum demand valve. A pressure relief device, set at a maximum of 15.8 bar g should be installed between the pressure reducing valve and the vacuum va- cuum demand valve. Warning! The standard demand valve must not be used for ammonia ser- vice. -
Page 27: Connection To A Chlorine Drum
S10k Installation 4.4.2 Connection to a chlorine drum A Relief line B Operating knob (to close the valve turn clockwise) C to the flowmeter assembly and the injector D Connection to the drum valve (gasket W3T172026 ) E Connection to the vacuum deamnd valve S10k (gasket W3T172027 + filter W3T167914 ) F Heater G Adaptor W3T166148... -
Page 28: Relief Line
S10k Installation Relief line • Do not terminate the safety vent line in areas frequented by personnel - external work areas, footpaths etc., or adjacent to windows or ventilation system intakes. • The line must run on a continuous down gradient, without low traps, to a point outside the building. -
Page 29: Mounting The Injector
S10k Installation Mounting the injector Note Never shorten the tailway. The tube connected to the tailway must be straight for at least 0,30 m more. Otherways the flow in the pressure-recovery zone will be interrupted and prevent normal performance. Do not direct the tailway downwards. Otherwise air or gas bubbles can accumulate in the tailway and impair the function of the injec- tor. -
Page 30: Point-Of-Application
S10k Installation Injector W3T171367 / W3T171368 Connection at the throat: PVC tube DN 25 (Ø32 mm) Connection at the tailway: PVC tube with 3/4“ inner Ø The gas connection can be turned in 60° steps. To do so remove the 6 bolts, remove the upper part of the housing and fix again in the desired position. -
Page 31: Water Supply
S10k Installation Water supply There must always be sufficient operating water available at an adequate supply pressure. The operating water must not contain any particulates (potable water quality). Water pressure and quantity depend on the maximum dosing ca- pacity, the counterpressure at the point of application, the diffe- rence in geodetic altitude between chlorinator and point of application and the friction in the dosage line. - Page 32 S10k Installation the gas flows has to be considered. Caution! When using polyethylene pipes don't install them in narrow, badly vented protection pipes or in the ground to prevent the pipe from fast embrittling under the influence of Cl2 or SO2. The following table shows the maximum length of pipe run, in me- tres, that can be used between its supply cylinder and a flowmeter and injector for a given Cl2/SO2/CO2 feedrate.
- Page 33 S10k Installation Max.tube/pipe length between vacuum demand valve and flowmeter assembly Feed of Feed of PE-hose PE-hose PE-hose PVC- PVC- PVC- , SO 6,35 mm 9,5 mm 12 mm pipe pipe pipe (1/4“) (3/8“) (1/2“) DN15 DN20 DN25 in g/h in g/h 250 m 1200 m...
-
Page 34: Commissioning
S10k Installation 4.11 Commissioning 4.11.1 Preparation Chlorination plants should be checked by a specialist for condition according to the rules before beeing taken into operation. Espe- cially the chlorine parts of the plant must be checked for leaks. When all the connections have been made, the following pre-start checks must be carried out before the plant can be taken into ope- ration. -
Page 35: Check For Gas Leaks
S10k Installation „Empty" 6 Check that the float rests on the bottom stop of the flowmeter. Any movement of the float indicates an ingress of air on one of the following locations: • through the pressure relief valve • through the 'O' ring on the bottom of the flowmeter •... -
Page 36: Check Of The Vacuum Demand Valve
S10k Installation Note Before commencing this procedure, ensure that the injector asso- ciated with the gas feed system is operational, i.e. that the injector is operating correctly and can be started immediately a gas leak is detected. If a leak of gas is detected, close the storage cylinder or header valves and start-up the injector immediately. -
Page 37: Commissioning
S10k Installation uncovered. Then the vacuum is sufficient. If the vacuum is not sufficient, refer to the chapters „Fault fin- ding“ and „Maintenance“. 4.12 Commissioning The following procedures assume that all preparatory steps and leak tests have been completed satisfactorily. 1 Set the vacuum demand valve to „operation"... - Page 38 S10k Installation zed and qualified personnel can work on or with the system, and within their specified area of responsibility. All personnel who work on the system must have read and under- stood the instruction manual, especially the safety instructions. WT.025.200.000.DE.IM 0517...
-
Page 39: Operation
S10k Operation 5. Operation Starting operation 1 Check the gas monitoring system. 2 Turn on the water supply to the injector. 3 Turn on the gas at the supply cylinder. 4 Set the vacuum demand valve to „operation" If there are two valves (automatic switchover system) select one cylinder as the 'duty' supply and set its demand valve to 'operation'. -
Page 40: Shutdown For Extended Periods
S10k Operation 5.2.2 Shutdown for extended periods also for servicing and repair Warning! In the following procedure, which must be carried out before servi- cing any gas feeder system, a gas line is disconnected with a pos- sible release of gas. It is recommended that breathing apparatus are worn. -
Page 41: Changing Gas Cylinders
S10k Operation Changing Gas Cylinders Warning! To avoid possible severe personal injury or equipment damage, prior to performing this operation you must be completely familiar with this manual and your local plant operating and emergency procedures. Put on your gas mask. Gas cylinders must be secured in such a manner (e.g. -
Page 42: Multiple Points - Of - Application
S10k Operation the cylinder valve packing nut has not worked loose. 8 Remove the old gasket (37) and the filter (40) from the supply line connection or demand valve inlet nipple and discard it. Replace it with a new lead gasket. Pay attention to the filter holder (39). -
Page 43: Maintenance And Inspection Plan
S10k Operation Maintenance and inspection plan... -
Page 44: Maintenance By The Operator
S10k Operation Maintenance by the operator The following maintenance instructions include works that are ne- cessary for the safe operation of the system. Frequency and ex- tend of the works have to be adapted to the operating conditions. When any connection is broken even for a short time, immediately plug the resultant opening with a rubber stopper or equivalent to prevent the entrance of moisture. -
Page 45: Further Maintenance
S10k Operation 3 When the indicator is red and the flowmeter float has settled on the bottom stop turn off the injector operating water. A rapid decrease in vacuum indicates an air leak somewhere in the system. 4 If the system is equipped with automatic switchover vacuum demand valves, operate the gas feeder with only one valve turned on. -
Page 46: Changing The Activated Carbon Filter
S10k Operation water. The above maintenance schedule provides recommended clea- ning intervals. However, your own operating experience is the best guide to preventative maintenance and may result in significant variations from the recommended schedule. 5.7.5 Changing the activated carbon filter Replace the carbon when smelling to chlorine or when lumped. -
Page 47: Fault Finding
S10k Operation mospheric moisture during the storage period. If a pump is being used, follow the pump manufacturers instructions for extended shut-down. Fault finding Symptoms Probable cause Remedy Gas control unit will not Chlorine supply exhausted Change chlorine container feed Chlorine supply is turned off Open valves Clogged solution tube at... - Page 48 S10k Operation Symptoms Probable cause Remedy Gas control unit will not Insufficient injector vacuum see 1. run up to full capacity Injector does not meet re- Change injector parts quirements Gas filter in vacuum de- Replace the filter mand valve clogged Flowmeter float moves Deposits on flowmeter parts Clean flowmeter...
-
Page 49: Maintenance
S10k Maintenance 6. Maintenance General Warning! Chlorine gas irritates the respiratory tracts. Contact with chlorine gas in high concentrations irritates and damages the membranes, respiratory system and the skin. In extreme cases death can result due to suffocation. Before carrying out any maintenance operations involving dis- mantling, the system should be cleared of gas. -
Page 50: Cleaning The Parts
S10k Maintenance • Replace all chlorine lines made of copper every 2 years. • Replace the auxiliary valves at least every 3 years. • Replace the pressure gauge of the vacuum demand valves at least every 5 years. • Replace chlorine lines including the unions when they are damaged or corroded. -
Page 51: Checking The Injector Performance
S10k Maintenance Checking the injector performance Good injector performance is necessary for proper gas feeder operation. The gas feeder is tested to ensure that it will deliver the required amount of gas when used at the correct hydraulic condi- tions. If the injector performance is poor check the following: •... -
Page 52: Two-Yearly Maintenance
S10k Maintenance Two-yearly maintenance 1 Replace the parts according to the maintenance parts kit „Two-yearly“ 2 Replace all flexible metal tubes even if they do not show corro- sion. Note It is recommended to have a shedule fixed to all the flexible metal tubes showing the date of the next replacement. -
Page 53: Preventive Maintenance Kits
S10k Maintenance Preventive maintenance kits Parts that have to be replaced after 1, 2 or 5 years are supplied in preventive maintenance kits. In the parts lists (chapter 10) these parts are marked. The standard kit includes parts to be replaced after one year of operation, the 2-years kit for replacement within 2 years etc. -
Page 54: Necessary Tools
S10k Maintenance Necessary tools Screw driver size PH2 for screw pos. 23 size PH3 for screw pos. 21 Allen key size 5 mm for pos. 45 open end wrench size 14 mm for pos. 36 open end wrench size 32 mm for pos. 41 socket wrench size 38 mm for pos. -
Page 55: Service Notes
S10k Maintenance Service Notes 6.8.1 Servicing the main components Servicing the S10K Gas Feeder system consists of cleaning the main components to remove deposits that hinder their efficiency. Warning! Except when detecting leaks or making calibration adjustments, to avoid possible severe personal injury or equipment damage, the system MUST be shutdown as detailed in Section 5.2.2 before breaking any connections. -
Page 56: Cleaning The V-Notch Plug
S10k Maintenance the lint from it will stick to the tube interior. Place the tube at a angle between a horizontal and vertical surface (as between a shelf and a wall) with both ends open so that air can flow through. -
Page 57: Cleaning The Injector
S10k Maintenance 6.8.4 Cleaning the injector Water containing carbonates, manganese or iron will frequently leave a deposit in injector tailways. As this deposit increases in thickness it can become scaly or rough and adversely affect pres- sure recovery or increase back pressure so that the injector fails to develop adequate operating vacuum. -
Page 58: Injector W3T171369 (3/4")
S10k Maintenance 6.8.5 Injector W3T171369 (3/4") The position numbers refer to the drawing W3T171369. 1 Put the chlorinator out of service, remove all the chlorine gas out of the tubing. 2 Drain the operation water tubes. 3 Remove gas tubes from the injector. Remove operation water tubes as far as necessary for removing tailway and nozzle from the injector. -
Page 59: Injector W3T171370 (3/4")
S10k Maintenance 6.8.6 Injector W3T171370 (3/4") The position numbers refer to the drawing W3T171370. 1 Put the chlorinator out of service, remove all the chlorine gas out of the tubing. 2 Drain the operation water tubes. 3 Proceed with actions described in 6.8.5. Injector U-96275 up to 12. -
Page 60: Injector W3T171367 (1")
S10k Maintenance 6.8.7 Injector W3T171367 (1") The position numbers refer to the drawing W3T171367. 1 Put the chlorinator out of service, remove all the chlorine gas out of the tubing. 2 Drain the operation water tubes. 3 Remove gas tubes from the injector. Remove operation water tubes as far as necessary for removing the tailway from the injector. -
Page 61: Antisyphon-Injector W3T171368 (1")
S10k Maintenance 6.8.8 Antisyphon-injector W3T171368 (1") The position numbers refer to the drawing W3T171368. 1 Put the chlorinator out of service, remove all the chlorine gas out of the tubing. 2 Drain the operation water tubes. 3 Proceed with actions described in 6.8.7 Injector W3T171367 up to 12. -
Page 62: Cleaning The Vacuum Demand Valve
S10k Maintenance 6.8.9 Cleaning the vacuum demand valve Every year clean the vacuum demand valve. The standard and au- tomatic switchover units are both cleaned in the same manner. Warning! To avoid possible severe personal injury or equipment damage, shut the gas supply container valve; evacuate all gas from the sys- tem and release any pressure in the solution discharge line as de- tailed in Section 5.2.2. - Page 63 S10k Maintenance 1½ turns around the nipple). Tighten the conical thread with a 13 mm fork wrench, without extension. French version: Mount the new filter (40) and filter holder (39). Caution! The pressure gauge (108, 109) includes a separating membrane. Do not damage this membrane.
- Page 64 S10k Maintenance Remove the seat pos. 32 1 Enter the disassembly tool (W3T162491) into the valve hou- sing (47). 2 Screw the thread of the tool into the seat (32). 3 Continue to turn the tool and pull it out of the housing: seat (32) cover (47) Mount the seat pos.
-
Page 65: Drawings
S10k Drawings 7. Drawings Typical installations The gas monitoring system is not displayed. 7.1.1 Basic installation for Cl or SO Gas supply by one gas cylinder Vacuum demand valve Flowmeter assembly Chlorine gas cylinder (or SO gas cylinder) with bracket Activated carbon filter (recommended for chlorine gas) or filter W3T159424 Operating water supply... -
Page 66: Installation With Remote Vacuum Manifold
S10k Drawings 7.1.2 Installation with remote vacuum manifold for Cl or SO Supply by two or more gas cylinders Switch-over vacuum demand valve Flowmeter assembly Chlorine gas cylinder (or SO gas cylinder) Bracket Vacuum gas manifold Point of application Injector Operating water supply Vent line with activated carbon filter or filter Support for the vacuum demand valve refer to... -
Page 67: Installation With Switch-Over Function
S10k Drawings 7.1.3 Installation with switch-over function for Cl or SO gas supply by 2 gas cylinders (alternating) Vent line with separate relief valve Switch-over vacuum demand valve Flowmeter assembly Chlorine gas cylinder (or SO gas cylinder) Bracket Vacuum gas manifold Relief valve Activated carbon filter (recommended for chlorine gas) or filter P-47803... -
Page 68: Mounting Drawings
S10k Drawings Mounting drawings 7.2.1 Mounting of flowmeter assembly 3“ version 5" version WT.025.200.000.DE.IM.0517... -
Page 69: Mounting Of Injector 3/4" W3T171369
S10k Drawings 7.2.2 Mounting of injector 3/4" W3T171369 A Gas inlet can be turned in 45° steps Hinweis Install the injector vertically (direction of flow upward!) or horizon- tally. Do not install hanging overhead! Nozzle and tailway for injector W3T171369 Nozzle Tailway W3T161564... -
Page 70: Mounting Of Antisyphon Injector 3/4" W3T171370
S10k Drawings 7.2.3 Mounting of antisyphon injector 3/4“ W3T171370 A Console (W3T161479), screws (2x W2T504542) (not included in W3T171370) B Gas inlet can be turned in 45° steps C Nozzle with cross-hole! Hinweis Install the injector vertically (direction of flow upward!) or horizon- tally. -
Page 71: Mounting Of Injector 1" W3T171367 / W3T171368
S10k Drawings 7.2.4 Mounting of injector 1“ W3T171367 / W3T171368 A Total length depending on tailway B Gas inlet can be turned in 60° steps Hinweis Install the injector vertically (direction of flow upward!) or horizon- tally. Do not install hanging overhead! Throat and tailway for injector W3T171367 and W3T171368 Throat Tailway... -
Page 72: Injector 3/4" With Accessories (N.101.A)
S10k Drawings 7.2.5 Injector 3/4" with accessories (N.101.A) A for hose ID6,35x1,6 (W2T505671). B for hose ID9,5x1,6 (W2T505672). C for hose ID12x2 (W2T505677). Pos. 4 and 5 tightened with teflon tape. * tightened with silicone grease (W3T165077). ** cemented (PVC) WT.025.200.000.DE.IM.0517... - Page 73 S10k Drawings Injector 3/4" with accessory Part no. Description Qty. W3T171369 Injector 3/4" PVC-U each Nozzle each Tailway each W3T167396 Adaptor union DN25-R 3/4" each incl. O-ring W3T172721 (D,1,2,5) W3T163750 Adaptor union DN 20-R 3/4 each incl. O-ring W3T172720 (D,1,2,5) W3T163705 Adaptor union DN25-R 3/4"...
-
Page 74: Anti-Syphon-Injector 3/4" With Accessory
S10k Drawings 7.2.6 Anti-syphon-injector 3/4" with accessory A for hose ID6,35x1,6 (W2T505671). B for hose ID9,5x1,6 (W2T505672). C for hose ID12x2 (W2T505677). Pos. 4 and 5 tightened with teflon tape. * tightened with silicone grease (W3T165077). ** cemeted (PVC) Hinweis Pos. - Page 75 S10k Drawings Anti-Syphon-Injector 3/4" with accessory Part no. Description Qty. W3T171370 Injector 3/4" PVC-U each Nozzle each Tailway each W3T167396 Adaptor union DN25-R 3/4" each incl. O-ring W3T172721 (D,1,2,5) d32,92x3,52 W3T163750 Adaptor union DN 20-R 3/4 each incl. O-ring W3T172720 (D,1,2,5) d28,17x3,52 W3T163705 Adaptor union...
-
Page 76: Injector 1" With Accessory
S10k Drawings 7.2.7 Injector 1" with accessory A for hose ID6,35x1,6 (W2T505671). B for hose ID9,5x1,6 (W2T505672). C for hose ID12x2 (W2T505677). Pos. 6, 7, 9, 10, 11 tightened with teflon tape. Pos. 15, 16 tightened with silicone grease (W3T165077). Pos. - Page 77 S10k Drawings Injector 1" with accessory Part no. Description Qty. W3T171367 Injector 1" PVC/PTFE/FPM each W3T171368 Anti-syphon injector 1" PVC/PTFE/FPM each Injector throat each Tailway each W3T170897 Clamping screw each W3T159484 Adaptor nipple PVC;R1" x 1"NPT;80lg. each W3T163793 Adaptor union incl.
-
Page 78: Spare Parts Of The Chlorinator
S10k Drawings Spare parts of the chlorinator 7.3.1 S10k Vacuum demand valve Connection to a french gas cylinder for Cl and SO A, D: Before assembly: Slightly grease with special grease W3T165077 B: cemented C: Tighten with 2 Nm E: sealed with teflon tape WT.025.200.000.DE.IM.0517... - Page 79 S10k Drawings Connection to a german gas cylinder for Cl and SO Grease the moving parts with W3T165077 Detail Diaphragm transparent black...
- Page 80 S10k Drawings Built-in relief valve A Grease the thread slightly with spe- cial grease W3T165077 Part no. Description Qty. W3T172594 Housing each W3T164186 Plate incl. spring and ring, each pre-assembled W3T160334 Operating diaphragm, black (2y, 5y) each W3T161119 Backing diaphragm, transp. (2y, 5y) each W3T161109...
- Page 81 S10k Drawings Part no. Description Qty. W3T161278 each W3T160383 Plug each W3T172759 Union each W3T169111 Union nut each W3T167992 Diaphragm (2y, 5y) each W2T507678 Spring cup each W3T161098 Spring (5y) each W3T172596 Plug, safety valve each W3T171794 Seat (1y, 5y) each W3T160740 Stem...
- Page 82 S10k Drawings Part no. Description Qty. W3T161698 Union each W3T170947 Union nut each W3T158534 Nipple each W3T158535 Ring each W3T165271 Gasket each (replace when changing the gas cylinder) Heating (optional, not shown): W3T160348 Heating element each W2T506383 Temperature switch each W3T169364 Plug with cable each...
-
Page 83: Hose Connections
S10k Drawings 7.3.2 Hose connections W3T161698 for hose Øi 12 x 2 W2T506536 for hose Øi 9,5 x 1,6 W3T171038 + W3T171353 for hose Øi 6,35 x 1,6 (standard version ) W3T171038 + W3T163657 (Ø1 mm, "B") W3T171038 + W3T159859 (Ø1,5 mm, "C") for hose Øi 12 x 2 Marking "B"... -
Page 84: Flowmeter Assembly 5" (W3T162278 )
S10k Drawings 7.3.3 Flowmeter assembly 5“ (W3T162278 ) * Grease the thread slightly with special grease W3T165077 Part no. Description Qty. W3T165007 Housing each W3T165008 Jack-screw-glass each W3T164997 Knob each W3T163300 Orifice each W3T164999 Plug each W3T171038 Reducing bush each W3T169110 Union nipple each... - Page 85 S10k Drawings Part no. Description Qty. W3T165188 O-ring each W3T164211 Warning label each W3T164210 Warning label each W3T163768 Fixing set Flowmeter 5“ Measuring Part no. Measuring Part no. Measuring Part no. range range range 5-25 g/h W3T173096 3-60 g/h W3T165334 2,4-48 g/h W3T164192 3,0-60 g/h...
-
Page 86: Flowmeter Assembly 3" W3T166029
S10k Drawings 7.3.4 Flowmeter assembly 3“ W3T166029 * slightly grease and tighten the thread with special grease W3T165077 Part no. Description Qty. W3T165010 Housing each W3T165016 Jack-screw-glass each W3T164997 Knob each W3T163300 Orifice each W3T164999 Plug each W3T171038 Reducing bush each W3T169110 Union nipple... - Page 87 S10k Drawings Flowmeter 3“ Measuring Part no. Measuring Part no. Measuring Part no. range range range 2-25 g/h W3T161773 1,0-20 g/h 1,2-24 g/h W3T171731 3,0-60 g/h W3T171738 2,4-48 g/h 3,0-60 g/h 10-200 g/h W3T171739 8,0-160 g/h 10-200 g/h 20-400 g/h W3T171740 16-320 g/h W3T171727...
-
Page 88: Spare Parts For The Injectors
S10k Drawings Spare parts for the injectors 7.4.1 Injector W3T171367 (1") WT.025.200.000.DE.IM.0517... - Page 89 S10k Drawings Injector W3T171367 (1") Part no. Description Qty. W3T159661 Seat, (1,2,5) PVC, 1" Injector each W3T161480 O-ring, (D,1,2,5) d13x2/FPM each W3T171124 Body PVC, 1"Injector each W3T161296 Plug GPN 610 U 28 each W3T172921 O-ring, (D,1,2,5) d10x4/75FPM602 each W3T170187 Seat (2,5) PVC, 1"...
-
Page 90: Anti-Syphon Injector W3T171368 (1")
S10k Drawings 7.4.2 Anti-syphon injector W3T171368 (1") WT.025.200.000.DE.IM.0517... - Page 91 S10k Drawings Injector W3T171368 (1") Part no. Description Qty. W3T159661 Seat, (1,2,5) PVC, 1" Injector each W3T161480 O-ring, (D,1,2,5) d13x2/FPM each W3T171118 Body PVC, 1"Inj., Antisyph. each W3T161296 Plug GPN 610 U 28 each W3T172921 O-ring, (D,1,2,5) d10x4/75FPM602 each W3T170187 Seat, (2,5) PVC, 1"...
- Page 92 S10k Drawings Part no. Description Qty. W3T159670 Valve stem guide PVDF, 1" Injector each W3T172903 Spring d18,2, V2A each W3T159671 Clamping disk PVC, 1" Injector each W3T159672 Diaphragm holder PVDF, 1" Injector each W3T159668 Separator PVC, 1" Injector each W3T173063 Securing clip, (1,2,5) POM-s;...
- Page 93 S10k Drawings...
-
Page 94: Injector W3T171369 (3/4")
S10k Drawings 7.4.3 Injector W3T171369 (3/4") WT.025.200.000.DE.IM.0517... - Page 95 S10k Drawings Injector W3T171369 (3/4") Part no. Description Qty. W3T159655 Inlet screw, (5) PVC,3/4" Injector each W3T168861 O-ring, (D,1,2,5) d25x2,5/FPM each W3T161434 O-ring, (D,1,2,5) d8x2/75FPM602 each W3T159656 Valve stem, (2,5) PVC,1" Injector each W3T171120 Body PVC,3/4" Injector each W3T158460 Valve seat, (1,2,5) PVC, UNF½"-20Gg each W3T169066...
-
Page 96: Antisyphon-Injektor W3T171370 (3/4")
S10k Drawings 7.4.4 Antisyphon-Injektor W3T171370 (3/4") WT.025.200.000.DE.IM.0517... - Page 97 S10k Drawings Anti-syphon-Injector W3T171370 (3/4") Part no. Description Qty. W3T159655 Inlet screw (5) PVC,3/4" Injector each W3T168861 O-ring (D,1,2,5) d25x2,5/FPM each W3T161434 O-ring (D,1,2,5) d8x2/75FPM602 each W3T159656 Valve stem (2,5) PVC,1" Injector each W3T171120 Body PVC,3/4" Injector each W3T158460 Valve seat (1,2,5) PVC, UNF½"-20Gg each W3T169066...
-
Page 98: Activated Carbon Filter W3T159902
S10k Drawings Activated carbon filter W3T159902 Part no. Description Qty. W3T172722 O-ring d59,69x5,33/EPDM each W3T161729 Activated carbon mixture 2500 W3T163644 Sodium thiosulfate 300 g *) necessary for the neutralisation of powder carbon loaded with chlorine WT.025.200.000.DE.IM.0517... -
Page 99: Manufacturer Declaration
S10k Manufacturer declaration 8. Manufacturer declaration... - Page 100 S10k Manufacturer declaration WT.025.200.000.DE.IM.0517...
-
Page 101: Index
S10k Index 9. Index Activated carbon filter Activated carbon filter, changing Carbon dioxide Cleaning Commissioning Conventions Corrosion Flowmeters Frost Gas supply Heater Injector, mounting Installation Maintenance Maintenance plan Max.tube/pipe length Neutralize Nozzle Operating knob... -
Page 102: Wt.025.200.000.De.im
S10k Index Pictogram Pressure relief valve Preventive maintenance kits Reliquefaction Safety Intended use Personnel Safety instructions Sodium thiosulphate Spare parts Sulphur dioxide Tailway Technical Data Training Unpacking Waste disposal Water supply Winter Shut-Down WT.025.200.000.DE.IM.0517... - Page 103 S10k ® Wallace & Tiernan Products worldwide Australia Canada China +61 3 8720 6597 +1 905 944 2800 +86 10 57076305 info.au@evoqua.com canadainfo@evoqua.com sales.cn@evoqua.com France Germany Singapore +33 1 41 15 92 20 +49 8221 9040 +65 6830 7165 wtfra@evoqua.com wtger@evoqua.com...
- Page 104 All information presented herein is believed reliable and in accordance with accepted engineering practices. Evoqua makes no warranties as to the completeness of this information. Users are responsible for evaluating individual product suitability for specific applications. Evoqua assumes no liability whatsoever for any special, indirect or consequential damages arising from the sale, resale or misuse of its products.
Need help?
Do you have a question about the WALLACE & TIERNAN S10k and is the answer not in the manual?
Questions and answers