Table of Contents
Advertisement
Advertisement
Table of Contents

Related Manuals for Maestro E214 078 Series


Summary of Contents for Maestro E214 078 Series
- Page 1 QUICK START GUIDE E210 Series cellular router Version 1.0...
- Page 2 All rights reserved This document is for the use of intended recipients only; content may not be reproduced, redistributed, or copied in whole or in part for any purpose without prior consent from Maestro Wireless Solutions Limited. P.1Maestro E210 Series www.maestro-wireless.com...
- Page 3 No warranty whether expressed or implied is given by Maestro Wireless Solutions Limitedin relation toany software, solution or application. User shall assume the entire risk of using or relying on this software, solution, and application, and, Maestro Wireless Solutions Limited takes no responsibility for, and will not be liable for, the product or any related software being temporarily unavailable due to any technical issue occurred in any event.
- Page 4 This E210 series quick start guideapplies to below models: E213 E214#02 E214#358S#158 E214#078 E214G#01 E214G#00 E215#02 E218#1JL E218#1BI E218#04 P.3Maestro E210 Series www.maestro-wireless.com...
-
Page 5: Table Of Contents
Product overview 4.1 General specification 4.2 Back panel connection 4.3 Front panel connection E210 cable and accessory Status LED Indicator Setup 7.1 Prerequisite 7.2 Connecting the E210 router 7.3 Software configuration Compatible Antenna USA local contact Conformity P.4Maestro E210 Series www.maestro-wireless.com... -
Page 6: Safety Precautions
Do not pull the power supply cable. Please attach or detach it by holding the connector after switching off the supply. Install and connect the routerin accordance with this document. Failure to do so will void the warranty. P.5Maestro E210 Series www.maestro-wireless.com... -
Page 7: Overview
2 Overview Scope This document provides youall the information needed to setup, to configure and to use the Maestro E210 series cellular router. Target audience This document is intended for end-users or resellers who understand basic telecommunications and information technology terminologies and concepts. -
Page 8: E210 Series Compatible Models
; or ; or Mbps Also Japan’s B9 subset - LTE cat. 4: 50 / 150 Mbps (FDD); 35 / 130 Mbps (TDD) In fact, the 2535 MHz ~ 2655 MHz subset of B41 08 August 2018 P.7Maestro E210 Series www.maestro-wireless.com... -
Page 9: Product Overview
Wi-Fi antenna, RP-SMA connector – Cellular diversity antenna, SMA connector Green – GPS antenna, SMA connector Yellow – Cellular main antenna, SMA connector Purple – MicroSD-XC card slot Blue – Dual SIM slots: Left: SIM 2; Right: SIM 1 P.8Maestro E210 Series www.maestro-wireless.com... -
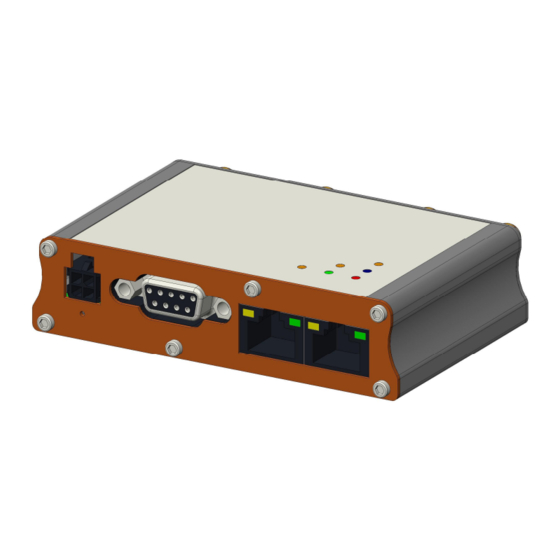
Page 10: Front Panel Connection
Back to default settings (push for 10sec) –RS-232: 1. DCD 2. Rx 3. Tx 4. DTR 5. Ground 6. DSR 7. RTS 8. CTS 9. RI Blue – Ethernet ports: Left: Right: WAN or set as 2 P.9Maestro E210 Series www.maestro-wireless.com... -
Page 11: E210 Cable And Accessory
5-band 850/900/1800/1900/2100MHz magnetic mount antenna, 3 meter A17A cable, SMA(M) ACC-A03 GPS 1575.42MHz Magnetic mount antenna, 3 meter cable, SMA(M) Ultra-wideband 698-960/1575.42/1710-2700MHz L-shaped antenna, ACC-A22 hinged, SMA(M) Miscellaneous ACC-DIN Metal dual mount DIN Rail clip ACC-CA29 RJ45(M) to RJ45(M), 1meter cable length P.10Maestro E210 Series www.maestro-wireless.com... -
Page 12: Status Led Indicator
Weak signal (CSQ ≤ 12) Amber ON Strong signal (CSQ ≥ 12) Power off Power Green ON Power on No alert Red Flashing Precaution (i.e. SIM not inserted, LAN not connected) Alert Red ON Hardware fault (i.e. overheated, memory corruption) P.11Maestro E210 Series www.maestro-wireless.com... -
Page 13: Setup
Wi-Fi and cellular antenna Ethernet port or Wi-Fi connectivity with Internet service Web browser; Internet Explorer 8+, Google Chrome, Mozilla Firefox or Safari for accessing the Maestro Web Admin Console DHCP set to enable Enabling DHCP on Windows: Start menu Control Panel Network and Internet Network and Sharing CenterChange adapter settings... -
Page 14: Connecting The E210 Router
SIM tray out from the slot, place the mini-SIM card with SIM chip facing up, and insert the tray back in place carefully. Connecting the AC power Connect the A.C. power cord as shown below,or you can refer to Section 4.3 in Green, D.C. Power. P.13Maestro E210 Series www.maestro-wireless.com... - Page 15 Cellular antenna selections base on frequency bands of cellular networks in individual countries, refer to Section 3, E210 series compatible models and Section 8, Compatible Antenna, or contact Maestro technical support https://support.maestro-wireless.com P.14Maestro E210 Series www.maestro-wireless.com...
- Page 16 Connecting the router to a computer Connect an Ethernet cable betweenthe LAN port of the Maestro router and a computer as shown below,orrefer to section 4.2 in Blue, Ethernet ports. P.15Maestro E210 Series www.maestro-wireless.com...
-
Page 17: Software Configuration
Password admin Note: Username and password are both case sensitive. Enter the above default login credentials when the below appears on the web browser; Click Quick Setup as shown below to bring the Network Setup page; P.16Maestro E210 Series www.maestro-wireless.com... - Page 18 If default settings need to be changed, settingscan be manually configured for LAN, WAN, Cellular and Wi-Fi, then you can click Save & Apply to store theconfiguration. In Cellular, all fields depend on SIM cards provider/cellular network operator, enquire with them for authentication credentials, if needed. P.17Maestro E210 Series www.maestro-wireless.com...
-
Page 19: Compatible Antenna
SMA, hinged RoHS Compliant Telefield North America USA local contact: Shaun Elliott, Telefield North America,Suite 205,4915 SW Griffith Drive Beaverton, OR 97005,USA Telephone: +1 503-734-8749 or further support on Maestro products, please visit Maestro support website, http://support.maestro-wireless.com/ P.18Maestro E210 Series www.maestro-wireless.com... -
Page 20: Conformity
Afin d'éviter la possibilité de dépasser les limites d'exposition aux fréquences radio de la ISED CNR-102, la proximité humaine à l'antenne ne doit pas être inférieure à 20 cm (8 pouces) pendant le fonctionnement normal. P.19Maestro E210 Series www.maestro-wireless.com...
Need help?
Do you have a question about the E214 078 Series and is the answer not in the manual?
Questions and answers