Table of Contents
Advertisement
Quick Links
ORICOM CUSTOMER SUPPORT
Oricom have a trained and dedicated team of Customer Support
Representatives, each with the knowledge and resources to assist in
answering your questions quickly and efficiently.
Oricom Support - Australia
For all product enquiries, troubleshooting or to discuss the range of
Oricom products, feel free to contact Oricom or visit our website for answers
to frequently asked questions.
1300 889 785
Monday - Friday 8am – 6pm AEST
Email: support@oricom.com.au
www.oricom.com.au
Oricom Support - New Zealand
0800 674 266
Monday - Friday 10am – 8pm NZST
Email: support@oricom.co.nz
www.oricom.co.nz
Ref: 29032019
Advertisement
Table of Contents

Subscribe to Our Youtube Channel
Related Manuals for Oricom PMR795


Summary of Contents for Oricom PMR795
- Page 1 Oricom Support - Australia For all product enquiries, troubleshooting or to discuss the range of Oricom products, feel free to contact Oricom or visit our website for answers to frequently asked questions. 1300 889 785 Monday - Friday 8am –...
-
Page 2: Operating Instructions
Operating Instructions PMR795 80 Channel UHF 2 Way Citizen Band Radio Keep this user guide for future reference. Always retain your proof of purchase in case of warranty service. www.oricom.com.au... - Page 3 Need Help? If you need assistance setting up or using your Oricom product now or in the future, call Oricom Support. Australia 1300 889 785 www.oricom.com.au Mon-Fri 8am – 6pm AEST New Zealand 0800 67 42 66 www.oricom.co.nz Mon-Fri 10am – 8pm NZST...
-
Page 4: Table Of Contents
Table of contents Safety Information and Warnings ........4 Getting Started .............. 9 Oricom PMR795 instructions........11 Operation ..............12 Channel Frequency Table ..........17 Troubleshooting guide ..........19 Customer Support ............20 Express Warranty (Australia) ........21 When a narrowband radio receives a transmission from an older wideband radio the speech may sound loud and distorted –... -
Page 5: Safety Information And Warnings
Safety Information and Warnings Safety Information and Warnings Information on Safe Operation Read This Information Before Using Your Oricom Radio. WARNING The operation of your UHF radio in Australia and New Zealand is subject to conditions in the following licenses:... - Page 6 Safety Information and Warnings • Never replace batteries in a potentially explosive atmosphere (such as where gas is leaking) as contact WARNING sparking may occur while installing or removing the batteries and cause a fire or an explosion. • Do not modify, cut, disassemble, crush, bend, puncture, heat or damage the batteries.
- Page 7 “blasting area” or in areas posted: “Turn off the two way radio.” Obey all signs and instructions. Exposure to Radio Frequency Energy Your Oricom two-way radio complies with Australian Communications Authority Radio communications (Electromagnetic Radiation-Human Exposure) Standard, 2003. To assure optimal radio performance and make sure...
- Page 8 Safety Information and Warnings Radio Operation and EME Exposure Unauthorized antennas, modifications, or attachments WARNING could damage the radio and violate compliance. Do NOT hold the antenna when the radio is “IN USE.” Holding the antenna reduces the effective range. Do not use the radio if the antenna is damaged.
- Page 9 Safety Information and Warnings Medical Devices - Pacemakers The Advanced Medical Technology Association WARNING recommends that a minimum separation of 6 inches (15cm) be maintained between a handheld wireless radio and a pacemaker. These recommendations are consistent with the independent research by and recommendations of the U.S.
-
Page 10: Getting Started
Getting Started Installation Removing the Belt Clip Pull the belt clip latch away from the radio. While pulling the belt clip latch, push up the belt clip. Installing the Belt Clip Slide the belt clip into the slot. A “click” indicates the belt clip is locked into position. Installing the Batteries WHEN USING RECHARGEABLE BATTERIES (not included) : The charge time is about 12 hours, charging is indicated by a red... - Page 11 Getting Started Low Battery Meter Indicator When the battery level is low, the battery icon will display the low battery status by flashing on and off. The battery symbol will continue to flash until it totally drains the battery, you will then have to replace the batteries.
-
Page 12: Oricom Pmr795 Instructions
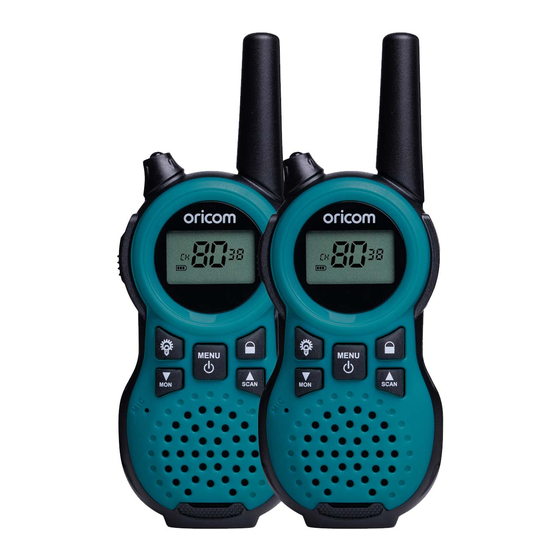
Oricom PMR795 instructions Oricom PMR795 2-Way CB Radio Antenna Torch PTT button Earphone jacket Lock button Torch button Power/Menu button Mon/Down button Scan/Up button Microphone Speaker Micro USB port LCD Screen Channel Number CTCSS Code. Changes from 1 to 38 as selected by the user. -
Page 13: Operation
Menu/PWR once and use the Up/Down buttons to scroll through to your preferred channel. Press the PTT button to confirm channel. Your PMR795 is simplex “one way at a time”. While you are speaking, you can not receive a Transmission. -
Page 14: Auto Scan
Operation Torch Press and hold the Torch button to turn on, release to turn off. The torch can still be used when the radio is off. Auto Scan To turn on Auto Scan, press & hold the Up / Scan button for 2 seconds. - Page 15 1 to 38, followed by DCS 1-83. Voice operated transmitter, allows you to transmit with your voice without pressing the PTT button. Your PMR795 is equipped with an adjustable Voice Operated Transmitter (VOX) that can be used for automatic voice transmission.
-
Page 16: Roger Beep
Operation Roger Beep Roger beep means a tone added to the end of broadcast, it indicates that the user/operator has concluded speaking. This is a tone which is automatically transmitted whenever the PTT button is released. This alerts the receiving party that you have ended the transmission, and you are now in receive mode. - Page 17 Operation Duplex operation via Repeaters This feature allows to use local repeater stations that are designed to automatically re-transmit your broadcast over a large area thus giving you increased range. Repeaters stations are privately operated radio systems installed throughout Australia. For example, if you wish to access a repeater station in your area which operates on channel 2, you need to set the Duplex access on this Channel.
-
Page 18: Channel Frequency Table
Channel Frequency Table Channel Frequency Table Radiocommunications (Citizen Band Radio Stations) Class Licence 2002 No licence is required to own or operate this radio in Australia and New Zealand. The Radiocommunications (Citizen Band Radio Stations) Class Licence 2002 contains the technical parameters, operating requirements, conditions of licence and relevant standards for Citizen Band (CB) radios. - Page 19 476.6000 476.6000 477.1000 477.1000 476.6125 477.1125 477.1125 476.6250 476.6250 477.1250 477.1250 Channel Frequency Table 476.6375 476.6375 477.1375 477.1375 476.6500 476.6500 477.1500 477.1500 476.6625 476.6625 477.1625 477.1625 476.6750 476.6750 477.1750 477.1750 476.6875 476.6875 477.1875 476.7000 476.7000 477.2000 477.2000 476.7125 476.7125 477.2125 476.7250 476.7250 477.2250...
-
Page 20: Troubleshooting Guide
Audio cutting in and out at 1: Too weak signal-too far away. receivers end. 2: External mic defective? Please contact Oricom Support. Too many transmissions heard on 1: Another group is using the my channel. same channel number -change... -
Page 21: Customer Support
Troubleshooting section of this user guide as well as “Frequently Asked Questions” on our website www.oricom.com.au. If you have further questions about using the product after reviewing the resources above or would like to purchase replacement parts or acces- sories, please call our Customer Support Team. -
Page 22: Express Warranty (Australia)
You are also entitled to have the goods repaired or replaced if the goods fail to be of acceptable quality and the failure does not amount to a major failure. Oricom warrants that the product is free from defects in materials or workmanship during the Express Warranty Period. - Page 23 No change to the conditions of this Express Warranty is valid unless it is made in writing and signed by an authorised representative of Oricom. Oricom will not be liable under this Express Warranty, and to the extent permitted by law will not be liable for any defect, loss, damage or injury arising out of or in connection with a: 1.
- Page 24 Please note that if a Customer Support Team member advises that your product does not qualify for return, this warranty does not apply to your product. Products that are authorised to be returned to Oricom in Australia must include all of the following: •...
-
Page 25: Important Information
Express Warranty (Australia) Important Information Repair Notice Please be aware that the repair of your goods may result in the loss of any user-generated data (such as stored telephone numbers, text messages and contact information). Please ensure that you have made a copy of any data saved on your goods before sending for repair.
Need help?
Do you have a question about the PMR795 and is the answer not in the manual?
Questions and answers