Table of Contents
Advertisement
Advertisement
Table of Contents

Subscribe to Our Youtube Channel
Related Manuals for Bibene WP7


Summary of Contents for Bibene WP7
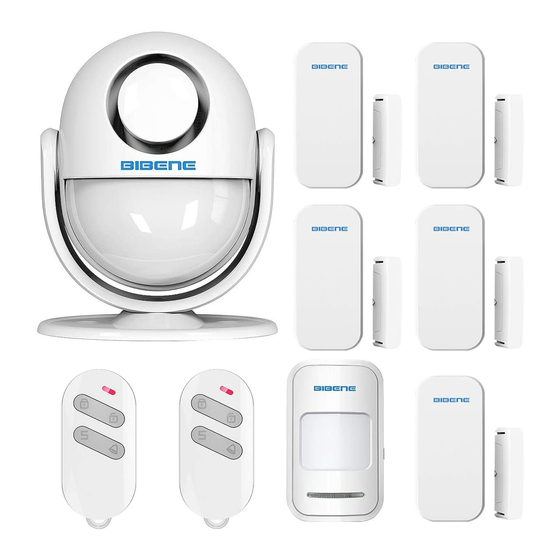
- Page 1 WP7 WIFI Wireless Security Alarm System Kit User Manual...
-
Page 2: Product Features
Foreword Product Features Thanks for purchasing WP7 WIFI alarm system. The system is already paired WIFI Wireless Alarm System out of box, customers can directly mount it on when they get it! For people who Friendly APP for both IOS/Android System... -
Page 3: Table Of Contents
..............7.Trouble Shooting ..............4.1 Download App ..............8.Specifications ..............4.2 Register Account ............8.1 WP7 Alarm Main Panel: ............. 4.3 WI-FI Configuration ............. 8.2 PIR Motion Sensor ..........5. APP Function Introduction ..........8.3 Wireless Door / Window Sensor ............. -
Page 4: Overview Of The Main Panel
DC 5V/1A for Panel Power 3.Before Installation LED Indication Wp7 Smart Security Alarm has paired to each sensor when out of box. Customer can plug and use the alarm with no need to pair the sensor again. If Panel State... -
Page 5: Register Account
Warm Tips: Tap “Allow” to allow receiving no fica on from “WP7” in your phone. 4.3 WI-FI Configura on Step 1: Make sure your main panel is power on, LED will flash purple when power on. 4.2 Register Account Register one account if you are first me to use the APP. Take Email register as... - Page 6 Step 2: Make sure your phone is connected to your WIFI network Important: WP7 doesn’t support WIFI of 5Ghz band. If your WIFI router is dual band(5Ghz and 2Ghz), please make sure to connect with the 2Ghz. Meanwhile, WP7 works with most of router, like TP-Link, if you cannot connect WP7 into your WIFI, please contact us with your router brand, thanks.
-
Page 7: Interface Overview
5.2 Se ng Overview 5. APP Func on Introduc on Tap "Se ng" into the alarm panel se ng menu. 5.1 Interface Overview Icon Descrip on Device Name Click to change your own device name Icon Descrip on Default password is 1234, click to change the new one. Share Password the password to your family so that they can enter this system. -
Page 8: Panel Setup
5.3 Panel Setup 2) Clock (Alarm Clock Func on) Tap "Clock" to setup the alarm me, also can be repeat se ng from Monday to 1) Arm Timing (Auto Arm/Disarm) Sunday. Only available to set up 2 alarm clocks. Tap "Arm Timing" to setup the auto arm/disarm ming func on. Customer can setup the repeat me from Monday to Sunday(1-7). -
Page 9: Add /Delete Remote
Overview 5.4.1 Add /Delete Remote Tap "Remotes" to enter adding remote page. Click “Add”, then the main panel will BEEP ONCE, then click any bu on on the remote, the main panel will BEEP Magnet Three Times means successfully added. The APP will change from ADD to DEL. Click “Del”... - Page 10 2.Tap "Sensors" to enter adding sensor page. Click “Add”, then the main panel Important: Sensor 8 is our EMERGENCY SENSOR, when you added sensor into will BEEP ONCE, then separate the magnet from transmi er around 2cm, LED sensor 8, it keeps working even under disarmed status. Customer should light in transmi er will flash in Red.
-
Page 11: Operate Pir Motion Sensor
5.4.4 Operate PIR Mo on Sensor With intelligent processing technology, the detector can detect infrared rays released from human body, and iden fy interfering signals and human movement signals, thus preven ng false alarm.Being able to detect human movement within 8m space, suitable for installa on in any place of your house that can't be cover by contact access sensor,without opening door or window. - Page 12 2. Fix the sensor It's recommended to mount it at height of 2.2m from ground, and to be Fix the installa on bracket on the wall with screws, then fit the groove at the installed indoors in a corner as far as possible in order to obtain the ideal back of the sensor on the bracket.
-
Page 13: Restore To Factory Setting
6.Restore to Factory Setting 2. Avoid infrared detectors facing to or close to heat/cold sources; Heat/Cold sources, such as heaters, air condi oner, microwave oven which may cause false triggering. Opera on steps: 1)Cut off the power of main panel: Plug out both AC adaptor and the backup AAA ba ery 2)Reboot the main panel: Long press and hold &... -
Page 14: Specifications
Foreword: Installa on Mode :Wall mounted by bracket BIBENE WP7 works with Alexa, once you have added to WP7(Skills Name) into Opera ng voltage: 4.5V Alexa, you can Arm/Disarm your WP7 alarm system anywhere with your Transmi ng Freq.: 433MHz... - Page 15 Step3:Search for “WP7” and Enable the App binding. “Alexa, tell smart penguin to arm” “Alexa, tell smart penguin to arm” Step2:Click “Skills” and go to home page. Step4: Please sign in with your WP7 App account and password you have registered already.
- Page 16 Step5:Please click “Yes and Go to Set PIN”. Delete the WP7 Skill. Enter “Your Skill” and “disable Skill” to delete. “Alexa, tell smart penguin to arm” Step6: Setup a 4 digits PIN code. (Only Digits is acceptable)
Need help?
Do you have a question about the WP7 and is the answer not in the manual?
Questions and answers