Table of Contents
Advertisement
Quick Links
PIPE THREADING MACHINE
8991
OPERATION MANUAL
Be sure to read this operation
manual before using the
machine.
- Be sure to hand this operation manual to the user.
- Be sure to keep the manual where the operator
can refer to it whenever necessary.
- To ensure safe and efficient use, read the manual
thoroughly before using the machine.
Date of Purchase: Year
Distributor:
50/60 Hz
Note
Month
Advertisement
Table of Contents

Related Manuals for Wheeler-Rex 8991

Summary of Contents for Wheeler-Rex 8991
- Page 1 50/60 Hz PIPE THREADING MACHINE 8991 OPERATION MANUAL Be sure to read this operation manual before using the machine. Note - Be sure to hand this operation manual to the user. - Be sure to keep the manual where the operator can refer to it whenever necessary.
-
Page 3: Table Of Contents
Be sure to observe these warnings carefully as they greatly affect safety. - If this manual is lost or damaged, promptly order a replacement from your distributor or WHEELER-REX. - Parts and specifications are subject to change without prior notice, due to improvements in quality, performance or safety standards. -
Page 4: Safety Considerations
SAFETY CONSIDERATIONS WARNING 1. Ensure you use the correct voltage. - Be sure to use the voltage indicated on the nameplate on the main unit or in this manual. If the voltage is different from the voltage indicated, overheating, smoke or fire may occur. 2 . -
Page 5: Precautions When Using 8991
- Our products comply with corresponding safety standards. Do not remodel. - Be sure to ask your distributor or WHEELER-REX for any repairs. If repairs are carried out by unskilled or unqualified personnel, the performance of the unit will be adversely affected and may result in accident or injury. - Page 6 - Be sure to attach accessories according to the operation manual. Make sure you use only genuine WHEELER-REX accessories. Using any other type can lead to accident and injury, as well as damaging the machine itself.
- Page 7 2 . Handling waste oil and waste cans. - Handle materials according to local laws and regulations regarding waste disposal and cleaning. - If uncertain, consult your distributor or WHEELER-REX. Pipe CAUTION 1.
-
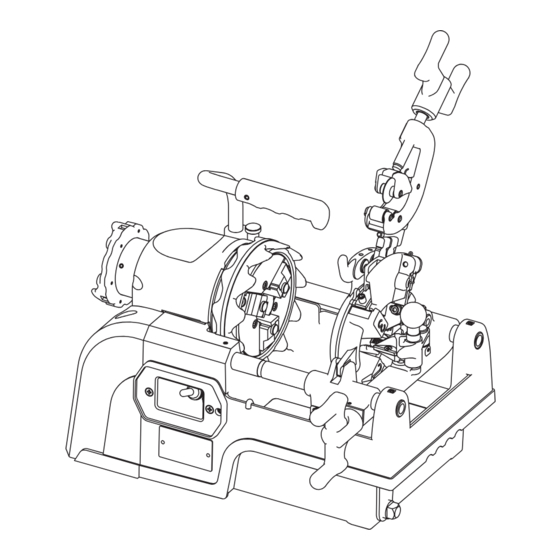
Page 8: Main Parts, Standard Specifications, Accessories, Options And Their Applications
Motor inside Carriage handle Drain plug Fig. 1 STANDARD SPECIFICATIONS Model No. 8991 Threading capacity ½ B (15A) - 1 B (25A) Voltage 120 V (50/60 Hz) Motor single phase Input 400 W / Output 400 W, series motor (with brake) Rotation speed 55 r.p.m (unloaded) -
Page 9: Getting Ready / Operation Guide
Genuine WHEELER-REX thread cutting oil Fill the tank with the cutting oil that is supplied with the machine. Use only genuine WHEELER-REX cutting oil. (Fig. 4) Using this oil for threading pipes made of other materials may result in irregular threads. -
Page 10: Self-Opening Die Head
GETTING READY / OPERATION GUIDE 5. Self-opening Die Head Note 15A: " Main Parts Die head position pins ¾ 20A: " 15A (Black) 20A (Black) 25A (Silver) 25A: 1" Dies notch A (for 15A - 20A) Dies notch B (for 25A) (Black) (Silver) Fig. - Page 11 GETTING READY / OPERATION GUIDE Attaching the Dies (1) Use the removal procedure in reverse to insert the dies in the die head. Attaching the Dies (2) Insert the dies in their corresponding die slot on the die head and push them in until they click into place. Cam plate handle (3) Raise the die head and insert replacement dies No.1 and No.2 until the notch is engaged.
-
Page 12: Manual-Open Die Head
GETTING READY / OPERATION GUIDE 6. Manual-open die head (There is no need to remove the die head from the machine). Removing the dies (1) Knock the eccentric handle to the right, loosen the lever nut and Removing the dies push the eccentric handle over to the far left. -
Page 13: Power Supply
Long pipe from becoming unstable under the weight of the workpiece. (Fig. 18) Use WHEELER-REX pipe support Keeps long pipes stable Fig. 17 WARNING Not using a pipe support may result in irregular threads, damage Pipe support to the machine and/or accident or injury. -
Page 14: Checks Before Starting
When an oxide fi lm is generated in the motor Allow the motor to rotate for about 10 minutes with no load. Table 3 If the brake does not work even under such circumstances, contact your distributor or WHEELER-REX. WARNING Motor with built-in braking system 1. -
Page 15: Cutting Pipes
GETTING READY / OPERATION GUIDE 11. Cutting pipes Cutter handle (1) Raise the die head and reamer. (2) Position the pipe so that it is ready for cutting, and fasten the pipe securely with the hammer chuck. (3) Open the pipe cutter wider than the diameter of the pipe, lower it into position and turn the cutter handle, bringing the cutter close to the position where the blade and roller lightly press against the pipe. -
Page 16: Reaming
GETTING READY / OPERATION GUIDE 12. Reaming After cutting the pipe with the pipe cutter, be sure to use the reamer to chamfer the inside of the pipe before making a thread. (1) Lift the die head and pipe cutter out of the way. (2) Lift up the set knob on the reamer and put the reamer in the chamfering position. -
Page 17: Cutting Threads (Self-Opening Die Head)
GETTING READY / OPERATION GUIDE 15. Cutting threads (Self-opening Die Head) Guide set knob Raise the cutter and reamer, and align the die head with the proper position. Look around the work site to make sure it is safe to begin operating the machine. -
Page 18: Cutting Threads (Manual-Open Die Head)
GETTING READY / OPERATION GUIDE 16. Cutting threads (Manual-open Die Head) Mark on eccentric Eccentric link link (1) To match the size of the thread, align the scale on the eccentric Lever nut link with the thread size on the size scale of the die head, and then tighten and fix the lever nut in position (Fig. -
Page 19: Measuring Threads With A Gauge
GETTING READY / OPERATION GUIDE 17. Measuring threads with a gauge Unacceptable threads (Fig. 37) Correct thread When connecting the male thread on a cut pipe to the female thread in the joint, various factors that could lead to leakage should be considered. The following examples may be due to the male thread on the pipe end. -
Page 20: Daily Inspection, Maintenance
DAILY INSPECTION, MAINTENANCE WARNING - Before inspecting or performing maintenance on the unit, always set the switch to the OFF position and remove the plug from the power outlet. If the unit is left plugged in, it may begin operating unexpectedly, resulting in injury. - If you discover any problems during inspection or maintenance, check the symptoms in "Troubleshooting"... -
Page 21: Requesting Repairs
Spring brush etc. Always keep the inserts clean. When the chuck jaw inserts need replacing, contact your distributor or WHEELER-REX. When replacing the chuck and the chuck jaw inserts, be sure to replace them with an 7991 model RT type chuck, and NS type for chuck jaw inserts. -
Page 22: Servicing And Repairs, Troubleshooting
If any problems occur that are not dealt with below, do not attempt an overhaul or repair by yourself, but ask your distributor or WHEELER-REX to service the machine. If repairs are attempted by anyone without the proper knowledge and skills, optimum performance will be impaired and accidents and injuries may occur. - Page 24 Manufacturer: 8V370-WH2 8991 1809D0100 Product specifications are subject to change without prior notice.
Need help?
Do you have a question about the 8991 and is the answer not in the manual?
Questions and answers