
Related Manuals for epiphan Pearl Mini


Summary of Contents for epiphan Pearl Mini
- Page 1 User Guide Epiphan Pearl Mini Release 4.8.0 April 22, 2019 UG122-06 © and ™ 2019, Epiphan Systems, Inc...
-
Page 2: Terms And Conditions
This document, the Epiphan web site, and the information contained therein, including but not limited to the text, videos and images as well as Epiphan System Inc.’s trademarks, trade names and logos are the property of Epiphan Systems Inc. and its affiliates and licensors, and are protected from unauthorized copying and dissemination by Canadian copyright law, United States copyright law, trademark law, international conventions and other intellectual property laws. -
Page 3: Technical Support
Warranty All Epiphan Systems products are provided with a 100% return to depot warranty for one year from the date of purchase. Technical support Epiphan’s products are backed by our professional support team. You can reach our team several ways: ... - Page 4 Audio inputs as playback audio sources for HDMI outputs Now you can select an audio input as the audio source for playback on the HDMI outputs on Pearl Mini, as well as select audio from a configured channel. Product registration As of release 4.8.0, systems that are registered are eligible to receive firmware updates including great new...
- Page 5 Original Livestream and Wowza Cloud streaming presets Integrated streaming presets for Original Livestream and the Wowza Cloud have been removed. What's fixed Switching performance improvement The speed of switching layouts using the touch screen on Pearl Mini was improved.
-
Page 6: Table Of Contents
What's new in release 4.8.0? Table of contents Start here About this Guide What is Pearl Mini? Front and back view Pearl Mini SD card installation and file management Quick start Live video mixing / switching Monitoring audio Selecting an audio source... - Page 7 Access Epiphan Live using a web browser or mobile device Access Epiphan Live from the Admin panel Stream, record, and monitor using the Dashboard interface Switching / mixing using Epiphan Live Your recordings Remote login access About remote login and control...
- Page 8 Video output ports About video output ports Video output port resolution Show a channel or video source on the output port Preview the video output port Disable the video output port Disable or enable audio and output port volume Display and reposition the audio VU meter Rename a video output port Mirror the video output port display Set up Kaltura CMS integration...
- Page 9 PART 2: Capture What is a channel? Channel layout examples Channel configuration Create a channel Add video sources or a channel as a source Add an audio source to a layout Duplicate a channel Rename a channel Delete a channel Preview channel Add or remove channel metadata Configure encoding...
- Page 10 USB signals RTSP sources Add a custom No Signal image PART 3: Stream What is streaming? Stream settings for video and slides View supported streaming formats Streaming a channel directly to viewers Stream content using HTTP, HTTPS or RTSP Directly share stream URLs with viewers View the live broadcast URL using a web browser View the streaming URL using a media player Restrict viewer access to channel streams...
- Page 11 Auto-restart playback to a UPnP device Change UPnP device name PART 4: Record About recording Record a channel Record using One Touch control Configure recording settings, file size and type Restart recording Recorders Add a recorder Select channels to record Start and stop a recorder Rename a recorder Duplicate a recorder...
- Page 12 Perform a factory reset Firmware upgrade Support Storage space maintenance Third party integration Controlling Pearl Mini using RS-232 / serial port Controlling Pearl Mini using HTTP/HTTPS commands Configuration keys for third party APIs Troubleshooting Limitations and known issues Software license...
-
Page 13: Start Here
Start here Start here Welcome, and thank you for buying Epiphan Pearl Mini™. You'll find all the information you need to set up and start using your system in this user guide. For a product description, see What is Pearl Mini?. -
Page 14: What Is Pearl Mini
What is Pearl Mini? What is Pearl Mini? Pearl Mini is a versatile live video production device that's a video encoder, video streamer, live switcher, and video recorder all in one. Pearl Mini is great for lecture capture applications. With Pearl Mini, you can capture, record and stream computer monitors, radar displays, or anything with a wide variety of supported video input signals, including: ... - Page 15 Pearl Mini User Guide What is Pearl Mini? Pearl Mini does not capture from HDCP encrypted sources. * Pearl Mini supports up to three video inputs with certain conditions, see inputs.
-
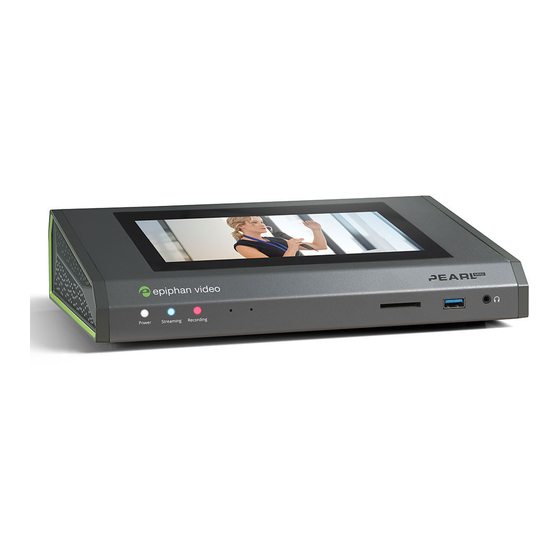
Page 16: Front And Back View Pearl Mini
Pearl Mini User Guide Front and back view Pearl Mini Front and back view Pearl Mini Table 1 Pearl Mini front panel descriptions Label Name Description Power light Glows when the system is powered on. Glows when the system is streaming. Flashing means that user action Streaming light is required and streaming has either stopped or won't start. - Page 17 Table 2 Pearl Mini back panel descriptions Label Name Description Allows Pearl Mini to be locked to a desk or surface using a laptop lock Lock cable. Press to toggle Pearl Mini on and off. If a software shutdown is performed when the toggle...
-
Page 18: Sd Card Installation And File Management
SD card installation and file management Pearl Mini comes with a standard SD card slot on the front panel. An SD card is needed when recording video. If you're only switching video or live streaming, then you don't need to install an SD card. - Page 19 Pearl Mini User Guide SD card installation and file management PNY 256 GB U3 / C10 AData 128 GB U3 / V90 When the SD card is full, new recordings overwrite the oldest recordings. Do not eject the SD card while recording is in progress as that may corrupt the SD card.
-
Page 20: Quick Start
Pearl Mini. Before you begin, make sure you have: a video source such as a camera or computer and cables to connect them to Pearl Mini. For HDMI, the video source must not be HDCP protected. ... - Page 21 Pearl Mini User Guide Quick start 5. Press the power button on the back of Pearl Mini to turn on the system. Wait for the power-up cycle to complete. The Grid view showing both channels appears on the touch screen. The video source you connected to the HDMI-A port appears in channel HDMI-A, and the video source connected to the HDMI-B port appears in channel HDMI-B.
- Page 22 Install a formatted SD card to record a channel An SD card must be installed and formatted before you can record video using Pearl Mini. You'll need to log in to the Admin panel using the IP address of your Pearl Mini to format the SD card, see Format the SD card.
- Page 23 To format an SD card and control recording using the Admin panel: 1. Insert the SD card into the SD card slot on Pearl Mini. 2. Using a web browser on the admin computer, go to the IP address of your Pearl Mini and log in, see Connect to the Admin panel.
- Page 24 For higher security, we recommend setting admin, operator and viewer-level passwords on Pearl Mini, see Set or change user passwords. When you're done setting up your Pearl Mini, make sure to back up the system configuration using the procedure described in Create a configuration preset.
- Page 25 Register Pearl Mini to get firmware updates Keep Pearl Mini up-to-date and get all the latest features and firmware updates. Registering your Pearl Mini is free and only needs to be done once. You can register anytime from the Firmware update page using the...
-
Page 26: Live Video Mixing / Switching
Epiphan Live on a mobile device, or from the Admin panel. Your program stream with switched layouts could look like this:... -
Page 27: Monitoring Audio
Monitoring audio Pearl Mini's front panel includes a 3.5 mm audio jack for monitoring audio. You can plug external speakers or headphones into the 3.5 mm audio jack. To monitor the audio for a channel, just select the channel using the touch screen. - Page 28 Pearl Mini User Guide Monitoring audio Audio VU meter A VU meter on the touch screen shows the audio levels for the selected channel. The value is displayed in dBFS (decibels relative to full scale). Colored bars represent the audio level. Channels that have stereo audio display two bars. The top bar is the left audio channel and the bottom bar is the right audio channel.
-
Page 29: Selecting An Audio Source
Select your audio sources from connected video sources (SDI, HDMI, USB video UVC, and RTSP), as well as from the dedicated analog audio input ports. The USB (UVC/UAC) ports on the rear panel of Pearl Mini will accept a USB microphone (UAC). - Page 30 XLR ports. To choose a different audio device for the channel: 1. Using a web browser on the admin computer, go to the IP address of your Pearl Mini and log in, see Connect to the Admin panel.
- Page 31 Pearl Mini User Guide Selecting an audio source 4. (Optional) Adjust the gain for an audio input source, select the input port from the Inputs menu and adjust the amount of gain on the configuration page for the audio input port. Click Save when you're done.
-
Page 32: Specifications
For best performance, we recommend using two video sources in up to two full HD channels simultaneously. However, you can connect up to three video sources to Pearl Mini in the following scenarios: 1. One 1920×1080@30 fps channel configured with three layouts, one for each full HD video source without any scaling and make the video image fill the whole frame. - Page 33 Pearl Mini User Guide AV inputs Input port Details dBV). White = left Red = right Mic-level input to connect a passive or active stereo electret 3.5 mm microphone (unbalanced) Combo XLR / TRS audio inputs operate as a stereo pair (left/right) by default.
-
Page 34: Tech Specs
You cannot use both XLR audio inputs and the TRS audio inputs at the same time. Only content that is not HDCP-protected is captured from HDMI and SDI sources. Tech specs The input and output connectors are listed for Pearl Mini. For the most up-to-date product specifications and information, go to www.epiphan.com/pearl-mini. Table 6... - Page 35 Pearl Mini User Guide Tech specs (1) Stereo RCA consumer line-level, - 10 dBV (1) Stereo 3.5 mm mic-level (unbalanced) for electret microphones (1) SDI audio (2) HDMI audio TRS maximum signal level: 12.3 V RMS, (+24 dBu) Analog audio max.
- Page 36 Multiple user accounts/passwords. Administration HTTPS for secure Admin panel and Epiphan Live access, as well as local network access to the live channel broadcast. API for integration into existing environments (HTTP/HTTPS and RS-232). Time synchronization...
-
Page 37: Optimum Cpu Performance
¹ One of the video sources you connect can be either a USB or an RTSP source; however, you cannot connect both at the same time. SD-SDI audio is not supported. Pearl Mini supports up to three HD video sources in a single channel with two picture in picture layouts under certain conditions, see inputs. -
Page 38: Vesa Mounting The Device
Vesa mounting the device The rear panel of Pearl Mini has vesa mounting holes to fit a standard, 75mm × 75mm vesa mount. Use four M4 screws with a maximum length of 5mm to mount the plate to the rear panel of Pearl Mini. - Page 39 Pearl Mini User Guide Vesa mounting the device Do not insert screws longer than the recommended 5mm. Using longer screws can damage the device.
-
Page 40: User Interfaces And Remote Access
Start and stop recording, perform rescue troubleshooting and more over the Internet when you use the cloud versions. All you need is a free AV Studio account to start remotely accessing your Pearl Mini right away. To learn how, see Access cloud versions of the Admin panel and Epiphan Live. -
Page 41: The Touch Screen
When you power on Pearl Mini, a grid view appears. The grid view displays all channels that are configured for your system. If you haven't created any channels yet, the grid view shows the two HDMI input ports by... - Page 42 Pearl Mini User Guide About the touch screen In this example, the grid view shows two video sources, which are plugged into HDMI video input ports A and B on Pearl Mini. If no video sources are connected, or your sources aren't sending a signal, the grid view shows no signal images.
-
Page 43: The Channel View
Each channel you configure on Pearl Mini can be monitored and controlled using the touch screen. After you power on Pearl Mini and the grid view opens, you can select a channel and open the channel view. Just tap the channel you want in the grid view and the channel view opens. - Page 44 Pearl Mini User Guide The Channel view Item Description has been in progress. Recording status. Bright red and flashing means recording is in progress. The recording timer shows the length of time that recording has been in progress. Controls to switch between channels. Tap the arrow to view the next (or previous) channel.
-
Page 45: Record A Channel Using The Touch Screen
Record a channel using the touch screen Record a channel using the touch screen Use Pearl Mini's touch screen to easily start and stop recording of a channel. Simply tap the recording control button that appears in the channel view. -
Page 46: Switching / Mixing Using The Touch Screen
Switching / mixing using the touch screen Switching live video inputs, or video mixing, is simple and intuitive using Pearl Mini's touch screen. After you select the channel you want to live switch, just tap the layout switching icon to open the convenient switcher on the touch screen. - Page 47 Performing live switching using one interface, like the touch screen, does not dynamically update the visuals in the other interfaces (e.g. the Admin panel and Epiphan Live). The other interfaces must be manually refreshed to accurately reflect the current live switching layout information.
- Page 48 Pearl Mini User Guide Switching / mixing using the touch screen 3. Tap any layout that appears in the carousel to load it in to the Preview panel. 4. Tap Apply or double tap inside the Preview panel to switch that layout to the Live panel. The layout that was in the Live panel moves to the Preview panel so that it's ready for the next time you switch.
-
Page 49: One Touch Streaming And Recording Control
One Touch streaming and recording control 6. Tap Back to exit the Live Switcher view. One Touch streaming and recording control You can easily control streaming and recording from the touch screen on Pearl Mini with the press of a single button. Topics include: ... - Page 50 Pearl Mini User Guide One Touch streaming and recording control Table 8 One Touch control screen components Label Description Start/stop button: Press the One Touch control button to start or stop streaming and recording for all specified channels and recorders.
- Page 51 Start Screen: The One Touch control screen displays automatically on the touch screen when you power on Pearl Mini. Operators can still navigate to other screens from the One Touch control screen. Locked: The One Touch control screen is the only screen that displays on the touch screen of Pearl...
- Page 52 Pearl Mini User Guide One Touch streaming and recording control To configure how the One Touch control screen displays on the touch screen: 1. Login to the Admin panel as admin, see Connect to the Admin panel. 2. From the Configuration menu, click Touch Screen. The Touch screen configuration page opens.
- Page 53 Pearl Mini User Guide One Touch streaming and recording control b. Click change, and then check Single touch control on the options page to enable the channel for One Touch control. Uncheck the check box if you don't want to include that channel for One Touch control.
- Page 54 Pearl Mini User Guide One Touch streaming and recording control a. From the Recorders menu, select the recorder you want. The Recorder Setup page opens. b. Click change, and then check Single touch control on the options page to enable the recorder for One Touch control.
- Page 55 Pearl Mini User Guide One Touch streaming and recording control Specify channels for One Touch streaming Channels are not enabled for One Touch streaming by default. You can enable and disable One Touch streaming control for individual channels using the Admin panel.
-
Page 56: Configure The Touch Screen
Configure the touch screen The touch screen on Pearl Mini is enabled by default and all its features are available. You can disable the entire screen or some of its features using the Admin panel. For information about how to connect to and use... - Page 57 Configure the touch screen Disable or enable the touch screen You can enable or disable Pearl Mini from displaying anything on the touch screen. The touch screen remains touch-sensitive even when the display is disabled. To disable or enable the touch screen display: 1.
- Page 58 The system status screen displays network and system related information, such as the IP address needed to access Pearl Mini. You may not want this information visible on the touch screen after you've configured Pearl Mini. You can use the Admin panel to disable the system status screen from displaying on the touch screen.
- Page 59 4. Click Apply. Disable or enable configuration using the touch screen You can apply configuration presets and configure network settings using the touch screen on Pearl Mini by default. You can disable this ability using the Admin panel. If configuration is blocked and system status is permitted, touch screen users see an i icon instead of the configuration gears icon in the lower right corner of the touch screen.
-
Page 60: Touch Screen
Disable or enable recording, streaming and switching from the touch screen Recording, streaming, and live switching control using the touch screen on Pearl Mini is enabled by default. You can disable this function using the Admin panel to stop users from switching layouts and from starting or stopping live streams and recordings. - Page 61 Pearl Mini User Guide Configure the touch screen 3. Uncheck Allow start/stop recording and streaming to disable recording, streaming, and live switching control from the touch screen. Check the check box to enable recording, streaming, and live switching control. 4. Click Apply.
- Page 62 4. Click Apply. Set a 4-digit PIN security code You can set a 4-digit PIN code to protect the touch screen of Pearl Mini from unauthorized access. By default, the PIN is not set. If a PIN is configured, users are prompted to enter the PIN code whenever: ...
- Page 63 2. From the Configuration menu, click Touch Screen. The touch screen configuration page opens. 3. Enter a 4-digit PIN code in the PIN field. Record the PIN code in a safe location for future reference. You need this PIN to access the touch screen of your Pearl Mini. 4. Click Apply.
-
Page 64: The Admin Panel
The Admin panel The Admin panel is used primarily to set up your Pearl Mini and perform administrative tasks. Most tasks in this user guide are performed using the Admin panel.This section contains what you need to get started using the Admin panel. - Page 65 Label Name Description The channels that are available for the current configuration of your Pearl Mini are listed. Select a channel to access the drop down list of Channels menu options that are available to configure channel encoding, add video and audio source, create layouts, perform confidence monitoring, record the channel, and more.
-
Page 66: Connect To The Admin Panel
Ethernet network as your Pearl Mini. You need the IP address of the system, which you can get from the settings using the front touch screen of your Pearl Mini. Using the touch screen is the easiest way to find the IP address of your system. - Page 67 c. To check the CPU usage from the touch screen, tap the gear icon and select System Status. d. 3. When you have the IP address of your Pearl Mini, enter the following into the address bar of your web browser to launch the Admin panel.
-
Page 68: Connect Using The Epiphan Discovery Utility
To access the Admin panel using the Epiphan discovery utility: 1. Launch the discovery utility. 2. Click Search to find all the Epiphan systems on the network. A list similar to the following appears. If more than one Pearl Mini appears, select the one you want using the serial number that's listed. -
Page 69: Connect Using A Dns-Based Service Discovery
Connect using a DNS-based service discovery Connect using a DNS-based service discovery Pearl Mini uses DNS-based messages to advertise details about itself, including its host name. With a compatible utility installed on your computer, you can access the system simply by typing its serial number and the suffix ".local"... -
Page 70: Connect Using Persistent Static Ip Address
Pearl Mini has a default persistent static IP address, also known as the recovery IP address. If ever you need to set up Pearl Mini on a network that does not support DHCP, or you need to recover from a previous static IP address setting, you can use this procedure to connect directly to the system for configuration. -
Page 71: Switching / Mixing Using The Admin Panel
b. Connect Pearl Mini directly to the workstation’s Ethernet port using either a regular or a crossover Ethernet cable. 2. Record the network settings of the workstation that are used to connect to Pearl Mini so that they can be restored later. - Page 72 Pearl Mini User Guide Switching / mixing using the Admin panel 2. From the Channels menu, select a channel and click Layouts. The layout editor page opens. 3. In the layouts list, the layout with the big red circle beside it is the currently chosen "live" layout.
-
Page 73: Epiphan Live
Admin panel and Epiphan Live. About Epiphan Live The Epiphan Live interface lets you easily operate your Pearl Mini using a computer or mobile device such as a tablet. You can: Control streaming and recording of channels and recorders. -
Page 74: The Dashboard Interface
Text scaling using Google Chrome for Android is not supported. The Dashboard interface The Dashboard interface is the first page you see when you open Epiphan Live. You'll find helpful tools for confidence monitoring, as well as streaming and recording control. - Page 75 Pearl Mini User Guide The Dashboard interface Table 11 Elements in the Dashboard interface Number Title Description Warning – This icon displays only if there are any configuration errors in your channels, sources, streams or recordings. Clicking the icon displays more detail about the errors.
-
Page 76: Access Epiphan Live Using A Web Browser Or Mobile Device
Access Epiphan Live using a web browser or mobile device You can open Epiphan Live using a web browser on your Windows, Mac, or Linux computer. You can also use Epiphan Live on an Android phone or tablet, an iPhone, or an iPad. -
Page 77: Access Epiphan Live From The Admin Panel
Firefox or update the version of your web browser, then add the security certificate for the website to the exceptions list. Access Epiphan Live from the Admin panel You need the IP address of your Pearl Mini to log in to the Admin panel for this procedure, see Connect to the Admin panel. -
Page 78: Stream, Record, And Monitor Using The Dashboard Interface
Pearl Mini User Guide interface Stream, record, and monitor using the Dashboard interface The Dashboard interface in Epiphan Live is where you can do confidence monitoring, as well as start and stop streaming and recording for your channels. Topics include: ... - Page 79 Pearl Mini User Guide interface Up to 8 Epiphan Live preview panels can be open at the same time. The limit of 8 live preview panels applies across all open instances of Epiphan Live, including multiple users accessing Epiphan Live simultaneously from different web browsers, or duplicate instances of the same Epiphan Live interface open on multiple browser tabs at the same time.
- Page 80 A triangular warning icon means there is a source configuration issue that needs attention. Tap the name of a video input to open the source details in a thumbnail view, including warning information if applicable. The audio inputs configured on your Pearl Mini appear in the Audio inputs section of the Dashboard.
- Page 81 Stream, record, and monitor using the Dashboard Pearl Mini User Guide interface A grayed-out audio source means that the audio source is not used in any channels. A triangular warning icon means there is a source configuration issue that needs attention. Click the audio source name to display the warning message.
- Page 82 Stream, record, and monitor using the Dashboard Pearl Mini User Guide interface Show or hide audio inputs You can pick which audio inputs display in the Dashboard view. Just tap the Audio inputs header and then check the checkbox next to the name of each source you want showing in the Dashboard view. Tap Save when you're done.
- Page 83 Stream, record, and monitor using the Dashboard Pearl Mini User Guide interface By default, video output ports are configured to maintain aspect ratio, use the display's default resolution, include audio at 100% and they don't include the audio VU meter. You can change these defaults in the Admin panel.
- Page 84 A green icon means audio is enabled. A gray icon means audio is disabled. Control streaming and recording From the Epiphan Live Dashboard, you can control streaming and recording for channels using the buttons in the Channels section. When a channel is not currently streaming or recording, the buttons are gray and their respective timers are set to 00:00:00.
- Page 85 Stream, record, and monitor using the Dashboard Pearl Mini User Guide interface If multiple streams are configured for a channel, a pair of control buttons is displayed for each stream. Click the channel name to open a preview thumbnail view.
-
Page 86: Switching / Mixing Using Epiphan Live
Switching / mixing using Epiphan Live The Live Switcher view in Epiphan Live is a simple interface that lets you live switch between layouts while streaming and recording. To learn how to create different layouts for a channel using the Admin panel, see Add or edit a custom layout. - Page 87 Table 13 Elements in the Switcher view Number Title Description A list of channels configured on your Pearl Mini. When a channel is Channel selector selected, you can switch between the different layouts that are configured for that channel. Menu icon Displays links to the Dashboard view and the Admin panel when clicked.
- Page 88 The Switcher interface lets you easily live switch between custom layouts with the simple press of a button. To switch layouts while live streaming and recording: 1. Log in to Epiphan Live. The Dashboard view opens by default. See Access Epiphan Live using a web browser or mobile device.
- Page 89 Pearl Mini User Guide Switching / mixing using Epiphan Live All the layouts for the selected channel are displayed in a carousel along the bottom of the screen. The layout that is live is displayed in the Live panel on the right side of the interface, see...
-
Page 90: Your Recordings
The layout that was in the Live panel moves to the Preview panel so that it's ready for the next time you switch. 6. To load a different layout into the Preview panel, tap another layout in the carousel. Your recordings All recordings made using Epiphan Live are saved to the Your recordings panel. - Page 91 Pearl Mini User Guide Your recordings After recoding a file, you can manage it and any other files using the following tools on the page: Number Title Description Select a From and a To date from the pop-up calendar to create a date Date selector range.
-
Page 92: Remote Login Access
Admin panel and Epiphan Live. You can see if Pearl Mini is paired from the AV Studio status page using the Admin panel . A simple, clickable link pairs Pearl Mini to your AV Studio team. All you need to do is login. -
Page 93: Enable Or Disable Av Studio For Remote Login
Disabling the AV Studio feature on Pearl using the Admin panel while Pearl Mini is paired to AV Studio causes Pearl Mini's encoder entry in AV Studio to permanently go offline. For information about how to use AV Studio and perform quick, low touch video editing and deliver the... -
Page 94: Pair And Unpair Pearl Mini From Av Studio
Pair and unpair Pearl Mini from AV Studio To use the remote login feature, you must pair Pearl Mini to AV Studio. An AV Studio account is needed. You can sign up for a free AV Studio account the first time you pair Pearl Mini. For more information, see... - Page 95 5. After you've logged in to AV Studio, select a team that's associated with your AV Studio account. Your default AV Studio team is selected by default. Then click Pair encoder. Your Pearl Mini is now paired to your AV Studio team and is listed on the Encoders page in AV Studio.
-
Page 96: Access Cloud Versions Of The Admin Panel And Epiphan Live
Pearl Mini User Guide Live 6. In the Admin panel, the status of Pearl Mini updates to paired on the AV Studio status page. To unpair Pearl Mini, select Unpair. Access cloud versions of the Admin panel and Epiphan Live Perform remote configuration and rescue troubleshooting using the cloud version of the Admin panel. -
Page 97: Using Av Studio To Control Pearl Mini
2. In the top header bar, click Encoders. The list of encoders opens. 3. Click Remote login beside the Pearl Mini encoder entry. A new tab with the cloud Admin panel login opens in your browser. 4. Enter your Admin panel login credentials to log in to the cloud version of the Admin panel . The default administrator username is admin. -
Page 98: About Using Av Studio To Control Pearl Mini
AV Studio is a cloud-based video production platform that lets teams remotely control video encoders like Pearl Mini. Using AV Studio, you can control recording and do quick, low touch editing for fast turn around and cloud delivery of recorded conferences, break out room sessions, seminars, and more. -
Page 99: Select Channels For Remote Control
Select channels for remote control When Pearl Mini is paired to AV Studio, up to four channels configured on Pearl Mini are automatically listed on the AV Studio status page in the Admin panel. The listed channels can be remotely controlled from AV Studio just like separate encoders for as long as Pearl Mini is paired. -
Page 100: Control Recording Using Av Studio
AV Studio status page in the Admin panel and in the AV Studio interface. Control recording using AV Studio You can remotely start and stop recording the channels on Pearl Mini directly in AV Studio from either the Encoders page or from the Encoder's detailed status page. -
Page 101: View And Download Av Studio Recordings Locally
Channels that you record directly using AV Studio are not saved to the same location as recordings you make for the channel using the Admin panel or Epiphan Live. A different queue is used, called the AV Studio upload queue. The AV Studio upload queue lists recordings that are stored locally on Pearl Mini that have not yet... - Page 102 View and download AV Studio recordings locally To see the AV Studio upload queue, Pearl Mini must be paired to AV Studio. Recordings listed in the upload queue can be download locally to your admin computer if the files have not yet uploaded to AV Studio. The AV Studio upload queue is accessed from the AV Studio page using the Admin panel.
-
Page 103: Configure Channel Encoding Using Av Studio
Pearl Mini User Guide Configure channel encoding using AV Studio admin computer, select the download icon. Configure channel encoding using AV Studio You can remotely configure certain video and audio encoding settings for a channel using AV Studio for Pearl Mini when it is paired with AV Studio. - Page 104 Pearl Mini User Guide Configure channel encoding using AV Studio 1. Login to your AV Studio account at https://go.avstudio.com 2. In the top header bar, click Encoders. The list of encoders opens. 3. Select the row for the channel and click Details in the thumbnail or click the three dots and choose Details.
-
Page 105: Part 1: Setup
PART 1: Setup This section contains tasks that are needed to get your Pearl Mini configured to connect to your local network, make system settings, add passwords, make backups of your configuration, and covers how to access status information and monitor the performance of your Pearl Mini. -
Page 106: Configure Network Settings
The following table lists the default incoming and outgoing network ports that Pearl Mini uses. Do not block traffic over these ports. If you want Pearl Mini to operate properly, make sure that your firewall is configured to open these ports. Blocking a port will cause the service that uses that port to fail. It is possible to use the Admin panel to change the default ports that are used for some services. - Page 107 Channel > Streaming , these ports remain open but refuse all external connection requests. In addition to the incoming ports, Pearl Mini uses some outgoing connections as follows: Port 80 - used for firmware update checks and downloads.
-
Page 108: Verify Ip Address And Mac Address Of Pearl Mini
Verify IP address and MAC address of Pearl Mini Verify IP address and MAC address of Pearl Mini There are two ways to view the current IP address and MAC address of your Pearl Mini: From the Network configuration page using the Admin panel. -
Page 109: Configure A Static Ip Address
See Configure the touch screen to enable system information. Configure a static IP address There are two ways you can set up Pearl Mini to use a static IP address: From the Network configuration page using the Admin panel. - Page 110 The internet protocol address (IP Address) to assign. Obtain this from your network IP Address administrator. Pearl Mini supports IPv4 addresses. It does not support IPv6 addresses. Also called the subnet mask, this value denotes a range of IP addresses. Obtain this...
- Page 111 The default gateway and DNS Server fields cannot be left blank. If you do not have a default gateway or a DNS server for your network, enter the static IP address in those fields. 4. Reboot Pearl Mini when prompted. From the Configuration menu, select Maintenance and click Reboot Now on the Maintenance page.
-
Page 112: Configure Dhcp
DNS server for your network, enter the static IP address in those fields. Configure DHCP If you need to switch Pearl Mini from using static IP address allocation to using dynamic allocation with DHCP, you can do this three different ways: ... - Page 113 Pearl Mini User Guide Configure DHCP To manually select DHCP as the network type using the Admin panel: 1. Login to the Admin panel as admin, see Connect to the Admin panel. 2. From the Configuration menu, select Network. The Network configuration page opens.
-
Page 114: Change The Http/Https Port Values
Change the HTTP/HTTPS port values On Pearl Mini, the default HTTP port is 80 and the default HTTPS port is 443. If the default ports used by Pearl Mini are not available on your network, you can change them using the Admin panel. Consult your system administrator for the correct port values to use for HTTP and HTTPS traffic. -
Page 115: Perform Network Diagnostics
Connect to the Admin panel. 2. From the Configuration menu, select Network. The Network configuration page opens. 3. Enter the IP address of Pearl Mini into the Address field and click ping or traceroute. The console-like results are displayed below the Address field. -
Page 116: Disable The Network Discovery Utility
Connect using the Epiphan discovery utility. The discovery utility uses port 5557 to discover the Pearl Mini devices on your network. You can disable Pearl Mini port 5557 using the Admin panel so that your Pearl Mini is not discoverable on that port. - Page 117 Pearl Mini User Guide Disable the network discovery utility ...
-
Page 118: Configure Network Security
Configure 802.1x network security and manage user certificates You can enable 802.1x security and configure the EAP method for Pearl Mini to use for secure network access using the Admin panel. Supported EAP methods include: PEAP (default) ... - Page 119 Configure 802.1x network security and manage user Pearl Mini User Guide certificates 4. (Optional) Check Verify server's identity. 5. Choose an Authentication method if you selected EAP-TTLS as the EAP method. The authentication method is automatically selected if PEAP or EAP-TLS is the EAP method.
-
Page 120: Manage Ca And Self-Signed Certificates
If you need to delete the user certificate or private key, click Delete certificate. Manage CA and self-signed certificates You can view the list of CA and self-signed certificates that come preloaded on Pearl Mini. CA and self-signed certificates are used for server authentication if Verify server's identity is selected when 802.1x network security is configured, see Configure 802.1x network security and manage user... -
Page 121: Configure Https
Configure HTTPS You can configure Pearl Mini to use HTTPS for secure, local network access to the Admin panel, as well as for viewing the live channel preview stream on the local network using the Live broadcast URL. -
Page 122: Tether To A Mobile Network
Tether to a mobile network Pearl Mini supports tethering to a mobile device over USB. You can use tethering to access a mobile hot spot for live streaming, or have the tethered mobile network on standby as a backup network for your Ethernet... - Page 123 Ethernet network as your preferred network, you will switch over to the tethered mobile network if the Ethernet network fails. When the failover happens, Pearl Mini is assigned a new IP address and all streaming sessions with viewers, clients or servers that are directly connected to Pearl Mini are closed. You must provide viewers, clients and servers with the new IP address so they can reconnect with Pearl Mini.
- Page 124 Pearl Mini User Guide Tether to a mobile network Label Description/Options When chosen, the system tries to use the Ethernet network first. It switches to use the mobile network (tethering) when the Ethernet network is no longer available. Prefer ethernet To prevent viewer interruptions, mobile data will continue to be used until the mobile network is down or publishing is restarted.
-
Page 125: Configure Date And Time
Configure date and time Configure date and time Pearl Mini uses the current date and time in naming recorded files and when synchronizing and timestamping inputs from multiple sources (i.e. when synchronizing an audio and a video source). The Admin panel lets you specify date and time settings to ensure they are correctly configured for your time zone and your network. - Page 126 Pearl Mini User Guide Configure date and time Table 20 Date and Time configuration options Label Description/Options Time Zone The currently selected time zone. Enable time Whether or not a time synchronization protocol is being used for setting time. If not synchronization selected, time is set manually.
- Page 127 NTP sends UDP packets over port 123 on Pearl Mini and PTP sends UDP packets over ports 319 and 320. If Pearl Mini is behind a firewall, you must open these ports to allow traffic when Pearl Mini is configured to use either an NTP or a PTP server to obtain its time and date information.
-
Page 128: Format The Sd Card
Format the SD card Before you can use your SD card for recording video using Pearl Mini, you must format the SD card for the Ubuntu operating system using the Admin panel. We recommend using a minimum class 10 SD card that is... - Page 129 To format your SD card using the Admin panel: 1. Insert the SD card into the SD card slot on Pearl Mini. 2. Login to the Admin panel as admin, see Connect to the Admin panel.
-
Page 130: Audio Input Ports
Enable or disable phantom power Phantom power is not enabled on the XLR audio input ports by default on Pearl Mini. You can enable 48 V Phantom power for the two XLR ports using the Admin panel. When phantom power is enabled: ... -
Page 131: Configure Audio Ports For Stereo Or Mono
2. From the Inputs menu, click XLR/TRS Audio. The XLR/TRS Audio page opens. 3. Check Phantom power 48V, then click Apply. Configure audio ports for stereo or mono The two combo XLR/TRS audio input ports on Pearl Mini ports are configured to work together as a stereo pair by default. ... -
Page 132: Assign Audio Sources To An Input
When mono is selected, two sets of parameters and two audio VU meters appear on the configuration page - one for each audio input port on Pearl Mini. Parameters that are listed only once on the page applies to both ports. -
Page 133: Adjust Audio Gain And Delay
Be aware that excessive amounts of gain can increase the perception of any noise that may be present in the audio signal. This table offers some guidelines for adjusting the gain at the audio input port of Pearl Mini for common types... - Page 134 1 To avoid unwanted signal noise on the RCA ports, we recommend adding no more than 12dB of gain to the RCA ports. Ensure the audio input source is connected to an analog audio input port on Pearl Mini before proceeding.
-
Page 135: Mute Audio
Some audio input ports share internal audio processing resources in Pearl Mini. Muting an audio input that shares internal resources mutes all the associated audio sources. The following table lists the audio input ports that share internal processing and the results of applying mute. - Page 136 Pearl Mini User Guide Mute audio Audio input Shared audio Results (Admin panel) input resources The XLR 1 (left) and TRS 1 (left) ports are muted. The XLR 2 (right) and TRS 2 (right) ports are not muted. In mono mode (XLR/TRS audio 2 muted): The XLR 2 (right) and TRS 2 (right) ports are muted.
- Page 137 Pearl Mini User Guide Mute audio 4. Click Apply.
-
Page 138: Video Output Ports
About video output ports An HDMI video output port is located on the rear panel of Pearl Mini. The output port is set to display HDMI A input port by default, but you can change this using the Admin panel The video output port is configured to maintain aspect ratio, use the display's default resolution, and include audio at 100% volume. -
Page 139: Video Output Port Resolution
You can change the video output port defaults and send any video source or channel to the port using the Admin panel or Epiphan Live. Audio is included for channels that have audio. To set and configure the video output port settings using the Admin panel, see Preview the video output port. -
Page 140: Show A Channel Or Video Source On The Output Port
The audio meter is set to a fixed size of 15% of the width (or height if displayed horizontally) of the display. Audio is not supported when sending a video source to the video output port. To set up the video output port using Epiphan Live, see Monitor and setup the output port source and audio. - Page 141 Pearl Mini User Guide Show a channel or video source on the output port 4. In the Resolution field, select the resolution for the video output port. Value Description Set the output to the same resolution as the channel or video source.
-
Page 142: Preview The Video Output Port
Pearl Mini User Guide Preview the video output port b. Uncheck Keep aspect ratio check to have the system stretch the source to fit the aspect ratio of the display. 6. For video sources, select a Frame rate to specify the number of frames per second to send out over the video output port. -
Page 143: Disable The Video Output Port
2.5 seconds, then the display output is changed to a black screen. You can also preview video output ports using the Epiphan Live control interface. See Monitor and setup the output port source and audio for more information. -
Page 144: Disable Or Enable Audio And Output Port Volume
Pearl Mini User Guide Disable or enable audio and output port volume Disable or enable audio and output port volume If you're displaying a channel as the source for your video output port, audio for that channel is also encoded and sent over the port by default. - Page 145 Pearl Mini User Guide Disable or enable audio and output port volume c. (Optional) For channels with audio enabled, choose whether or not to display the audio meter from the Audio meter drop down. d. If displaying the audio meter, select horizontal or vertical from the Audio meter orientation drop down to change the orientation of the displayed audio meter.
-
Page 146: Display And Reposition The Audio Vu Meter
5. Click Apply. You can also disable or enable audio on the video output port and adjust the volume using Epiphan Live, see Monitor and setup the output port source and audio. Display and reposition the audio VU meter When sending a channel with audio over the video output port, you can choose whether or not to display the audio VU meter using the Admin panel. -
Page 147: Rename A Video Output Port
5. Click Apply. Rename a video output port Using the Admin panel or Epiphan Live, you can easily change the video output port default name from HDMI 1 to something more suitable. For example, Projector Output or Confidence Monitor. To change a video output port name: 1. -
Page 148: Mirror The Video Output Port Display
Pearl Mini User Guide Mirror the video output port display 4. Press Enter using your keyboard to save the changes. You must press Enter to save the new name. The Apply button does not save the source name change. Mirror the video output port display You can use the Admin panel to mirror the original video source on the output port so that it appears reversed on the connected display. - Page 149 Pearl Mini User Guide Mirror the video output port display...
-
Page 150: Set Up Kaltura Cms Integration
Kaltura system is when you register. The resource name you assign to Pearl Mini should be unique. A default resource name that includes the serial number of your Pearl Mini helps to ensure that. However, it's possible to transfer scheduled events from one resource to another by assigning Pearl Mini the same resource name as another resource. -
Page 151: Disable Or Deregister The Device From Kaltura
Disable or deregister the device from Kaltura You can disable CMS for a registered Pearl Mini using the Admin panel and still select Pearl Mini as a resource using Kaltura MediaSpace. However, the events schedule won't synchronize on Pearl Mini and any events that... - Page 152 Disable or deregister the device from Kaltura are scheduled to start while CMS is disable do not start on Pearl Mini. If CMS is re-enabled on Pearl Mini before the event is scheduled to end, that event will start automatically after the events schedule is refreshed on...
-
Page 153: Change The Resource Name Used For Kaltura
Using the Admin panel, you can change the resource name that's assigned to Pearl Mini while it's registered with Kaltura. Each Pearl Mini is assigned a unique resource name that includes the serial number of the device by default. You can transfer scheduled VOD and scheduled webcasting events from one resource to another by assigning Pearl Mini the same resource name as another resource. -
Page 154: Reassign A Registered Resource
Reassign a registered resource Every encoder you register with Kaltura has a unique resource name. To swap out one Pearl Mini encoder with another one, you can simply reassign the existing Pearl Mini resource name to the replacement Pearl Mini. - Page 155 You can also use this procedure if you've performed a factory reset, which resulted in an orphaned Kaltura resource registration and you need to reregister your Pearl Mini using the same resource name to take over the resource instance that is still registered in Kaltura.
-
Page 156: User Administration
No password is assigned to these user levels by default and you cannot change the default user names or disable these user levels. When you log in to Pearl Mini, you must log in as one of these three user levels. - Page 157 Pearl Mini is admin. Operator The operator account allows users limited Pearl Mini configuration control. The default user name used to log in to Pearl Mini is operator. Operators can to do the following: ...
- Page 158 The viewer account is for all users who are permitted to view the streamed channels. The default user name used to log in to Pearl Mini is viewer. If no password is assigned, then viewers are not prompted for a user name and password to view a channel.
- Page 159 Pearl Mini User Guide User types and privileges Action or Menu Option viewer operator admin Source Operations View Source Configuration ü ü Rename Source ü ü ü Configure Source View Source Snapshot ü ü Network Security ü...
-
Page 160: Set Or Change User Passwords
Admin and operator-level users have access to the Admin panel to control Pearl Mini. If the admin password is defined and the operator password is undefined, by default the operator... -
Page 161: Remove User Passwords
Pearl Mini User Guide Remove user passwords Passwords are case sensitive and can use all alpha-numeric keys in the ASCII range. Your password can be up to 255 characters long, but should not include any spaces. Contact your system administrator for your organization’s specific password requirements. -
Page 162: Overcome Lost Passwords
Set or change user passwords. If you have lost the admin password and you have remote support enabled on the system, contact Epiphan Support to request a remote password reset. If remote support is disabled, you must return the system... -
Page 163: Configure Ldap User Authentication
Pearl Mini User Guide Configure LDAP user authentication Alternatively, you can regain access to Pearl Mini if you apply the factory default configuration preset using the touch screen, Apply a configuration preset using the touch screen. The factory default configuration will change the current settings on Pearl Mini, see The Factory default configuration... - Page 164 Pearl Mini User Guide Configure LDAP user authentication 4. In the Server address[:port] field, enter the server IP address and (optional) port for your LDAP server. For example, 192.168.1.101:389. 5. In the Connection encryption drop-down, choose the type of encryption used by your LDAP server (if any is used).
-
Page 165: Change The Logged-In User
Restrict viewers by IP address Pearl Mini permits you to restrict which computers can access broadcasts by building a list of allowed and denied IP addresses. You can do this at a global level for the system and can also override these settings on a... - Page 166 Pearl Mini User Guide Restrict viewers by IP address The following table describes what happens when an IP address is added to the allowed and denied IP address lists. Item Description Users connecting from addresses in this list are permitted to view broadcasts from the system, provided their IP address is not in the Deny IP’s list.
-
Page 167: Ip Restriction Examples
Pearl Mini User Guide IP restriction examples To restrict viewer access to watch streams on a specific channel by their IP address: 1. Login to the Admin panel as admin, see Connect to the Admin panel. 2. From the Channels menu, select a channel and click Streaming. The channel's streaming configuration page opens. - Page 168 Pearl Mini User Guide IP restriction examples Example Description individual address. The allow list looks as follows: Allow: 192.168.1.200-192.168.1.250 Note that we could have specified two of the IP addresses in the previous example as a range. Putting the first two examples together, we want to permit access to IP addresses in the range of boardroom computers (192.168.1.200-...
- Page 169 Pearl Mini User Guide IP restriction examples Table 28 Example deny lists Example Description Another simple allow/deny list is to use the list of known IP addresses to list specific denied IP addresses. All other addresses are allowed access to the broadcast.
-
Page 170: Configuration Presets
Configuration presets are groups of settings that get applied to the system, leaving other important settings intact. They make it easy to manage multiple Pearl Mini systems and shared spaces, like a studio, a breeze to set up and maintain a consistent setup each time you go to use your Pearl Mini. - Page 171 At the conference, simply apply the configuration preset that you need for the appropriate session using either the Admin panel or the touch screen on Pearl Mini. When applying the configuration preset, all other preset groups remain unchanged. The preset only affects channels and their configuration.
-
Page 172: Configuration Preset Considerations
Pearl Mini User Guide Configuration preset considerations Session 1 presenter data plus the conference IP and background image address Session 2 preset Session 2 presenter data plus the conference IP and background image address After applying a configuration preset, recorded files from the previous session remain present on the system. - Page 173 Users can erase uploaded media or recordings that belong to other users. Media files that you've uploaded to Pearl Mini (logos, background images, etc) are included in the configuration preset and must be present on the system when creating a preset that includes the Channels group;...
- Page 174 Pearl Mini User Guide Configuration preset considerations Configuration presets that contain the channels configuration group specify the channels in the preset by their index number. This means if you have channels 1, 2, 3 and 4 when you save your preset, applying that preset will overwrite the configuration of your current channels with indexes 1, 2, 3 and 4.
- Page 175 Pearl Mini User Guide Configuration preset considerations Overwritten channel files are still available. To access and download/delete these recorded files, enter the following into the address bar: http://<deviceIP>/admin/channelN/archive or http://<deviceIP>/admin/recorderN/archive, where N is the index of the removed channel/recorder. For example, if a Channel with index 3 is no longer present, its corresponding files can be accessed by entering the following into the address bar: http://192.168.0.183/admin/channel3/archive...
-
Page 176: Configuration Groups
Reassign a registered resource. If you apply a configuration preset to set up a replacement Pearl Mini with the settings from a Pearl Mini that is currently registered with Kaltura, the replacement Pearl Mini assumes the identity of the registered resource. -
Page 177: The Factory Default Configuration Preset
Include CMS settings for Kaltura. The Factory default configuration preset You can apply the default factory configuration preset to Pearl Mini, which resets most of the settings in each of the main configuration groups. Applying the factory default configuration preset is similar to a factory... - Page 178 ü Deletes all Automatic file upload settings Returning Pearl Mini to the factory defaults or performing a factory reset does not delete the registered resource instance in Kaltura CMS. You can reregister your Pearl Mini using the same resource name and take over for the resource instance that is still registered in Kaltura, see...
-
Page 179: Create A Configuration Preset
Configuration groups for which settings are included in each group. After you're finished configuring your Pearl Mini, it's good practice to save a full backup with all groups selected so that you can restore your full configuration at a later date. -
Page 180: Apply A Configuration Preset Using The Admin Panel
5. Click Save. Your configuration preset appears in the list. What's next? You can export the configuration preset to your admin computer and then import it to another Pearl Mini, see Export and import configuration presets, and you can... - Page 181 2. From the Configuration menu, click Maintenance. The maintenance page opens. 3. In the Configuration presets section, click the Apply button next to the configuration preset you want to apply. Click OK when prompted. Pearl Mini reboots automatically if the configuration preset includes the network or system configuration groups.
-
Page 182: Apply A Configuration Preset Using The Touch Screen
Apply a configuration preset using the touch screen You can use Pearl Mini's touch screen to apply configuration presets. If you apply a preset that has the EDID configuration group, the system may appear unresponsive for a short time while it applies these EDIDs to the video grabbers. -
Page 183: Export And Import Configuration Presets
You can download configuration presets to your local computer, then upload and apply the preset to other Pearl Mini systems or save the configuration preset as a backup of your current configuration. Either way, it's a simple two-step process to download the preset from one system and upload it to another. - Page 184 Pearl Mini User Guide Export and import configuration presets Before creating and using a configuration preset, read Configuration preset considerations. Download a configuration preset To download or export a configuration preset: 1. Login to the Admin panel as admin, see Connect to the Admin panel.
-
Page 185: Update A Configuration Preset
Click OK to overwrite the existing preset or Cancel to cancel the upload. What's next After you upload a configuration preset file, you must apply the configuration preset to Pearl Mini. To apply the configuration preset, see... -
Page 186: Delete A Configuration Preset
Pearl Mini User Guide Delete a configuration preset 3. Copy the name of the preset you want into the Name field and select the configuration groups to include, then click Save. 4. Click OK when prompted to overwrite the existing configuration preset with the new one. - Page 187 Pearl Mini User Guide Delete a configuration preset...
-
Page 188: Status And Monitoring
Monitoring audio and VU sensitivity You can connect headphones or external speakers to the 3.5 mm audio jack on the front panel of Pearl Mini. To monitor the audio for a specific channel, just select the channel using the touch screen. The audio you hear depends on which layout is currently live because different layouts can have different audio sources configured. - Page 189 Have complete confidence about what you're capturing, streaming, and recording. All the channels you have configured are displayed in the grid view. The grid view opens by default when you turn on Pearl Mini. If necessary, tap the touch screen once to turn it on and tap again to display the controls.
- Page 190 Pearl Mini User Guide Status and monitoring Item Description Streaming has an error and recording is stopped. Streaming is stopped and recording is started. Streaming is started and recording is started. Streaming has an error and recording is started. Streaming is disabled and recording is started.
- Page 191 Pearl Mini User Guide Status and monitoring Table 33 Individual channel view indicators Item Description Streaming indicator appears in the top-left corner: (no dot) Streaming is disabled. Gray means streaming is stopped. Streaming status Flashing blue means streaming is in progress.
- Page 192 Status and monitoring View system information using the touch screen Find the serial number, check the installed firmware version of your Pearl Mini and more on the System Status screen using the touch screen. The System Status screen displays basic system information that's useful when first setting up your Pearl Mini.
- Page 193 Pearl Mini User Guide Status and monitoring Label Description Disk space available Pictogram of available disk space To open the System Status screen: 1. Tap the gear icon. If the control icons aren't showing, tap anywhere on the touch screen.
- Page 194 2. From the Configuration menu, click Info. The system information page opens. View 802.1x network connection status messages When you first connect your Pearl Mini to a network, the status of the connection is displayed on the System Status touch screen, see View system information using the touch screen.
- Page 195 802.1x: FAILED network failed. If you attempt to connect to a network that isn't 802.1x enabled when 802.1x is configured on Pearl Mini, a consistent 802.1x: FAILED status message appears on the Network Configuration page in the Admin panel. View the video output port status The current status of the video output port and attached video display appears at the top of the video output port configuration page.
- Page 196 Running at w×h The video output port is functioning at the specified resolution. You can also view video output status using the Epiphan Live control interface. See Monitor and setup the output port source and audio for more information. View AFU status...
- Page 197 Pearl Mini User Guide FTP and automatic file transfers to learn how to configure AFU settings using the Admin panel. Table 36 AFU status touch screen components Label Name Description Indicates the AFU status: Waiting Disabled In Progress – files are in queue to be transmitted for Status upload according to specified time interval –...
- Page 198 Pearl Mini User Guide To access the Automatic File Upload status using the touch screen: 1. Tap the gear icon. If the control icons aren't showing, tap anywhere on the touch screen. If the gear icon is not visible on the touch screen, tap the screen once to activate the control buttons.
- Page 199 Using the Admin panel, select the Events menu to see up to 90 days of upcoming scheduled events and up to 90 days of ongoing and completed events for this Pearl Mini resource. Click the page arrows at the bottom of each list to navigate through multiple pages.
- Page 200 Pearl Mini to match the time and zone of Kaltura's scheduling server, see Configure date and time. From the touch screen on Pearl Mini, you can tap the Scheduled events icon at any time to display the Events screen. The icon only appears when Kaltura CMS is enabled on Pearl Mini.
-
Page 201: Part 2: Capture
PART 2: Capture Capturing is the process of taking the signals from your video and audio sources and encoding them so they're ready for streaming and recording. You add the captured video and audio to channels, which you customize for live streaming, switching, and recording. This section covers how to create channels and add custom layouts so that you can capture, stream, and record exactly what you want - how you want! Whether that's a simple channel with a single video and audio source or channels that have multiple video and audio sources and custom layouts like picture in picture. -
Page 202: What Is A Channel
What is a channel? Your video and audio sources that are connected to the input ports on Pearl Mini can be combined and added to channels, which you can stream and record. A channel is essentially an encoding instance that you associate with your video and audio inputs to produce outputs such as video recordings and streaming destinations. -
Page 203: Channel Layout Examples
Pearl Mini User Guide Channel layout examples Important note for channels with multiple layouts The two default channels are named HDMI-A and HDMI-B. Each has a default layout with the corresponding HDMI-A (or HDMI-B) video and audio sources already assigned. By default, when a channel includes only one layout that has a single video source, the default channel name is assigned the name of the video source. - Page 204 Pearl Mini User Guide Channel layout examples Layout example Description One video source (a slideshow presentation in this case), with a green background matte. To get this look: Using the custom layout editor, select a background color. Add a video source to the layout and size appropriately, leaving the background matte visible.
- Page 205 Pearl Mini User Guide Channel layout examples Layout example Description Two video sources (one cropped to a new aspect ratioCrop a video source), a background image, and a logo. Make sure the background image has the correct aspect ratio. To get this look: Upload your background...
- Page 206 Pearl Mini User Guide Channel layout examples Layout example Description One 4x3 video source in a 16x9 frame with a green background matte. To get this look: From the Encoding page for the channel, make sure that the 16x9 frame size is selected. Then using the custom layout editor, select a background color.
-
Page 207: Channel Configuration
Create a channel You create channels on Pearl Mini using the Admin panel. New channels automatically use the same aspect ratio as the default frame size setting for the channel, which is 16:9. You can change the encoding settings for... - Page 208 If you want to change the aspect ratio for your channel, see Configure encoding. For optimal performance, Pearl Mini comes pre-configured with two full HD channels at 30 fps: HDMI-A and HDMI-B. You may find it easier to reconfigure those existing channels instead of deleting and creating new ones.
- Page 209 Pearl Mini User Guide Create a channel 3. Click Add new item and select Video Source. 4. From the Source settings, select a video source in the Source drop down.
- Page 210 Pearl Mini User Guide Create a channel For best results, Keep aspect ratio when scaling should be checked under Source settings. The selected video source appears in the layout area. 5. Click and drag the red and white handles on the corners of the source to re-size it in the layout editor area.
-
Page 211: Add Video Sources Or A Channel As A Source
Pearl Mini User Guide Add video sources or a channel as a source If a channel is selected as a video source, the corresponding audio for that channel is selected by default. 7. Click Save. Your channel is ready for basic streaming and recording. - Page 212 Pearl Mini User Guide Add video sources or a channel as a source If more than one video source is added to a channel, we recommend configuring the channel encoding to use a fixed resolution as the frame size instead of automatically using the resolution of the video source as the frame size (default).
- Page 213 Pearl Mini User Guide Add video sources or a channel as a source For best results, check Keep aspect ratio when scaling in the Source settings. The selected video source appears in the layout editing area. 6. Click and drag the red and white handles on the corners of the source to re-size it in the layout editor area.
- Page 214 Pearl Mini User Guide Add video sources or a channel as a source To layer video sources over top of each other, like for picture in picture, you can click and drag the video sources that appear in the item list beneath Add new item and change their order.
-
Page 215: Add An Audio Source To A Layout
If an audio source is added to a layout and then the audio device is disconnected from the input port on Pearl Mini, some residual noise may be detected in the layout. Remove the audio source from the layout. -
Page 216: Duplicate A Channel
Pearl Mini User Guide Duplicate a channel To add an audio source to a layout: 1. Login to the Admin panel as admin, see Connect to the Admin panel. 2. From the Channel menu, select a channel and click Layouts. The custom layout editor opens. -
Page 217: Rename A Channel
Pearl Mini User Guide Rename a channel 4. Click Duplicate this channel. The duplicate channel is created and assigned the next sequential number in the Channel menu. 5. Click Save. Rename a channel Channels are created with the same name as their video source by default. When a second layout or a second video source is added to the channel, the channel name changes to Channel X, where X is the index number for the channel. -
Page 218: Delete A Channel
If you have multiple configuration presets, deleting a channel removes all recorded files that are related to that channel across all presets. For important information about how channels are indexed in Pearl Mini and how that affects deleting channels when configuration presets are used, see Configuration preset considerations. -
Page 219: Preview Channel
Preview a channel from the Status page Preview all channels at the same time You can also preview channels using Epiphan Live, see Configure Dashboard panels for more information. Important considerations Some web browsers disable auto playback of videos with audio. In those cases, the audio for the channel being previewed is muted by default. - Page 220 PCM audio encoding with a sampling bitrate of 48 kHz. If HTTPS is configured for Pearl Mini, the live broadcast URL will start with https instead of http. Preview a channel from the Info page The Info page has preview links for all the channels that are configured on Pearl Mini.
- Page 221 1. Open a new tab in your web browser on the Admin computer. 2. Go to the following URL to open the preview web page for your Pearl Mini, where <ip address> is the IP address of Pearl Mini. To find the IP address of your system, see...
-
Page 222: Add Or Remove Channel Metadata
Pearl Mini User Guide Add or remove channel metadata Add or remove channel metadata When you configure metadata for a channel, that metadata is embedded in all channel recordings and streams. You can specify the following metadata that the media player displays for your viewers: ... -
Page 223: Configure Encoding
Table 37 Supported video codes Value Description H.264 is the default video codec configured for the channels on Pearl Mini. This codec H.264 provides high quality video while using low bandwidth and is the preferred codec to use with the system. - Page 224 Pearl Mini User Guide Codecs and file format compatibility Value Description may result in distorted audio. MP3 provides a common audio format for audio storage. Supported sampling bitrate values are: 22 kHz, 44 kHz and 48 kHz. Setting the channel bitrate to match the audio source's bitrate provides the best sound quality and avoids audio resampling.
-
Page 225: Configure Video Encoding
Options are H.264 (default) and Motion JPEG. Hardware or software encoding: Hardware encoding is the default setting and is the recommended encoding for use with Pearl Mini. Encoding level: This can be set to High, Main, or Baseline. - Page 226 For example, if the input video signal resolution is 1920×1080 (a 16:9 aspect ratio) and the channel's frame size is set to 1280×720, Pearl Mini downscales the video and streams (and records) the channel at the lower frame size, using less bandwidth and producing smaller recorded files.
- Page 227 Pearl Mini User Guide Configure video encoding Table 41 Video encoding settings Setting Description H.264 is the default codec and provides high quality video while using low H.264 bandwidth. This is the preferred codec for the system. This codec is suitable for streaming and recording video, however you get Motion JPEG lower quality images and it requires a large amount of bandwidth.
- Page 228 Hardware Accelerated: This is the default H.264 encoding preset. Choose this setting for best performance. Video encoding Software: This matches the default from previous generations of Epiphan preset products. Only select this if you need software encoding or X.264 encoding to match results created with previous generations of Epiphan products or...
- Page 229 Pearl Mini User Guide Configure video encoding Item Options Main: Choose this option for standard-definition broadcasts. High: This is the default. Choose this option when video is viewed for broadcast and disk storage applications, particularly for high definition television application such as Blu-ray disk storage format and HDTV broadcast service.
-
Page 230: Configure Audio Encoding
Pearl Mini User Guide Configure audio encoding Configure audio encoding If your channel includes audio sources in any of the layouts, then AAC 48 kHz is set as the default audio codec for the channel. You can choose a different audio codec for a channel using the Admin panel. The following table lists the supported audio codecs and bitrates. -
Page 231: Multi-Encoding And Channel As A Source
256 kbps or 320 kbps. 7. Click Apply. Multi-encoding and channel as a source Pearl Mini lets you easily do multi-encoding so you can record and stream the same content at different encoding settings. This is useful when you want to: ... - Page 232 Pearl Mini User Guide Multi-encoding and channel as a source For example, take a scenario where you want to record a video at 1080p and 8 Mbps, while simultaneously live stream the same video online 720p and 1 Mbps. You can create your custom layouts and do all your switching in one channel (i.e.
-
Page 233: Custom Layout Configuration
When you're ready to stream or record, you can switch between the different layouts for a more interesting and dynamic presentation. Each layout you add to your channel adds overhead to Pearl Mini, and more complex layouts consume more of the system's resources. So, it's a good idea to delete any layouts you're not using. - Page 234 Pearl Mini User Guide About the custom layout editor Layout selector When you open the custom layout editor for a channel, a list of layouts appears at the top. You can create and delete layouts, duplicate layouts, choose which layout to preview and edit, and select the active live layout for live switching.
- Page 235 Pearl Mini User Guide About the custom layout editor The main layout area has the same frame size and aspect ratio as the encoding setting of the channel. As you add items to the layout, they appear in the layout editing area. The currently selected item is presented in full color.
- Page 236 Pearl Mini User Guide About the custom layout editor Using percents: Specify a whole number, followed by a percent sign (e.g. 4%) in any of the manual positioning fields. Resize and position items using percents or pixels for more information.
-
Page 237: Resize And Position Items Using Percents Or Pixels
(mic or line) on Pearl Mini. When setting the audio gain for your channel, add all your audio sources to your layout first, then set level of gain for your audio sources appropriately. - Page 238 Pearl Mini User Guide Resize and position items using percents or pixels The values contained in checked boxes (bordered with red) are anchored and do not dynamically adjust their values. Table 43 Adjustment boxes for item resizing and positioning...
- Page 239 Pearl Mini User Guide Resize and position items using percents or pixels Item Description axis. (I.e. the item takes up 60% of the layout's width – represented by a thin red bar above the percent box). If using pixels, this value is the item's width, in pixels, with a maximum pixel width (i.e. frame...
- Page 240 Pearl Mini User Guide Resize and position items using percents or pixels In the example above, the presenter video source is resized to 60% of the layout's width and 70% of the layout's height (with aspect ratio maintained). (Alternatively, pixels could be used to resize the layout item in a similar fashion.)
- Page 241 Pearl Mini User Guide Resize and position items using percents or pixels Setting the left and right (or top and bottom) percent values so the axis total among the three percent boxes exceeds 100% will always result in the center percent box value automatically reducing itself to maintain the 100% total, shrinking your selected layout item in the process.
- Page 242 Pearl Mini User Guide Resize and position items using percents or pixels For example, using percents to move a layout item with a 60% width as far to the right of the layout area as possible, you would need to enter 40% into the left percent box to push the item to the right.
-
Page 243: Open The Custom Layout Editor For A Channel
Pearl Mini User Guide Open the custom layout editor for a channel You can manipulate elements to get the custom look that you want using percents, pixels, your keyboard, or any combination. Here's an example of using pixels and percents to created a custom layout with two video sources and a background image. -
Page 244: Add Or Edit A Custom Layout
Pearl Mini User Guide Add or edit a custom layout 2. From the Channels menu, select a channel and click Layouts. The custom layout editor opens. 3. From the Layouts list, select the layout you want to edit. The layout editor updates to display the selected layout and the row for the selected layout is highlighted in green. - Page 245 Pearl Mini User Guide Add or edit a custom layout 1. Login to the Admin panel as admin, see Connect to the Admin panel. 2. From the Channels menu, select a channel and click Layouts. The custom layout editor page opens.
-
Page 246: Rename A Layout
Pearl Mini User Guide Rename a layout 5. Click Save when you're done or continue to add additional video sources to the layout, resize and crop each video source to exactly how you want them to appear. Rename a layout You can rename any layout, even the currently active layout. -
Page 247: Delete, Move, Or Duplicate A Layout
Pearl Mini User Guide Delete, move, or duplicate a layout 5. Enter a new name and press Enter. Delete, move, or duplicate a layout Layouts appear listed in the layouts list in the same order that they are presented on the touch screen. It's simple to re-order, remove, and duplicate layouts using the custom layout editor. - Page 248 Pearl Mini User Guide Delete, move, or duplicate a layout 4. Click OK. When using the switcher on Epiphan Live, refresh your browser if you still see a layout that was deleted. The deleted layout should disappear. Duplicate layouts If you're planning to use live switching, we strongly recommend you rename the channel rather than using the...
-
Page 249: Set The Background Color
Pearl Mini User Guide Set the background color If the channel is streaming, the stream is stopped and restarted. If the channel's recorder is recording, then recording is stopped and a new file is started. If you delete all the layouts in a channel until there is only one layout left and that layout has only one video source assigned, then the channel name changes back to the name of the video source. -
Page 250: Add An Image To A Layout
Pearl Mini supports png (PNG) and .jpg (JPEG) images. You can upload images that are 16×16 pixels to a maximum image size of 4096×4096; however it's strongly recommended that you upload exactly the size you need to avoid image scaling. - Page 251 Pearl Mini User Guide Add an image to a layout For best results, check Keep aspect ratio when scaling in the Source settings. 5. Your picture appears in the Picture settings preview and is added to the layout area. 6. In the layout area, use the mouse, the keyboard or the manual position value fields to position and resize your image.
-
Page 252: Upload Or Remove An Image Using The Media Page
Pearl Mini User Guide Upload or remove an image using the Media page 7. Re-order the items in your layout by clicking and dragging items in the item list. To layer video sources over top of each other, like for background images or a transparent logo, you can click and drag elements that appear in the item list beneath Add new item and change their order. - Page 253 Pearl Mini User Guide Upload or remove an image using the Media page For best results always upload images that are already the correct size needed in your layout. Background images should match the frame size of your channel (frame size is set in the Encoding configuration page).
-
Page 254: Add A Text Overlay
Pearl Mini User Guide Add a text overlay Add a text overlay Text overlays are useful to add information like a title, location, or the date and time in to layouts in your channel. You can add text to any layout using the custom layout editor. The following tables lists shortcut codes that you can enter and the resulting content that appears on screen. - Page 255 Pearl Mini User Guide Add a text overlay 2. From the Channels menu, select a channel and click Layouts. The custom layout editor opens. 3. Click Add new item and select Text. The new item is added to the layout editing area and to the top of the list of items.
- Page 256 Pearl Mini User Guide Add a text overlay The resulting text is displayed: 5. Select the Font, Font size, and Text color. You can also change the default Line spacing in percentages. For a mono-spaced font, use Droid Sans Mono.
-
Page 257: Custom System Variables For Text Overlays
You can crop a video source to change the size and shape of your video as it appears on screen using the custom layout editor. Cropping a source gives you a lot of advantages and can help to conserve the overall amount of processing CPU usage for your Pearl Mini. - Page 258 Pearl Mini User Guide Crop a video source To crop a source in your layout: 1. Login to the Admin panel as admin, see Connect to the Admin panel. 2. From the Channels menu, select a channel and click Layouts. The custom layout editor opens.
- Page 259 Pearl Mini User Guide Crop a video source 5. The Crop window has several tools for creating the best crop possible. Free form is the default crop mode. In this mode, you can change the size, aspect ratio, and position of the crop with minimal restrictions.
-
Page 260: Video And Audio Input Sources
The Admin panel automatically discovers all video and audio sources that you connect to the input ports on Pearl Mini and lists them in the Inputs menu of the Admin panel. RTSP sources need to be added manually to display in the Inputs menu (see Connect an RTSP source). - Page 261 The Admin panel automatically discovers all video and audio sources that you connect to the input ports on Pearl Mini and lists them in the Inputs menu of the Admin panel. RTSP sources need to be added manually to display in the Inputs menu (see Connect an RTSP source).
-
Page 262: Connect An Rtsp Source
Pearl Mini. Audio mixers and other line-level audio devices can be connected to the RCA and ¼" TRS audio input ports on Pearl Mini. Audio from sources connected to the HDMI and SDI ports is also supported. - Page 263 Pearl Mini User Guide Connect an RTSP source server on your Pearl Mini and use Pearl Mini as a time synchronization server for your RTSP source. See Configure a time server. The timestamps of an RTSP source and Pearl Mini tend to gradually go out of sync. If there's a 2500 –3000 ms difference between the timestamp of your RTSP source and...
-
Page 264: Preview A Video Source Using The Admin Panel
Preview a video source using the Admin Panel You can preview the images captured from your video sources in the Admin panel. You can also preview your sources using the Epiphan Live control interface, see Monitor video and audio input sources. -
Page 265: Rename An Input Port
Pearl Mini User Guide Rename an input port 2. Ensure a source is connected to the input port. 3. From the Inputs menu, click the source name. The configuration page for the source opens. A preview appears at the bottom of the page. -
Page 266: Configure A Video Input Source
Pearl Mini User Guide Configure a video input source 2. From the Inputs menu, click the source name. The configuration page for the source opens. 3. Click on the input port's name that appears at the top of the page. The text turns red. -
Page 267: Sdi Signals
Pearl Mini User Guide SDI signals Value Description Enable Enable this feature to convert an interlaced source signal to a non-interlaced deinterlacing signal. This menu allows you to choose a custom no-signal image for the channel. The Image drop-down list gives you the option to choose the default image or any image... -
Page 268: Usb Signals
Pearl Mini User Guide USB signals Value Description This menu allows you to choose a custom no-signal image for the channel. The Image drop-down list gives you the option to choose the default image or any image you have uploaded through the... - Page 269 Pearl Mini User Guide USB signals Value Description This feature is useful for simultaneously dictating the resolution and fps at which Capture mode the camera is captured. The drop down list of available resolutions and frame rates changes depending on the attributes of the connected device.
- Page 270 Pearl Mini User Guide USB signals Value Description is achieved. The contrast of the video can be adjusted by entering a numerical value from 0 to Contrast 100. Estimate values and view the result in the preview area until desired result is achieved.
-
Page 271: Rtsp Sources
(or expected resolution time) using the no signal image. Before you can specify a custom No Signal image for an input port on Pearl Mini, you must upload it, see Upload or remove an image using the Media page. - Page 272 Pearl Mini User Guide Add a custom No Signal image 6. Test that the No Signal image is correctly applied by disconnecting your source and previewing the channel(s) containing said source, see Preview channel.
-
Page 273: Part 3: Stream
Smart TVs, and Content Distribution Networks. Pearl Mini is flexible, easy to setup, and supports all the standard codecs, as well as the most common media players. Streaming options include: unicast, multicast, CDN, SAP, UPnP, streaming scheduled webcasting events to the Kaltura Content Management System, and more. -
Page 274: What Is Streaming
Pearl Mini can stream directly to your viewers on the same local network using HTTP/HTTPS Live Streaming, UPnP, HTTP (for FLV and MPEG-TS) and RTSP. At the same time, Pearl Mini can stream to a server, such as a multicast server or CDN. -
Page 275: Stream Settings For Video And Slides
If you're streaming a slide presentation, you can save bandwidth and system processing by lowering the bitrate and frame rate. The following table provides suggested settings to maximize your video quality while minimizing system resource usage when streaming video content from your Pearl Mini. Table 46 Suggested stream settings for video... -
Page 276: View Supported Streaming Formats
Pearl Mini User Guide View supported streaming formats Option Setting Limit frame rate Bitrate 1000 kbps for HD; 2000 kbps for Full HD Audio format AAC 44 KHz View supported streaming formats When you set up your channel, the system generates and displays a list of available video formats and standards specific to the selected audio and video codecs that you configured for your channel. -
Page 277: Streaming A Channel Directly To Viewers
Streaming a channel directly to viewers Streaming a channel directly to viewers You can stream any channel on Pearl Mini directly to your viewers on your local network, who can tune in and watch your program using their web browser or media player. -
Page 278: Stream Content Using Http, Https Or Rtsp
You can get that using the Admin panel. A separate URL exists for each channel you stream. The format of the URL depends on the method you used to access Pearl Mini, which can be done though network discovery using Pearl's serial number or IP address. Pearl Mini must be accessible on the viewer's LAN for them to access and view the stream using serial discovery. -
Page 279: Directly Share Stream Urls With Viewers
Directly share stream URLs with viewers Participants can view a channel's stream directly from Pearl Mini when you provide them the channel's stream URL and log in credentials. You can provide separate URLs for streams coming from each channel, or one URL that includes all the streams for the channel. -
Page 280: View The Live Broadcast Url Using A Web Browser
You can share a channel's live broadcast URL with viewers so they can watch your live stream using their favorite web browser. Your viewers must be on the same network as Pearl Mini to watch a live broadcast using the channel's live broadcast URL. - Page 281 Set or change user passwords. If HTTPS is enabled on Pearl Mini, replace http with https in the URL of the stream. To share the live broadcast URL with viewers: 1. Login to the Admin panel as admin or operator, see Connect to the Admin panel.
-
Page 282: View The Streaming Url Using A Media Player
You can share a channel's streaming URL with viewers so they can watch your live stream using their favorite media player, like VLC. Your viewers must be on the same network as Pearl Mini to watch a channel stream using a stream URL. - Page 283 Pearl Mini User Guide View the streaming URL using a media player The type of stream URL you provide to your viewers can affect their choice of media player needed to watch the stream. This procedure assumes that the VLC media player is used.
-
Page 284: Restrict Viewer Access To Channel Streams
4. Press Play to watch the stream in the media player window. Restrict viewer access to channel streams Pearl Mini can restrict access to all viewer streams from the channels on Pearl Mini using global viewer passwords and IP allow/deny lists. See... -
Page 285: Restrict Viewers By Ip Address
Restrict viewers by IP address Pearl Mini permits you to restrict which computers can access broadcasts by building a list of allowed and denied IP addresses. You can do this at a global level for the system and can also override these settings on a per-channel basis. - Page 286 Pearl Mini User Guide Restrict viewers by IP address Item Description system, provided their IP address is not in the Deny IP’s list. To allow all except IP addresses in the deny list, if any, leave the field blank. You can use the Allow list by itself, or in conjunction with the Deny IP’s list as an exception to a rule in the allow list.
-
Page 287: Ip Restriction Examples
Pearl Mini User Guide IP restriction examples 2. From the Channels menu, select a channel and click Streaming. The channel's streaming configuration page opens. 3. From the Stream access control drop-down, select Use these Settings to enable local password and Allow/Deny IP lists are enabled. - Page 288 Pearl Mini User Guide IP restriction examples Example Description Allow: 192.168.1.200-192.168.1.250 Note that we could have specified two of the IP addresses in the previous example as a range. Putting the first two examples together, we want to permit access to IP addresses in the range of boardroom computers (192.168.1.200-...
-
Page 289: Change Http And Rtsp Streaming Port Values
Pearl Mini User Guide Change HTTP and RTSP streaming port values Table 52 Example deny lists Example Description Another simple allow/deny list is to use the list of known IP addresses to list specific denied IP addresses. All other addresses are allowed access to the broadcast. - Page 290 Pearl Mini User Guide Change HTTP and RTSP streaming port values For RTSP streaming directly to users on your LAN, the only information that's needed to view the broadcast is the URL and the RTSP port number used to stream the broadcast.
-
Page 291: Disable And Enable Direct Channel Streaming
Pearl Mini User Guide Disable and enable direct channel streaming Disable and enable direct channel streaming When you create a channel, the channel's streaming URLs are enabled by default. The channel streaming URLs are listed on the Status page for the channel, which you can share with viewers. You can disable channel streaming using the channel's streaming URLs from the Streaming configuration page using the Admin panel. -
Page 292: Streaming To A Server
Streaming to a server Your Pearl Mini streams to a server when you want to use a CDN or Multicast. Streaming a channel to CDNs and multicast streaming is available only when the H.264 codec is configured as the channel encoding, see Configure video encoding. -
Page 293: Stream To A Cdn
CDN. You can also test how your content is streamed by sending your content to Epiphan’s CDN. For a list of Epiphan’s preferred CDN providers, see: https://www.epiphan.com/partners/cdn-partners/. Use one of the following links to configure your Pearl Mini for publishing to a CDN:... -
Page 294: Start And Stop Streaming To A Cdn
Start and stop streaming to a CDN After your CDN streaming is configured for RTMP or RTSP, you can start and stop streaming using the Admin panel, the touch screen, or Epiphan Live. To start and stop streaming using the Admin panel: 1. - Page 295 Start and stop streaming to a CDN You can tell if your channel is streaming from the touch screen on Pearl Mini when you look at the channel view or the Grid view. The following shows an example Grid view. The streaming LED on the front panel of Pearl Mini is solid on when streaming is in progress.
-
Page 296: Set Up A Stream Using Rtmp Or Rtmps Push
Mini can't find the CA certificate of your CDN in it's list of certificates. Pearl Mini has the CA certificates for many of the major CDNs already installed. For RTMPS streaming to work for your particular CDN, or if you're using a proprietary RTMPS server, ensure that your streaming server's CA... -
Page 297: Set Up A Stream Using Rtsp Announce
Start and stop streaming to a CDN for instructions to control streaming from the touch screen or see Control streaming and recording for instructions to use Epiphan Live. Set up a stream using RTSP announce 1. Login to the Admin panel as admin, see Connect to the Admin panel. -
Page 298: Stream To A Cdn Using An Xml Profile
Start and stop streaming to a CDN for instructions to control streaming from the touch screen or see Control streaming and recording for instructions to use Epiphan Live. Stream to a CDN using an XML profile Some CDNs provide an XML file for easy configuration. - Page 299 Pearl Mini User Guide Stream to a CDN using an XML profile To stream to a CDN using an XML profile: 1. Login to the Admin panel as admin, see Connect to the Admin panel. 2. From the Channels menu, select a channel and click Streaming. The Streaming configuration page opens.
-
Page 300: Stream Using Multicast
CDNs. Pearl Mini supports multicast streaming content to an IP TV or a set-top box playlist when the stream format is MPEG-TS. You may only stream to one multicast network at a time. - Page 301 Pearl Mini User Guide MPEG-TS streams using RTP/UDP push 4. Enter the destination multicast IP address where the broadcast can be viewed. A IPv4 multicast address range is an address between 224.0.0.0 to 239.255.255.255. Contact your System Administrator for the specific address to use.
-
Page 302: Mpeg-Ts Streams Using Udp Push
Pearl Mini User Guide MPEG-TS streams using UDP push in cases where folders are not displayed, use dot separator hierarchy to help your viewers filter out unwanted streams by category. 7. Click Apply. 8. Click the Info menu option of the Admin panel. An Info page opens displaying stream information. - Page 303 Pearl Mini User Guide MPEG-TS streams using UDP push 5. Enter the destination multicast IP address where the broadcast can be viewed. A IPv4 multicast address range is an address between 224.0.0.0 to 239.255.255.255. Contact your System Administrator for the specific address to use.
-
Page 304: Multicast Streaming Using Rtp/Udp
Pearl Mini User Guide Multicast streaming using RTP/UDP in cases where folders are not displayed, use dot separator hierarchy to help your viewers filter out unwanted streams by category. 8. Click Apply. To view the stream, open the URL in a media player, for example: udp://@ip:port For example: udp://@226.10.24.32:7000... -
Page 305: Viewing With Session Announcement Protocol (Sap)
Pearl Mini User Guide Viewing with Session Announcement Protocol (SAP) Audio and video use nearby port numbers (<port number>and <port number+2>). The minimum distance between audio and video ports must be 2. 6. Click Apply. An SDP file is generated. -
Page 306: Stream To Kaltura Cms
When you schedule a webcasting event in Kaltura, the stream url and other event settings are sent to Pearl Mini. When the event is scheduled to start, the ingestion settings are applied automatically to Pearl Mini. Only the primary URL from Kaltura is used by default, but you can enable the secondary backup stream URL. - Page 307 The streamed content for a channel won't upload to Kaltura if AFU is disabled for that channel. If a new channel is created when CMS is enabled on Pearl Mini, AFU is disabled by default for that channel. You must manually enable AFU for the new channel before it can be used for a webcasting event.
-
Page 308: Use Rtmps For A Kaltura Webcasting Event
Use RTMPS for a Kaltura webcasting event Pearl Mini sends an RTMP stream to the primary URL associated with the webcasting event, or to both the primary URL and the secondary backup URL if you've enabled the backup stream, see... - Page 309 Pearl Mini User Guide Use RTMPS for a Kaltura webcasting event...
-
Page 310: Stream To A Media Player Or Smart Tv
Stream to a media player or smart TV Stream to a media player or smart TV Your Pearl Mini can use UPnP and SAP to stream to set top boxes, digital signs, smart TVs and other digital media players. The following table gives an overview of each option. -
Page 311: Enable Upnp
Enable UPnP For security reasons, UPnP is disabled for Pearl Mini at the device level and for each channel by default. You can enable UPnP to allow digital media players on the network to browse for recorded media files or live streams on your Pearl Mini. - Page 312 Pearl Mini User Guide Enable UPnP If no live stream is available that meets the criteria for UPnP, a message is displayed in the Play on service start section of the page. Otherwise, the Play on service start section shows a drop-down list of what can be streamed.
- Page 313 Pearl Mini User Guide Enable UPnP If you have not already enabled UPnP for the device, the message "UPnP live video sharing is not enabled with this device, to fix it, click here" appears. Click to fix it click here. The UPnP service will start when you click Apply.
-
Page 314: Disable Upnp
Pearl Mini User Guide Disable UPnP c. Check Share via UPnP and click Apply. If you have not already enabled UPnP for the device, the message "UPnP live video sharing is not enabled with this device, to fix it, click here" appears. Click to fix it click here. The UPnP service will start when you click Apply. -
Page 315: Viewing With Upnp
Some players cannot access the stream or saved recordings if a viewer password is set. If needed, see Remove user passwords to clear the viewer password. When browsing via UPnP your Pearl Mini is displayed by the server name you set, or it's product serial number. - Page 316 UPnP can also be used to directly play a recording to the digital media player, or to set a media player to automatically play a particular live stream after reboot of Pearl Mini. See Stream using UPnP...
-
Page 317: Play Directly To A Media Player
Play directly to a media player Play directly to a media player If your digital media player is UPnP enabled, Pearl Mini can play direct the media player to play recorded files, without browsing through menus in the player. Recorded files must be in MPEG-TS format and use the supported codecs: H.264 with MP3 or AAC audio. -
Page 318: Change Upnp Device Name
Change UPnP device name Change UPnP device name You can configure the UPnP server name that appears for your Pearl Mini. By default, if you left the server name field blank when enabling UPnP, the server name is the system's serial number. -
Page 319: Part 4: Record
PART 4: Record Pearl Mini encodes the video and audio it captures. You can stream your content and record it at the same time. You can even stream your switched program using a lower quality stream (i.e. 1280×720 at 2Mbps) and at the same time make a high quality recording of the second channel (i.e. -
Page 320: About Recording
About recording About recording You can record each of the channels on Pearl Mini as AVI, MOV, MPEG-TS, MP4, or MP4-Fragmented. You can also setup multi-track recorders, see Recorders. Recording using Pearl Mini is robust. If an accidental system shutdown occurs while recording is in progress, your recordings are gracefully closed off so they are still playable. - Page 321 Google Chrome 37+ (works with MOV and MP4 files using H.264 codec) (Windows) Not all media players and editors support all recording formats, such as the more modern MP4- fragmented format. To playback MOV files created by Pearl Mini, we recommend using a newer media player.
-
Page 322: Record A Channel
Each channel has a configuration page in the Admin panel where you can start and stop recording, as well as configure recording settings for the channel. You can also start and stop recording from the channel view using the touch screen on Pearl Mini (see Record... -
Page 323: Record Using One Touch Control
Record using One Touch control Pearl Mini's One Touch recording and streaming control allows you to control your recording and streaming across any number of channels and recorders with a single tap on the touch screen. Channels and recorders are enabled for One Touch recording by default. -
Page 324: Configure Recording Settings, File Size And Type
Pearl Mini User Guide Configure recording settings, file size and type If the One Touch control icon is not visible on the touch screen, tap the screen once to activate the control icons. If the control icons are still not visible, they are disabled. See Configure the touch screen. - Page 325 (assuming the time limit has not yet been reached). Values depend on the size of SD card installed in Pearl Mini. The limit maximum is 64 GB. Specifies the recording file type. Select from AVI, MP4, MP4-Fragmented, MPEG-TS, or MOV.
- Page 326 Pearl Mini User Guide Configure recording settings, file size and type Label Description / Options most video players and editors. Progressive MP4 files are initially recorded as MP4-Fragmented and are converted when the recording ends. If power is lost while recording is in progress or during conversion, the files remain in fragmented MP4 format.
-
Page 327: Restart Recording
Pearl Mini User Guide Restart recording 2. Do one of the following: a. For a channel, click Recording from the Channels menu. The Recording page opens. b. For a recorder, select a recorder from the Recorders menu. The Recorder configuration page opens. - Page 328 Pearl Mini User Guide Restart recording 3. Click Reset to stop the current recording and start a new recording. 4. Refresh the page to see the updated list of recordings.
-
Page 329: Recorders
Recorders Recorders Using recorders with Pearl Mini, you can record multiple channels together in a single multi-track file. Recording multiple channels at the same time ensures that all your recordings start and stop at the same time. After recording stops, you can automatically use one of the system's file synchronization methods to copy the recordings off the server, or you can use our built-in tool to split the file into individual tracks for post- processing. -
Page 330: Select Channels To Record
Select channels to record When you create a new recorder, it records all the channels configured on Pearl Mini in the single multi-track file by default. If you create new channels, they are automatically added to the recorder. You can choose which channels the recorder includes in the multi-track file using the Admin panel. -
Page 331: Start And Stop A Recorder
You can start and stop recorders from the recorder's configuration page using the Admin panel. You can also start and stop recorders using the One Touch control feature (see Record using One Touch control) and using Epiphan Live (see Record a channel using the touch screen). -
Page 332: Rename A Recorder
Pearl Mini User Guide Rename a recorder You can have multiple recorders and multiple channels recording all at the same time. The number of channels being recorded is shown below the Start and Stop buttons on the recorder's configuration page. To select... -
Page 333: Duplicate A Recorder
Pearl Mini User Guide Duplicate a recorder 4. Press Enter to save the new name. You must press Enter to save the recorder name change. Duplicate a recorder You can duplicate any recorder you've created. All settings in the recorder you duplicate are recreated. -
Page 334: Delete A Recorder
Pearl Mini User Guide Delete a recorder Delete a recorder When you no longer need a recorder, you can delete it. Deleting a recorder deletes all the recorded files for the recorder. Be sure you have a copy of any important recorded files before proceeding. -
Page 335: Record To Kaltura Cms
(ad hoc) events. Once you've registered Pearl Mini with Kaltura, you can simply assign Pearl Mini as a resource when you set up the event in Kaltura using MediaSpace. When Kaltura CMS is enabled on Pearl Mini, a new icon appears on the touch screen. Tap this icon to see the scheduled events screen. - Page 336 If a new channel is created when CMS is enabled on Pearl Mini, AFU is disabled by default for that channel. You must manually enable AFU for the new channel before it can be used for an ad hoc event.
- Page 337 Kaltura media list with each source (i.e. view) listed as a separate "child" sub-entry. You can choose which source to use as the main entry using the Admin panel on Pearl Mini.
-
Page 338: Select Channels For Vod Event Views
Using the Admin panel, you can enter the metadata that you want to link to the ad hoc recordings before starting the ad hoc event, including: description, tags, category, and owner. When you're ready to record, you can start recording the channel from the recording tab in the Admin UI, from Epiphan Live, or using One Touch control. -
Page 339: Manually Start/Stop Scheduled Vod Events
Admin panel As soon as the Events screen displays on the touch screen of Pearl Mini (about five minutes before the event starts), you can tap Start event to immediately start recording the event. The button changes to Stop event... - Page 340 Or you can tap the Scheduled events icon at any time to display the Events screen. The icon only appears when Kaltura CMS is enabled on Pearl Mini. To manually start a scheduled event that hasn't started yet using the Admin panel, click Start beside the...
-
Page 341: Manually Start/Stop An Ad Hoc Event
Manually start/stop an ad hoc event To record ad hoc events manually, you just need to start recording on Pearl Mini when CMS is enabled and Pearl Mini is registered with Kaltura. Whatever channels you start recording will automatically upload to... - Page 342 If a new channel is created when CMS is enabled on Pearl Mini, AFU is disabled by default for that channel. You must manually enable AFU for the new channel before it can be used for an ad hoc event.
- Page 343 3. Under Metadata, enter the information you want associated with this ad hoc event and click Apply. What's Next When you're ready to record, you can start recording the channel from the recording tab in the Admin UI, from Epiphan Live, or using One Touch control, see: Record a channel ...
-
Page 344: Manage Recorded Files
Rename recorded files Delete recorded files For information about automatic file transfers or setting up Pearl Mini as a local FTP server so you can manually or automatically connect to the system and download recordings, see FTP and automatic file transfers. -
Page 345: Download Recorded Files Manually
Download recorded files manually You can manually download recordings using the Admin panel. Files you download are saved to your connected admin computer. To free up space for new recordings, consider deleting recordings off of Pearl Mini, see Delete recorded files. -
Page 346: Join Recorded Files Together
Join recorded files together After recording files on Pearl Mini, you can join two or more files together. This is useful when a recording exceeds the maximum recording time limit and the recording is split in to multiple files. You can use the third- party tool called ffmpeg to join the files. -
Page 347: Extract Tracks From A Recording
Pearl Mini User Guide Extract tracks from a recording 3. Repeat the process and specify the file you want to join to the first file. You can keep adding as many files as you want to join together. For example, specifying a second file looks like this: ffmpeg -i C:\Users\JoesComputer\downloads\Program_A_May11_16-24-56.avi -i... - Page 348 Pearl Mini User Guide Extract tracks from a recording 4. Select the tracks you want to extract. Tip: To deselect all tracks, click the check box for the top track, then hold SHIFT and click the check box for the bottom track.
-
Page 349: Rename Recorded Files
Recording files are named based on the file name prefix specified during configuration. You can change the recording file name using the Admin panel. You can also change the default name that Pearl Mini assigns recordings, see Configure recording settings, file size and type for information about setting file name prefixes. - Page 350 Pearl Mini User Guide Delete recorded files 3. Do one of the following: a. To delete a single recording, click the X icon to the right of a recording and click OK when prompted. b. To delete multiple recordings, check the check box beside the recordings you want to delete and click OK when prompted.
-
Page 351: Ftp And Automatic File Transfers
USB drive. We call this Automatic File Upload or AFU for short. You can also configure Pearl Mini to act as an FTP server, allowing you to manually or automatically connect to Pearl Mini and download recordings. -
Page 352: Choose Files To Include In Afu
Only one type of AFU can be used for all file transfers from the same channel or recorder. When Content Management System (CMS) is enabled on Pearl Mini, you cannot change the AFU settings for channels that are configured as part of a scheduled VOD event. As well, AFU is disabled for all new channels that are created while CMS is enabled on Pearl Mini. - Page 353 Pearl Mini User Guide Choose files to include in AFU To add a channel or recorder to your AFU schedule: 1. Login to the Admin panel as admin, see Connect to the Admin panel. 2. Do one of the following: a.
-
Page 354: Enable Afu And Set Parameters
Pearl Mini User Guide Enable AFU and set parameters 4. Check Automatic file upload and click Apply. What's Next After you've enabled AFU for your channels and recorders, enable AFU and configure the AFU settings for the location type (i.e. FTP, USB, AWS, etc). - Page 355 Pearl Mini User Guide Enable AFU and set parameters Table 55 AFU Interval Options Name Description The system uploads each file after it stops recording it. You can control file size and length to determine when files are done recording. You can also use the On file rotation reset button to close the current file and open a new one.
- Page 356 If AFU to your server fails, check the server configuration and permissions. 6. (Optional) Set optional parameters: Check Remove after upload to have the files deleted from local storage on Pearl Mini when the upload completes.
-
Page 357: Configure Afu To Ftp Server Parameters
Pearl Mini User Guide Configure AFU to FTP server parameters Check Mark file as downloaded to have the color of the file link in the recording list change to show the files are downloaded. This only applies if the files are not deleted after upload is complete. -
Page 358: Configure Afu To Rsync Server Parameters
Pearl Mini User Guide Configure AFU to RSync server parameters Prerequisites Channels and recorders are already added for AFU, see Choose files to include in AFU AFU is enabled and the parameters configured, see Enable AFU and set parameters. - Page 359 Pearl Mini User Guide Configure AFU to RSync server parameters Table 57 RSync Automatic File Upload Configuration Parameters Name Description Server The IP address (or fully qualified domain name) of the RSync server. address Server module The name of the shared folder on the RSync server.
-
Page 360: Configure Afu To Cifs Server Parameters
Pearl Mini User Guide Configure AFU to CIFS server parameters 4. Specify a username for the RSync Server in the Login field. The user must have write permissions for the module. 5. Specify the password for the user in the Password field; the value is masked by dots. -
Page 361: Configure Afu To Scp Client Parameters
Pearl Mini User Guide Configure AFU to SCP client parameters 2. Specify the target Server address. If your system is configured with DHCP or has a valid DNS configuration (see Configure DHCP), you can use the server’s fully qualified domain name instead of the IP address. - Page 362 Pearl Mini User Guide Configure AFU to SCP client parameters Table 59 SCP Automatic Upload Configuration Parameters Name Description Server address The IP address (or fully qualified domain name) of the destination server. Server port The SCP port used by the target server. Standard port is 22.
-
Page 363: Configure Afu To Sftp Server Parameters
Pearl Mini User Guide Configure AFU to SFTP server parameters For secure copy you can upload an SSH identity for your Pearl Mini. This key must be trusted by the destination server. Details for generating the key and setting up this trust are beyond the scope of this document. - Page 364 Pearl Mini User Guide Configure AFU to SFTP server parameters Table 60 SFTP Automatic Upload Configuration Parameters Name Description Server The IP address or fully qualified domain name of the SFTP server. address Server port The port used by the target SFTP server. Standard port is 22.
- Page 365 6. Select Use temp file to name files with a temporary filename extension (.part) on the server until upload is complete. For secure file transfer, you can upload an SSH identity for your Pearl Mini. This key must be trusted by the destination server. Details for generating the key and setting up this trust are beyond the scope of this document.
-
Page 366: Configure Afu To Aws S3 Parameters
Pearl Mini User Guide Configure AFU to AWS S3 parameters Configure AFU to AWS S3 parameters You can automatically upload recordings to an Amazon Web Server (AWS) when you select AWS S3 as the AFU protocol transfer type using the Admin panel. -
Page 367: Configure Afu To Webdav Server Parameters
Pearl Mini User Guide Configure AFU to WebDav server parameters 2. Specify the AWS Region Code and the data storage Bucket where you want to upload the file. 3. Enter your AWS Access Key Id and Secret Access Key to authenticate access to the AWS S3 data storage bucket. - Page 368 Pearl Mini User Guide Configure AFU to WebDav server parameters Name Description / Options Causes files to be named with .part extension on the server during active upload. When Use temp file the upload completes, the file is renamed to the appropriate extension (.mov, .mp4 or .avi).
-
Page 369: Afu Or Copy To Usb
AFU or copy to USB Pearl Mini has USB 3.0 ports that you can use to copy recordings from the SD card to external USB flash drives or hard drives. Use this to conveniently provide speakers with a copy of their presentation before they leave the presentation venue. -
Page 370: Do A One-Time Copy/Move All Recordings To Usb Storage Device
3. Click Apply. Do a one-time copy/move all recordings to USB storage device When one-time move/copy of files is configured, Pearl Mini automatically starts copying files as soon as you connect a USB storage device to one of the USB ports. - Page 371 Prerequisites A properly formatted USB device not connected to a USB port on Pearl Mini. To configure a one-time copy of all recorded files to a USB storage device: 1. Login to the Admin panel as admin, see Connect to the Admin panel.
-
Page 372: Manually Copy Recordings To Usb Storage Device
Manually copy recordings to USB storage device You can manually copy recorder files to a USB drive connected to Pearl Mini. This procedure is separate from automatic file upload and does not need any pre-configuration in the automatic file upload page. - Page 373 Automatic File Upload configuration page and disable automatic file upload or switch to a non-USB based upload type. 4. Insert your USB storage device into an available USB port on Pearl Mini and do one of the following: a. To download files for a specific channel, click Recording from the Channels menu.
-
Page 374: View Available Usb Storage Space
Pearl Mini User Guide View available USB storage space View available USB storage space When you insert a USB storage device into an available USB port and select an External USB Drive action other than ignored (i.e. manual copy, automatic copy, etc), the total and free space are calculated and displayed in the Admin panel. -
Page 375: View The Afu Log
Pearl Mini User Guide View the AFU log It's now safe to disconnect the USB storage device from Pearl Mini. View the AFU log A log is kept of automatic file uploads. You can view the AFU log using the Admin panel, If you want to view... -
Page 376: Manage The Afu Queue
Pearl Mini User Guide Manage the AFU queue Manage the AFU queue The AFU queue displays a list of recording files waiting to be uploaded. Individual file details can be viewed using the Admin panel. View the AFU queue You can view the list of files that are queued for automatic upload using the Admin panel. - Page 377 Pearl Mini User Guide Manage the AFU queue The upload queue can display only 15 files at one time. Additional content is still stored and is viewed in increments of five files when you select Newer 5. Delete content in the AFU queue Files can be deleted from the upload queue, either individually or as a group.
-
Page 378: Local Ftp Server
Local FTP server Local FTP server Pearl Mini can act as an FTP server, allowing you to manually or automatically connect to the system and download recordings. Depending on configuration of the FTP server, you may also be able to remotely delete files after download, maximizing available system storage. - Page 379 Pearl Mini User Guide Local FTP server 3. To enable or disable the FTP server, do one of the following: a. Check Enable FTP access and select a user from the FTP user name drop down. Then click Apply to enable the FTP server.
- Page 380 The username and password for your FTP user, see Configure the local FTP server In the following example, the IP address of Pearl Mini is 192.168.1.210, the username is admin, there is no password, and the Windows command line ftp utility is used.
- Page 381 Pearl Mini User Guide Local FTP server 8. If enabled in the FTP configuration page, delete the file after downloading it by issuing the delete command, or using your tool’s delete mechanism. If the delete command is not enabled, attempting to delete a file will result in an Unknown...
-
Page 382: Part 5: Maintenance
PART 5: Maintenance Keep your Pearl Mini running smoothly and operating with the latest firmware. Learn the maintenance features of Epiphan Live and different ways you can configure and operate Pearl Mini using third party tools over HTTP/HTTPS or RS-232. -
Page 383: Power Down And System Restart
Power off the device using the Admin panel You can use the Admin panel to power off Pearl Mini. The power button on Pearl Mini is a toggle switch. If you power off the device using the Admin panel, the power switch remains in the on state. To power back on, you must double press the power button. - Page 384 Pearl Mini User Guide Power down and system restart To power off Pearl Mini manually, press the power button on the rear panel once.
-
Page 385: Backup Your Pearl Mini Setup
Backup your Pearl Mini setup Backup your Pearl Mini setup Configuration presets are the perfect way to backup your Pearl Mini setup so that you can reapply it later without worrying if someone changes your settings or does a factory reset. -
Page 386: Perform A Factory Reset
Perform a factory reset Perform a factory reset Use the Admin panel to perform a factory reset and restore the configuration of your Pearl Mini to the manufacturer's original default settings. Performing a factory reset erases all your input port settings (video and audio), channels, configuration presets, network settings, all locally saved media files and recordings from Pearl Mini. -
Page 387: Firmware Upgrade
Update the firmware BIOS update The BIOS update section appears on the Firmware Update page only when your Pearl Mini system requires a BIOS update. Check for firmware updates Your Pearl Mini automatically checks for firmware updates if the Enable connection to maintenance server option is checked on the Maintenance page of the Admin panel. -
Page 388: Update The Firmware
If your Pearl Mini has internet access, the easiest way to install a firmware update is to use the download link that's provided when you check for new firmware. If you have a Pearl Mini firmware file that was provided to you by Epiphan Video, you can install the new firmware from that file. - Page 389 BIOS update If Pearl Mini requires a BIOS update, a BIOS Upgrade section appears on the Firmware update page in the Admin panel. We recommend performing the BIOS update whenever they become available to ensure optimum performance of your device.
- Page 390 Firmware upgrade Do not interrupt power to the system during the BIOS update. 5. When the BIOS update is complete, a message lets you know that Pearl Mini is going to reboot. Wait for the system to restart. 6. After the system reinitializes, go to the settings for your web browser and clear your web browser's cache 7.
- Page 391 Pearl Mini User Guide Firmware upgrade You can also confirm that the latest BIOS is installed on Pearl Mini when the section called BIOS Upgrade no longer appears on the Firmware Upgrade page in the Admin panel.
-
Page 392: Support
(Monday to Friday between 9am and 5pm Eastern) Call: 1-877-599-6581 / 613-599-6581 From time to time, Epiphan support may ask you for logs from your system. Follow the instructions in this section to download the log files for support, see Download logs and "allinfo". - Page 393 Remote support uses ports 22 and 30. Ensure that these ports are opened to allow remote communication. If your Pearl Mini is on a network that is protected from the Internet by a firewall, consult with your network administrator to configure your network to allow remote Internet access through the firewall for those ports...
- Page 394 a. From the Configuration menu, click Network. b. In Network Diagnostics, enter epiphany.epiphan.com and click ping. c. The result of the ping should show an IP address for epiphany.epiphan.com. Report any packet losses to Epiphan support. 7. If Pearl Mini can't reach the maintenance server, check the network settings (see...
- Page 395 9. Confirm with Epiphan support that they are able to access your Pearl Mini for remote troubleshooting. Disable remote support Remote support is enabled by default. You can turn remote support off for your Pearl Mini using the Admin panel.
-
Page 396: Storage Space Maintenance
You can see how much space you have for media files using the Admin panel. Recordings that you make are saved to the SD card installed in Pearl Mini. You can check how much space you have left on the SD card using the Admin panel and from the touch screen. - Page 397 Check media storage capacity Pearl Mini has 2 GB of internal storage that's allocated for uploaded media, like image files that you add to your channel layouts. You can see how much space you have for media files using the Admin panel.
- Page 398 Pearl Mini User Guide Storage space maintenance Read data from the SD card Pearl Mini has support for removable SD cards, which are formatted to use the ext4 file system and can only be read with a computer running Linux.
-
Page 399: Third Party Integration
Third party integration Third party integration Pearl Mini has a comprehensive set of APIs to allow integration with third party tools. You can use either the HTTP/HTTPS or RS-232 commands to configure your system exactly how you need it. You can start and stop recordings, configure meta data on a channel, or even change a channel's frame size and encoding settings using the API. -
Page 400: Controlling Pearl Mini Using Rs-232 / Serial Port
Pearl Mini User Guide Controlling Pearl Mini using RS-232 / serial port Controlling Pearl Mini using RS-232 / serial port Pearl Mini has an RS-232 / serial port control interface (via USB) for integration with existing control room and board room equipment. Important considerations ... - Page 401 SAVECFG Connect and configure the RS-232 port To connect your control equipment to Pearl Mini, you need a standard RS-232 null-modem cable and a USB to RS-232 serial adapter cable. Adapter cables are not included with Pearl Mini. Only certain adapter chipsets are supported, Epiphan recommends this adapter cable from Startech.
- Page 402 Control Pearl Mini with RS-232 You can use the null-modem cable and your control terminal software to issue commands to Pearl Mini, such as when to start or stop recording, and to retrieve or set the value of certain parameters.
- Page 403 Pearl Mini User Guide Controlling Pearl Mini using RS-232 / serial port The following table describes the supported RS-232 commands. Table 67 Supported RS-232 Commands Command Name Description Recording Commands Starts recording for the provided channel or recorder. This can alternatively be accomplished with the following set commands: START.<channel>...
- Page 404 Reports the elapsed recording time in seconds for the current file on the specified channel or recorder. RECTIME.<recorder> RECTIME Reports the elapsed recording time in seconds for the current file on each channel. Pearl Mini returns a status change message whenever changes are made. Table 68 RS-232 Status Changed Messages Command Name Description Provides the status of the recording service for the channel as either: STATUS.<channel>...
- Page 405 Pearl Mini User Guide Controlling Pearl Mini using RS-232 / serial port Command Name Description Uninitialized The Uninitialized status is sent when there is an internal error. Check the system for more details.
-
Page 406: Controlling Pearl Mini Using Http/Https Commands
Controlling Pearl Mini using HTTP/HTTPS commands Pearl Mini has an HTTP API interface. You can swap the HTTP for HTTPS in the URL without affecting the API commands. The HTTP/HTTPS API is used for configuration and control by third party applications or scripts that send commands as a series of URLs. - Page 407 For recorders, add 'm' before the recorder number (i.e. channelm1 for recorder 1), for example: http://<address>/admin/channelm<N>/set_params.cgi?key Where <address> is the IP address of the Pearl Mini, channel<N> is the channel number (i.e. channel2 for channel number two), and channelm<N> is for recorders (i.e. channelm2 for recorder two), key is the configuration key for the item being checked or changed (see Configuration keys for third party APIs...
- Page 408 You can substitute https for http in the urls. Third party applications like wget If you’re using a third party application like wget to send commands to Pearl Mini, always include the admin username and password when viewing or setting configuration items.
- Page 409 Pearl Mini User Guide HTTP/HTTPS commands Specify your Pearl Mini’s IP address, password and the key(s) or value(s) you want to query using the following syntax. Note that your system may require use of single quotes around the password to handle special characters such as exclamation marks.
- Page 410 Set variables – syntax and example A set command saves a value to a variable, where <address> is the IP address of Pearl Mini, name is the unique name for each variable, and value is the text/character content stored in each variable.
- Page 411 Controlling Pearl Mini using Pearl Mini User Guide HTTP/HTTPS commands To "get" a list of all variables saved to Pearl Mini: http://<address>/admin/get_variables.cgi Example: "http://192.168.0.129/admin/get_variables.cgi" returns: "gpsvar1=N103 68201 W765 29712 gpsvar2=S490 18731 E756 19890 gpsvar3=N123 46891 W345 65431 gpsvar4=S767 33410 E770 04513"...
-
Page 412: Configuration Keys For Third Party Apis
Pearl Mini User Guide Configuration keys for third party APIs Configuration keys for third party APIs Using HTTP/HTTPS or RS-232, you can send query and configuration commands to Pearl Mini. For the RS-232 and HTTP/HTTPS syntax, see Controlling Pearl Mini using RS-232 / serial port Controlling Pearl Mini using HTTP/HTTPS commands. - Page 413 RTMP push configuration keys (Publish type 6 and 7) Content metadata configuration keys You can also see the list of supported keys from Pearl Mini when you browse to the following URL, where <address> is the IP address of Pearl Mini: http://<address>/admin/http_api.cgi System-level settings keys (read-only) The following read-only system-level setting keys are supported.
- Page 414 To enable firmware update checking, set to on. enabled empty string ("") To disable firmware update checking, set to an empty string (""). To give this system a name in the Epiphan discovery utility, description string specify a description string.
- Page 415 Pearl Mini User Guide Configuration keys for third party APIs Values Description screen. To enable system info from the touch screen, set to on. empty string ("") To disable system info from the touch screen, set to an empty string (""). Enables or disables channel preview on the touch screen.
- Page 416 To disable SSL, set to an empty string (""). IP-based access control configuration keys The following settings are supported for configuring allowed and denied IP addresses for Pearl Mini only, not for individual channels. See Restrict viewers by IP address for more information about Allow and Deny lists.
- Page 417 Pearl Mini User Guide Configuration keys for third party APIs Values Description separated list of IP addresses and/or To restrict access, provide a list of denied IP addresses. ranges. To clear denied IP restriction, set to an empty string (""). empty string("") UPnP configuration keys The following settings are supported for UPnP streaming.
- Page 418 Specifies the frame (width by height) size in pixels. for example: framesize Set to desired size. Choose from the list in the UI or set a 640x480, 720x400, custom value of your choosing up to the maximum output 1024x768, resoultion supported by Pearl Mini 1920x1080...
- Page 419 Pearl Mini User Guide Configuration keys for third party APIs Values Description Enables or disables H.264 slicing for RTP. To enable slicing, set slicemode empty string ("") to on. To disable slicing, set to empty string (""). Integer vbitrate Gets or changes the video bit rate in kbps.
- Page 420 Pearl Mini User Guide Configuration keys for third party APIs Table 79 Supported channel layout configuration keys Values Description Specifies which layout is currently active for the specified active_layout integer channel. Audio configuration keys The following audio configuration keys are supported. For more information on individual items listed, see Configure channel encoding.
- Page 421 Pearl Mini User Guide Configuration keys for third party APIs Stream publishing configuration keys The system supports the following stream publishing settings. For more information on publishing the stream, see What is streaming?. Table 81 Supported Stream Publishing configuration keys Values Description Starts or stops streaming to CDN servers (RTSP, RTMP type streaming).
- Page 422 Pearl Mini User Guide Configuration keys for third party APIs RTP/UDP configuration keys (Publish type 3) The following settings are supported when the publish type is set to RTP/UDP. For more information on RTP/UDP and these settings, see What is streaming?. Table 83...
- Page 423 Pearl Mini User Guide Configuration keys for third party APIs RTMP push configuration keys (Publish type 6 and 7) The following settings are supported when the publish type is set to RTMP Push. For more information on RTMP and these settings, see Set up a stream using RTMP or RTMPS push What is streaming?.
-
Page 424: Troubleshooting
Pearl Mini User Guide Troubleshooting Troubleshooting In addition to fine tuning channel settings such as frame rate, resolution and bit rate to ensure optimal use of resources while streaming a quality video, there may be circumstance when you must fine tune the video input source. - Page 425 Monitor video and audio input sources. source. Check the touchscreen interface for audio monitoring or use the 3.5 mm audio jack on the front of Pearl Mini to verify audio, About the touch screen. Captured SDI audio contains audible Ensure audio sample rate is set to 48 kHz. Lower sample rates "clicking"...
- Page 426 Problem Action(s) to Resolve timestamps. Verify that you are using a local NTP server on RTSP source are not synchronized. your Pearl Mini as a time synchronization server for your RTSP source, see Configure a time server. Check the input level of the audio source to make sure it's the...
- Page 427 If you still cannot see the stream, try disabling your local computer firewall. If the issue is still not resolved, contact Epiphan Support at support@epiphan.com. The following tips can help diagnose image problems: 1. Ensure the source resolution is used as the output or recorded resolution.
- Page 428 They may be conflicting with the internal hard drive, causing unexpected behavior. If you deregister Pearl Mini from Kaltura and then too quickly register again using the same name, you may receive the I can't register my Pearl Mini with Kaltura following error message "Unable to register device: System...
- Page 429 Pearl Mini User Guide Problem Action(s) to Resolve models. If it is not, try using a supported camera, and if the problem persists, contact our support team. Remove black bars (matte) from the video Channels with only one layout and only one source by default use the aspect ratio of input signals when the output is streamed.
- Page 430 Pearl Mini User Guide For example: Input signal resolution is 720×480 (a 3:2 aspect ratio) encoded resolution is 1280×800 (a 16:10 aspect ratio that is wider than the input resolution) Borders are added to the left and right of the image to preserve the narrower ratio of the input.
- Page 431 Pearl Mini User Guide a. If the source resolution appears in the list, you can choose any resolution that's listed on the same line (i.e. with the same aspect ratio). b. If the source resolution doesn't appear in the list, calculate the source resolution and enter it in the Frame size fields.
- Page 432 Mini. However, there may be times when a connected video source uses resolutions that you do not want to use. In that case, you can manually upload an EDID and force Pearl Mini to use a specific set of attributes for a specific HDMI input port.
- Page 433 Pearl Mini User Guide 6. Browse to the location where the custom EDID file was saved and select it, then click open. 7. Click upload. When the upload is complete, the page updates to reflect success or failure. Restore factory default EDID When you no longer want a custom EDID assigned to an input port, you can restore the input port to use the factory default EDID. Currently there is no way to tell if your input port is using a custom EDID.
- Page 434 Unstretch the output video Pearl Mini preserves the aspect ratio of your input video signal by default when you add the source to a layout using the custom layout editor. If you've changed the default setting, the image is stretched to match the output frame size.
- Page 435 Pearl Mini User Guide To convert an interlaced source signal to a non-interlaced signal. 1. Login to the Admin panel as admin, see Connect to the Admin panel. 3. From the Inputs menu, click the source name. The configuration page for the source opens.
-
Page 436: Limitations And Known Issues
Configuring very low frame rates such as 1 fps encoding with a high bitrate setting (e.g. 7000 kbps) results in poor video quality. Workaround: Allow Pearl Mini to automatically select the best bitrate setting. For 1 fps, this results in a bitrate of about 1180 kbps. - Page 437 Using Microsoft Edge to connect to Pearl Mini using the mDNS name of Pearl Mini does not work. Workaround: Use a different web browser such as Chrome, Firefox, or Internet Explorer since Microsoft Edge doesn't support mDNS.
- Page 438 When a HDMI output assigned to a Dashboard preview panel has its source changed, the preview panel does not automatically update to reflect the change. Workaround: Refresh the Epiphan Live Dashboard in your web browser to update any changes in your preview panels.
-
Page 439: Software License
"Software" means the Licensor binary and/or bytecode software and/or firmware programs that are (i) specified in Your Order or that are included with or in the Epiphan Hardware Products specified in Your Order, (ii) are made available to You for download after acceptance of this Agreement, (iii) are packaged with this Agreement, (iv) pre- installed on Epiphan Hardware Products, (v) embed this Agreement in their installer(s) and which are installed after acceptance of this Agreement, or (vi) embed this Agreement in their product documentation. - Page 440 Software functions is controlled by a Licensing Key and that You will not be able to use such functions unless You have paid the applicable fees charged by Epiphan for the right to use such functions and to receive a Licensing Key to enable such functions.
- Page 441 Third-Party Services. If You access or use any Third-Party Service and/or related APIs using an Epiphan Hardware Product and/or the Software then You shall comply with all of the terms and conditions for such Third-Party Service and/or related APIs.
- Page 442 ECONOMIC LOSS, ARISING FROM OR RELATING TO ANY INFORMATION AND/OR DATA THAT MAY BE PROCESSED BY OR MADE AVAILABLE USING ANY EPIPHAN HARDWARE PRODUCT AND/OR SOFTWARE OR ARISING FROM OR RELATING TO ANY THIRD-PARTY SERVICE THAT MAY BE ACCESSIBLE USING ANY EPIPHAN HARDWARE PRODUCT AND/OR SOFTWARE.
- Page 443 Products, Documentation and/or related information, You are representing and warranting that You are not located in, are not under the control of, and are not a national or resident of any country to which the export of the Epiphan Hardware Products, Software, Documentation and/or related information would be prohibited by the laws and/or regulations of Canada or the United States.
-
Page 444: April
Canada applicable therein. No choice or conflict of laws rules of any jurisdiction shall apply to this Agreement. You shall only be entitled to bring any action or proceeding arising out of or relating to this Agreement, the Epiphan Hardware Products, Software, Documentation or any services provided in respect to the Epiphan Hardware Products, Software and/or Documentation in a court in Ottawa, Ontario, Canada, and You consent to the jurisdiction of such courts for any such action or proceeding. - Page 445 Epiphan makes no representation that its products or information in this document or its web site is appropriate or available for use in your jurisdiction. Those who choose to access the Epiphan web site or use Epiphan products do so...
- Page 446 Epiphan is not responsible for the content of any linked web site. Any outside web site accessed from the Epiphan web site is independent from Epiphan, and Epiphan has no control over the content of that web site. In addition, a link to any non-Epiphan web site does not imply that Epiphan endorses or accepts any responsibility for the content or use of such a web site.
- Page 447 © and ™ 2019, Epiphan Systems, Inc...
Need help?
Do you have a question about the Pearl Mini and is the answer not in the manual?
Questions and answers