Advertisement
Available languages
Available languages
Quick Links
Advertisement

Subscribe to Our Youtube Channel
Related Manuals for Inova MaxiClimber Sport


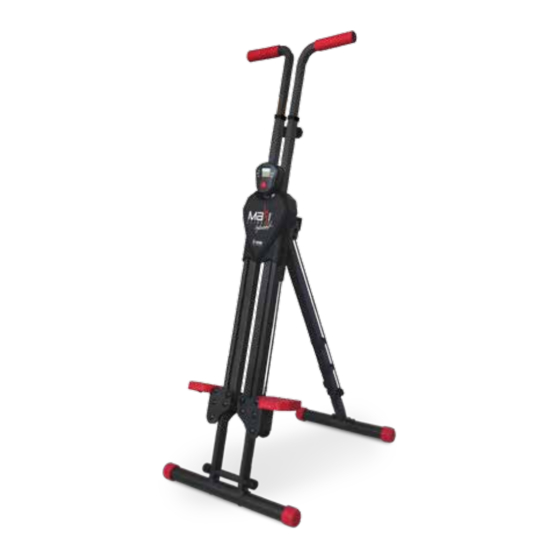
Summary of Contents for Inova MaxiClimber Sport
- Page 1 USER MANUAL with IEAS (Integrated Elastic Assisted System) www.maxiclimber.com...
- Page 2 USER MANUAL 1. SAFETY WARNING • SERIOUS INJURY COULD OCCUR IF THESE PRECAUTIONS ARE NOT OBSERVED. • Read the user manual prior to using the machine. WARNING: Make sure the locking pin is • CONSULT YOUR PHYSICIAN prior to beginning an exercise program. secured before getting on the machine.
-
Page 3: How To Mount The Unit
• Do not replace any parts with parts from other equipment or other manufacturers. Use only parts provided by the manufacturer. 3. WARNING: PROPER • Inova US IS NOT RESPONSIBLE FOR PERSONAL INJURY OR POSITIONING PROPERTY DAMAGE SUSTAINED BY OR THROUGH THE USE OF THE MaxiClimber®... - Page 4 USER MANUAL 4. PARTS PARTS PICTURE Body 1 screw, 1 nut for the cable packed with user manual Left + Right Handle Bars Small Back Tube 2 screws, 2 nuts and 2 washers packed with user manual Large Front Tube Screw packed with user manual Front Rear with pedals...
- Page 5 5. ASSEMBLY MaxiClimber® Sport can be assembled in minutes by only one person. Screws and nuts only need to be tighten with the wrench (part). When assembling the MaxiClimber® Sport follow these instructions: (1) Assemble the Large Front Tube (Part D) to the body (Part A), below the rear with the pedals. (2) Take the Small Back Tube (Part C), and take from the Manual bag 2 screws, 2 nuts and 2 washers Put the 2 screws (Part E) and tight them with the #5 Allen Wrench (Part H).
- Page 6 USER MANUAL (3) Then assemble the Small Back Tube (Part C) with the back rear of the body (Part A) and place (4) Stand-up the body (Part A) and remove the safety pin (Part G) from the second hole. washers and nuts at the screws, then tight them with wrench (Part I). See picture. See picture.
- Page 7 (5) Pull-open the body main frame (Part A) and put the safety pin (Part G) at the first hole - this (6) Pull down the pedals. At the back of the pedal insert the cable, put the screw and the nut (packed with hole will be the only visible-, in order to secure the position.
- Page 8 USER MANUAL (7) Looking the back of the machine take off the adjust knobs from movable handle bars and (8) Insert the Calorie Counter (Part F) into the front part of the body (Part A). See picture. assemble the Left and Right Handle Bars (Part B). Screw the adjustable knobs in order to secure position.
-
Page 9: Battery Caution & Disposal Information
6. BATTERY CAUTION & DISPOSAL INFORMATION 1. For best results, use battery type AAA (Included). 2. Install only new batteries of the same type in your product. MaxiClimber® Sport assembled. 3. Failure to insert batteries in the correct polarity, as indicated in the battery compartment, may shorten the life of the batteries or cause batteries to leak. -
Page 10: Height Adjustments
USER MANUAL 8. HEIGHT ADJUSTMENTS 9. GETTING STARTED Then place the same side foot There are five different height settings in the MaxiClimber® Sport so you can custom- First you need to adjust the height over the pedal ize the machine to your size. Take off the adjustable knobs shown in the picture, and of the moving handles (See Height and stand on it at the same time, with your opposite hand, move the respective post up or down... - Page 11 10. ALL-IN-ONE WORKOUT RECORD KEEPING 11. ALTERNATE MOVEMENTS RESET: Press down the MODE key and hold it for 4 seconds, the values of TIME, CAL and CNT will Biceps be reset. When the battery is removed, all function values will be reset. AUTO ON/OFF: The counter will be auto-powered when starts exercising or presses the MODE You can target your biceps by holding the key.
-
Page 12: Folding And Storage
USER MANUAL 13. FOLDING AND STORAGE MaxiClimber® Sport takes up very little space as it can be easily folded by performing the following steps: (a) Put down the Left and Right Handle Bars (Part B) screwing the adjustable knobs. Then (b) Then put the safety pin (Part G) at the second hole -this hole will only get visible when the remove the safety pin (part G) from the first hole and fold the body (Part A). - Page 13 BEFORE RETURNING THIS PRODUCT TO THE STORE We will be happy to correct any problem that you may have or to answer any of your questions regarding the purchase of this product. Please contact us at our Toll-Free Customer Service Line (888)433-9083. You may also e-mail us at customerservice@maxiclimber.com or visit our web site at www.maxiclimber.com Thank you!
- Page 14 240 pounds (110 kg); used (if assembled and/or used); and (IV) being returned you must notify Inova in writing within 30 days to obtain a • Any products for which the Customer does not follow the within one (1) year from the date of sale to the buyer.
- Page 15 MANUAL DE USUARIO con IEAS (Integrated Elastic Assisted System) www.maxiclimber.com...
- Page 16 MANUAL DE USUARIO 1. SEGURIDAD ADVERTENCIA SI ESTAS PRECAUCIONES NO SON TOMADAS EN CUENTA, PODRÍAN OCURRIR ACCIDENTES. • IMPORTANTE: Por favor lea y siga las instrucciones antes de usar su MaxiClimber® Sport. ADVERTENCIA: Antes de subirse al aparato • CONSULTE A SU MÉDICO Y ESPECIALISTA , ANTES DE INICIAR EL PRESENTE PROGRAMA asegúrese que el perno de seguridad esté...
- Page 17 2. CÓMO MONTAR LA UNIDAD (1) Tome el puño del lado (2) Sin soltar el puño, (3) Escalar para tomar con la (4) Finalmente colocar su pie en •Para evitar golpes en la cara, no se incline hacia el aparato mientras derecho con su mano colocar su pie derecho mano izquierda el manubrio...
- Page 18 MANUAL DE USUARIO 4. PARTES PARTES FIGURA CANTIDAD Cuerpo 1 tornillo, 1 tuerca para el cable empacados junto al manual Manubrio IZQ y DER Tubo Trasero Pequeño 2 tornillos, 2 rondanas y 2 tuercas empacados junto al manual Tubo Frontal Largo Tornillo empacado junto al manual Parte frontal con pedales...
- Page 19 5. ARMADO MaxiClimber® Sport puede ser armado por una sola persona, en minutos. Para armar MaxiClimber® Sport por favor siga las siguientes instrucciones: (1) Coloque el Tubo Largo Frontal (Part D) en el cuerpo (Part A), en la parte trasera donde se (2) Tomar el tubo trasero pequeño (Part C) y tomar de la bolsa del Manual sus 2 tornillos, 2 encuentran los pedales.
- Page 20 MANUAL DE USUARIO (3) Coloque el tubo trasero pequeño (Parte C) en la parte trasera del cuerpo del aparato (Parte A) (4) Pare el cuerpo del aparato (Parte A) y retire el perno de seguridad (Parte G) del segundo ponga las rondanas y tuercas en los tornillos, apriete con la llave hexagonal (Parte I). Ver imagen. agujero.
- Page 21 (5) Extienda el cuerpo del aparato (Parte A) y coloque nuevamente el perno de seguridad (6) Baje los pedales hacia abajo. En la parte de atrás del pedal, coloque el cable y coloque su tornillo y tuerca (empacados con el manual), apriételos con la llave Allen No. 5 (Parte H) y (Parte G) en el primer agujero - que será...
- Page 22 MANUAL DE USUARIO (7) Viendo el aparato desde atrás remueva las perillas de ajuste en las barras y coloque las manijas (8) Inserte el contador de calorías (Parte F) en la parte frontal del cuerpo del aparato (Parte A). izquierda y derecha (Parte B). Atornille la perillas de ajuste para fijar posición. Ver imagen. Ver imagen.
- Page 23 6. PRECAUCIONES E INFORMACIÓN PARA EL DESECHO DE LAS BATERÍAS 1. Para obtener los mejores resultados, utilice el tipo de batería AAA (ya incluída). 2. Instale sólo baterías nuevas del mismo tipo en su producto. 3. Si las baterías no se insertan con la polaridad correcta, tal como se indica en el compartimiento,la vida útil de las baterías puede acortarse y pueden ocasionarse fugas en las mismas.
-
Page 24: Ajuste De Altura
MANUAL DE USUARIO 8. AJUSTE DE ALTURA 9. ANTES DE EMPEZAR Luego coloque el pie del mismo MaxiClimber® Sport tiene cinco niveles de ajuste de altura, por lo que usted puede lado sobre el Primero ajuste la altura de los personalizar la máquina a su tamaño. - Page 25 11. OTROS EJERCICIOS 10. CONTADOR DE PASOS, REPETICIONES Y CALORÍAS RESET: Pulse la tecla MODE y mantenerla durante 4 segundos, los valores de tiempo, CAL y CNT Bíceps se reiniciarán. Cuando se quita la batería, se restablecerán todos los valores de la función. AUTO ON / OFF: El contador se auto-alimentado cuando comienza el ejercicio o presiona la tecla MODE.
- Page 26 MANUAL DE USUARIO 13. ALMACENAMIENTO MaxiClimber® Sport ocupa muy poco espacio y se puede cerrar fácilmente siguiendo estos pasos: (a) Baje las manijas izquierda y derecha (Partes B) desatornillando los mandos ajustables. Entonces quita el (b) A continuación, coloque el broche de seguridad (Parte G) en el segundo agujero - el cuál sólo ser broche de seguridad (Parte G) del primer agujero y doble el cuerpo del aparato (Parte A).
- Page 27 ANTES DE DEVOLVER ESTE PRODUCTO A LA TIENDA Estaremos encantados de ayudarle con cualquier problema que pueda tener o para contestar cualquiera de sus preguntas con respecto a la compra de este producto. Puede contactar a servicio al cliente a través de la línea gratuita (888)433-9083 o enviándonos un correo electrónico a customerservice@maxiclimber.com o bien visitando nuestro sitio web en www.maxiclimber.com ¡Gracias!
- Page 28 Si alguna parte de (I) que vaya a devolver, con flete pre-pagado a Inova en la y / o accesorios que no sean compatibles con el uso original esta garantía es considerada inválida o inaplicable por cualquier...
Need help?
Do you have a question about the MaxiClimber Sport and is the answer not in the manual?
Questions and answers