Table of Contents
Advertisement
Quick Links
Advertisement
Table of Contents

Related Manuals for Renishaw RCU10

Summary of Contents for Renishaw RCU10
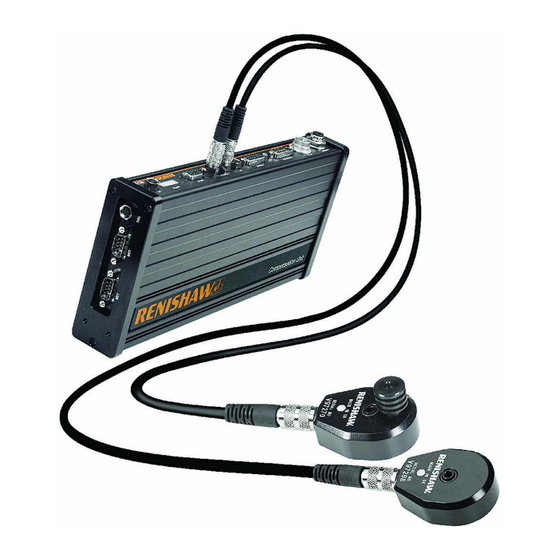
- Page 1 Installation and user’s guide M-9904-1122-09-A RCU10 quadrature compensation unit...
- Page 2 Trademarks may cause undesired operation. RENISHAW® and the probe emblem used in the This equipment has been tested and found RENISHAW logo are registered trademarks of to comply with the limits for a Class A digital Renishaw plc in the UK and other countries.
- Page 3 (SVHCs) is available at: www.renishaw.com/REACH RoHS compliance The use of this symbol on Renishaw products Compliant with EC directive 2011/65/EU (RoHS). and/or accompanying documentation indicates that the product should not be mixed with general household waste upon disposal.
- Page 4 The following is a list of measures that should be considered as part of that process. The Renishaw system includes an Error signal output. The control system must be designed to stop the axis motion if this error output is asserted. In addition to the Error signal, the position feedback signals can also be configured to go tristate (open circuit) under fault conditions.
- Page 5 General safety notice In the case of synchronised parallel motion systems (for example twin rail gantry drive systems), the relative positions of master and slave axes should be monitored. If the difference in their positions exceeds an expected limit, then axis motion must be stopped.
-
Page 6: Table Of Contents
Section 3 Kit configuration and part identification Defining kit numbers ....................3-2 Kit numbers and part identification ................ 3-3 3.2.1 RCU10 kit numbers (laser encoder based systems) ........ 3-3 3.2.2 RCU10 kit numbers (non-laser encoder based systems) ......3-4 Additional components and part identification ............3-5... - Page 7 Contents Section 4 System installation System installation ....................4-2 4.1.1 Hardware installation and initial power-up ..........4-2 4.1.2 RCU10 address set-up ................4-2 4.1.3 Electrical installation .................. 4-4 4.1.4 RCU CS settings ..................4-4 System configuration ..................... 4-5 4.2.1 System configuration ................. 4-6 4.2.2...
- Page 8 Contents Appendix B Connector pinout and hardware installation details Introduction ......................B-2 24 V dc power (J1) ....................B-2 B.2.1 Connector pinout ..................B-2 B.2.2 Wiring requirements .................. B-3 Controller output (J2) ..................... B-4 B.3.1 Digital feedback signals ................B-4 B.3.1.1 Connector pinout ...............
- Page 9 Test 4 – Workpiece temperature change at material reference position .. E-5 E.1.6 Test 5 – Static workpiece temperature change at distance ...... E-6 Appendix F Extended capability Extended RCU10 system capability ..............F-2 F.1.1 Extended system capability ............... F-2 F.1.2 Extended system status monitoring ............
- Page 10 Contents Appendix G Reference Compensation equation overview ................ G-2 G.1.1 Encoder compensation................G-2 G.1.1.1 Definition of position terms ............G-2 G.1.1.2 Definition of compensation terms ..........G-3 G.1.2 Laser compensation ................. G-5 G.1.2.1 Definition of position terms ............G-5 G.1.2.2 Definition of compensation terms ..........
- Page 11 viii Contents This page is intentionally left blank.
-
Page 12: System Overview
System overview Section 1 System overview Contained in this section Introduction ......................1-2 System overview ....................1-2 Compensation functions ..................1-4 1.3.1 Scale factor ....................1-4 1.3.2 Air refractive index compensation ............. 1-4 1.3.3 Encoder thermal expansion compensation ..........1-5 1.3.4 Workpiece thermal expansion compensation ........... -
Page 13: Introduction
The RCU10 real-time quadrature compensation system overcomes environmental error sources in linear motion systems to improve process accuracy and repeatability. The RCU10 monitors a machine’s ambient environment, via a network of sensors, and uses advanced digital signal processing to perform real-time compensation on the position feedback signals. - Page 14 One compensator is required for each machine axis that is to be compensated. When laser encoders are being used, one compensator in the system must be an RCU10-P so that the ambient air pressure can be determined and refractive index compensation applied. The basic RCU10 may be used for conventional (non-laser)
-
Page 15: Compensation Functions
1.3.1 Scale factor The RCU10 is capable of performing a fixed scale factor correction to convert the intrinsic encoder resolution into a more useable value (e.g. 633 nm -> 1 µm). The scale factors available depend on the input resolution and the type of output required. -
Page 16: Encoder Thermal Expansion Compensation
(RCU10-P model only). Humidity is assumed to be relatively constant, and a fixed value may be entered via the configuration software. To enable the RCU10 system to perform in real time, each of these sensors is read, and the related computation (Edlen’s equation*). - Page 17 By constantly monitoring the workpiece temperature, the RCU10 can use its CTE to calculate the expansion that has occurred relative to a nominal reference temperature of 20 °C (68 °F).
-
Page 18: Structure Thermal Compensation
expansion of the machine structure As long as the thermal effect is linear and not related to axis position, the RCU10 can be used to reduce the error. To utilise this compensation mode, a material temperature sensor must be placed on the applicable part of the machine structure and the RCU10 configured with the number of micrometres of correction required per degree C. -
Page 19: Operational Functions
1.4.2 Compensation buffering When the RCU10 is in this mode, it will continue to monitor the encoder input and perform the relevant quadrature scaling. However, any injection required to maintain compensated position will be stored in a buffer within the RCU10. When the mode is disabled, any stored (buffered) count is slowly injected into the motion feedback loop and the fully compensated position re-established. -
Page 20: System Components
Compensation unit (part number: RCU10-XX-XX) Similar to the RCU10-PX-XX, however this assembly does not contain a pressure sensor. Note that one RCU10 compensation unit is required for each axis to be compensated. For example, a three-axis laser encoder based system would need:... - Page 21 RCU10 units. High-speed serial link cable (part number: A-9904-1451) The high-speed serial link cable allows a number of RCU10 units to be linked as a network. During configuration a multi-axis system can be set up by connecting the computer system to only one of the RCU10 units.
-
Page 22: Installation Procedure Overview
1-11 1.6 Installation procedure overview Since the RCU10 system may be used in a diverse range of applications, from simple open-loop calibration systems to complex multi-axis closed loop motion systems, it is difficult to specify an optimum installation procedure for all cases. However, if sections 2 to 6 of this manual are followed sequentially, as outlined in the procedure below, the user will be taken through a typical installation process. - Page 23 1-12 System overview This page is intentionally left blank.
- Page 24 Output frequency ..................2-10 Referencing ......................2-12 2.5.1 Signal format and re-synchronisation ............2-12 2.5.2 Referencing options ................2-14 RCU10 component mounting ................2-17 2.6.1 RCU10-XX-XX or RCU10-PX-XX ............2-17 2.6.2 Air temperature sensor ................2-18 2.6.3 Material temperature sensor ..............2-19 2.6.4...
-
Page 25: Requirements
System design 2.1 Requirements The RCU10 has been designed for maximum flexibility so that it can suit a wide range of applications whilst maintaining simple configuration and installation. In order to use the RCU10 system certain requirements should be met: ... -
Page 26: Sensors And Sensor Networks
2.2.1 Environment sensors Two types of remote RCU10 sensor are available – one for sensing air temperature and one for sensing material temperature. Both sensors have built-in electronics to convert the temperature reading into RS485 data. Consequently, many sensors can be linked together to form a network. -
Page 27: Sensor Network Connection
2.2.2 Sensor network connection Two sensor network ports (J5 and J6 – see Figure 2.4) are provided per RCU10, to which all the air temperature and material temperature sensors are connected. Up to four sensors may be connected to each RCU10 sensor port using the sensor distribution box (as shown in Figure 2.3), making a maximum of eight sensors per RCU10. -
Page 28: Electrical Connections
System design 2.3 Electrical connections The following pages provide details of the RCU10 input and output ports and the signal functions and types. For information on the connectors and hardware installation details refer to Appendix B. CAUTION: Do not connect anything other than Renishaw environmental sensors to the sensor ports. -
Page 29: Connector Functions
Connector functions J1 – 24 V dc power The RCU10 uses 24 V dc as its power supply. Power supply requirements can be found in Appendix A. If required, a power supply with a remote sense function can be used. For connector pinout and hardware installation details please refer to Appendix B. -
Page 30: J4 - Reference Switch Port
For example, if the output resolution of the RCU10 system is set to double that of the controller input, the axis may move twice as far and twice as fast as expected. -
Page 31: J7 - Auxiliary I/O
System design J7 – Auxiliary I/O The auxiliary input/output connector provides various functions that can be used to control and monitor the operation of the RCU10. These functions are described below. Table 2.1 – J7 pinouts (Auxiliary I/O) Auxiliary Active... -
Page 32: J8 - Pc Port
System design J8 – PC port The PC port is used to connect the RCU10 to the RS232 port of a computer. Once connected, the PC may be used with the Renishaw RCU CS software to both configure the RCU10 and monitor the RCU10 during operation. -
Page 33: Encoder Input Frequency
Velocity (m/s) Encoder resolution (µm) Ensure that the encoder frequency is less than 20 MHz and less than the RCU10 sample rate setting. Note: The input sample rate of the RCU should be at least 25% greater than the encoder output quadrature rate. - Page 34 0.197 m/s 0.197 m/s 0.197 m/s * only available from RLE10 Table 2.3 – Maximum velocity for analogue output resolutions - RLE10 or HS10 laser encoder RCU10 output resolution (sinusoid period (µm)) Encoder input resolution (nm) 5.00 m/s 3.164 m/s 3.164 m/s...
-
Page 35: Referencing
To overcome this, the RCU10 includes a circuit that re-phases the position signals so that the reference mark output occurs synchronised and in a repeatable position. - Page 36 System design 2-13 Analogue interface re-synchronisation The output is produced between –45° and +135° and is valid when the amplitude of sine and cosine are equal. The re-synchronisation process ensures a reference output starts nominally 256 output counts later than the reference input and is valid at 320 ±1. Reference Out Cosine Sine...
-
Page 37: Referencing Options
Referencing options Axis referencing with minimum control inputs In the simplest configuration it is possible to use the RCU10 without any input control lines by linking ‘Seek Reference’ and ‘Reset’ to 0 V. When ‘Seek Reference’ is linked permanently to 0 V, the reference mark input will be permanently active, and every time the machine passes over the reference actuator an output reference mark will be issued. - Page 38 ‘Seek Reference’ line can be used to enable a reference cycle. In this mode of operation, taking the ‘Seek Reference’ line low enables the reference mark input line into the RCU10. At all other times (i.e with ‘Seek Reference’ high) the reference mark request is ignored.
- Page 39 2-16 System design...
-
Page 40: Rcu10 Component Mounting
(display window to the top). If the RCU10-P is to be contained in a sealed enclosure, it will be necessary to port the pressure sensor aperture to the outside environment such that the correct air pressure is measured. -
Page 41: Air Temperature Sensor
System design 2.6.2 Air temperature sensor RCU10-AT-XX The air temperature sensor may be mounted either by the built-in magnetic base or using the central mounting hole. It is recommended for permanent installations that the mounting hole be used for security. -
Page 42: Material Temperature Sensor
2-19 2.6.3 Material temperature sensor RCU10-MT-XX The material temperature sensor may be mounted in a similar way to the air temperature sensor, by using either the built-in magnetic base or the central mounting hole. It is recommended for permanent installations that the mounting hole be used for security. -
Page 43: Sensor Distribution Box
Sensor distribution box RCU10-DB-XX The sensor distribution box allows up to four sensors to be connected to a single RCU10 sensor port. One cable is attached to the RCU10 and the sensors are plugged into the distribution box at a remote location. - Page 44 Contained in this section Defining kit numbers ....................3-2 Kit numbers and part identification ................ 3-3 3.2.1 RCU10 kit numbers (laser encoder based systems) ......... 3-3 3.2.2 RCU10 kit numbers (non-laser encoder based systems) ......3-4 Additional components and part identification ............3-5...
-
Page 45: Defining Kit Numbers
The format of this kit part number is shown below, along with tables that identify the contents. Kits for laser compensation applications include one RCU10-P, whilst kits for non-laser applications include only the RCU10 version. Any of the parts may be ordered separately if required. -
Page 46: Kit Numbers And Part Identification
3.2 Kit numbers and part identification The following tables depict standard kits both for systems which use laser encoders and also those that are non-laser encoder based. 3.2.1 RCU10 kit numbers (laser encoder based systems) Component Part number description RCU10 compensation... -
Page 47: Rcu10 Kit Numbers (Non-Laser Encoder Based Systems)
Kit configuration and part identification 3.2.2 RCU10 kit numbers (non-laser encoder based systems) Component Part number description RCU10 RCU10-XX-XX compensation unit Material RCU10-MT-XX temperature sensor RCU10-TC-X5 Sensor cable RCU10-CS-XX RCU10 CS software RCU10 connector A-9904-1455 Sensor connector A-9904-1636 High speed serial... -
Page 48: Additional Components And Part Identification
Kit configuration and part identification 3.3 Additional components and part identification Part number Component description A-8014-0670 Serial-USB adaptor RCU10-DB-XX Sensor distribution box RCU10-AC-X5 Armoured sensor cable (5 m) - Page 49 Kit configuration and part identification This page is intentionally left blank.
- Page 50 System installation Section 4 System installation System installation ....................4-2 4.1.1 Hardware installation and initial power-up ..........4-2 4.1.2 RCU10 address set-up ................4-2 4.1.3 Electrical installation .................. 4-4 4.1.4 RCU CS settings ..................4-4 System configuration ..................... 4-5 4.2.1 System configuration .................
-
Page 51: Hardware Installation And Initial Power-Up
In order for the RCU10s to operate as part of a network, each unit must have a unique address. All RCU10s are shipped from the factory with a default address of 1. NOTE: This operation must be carried out on every RCU10 to be used in a network before connecting the high-speed serial link cables. - Page 52 Figure 4.1 – RCU10 status display Connect the PC to the RCU10 that is to be configured, using the PC cable provided. Click the Receive button on the RCU CS screen. The connected RCU10 unit should be detected with a default address of 1.
-
Page 53: Electrical Installation
System installation 4.1.3 Electrical installation Once all the RCU10 units have been set to unique addresses, a network may be established: Remove power from all RCU10s. Connect the high-speed serial link cables across the link connectors on the end of the RCU10s (either link connector may be used because they are part of a common serial bus). -
Page 54: System Configuration
Three options are available: Inches, Millimetres or Metres. 4.2 System configuration Press the Configuration button in the button bar. The following window will appear: Note the pressure sensor and RCU10 address before leaving this screen, for example 75L324 and RCU10 address 1 Figure 4.2 –... -
Page 55: System Configuration
Configure each setting on the System tab according to the descriptions shown below. Make a note of the pressure sensor serial number and the RCU10 address that it is connected to before completing the configuration on this page. ... -
Page 56: Sensor Network Configuration
4.2.2 Sensor network configuration All sensors that are to be used in a multi-axis RCU10 system must be identified before they can be assigned to any functions. The serial number of the sensor is used as a unique identifier on the sensor network. -
Page 57: Compensation Settings Configuration
System installation A completed sensor configuration should look similar to that shown in the screen below: Figure 4.3 – Completed configuration window (Sensors tab) 4.2.3 Compensation settings configuration At this stage each axis must be configured to specify encoder input settings, compensation settings, encoder output settings, safety limits and other axis-specific functions. - Page 58 See configuration warning 1 on page 4-12. Direction sense (input): Sets the input quadrature direction. This must be selected such that the RCU10 input counts in the same direction as the machine control. See configuration warning 2 on page 4-12.
- Page 59 Encoder – uses the reference signal (Z, /Z) from the encoder connector, in RS422 format. External Port – uses the RCU10’s J4 – reference switch port. Compensation These settings are used to select which modes of compensation are enabled on the RCU10 hardware.
- Page 60 Tristate On Error: The output quadrature signal may be configured to transfer into a high impedance (undriven differential) when an error occurs on the RCU10. Ensure that the controller is capable of recognising this if it is enabled. This selection is not available if analogue output format is selected.
- Page 61 For example, if the output resolution of the RCU10 system is set to half that of the controller input, the axis may move twice as far and twice as fast as expected.
-
Page 62: Parameter Settings Configuration
Data that is definable across different parameter tables is indicated by <n> to the right of the text (where n is the parameter table number). All other data is common across all parameter tables for that particular RCU10 axis. ... - Page 63 Define the laser dead path value to be used in the compensation algorithm. Unique to each parameter table in one RCU10 axis. Dead path is the separation between the optics when the axis is at the reference position. See Appendix G for an example.
-
Page 64: Transmitting The Configuration
RCU10s are switched off. To transmit the configuration to the RCU10 system, click on the Transmit button in the button bar or select Transmit Configuration from the Configure menu. A dialogue will appear for confirmation –... -
Page 65: Configuration Validation
Now that the system is in compensation mode, this is simply a case of observing that the display on the front of each RCU10 unit shows RDY. If this is the case, then the next stage of installation is controller integration as described in section 5 of this manual. - Page 66 Having identified the source of the problem, refer to Appendix D for corrective action guidance. Once all errors have been corrected, as shown by both Comms and Status indicators for all axes being green and the RCU10 status window displaying RDY, progress to controller integration.
- Page 67 4-18 System installation This page is intentionally left blank.
- Page 68 Contained in this section Introduction ......................5-2 Safety function testing.................... 5-2 5.2.1 Encoder error testing ................. 5-2 5.2.2 RCU10 error testing .................. 5-2 5.2.3 Testing environment sensors ..............5-5 5.2.4 Auxiliary I/O connector input functions ............5-6 5.2.5 Reference mark connector function ............5-8 5.2.6...
-
Page 69: Introduction
5.2 Safety function testing It is imperative that the safety features of the RCU10 and the encoder connected to the RCU10 are checked before proceeding with integration of the RCU10 into the axis feedback loop. -
Page 70: Encoder Error Testing
Simulate an error condition to place the RCU10 into error. The simplest method for this test is to disconnect any connections from J3 – Encoder input port on the RCU10. Check the RCU CS compensation screen to ensure that the error has been recognised and handled by the relevant RCU10. - Page 71 Clear the initial error asserted at start-up by sending a Reset signal to the RCU10. Assert an error on the encoder to place the RCU10 in error. This may be a beam block on a laser encoder, or a similar “beam block” type of error on a tape scale with a piece of paper placed between the head and the scale.
-
Page 72: Testing Environment Sensors
Suspend and Error lines will also be asserted to indicate the failure of a compensation algorithm. These can be cleared by issuing a Reset signal to the RCU10 to clear the Error line and by referencing the axis again to clear the Suspend line. 5.2.3... -
Page 73: Auxiliary I/O Connector Input Functions
RCU CS compensation screen (see Appendix D, section D.3.1). To test the outputs from the RCU10, simulate the error conditions as described in sections 5.2.1, 5.2.2 and 5.2.3. Ensure that the controller recognises the input and responds as detailed in Table 5.1. - Page 74 Pin 6 – 24 V Output 24 V active low Error output signal. Indicates any error conditions in the signal. RCU10. This line is for information only and is not safety /Error critical. Pin 7 – Pull up Input User selectable...
-
Page 75: Reference Mark Connector Function
24 V input RCU10. It may be linked permanently low to the 0 V line (pin 2) to level. act as an auto reset function. The error signal will be asserted for a minimum of 1 second before automatically resetting. -
Page 76: Encoder Considerations
Dual encoder systems: Each machine axis has a basic (secondary) encoder system that is separate to the encoder being used with the RCU10 system. This may be the motor rotary encoder or a pre-existing tape scale etc. This enables the machine to be moved safely and independently by the machine control whilst ignoring the RCU10 system. -
Page 77: Integration Procedure
Method 1 (dual encoder systems): Dummy axis monitoring Connect the RCU10 system to "dummy" axis inputs. This enables the machine to be moved under the control of the secondary feedback system. Configure the user interface such that the position readout of this "dummy" axis is visible on the user console. -
Page 78: Closing The Control Loop
If you are experiencing an incorrect magnitude, you must check the input and output resolutions: Using RCU-CS, return the RCU10 to configuration mode. Open the system Configuration and under the Compensation tab check the Resolution and Sample Rate setting in the Encoder Input section. Also check the Resolution and Update Rate setting in the Output To Controller section. -
Page 79: Referencing The System
5-12 Controller integration 5.2.11 Referencing the system The final stage of controller integration is to confirm the correct operation of the machine home (or reference) cycle; once the system is correctly homed, compensated feedback can begin. • Perform a normal machine home operation, if possible setting the feed rate to a low value. - Page 80 Operation Section 6 Operation Contained in this section Standard operation ....................6-2 RCU CS status during operation ................6-2 6.2.1 Compensation display ................6-3 6.2.2 Sensor display ................... 6-4 6.2.3 Diagnostics display ..................6-5 General maintenance .................... 6-6...
-
Page 81: Standard Operation
RCU CS software may also activate compensation mode. When compensation mode is first activated, the error line on the RCU10 will be active. This must be cleared by applying a reset signal to the Reset line on the Auxiliary I/O connector before operation. -
Page 82: Compensation Display
Axis 6 Figure 6.2 – System compensation screen This displays the status of all RCU10 units in the system: general axis information and system status indicators. By selecting the individual axis required from the displayed tabs in this window, this summary information may be displayed in a clearer, single screen (shown in Figure 6.3). -
Page 83: Sensor Display
Pressing the Sensors button displays the sensor overview screen (shown in Figure 6.4). Figure 6.4 – Sensor information screen This displays an overview of all sensors configured in the RCU10 network. It displays operational and communication status, as well as a real-time display of the reported readings. -
Page 84: Diagnostics Display
Figure 6.5 – System status bar This displays a basic overview of each RCU10’s communications status and operational status. These status lights will display any problems on any of the individual RCU10s within the network. -
Page 85: General Maintenance
Note: The RCU10 contains a lithium metal battery. Please contact Renishaw for details of battery replacement. (The customer must not change the battery). Typical battery life is ten years. At end of life the RCU10 must be disposed of in accordance with local regulations. - Page 86 RCU10 system specifications Appendix A RCU10 system specifications Contained in this appendix RCU10 system performance ................. A-2 Component performance ..................A-4 A.2.1 Compensation unit ..................A-4 A.2.2 Air sensor ....................A-5 A.2.3 Material sensor ..................A-5 A.2.4 Pressure sensor ..................A-5...
-
Page 87: Rcu10 System Performance
RCU10 system specifications A.1 RCU10 system performance Input resolutions Laser encoder: 10 nm*, 20 nm*, 40 nm, 79 nm, 158 nm, 316 nm and 633 nm (digital format) * RLE laser only Encoder: 0.1 µm, 0.5 µm, 1µm and 5 µm (digital... - Page 88 This filter is only operational for input sample clocks of 10 MHz and below. NOTE: RCU10 performance specifications are only guaranteed in a working environment that falls within a 0 °C to 40 °C temperature range, 650 mbar to 1150 mbar and a relative humidity entered to within ±20% of actual.
-
Page 89: Component Performance
0-95% RH (non-condensing) Temperature Storage -20 °C to 70 °C Operating 0 °C to 50 °C NOTE: RCU10 system performance specifications are only guaranteed over a 0 °C to 40 °C temperature range. Standards compliance CE EMC BS EN 61326... -
Page 90: Air Sensor
RCU10 system specifications A.2.2 Air sensor ± 0.2 °C (k=2) Accuracy * 0 °C – 40 °C Measurement range Update rate 1 Hz A.2.3 Material sensor ± 0.1 °C (k=2) Accuracy * 0 °C – 55 °C Measurement range Update rate 1 Hz A.2.4... - Page 91 RCU10 system specifications This page is intentionally left blank.
- Page 92 Connector pinout and hardware installation details Appendix B Connector pinout and hardware installation details Contained in this appendix Introduction ......................B-2 24 V dc power (J1) ....................B-2 B.2.1 Connector pinout ..................B-2 B.2.2 Wiring requirements .................. B-3 Controller output (J2) ..................... B-4 B.3.1 Digital feedback signals ................
-
Page 93: Introduction
The following pages give the connection pinouts and hardware installation details for each connector in the system. NOTE: All genders are specified for the cable connector. All pinouts are shown from the connector wiring side (RCU10 front panel). B.2 24 V dc power (J1) B.2.1 Connector pinout 4-way binder 680 series, female. -
Page 94: Wiring Requirements
The protection circuit will allow safe operation up to ±35 V across the supply terminals, but operation above these levels will result in damage. NOTE: The action of the fuse is to remove power from the RCU10 unit. Until the fuse has tripped, the supply will be short-circuited. -
Page 95: Controller Output (J2
‘pass through’ to the encoder connector. This 5 V supply must be provided by the controller or an external PSU – it is not supplied by the RCU10. Pin 2 is 0 V which is connected to the internal RCU10 0 V line. -
Page 96: Wiring Requirements
Wiring requirements A cable with twisted pairs and overall shield is recommended for the digital quadrature interface between the RCU10 and the controller, as specified in EIA RS 422 (e.g. Belden 8107). Maximum cable length is dependent on the update rate of the quadrature signals;... -
Page 97: Connector Pinout
Note 3: When used with an RLE or tape/glass encoder, pin 15 may be used to ‘pass through’ the internal cable screens. This must be connected to the screens at the controller end – it is not grounded inside the RCU10. IMPORTANT: When HS10 or HS20 is used, this pin must not be connected. -
Page 98: Wiring Requirements
B.3.2.2 Wiring requirements A cable with twisted pairs and overall shield is recommended for the analogue quadrature interface between the RCU10 and the controller (e.g. Belden 8107). Analogue quadrature is fully short-circuit protected. Termination A dc termination resistor, which has a nominal value of 120 Ω, should be connected across the differential pairs. -
Page 99: Connector Pinout
If a reference switch or other device is accidentally connected to the RLE10 sensor ports, the sensor network operation may become disrupted. This may cause errors on the RCU10 system but no damage will be caused. Always ensure that nothing is connected to the RLE10 sensor ports when not in use. -
Page 100: Wiring Requirements
Wiring requirements A cable with twisted pairs and overall shield is recommended for the digital quadrature interface between the RCU10 and the encoder, as specified in EIA RS 422 (e.g. Belden 8107). Maximum cable length is dependent on the update rate of the quadrature signals;... -
Page 101: Connector Pinout
B-10 Connector pinout and hardware installation details B.5 Reference switch port (J4) B.5.1 Connector pinout 4-way binder 712 series. The connector is viewed from the wiring side. Table B.5 – J4 connector pinouts (reference switch port) Function Input return +5 V supply – thermal fuse protection Input Shell Case... -
Page 102: Connector Pinout
Thermal fuses protect the 24 V and 5 V supply outputs – to reset a fuse, remove the power from the RCU10 unit for a number of seconds. All signal pins (both input and output) are fully protected against a direct connection of an external supply, up to ±30 V. - Page 103 NOTE: For HS20 applications the RCU10 system should not be wired to automatically reset errors. NOTE: In applications where the RCU10 is not connected to the controller via the Aux I/O port, another method of clearing the error must be used. Using a 15-way high density D-type female connector, link pin 2 to pin 5, link pin 7 to pin 11 and connect a push to make switch across pins 2 and 15.
-
Page 104: Pc Port (J8
Belden 8102 or Belden 8132. For a simple network with one RS485 controller and one RCU10, a cable as specified in EIA RS 422 would be suitable. For a more complex RS485 network, then follow the guidelines in EIA RS485. -
Page 105: Fastlink Port
Connector pinout and hardware installation details B.8 Fastlink port To ensure correct operation of the RCU10 network, the Fastlink cable assembly provided by Renishaw must be used. Fastlink cable termination should be applied to the physical end units of the network during the configuration stage. -
Page 106: Wiring Requirements
The sensor supply lead is fitted with an inline thermal fuse – if activated, then power must be removed from the RCU10 unit so that it can reset. The Data and /Data lines are protected from short-circuit to each other and to either supply line. - Page 107 B-16 Connector pinout and hardware installation details A maximum allowable voltage drop of 1.25 V from the RCU10 to the sensor governs the maximum allowable cable run. The specification for peak current drawn by any one sensor is 20 mA, which means that for a single run of cable, the power lead resistance must be less than 31.25 Ω.
- Page 108 RCU CS Appendix C RCU CS Contained in this appendix RCU CS ......................... C-2 C.1.1 Overview ....................C-2 C.1.2 Access levels ..................... C-2 C.1.3 Operating modes ..................C-3 C.1.4 Configuration data ..................C-4 RCU CS installation ....................C-5 C.2.1 System requirements ................C-5 C.2.2 Installation procedure ................
-
Page 109: Rcu Cs
C.1.1 Overview Before the RCU10 may be used, it must be configured using the RCU10 configuration software (RCU CS). This package allows all the parameters and operational modes to be configured and also provides an operational display to monitor the compensation process, environment and error status. -
Page 110: Operating Modes
The RCU CS software is used to switch between these modes using the Mode button on the button bar. The current operating mode can be seen on the status bar at the bottom of the RCU CS screen, and the RCU10 will display the following on the front panel display: Table C.2 –... -
Page 111: Configuration Data
Local configuration data comprises settings that are unique to each axis of the system. This data is stored only in the relevant RCU10 unit and comprises all the settings and data in the Compensation and Parameters tabs of the configuration screen (detailed in sections 4.2.3 and 4.2.4). -
Page 112: Rcu Cs Installation
800 x 600 screen resolution (minimum); 1024 x 768 (preferred) DVD-ROM At least one free serial port - either RS232 or USB used with an RS232 to USB converter (available from Renishaw) See Renishaw website for more details on current system requirements... -
Page 113: Installation Procedure
Previous versions of Renishaw RCU-CS software must be uninstalled before installing an upgrade. The removal of any shared files may affect other applications installed on your PC. Prior to uninstalling or upgrading RCU-CS it is recommended that the RCU10 configuration is backed up in accordance with section F2.1.1. -
Page 114: Screen Layout
The screen layout for the RCU CS is shown in Figure C.2. Any commands that require user input will be marked in bold. Menu bar Button bar Status bar Serial RCU10 Current Current port connection RCU CS access status status operating level mode Figure C.2 – RCU10 status display... - Page 115 Multi axis RCU10 configuration. networks need to be (In compensation mode it separated so that each will display the RCU10 unit is isolated configuration stored in from other units before the RCU10 network) using this function. Transmit the Receive the configuration...
- Page 116 RCU10 network. Figure C.5 – View menu functions Note: Do not leave diagnostics or sensors windows open if the RCU10 system hardware needs to be powered down. Doing so may prevent the RCU10 powering up correctly. •...
- Page 117 Current operating mode (configuration/compensation). Current access level (user/system configurator/system upgrade). Note: Do not leave diagnostics and sensors windows open if the RCU10 system hardware needs to be powered down. Doing so may prevent the RCU10 powering up correctly.
- Page 118 Compensation system status information and diagnostics Appendix D Compensation system status information and diagnostics Contained in this appendix Diagnostics ......................D-2 D.1.1 Process overview ..................D-2 Error descriptions ....................D-3 RCU CS information screens ................D-4 D.3.1 Compensation system screen ..............D-4 D.3.2 Compensation axis screen ................
-
Page 119: Diagnostics
Compensation system status information and diagnostics D.1 Diagnostics The RCU10 is a powerful system with in-built fault diagnosis/logging to determine the cause of any system errors that may occur. This section aims to give an overview of each of the various warning indicators available across the RCU CS software. This will provide the user with a basic understanding of the fault being exhibited and will aid the diagnosis process should the user need to contact Renishaw for further support. -
Page 120: Error Descriptions
Compensation system status information and diagnostics D.2 Error descriptions There are four levels of error supported by the RCU10 firmware. These are, starting with the most critical: 1. System errors (SE) 2. Errors (E) 3. Warnings (W) 4. Sensor failure System errors (SE) indicate a critical system failure. -
Page 121: Rcu Cs Information Screens
Output count Fully compensated output count from the RCU10. Count Single counts size depends upon the selected output resolution and on movement since the axis was referenced. - Page 122 Compensation system status information and diagnostics Table D.2 – Status lights (compensation system screen) Corrective action Acronym Meaning States Description/cause (if necessary) Error out Axis is functioning without error. None required. Axis has registered an error. Refer to other status light to identify cause.
- Page 123 RCU reference mark port. Referenced Axis is not referenced. Machine will operate but RCU10 will not apply compensation. GREEN Axis is referenced. None required. Structure Structure compensation is If this function is required compensation disabled.
- Page 124 Compensation system status information and diagnostics Table D.2 – Status lights (compensation system screen) continued Acronym Meaning States Description/cause Corrective action (if necessary) Workpiece Workpiece compensation is not Activate compensation by compensation being applied. moving the machine to the point of origin of structure expansion and taking the Workpiece compensation enable line on the Auxiliary...
-
Page 125: Compensation Axis Screen
Compensation system status information and diagnostics D.3.2 Compensation axis screen This screen (shown in Figure D.2) is the individual axis tab from the complete compensation status display. It displays the same information as the system compensation screen, but in a clearer manner. It is accessible by pressing Compensation on the button bar and then selecting the desired axis from the tabs at the top. -
Page 126: Sensor Data Screen
Compensation system status information and diagnostics Table D.5 – Active parameter table box (compensation axis screen) Meaning Description Displays Parameter table Selected parameter table currently in use. Integer 1-4 Table D.6 – State box (compensation axis screen) Acronym Meaning States Description/cause Corrective action (if necessary) -
Page 127: Individual "View Status" Screen
D-10 Compensation system status information and diagnostics Table D.8 – Sensor data screen sensor information Field Meaning Description Displays Serial Sensor serial Unique number on the sensor body and input into the Serial number Number number system during configuration. Required for communication purposes. - Page 128 Calibration Sensor is operating within its calibrated None required. Failure specification. Sensor data is out of calibration. Return sensor to Renishaw for recalibration. Not Ready Sensor is operating normally. None required. Sensor’s operational accuracy is not ready. Wait for sensor to finish initialising Sensor is still initialising.
- Page 129 D-12 Compensation system status information and diagnostics Table D.10 – Compensator status errors/warnings Error State Description Corrective action (if necessary) Out Of Compensator is receiving data within the None required. Range configured range of operation. Compensator is receiving a value outside Change configured limit values on the configured range of operation.
-
Page 130: Diagnostics
Compensation system status information and diagnostics D-13 D.3.4 Diagnostics These screens display all the various axis-specific errors that a system may be displaying. They may all be accessed from the System status screen that is available by pressing the Diagnostics button on the button bar. D.3.4.1 System status screen Figure D.5 –... -
Page 131: Rcu Diagnostics Screen (Top Display
D-14 Compensation system status information and diagnostics D.3.4.2 RCU diagnostics screen (top display) At the top of the axis diagnostics screen is a range of information that is available across all the diagnostics tabs. In general, it provides a basic overview of the system and its functionality. -
Page 132: Rcu Diagnostics - Configuration Tab
This screen details most of the functional, configuration and start-up errors that can occur inside the RCU10. NOTE: In the following tables, System Reset refers to a power cycle of the RCU10 unit. This enables the unit to start up again, perform all functional self-check tests and load the compensation modules again. - Page 133 SYSTEM ERROR Queue RCU10 state machine System Reset. Overflow damaged. Internal diagnostics function. Error Queue SYSTEM ERROR Too many errors. RCU10 error Overflow tracking is damaged. Internal System Reset. diagnostics function. Configuration ERROR For safety reasons two copies Not applicable...
-
Page 134: Axis Diagnostics - Compensation Tab
Compensation system status information and diagnostics D-17 D.3.4.4 Axis diagnostics – Compensation tab This screen details the errors that can occur to prevent the RCU10 compensating correctly. Figure D.9 – Axis diagnostics Compensation tab (Compensation mode) - Page 135 Excessive More than 25 mm of ERROR Comp Applied compensation has been — Assert Reset line on Auxiliary I/O requested by the RCU10. connector. Parameter An undefined parameter set has SUSPEND ERROR Table Change been selected for use in the Assert Reset Re-reference axis.
-
Page 136: Axis Diagnostics - Communication Tab
Compensation system status information and diagnostics D-19 D.3.4.5 Axis diagnostics – Communication tab This screen details the systems communication status. This may be the sensor communications, RCU10 network communications or PC communications. Figure D.10 – Axis diagnostics Communication tab... - Page 137 D-20 Compensation system status information and diagnostics Table D.16 – Axis diagnostics (Communication tab) Compensation mode Error Description Configuration mode Advanced Simple Sensor No reply from a sensor. One or WARNING ERROR Comms more sensors timed out. Check sensor connections. Timeout Check Sensor screen for errors.
-
Page 138: Axis Diagnostics - Sensors Tab
Compensation system status information and diagnostics D-21 D.3.4.6 Axis diagnostics – Sensors tab Compensation mode Figure D.11 – Axis diagnostics Sensors tab... - Page 139 D-22 Compensation system status information and diagnostics Table D.17 – Axis diagnostics (Sensors tab) Compensation mode Configuration Error Description mode Advanced Simple Pressure Allocated pressure sensor has failed. WARNING SUSPEND ERROR Sensor Check sensor connections. Failure Check Sensor screen for errors. Check individual sensor errors.
- Page 140 Commissioning tests Appendix E Commissioning tests Contained in this appendix System performance testing .................. E-2 E.1.1 Prerequisites....................E-2 E.1.2 Test 1 – Linear compensation (air refractive index or encoder scale compensation) ................... E-3 E.1.3 Test 2 – Workpiece thermal expansion compensation ......E-4 E.1.4 Test 3 –...
-
Page 141: System Performance Testing
Commissioning tests E.1 System performance testing There are a number of calibration tests that may be performed on the installed RCU10 compensation system. Not all tests will be required, depending upon the configuration of the installation and the functions being used. The majority of tests are designed to test the operation of workpiece thermal compensation. -
Page 142: Test 1 - Linear Compensation (Air Refractive Index Or Encoder Scale Compensation
RCU10. Move the axis under test to a position near the axis reference position. Datum the XL-80 (inputting an offset, if required, to allow the XL-80 and RCU10 to display the same position). -
Page 143: Test 2 - Workpiece Thermal Expansion Compensation
E.1.3 Test 2 – Workpiece thermal expansion compensation This is a repeat of test 1, with workpiece compensation enabled on both the RCU10 compensation system and on the XC-80 calibration system. This will test that workpiece thermal compensation is operating correctly. -
Page 144: Test 3 - Workpiece Thermal Expansion At Higher Temperatures
The response times of the XC-80 and RCU10 material sensors are not the same, so it is important to maintain as constant a temperature as possible throughout the testing period so that performance differences do not introduce additional errors. -
Page 145: Test 5 - Static Workpiece Temperature Change At Distance
Check that the ‘WP’ light in the RCU CS Compensation screen is on (this indicates a successful activation). Datum the XL-80 (inputting an offset, if required, to allow the XL-80 and RCU10 to display the same position). Artificially elevate the RCU10 material temperature sensor allocated to workpiece thermal compensation. - Page 146 Check that the change in the axis position is of the order of magnitude expected using the XL-80. NOTE: During this test, the RCU10 quadrature compensation system will provide correction to the controller. The machine will move physically to compensate for the temperature change.
- Page 147 Commissioning tests This page is intentionally left blank.
- Page 148 Extended capability Appendix F Extended capability Contained in this appendix Extended RCU10 system capability ..............F-2 F.1.1 Extended system capability ............... F-2 F.1.2 Extended system status monitoring ............F-2 F.1.2.1 Extended status monitoring ............F-2 F.1.3 Axis referencing with extended error lines ..........F-4 F.1.4...
-
Page 149: Extended Rcu10 System Capability
F.1 Extended RCU10 system capability F.1.1 Extended system capability The RCU10 system includes a number of features that enable the basic performance of the system (detailed in section 1) to be extended. These optional features include: Extended system status monitoring capability through three output lines (per axis). - Page 150 Display a message. Beam low level. Schedule maintenance. Unassigned or unallocated sensor detected. Other minor RCU10 condition. Suspend Sensor rate of change exceeded. Stop the machining operation (part program). Sensor reading out of range.
-
Page 151: Axis Referencing With Extended Error Lines
Extended capability F.1.3 Axis referencing with extended error lines The axis referencing sequence for applications that use Error, Suspend and Warning lines is shown in Figure F.1. Figure F.1 – Axis referencing sequence using extended error lines (Error, Suspend and Warning) -
Page 152: Controlling Workpiece Compensation From Motion Control System Output Lines
Depending upon the application, there may be a requirement to enable workpiece compensation at a location other than machine home. To enable this to be achieved, an input to the RCU10 unit called Workpiece compensation enable is provided. Through this line it is possible to both enable and disable workpiece compensation anywhere along the axis. -
Page 153: Suspending Workpiece Compensation
Extended capability Workpiece compensation is now deactivated. If M90 is used at a machine position which is away from the workpiece origin, the appropriate number of compensation pulses will be re-injected into the machine control to bring the machine back into a position that is compensated only for the effects of wavelength variation (if laser encoders are used). -
Page 154: Parameter Table Selection
Extended capability F.1.5 Parameter table selection A number of ‘parameter tables’ may be available for use during operation. The purpose of these is to allow the easy selection of a number of common options/operations. The parameters which may be selected are shown below: Dead path for laser encoders or reference offset from scale expansion origin ... -
Page 155: Compensation Buffering
To activate this facility, pin 14 of the Auxiliary I/O port on the RCU10 needs to be taken low; to deactivate the facility, this line should be at the voltage level determined by the pull up voltage selected (either 24 V or 5 V). -
Page 156: Operating With Multiple Parameter Tables
Extended capability F.1.7.2 Operating with multiple parameter tables Two of the commonest applications are shown below: Using parameter tables to change material type In the case where workpiece expansion compensation is being used and different materials are regularly worked on the same machine, it may be necessary to change the thermal expansion coefficient. - Page 157 F-10 Extended capability To implement multiple parameter tables: 1. Make the wiring to the parameter table selection lines (Auxiliary I/O connector) only on those axes which are to have multiple home/zones. 2. On the System tab of the Configuration window, select Multiple parameter tables. Determine how many home/zone positions are to be used, and set the number of parameter tables to this number (one for each home/zone).
- Page 158 Extended capability F-11 In parameter table 2 the machine will use a second home position which is 5 m further down the X axis. For this reason, the dead paths for X1 and X2 are 5500 and 5475. Note the Y does not change, as this uses the same home position as before. A different material temperature sensor is used in this position, therefore V97308 is entered.
-
Page 159: Rcu Cs - Additional Functionality
F-12 Extended capability F.2 RCU CS – Additional functionality F.2.1 Additional RCU CS configuration functionality As well as the basic functions described so far, the RCU CS software has a number of additional configuration functions that may be used. F.2.1.1 Saving the configuration It is advisable to save the finished configuration to a file that may be kept as a back-up of the system configuration. -
Page 160: Loading A Configuration
Extended capability F-13 F.2.1.2 Loading a configuration Saved configuration files can be restored on to the RCU10 hardware if necessary using the following procedure: Select Open from the File menu. A window will appear asking for the name and location of the configuration file to load. -
Page 161: Setting The Pc Communication Port
F-14 Extended capability F.2.1.3 Setting the PC communication port The default setting for the PC communication with the RCU10s is COM 1. If an alternative COM port is to be used, this can be done as follows. From the Tools menu, select the Serial Port option. ... -
Page 162: Configuring Passwords
Select the password to change and enter the new password into both fields. Click OK when complete. Make a note of the new password. If the user-defined password is forgotten, contact your Renishaw representative who will restore access by supplying a recovery password. -
Page 163: Logging In As New User
F.2.1.6 Rebooting the RCU By selecting Re-boot RCU from the Tools menu, the user may re-start the RCU10 they are connected to, or the entire network. The start-up mode may be selected as either configuration or compensation mode. This can allow the user to force the RCU10(s) into... - Page 164 Select the RCU10(s) to re-boot from the drop-down list. The user may select either the single RCU10 that RCU CS is connected to, or all RCU10s in the network. Select the mode the unit(s) must start up into. True will boot the RCU10(s) into configuration mode, False will boot the RCU10(s) into compensation mode.
-
Page 165: Data Logging
***** is the file name entered *****_Stat.txt The data is recorded at the rate at which it is received from the RCU10 network. This is approximately 17-20 readings per second. The number of records created depends upon the number of display screens open:... - Page 166 Extended capability F-19 Open the Compensation, Configuration and Diagnostics information views as required to display the required information. To complete the data logging process, press the Data Log button on the button bar, or select Data Log from the Tools menu. ...
-
Page 167: Error Logging
Extended capability F.2.3 Error logging The error log is a powerful diagnostics tool that is provided primarily for Renishaw diagnostics purposes. To activate the error log, it must be configured in the global system settings: Ensure that the RCU10 network is in configuration mode. - Page 168 Extended capability F-21 Press Select All to enable the logging of all errors. Press OK to continue and transmit the configuration as normal. Each individual unit will now log all errors during operation. To access the error log, select Error Log from the Tools menu.
- Page 169 F-22 Extended capability The screen will show a list of up to the last 32 errors logged in all the RCU10s in the network. To look at individual errors, double-click the error to display the full details of that error condition.
- Page 170 Extended capability F-23 To look at the resulting error conditions as they would appear in the diagnostics window, press the View Status Bitfields button to call up the screen below. Saving data The error log may be saved for records or analysis. Select Save from the Log menu in the error log window.
- Page 171 F-24 Extended capability Error log codes Below is a basic list of codes for reference. These will give a basic overview of the main events occurring in each error log record. For a clearer description, open each log event and press View Status Bitfields to view the status lights activated. Configuration compare failed Reserved LUT error...
-
Page 172: Error Log Descriptions
Extended capability F-25 F.2.3.1 Error log descriptions The dialog below shows all the errors that can be recognised by the system:... - Page 173 F-26 Extended capability Table F.3 below gives a brief description of each error. Table F.3 – Error log descriptions Event Description Advanced Simple setting setting Config Compare Failure RCU10s in a network are operating with ERROR ERROR different configuration modules. LUT Error Look up table (LUT) error.
- Page 174 Message Queue Message queue overflow. RCU10 state ERROR ERROR Overflow machine damaged. Internal diagnostics function. Error Queue Overflow Error queue overflow. RCU10 error tracking is ERROR ERROR damaged. Internal diagnostics function. Structure Mat Temp Allocated material temperature sensor has SUSPEND ERROR Snsr Failed failed.
- Page 175 F-28 Extended capability This page is intentionally left blank.
- Page 176 Reference Appendix G Reference Contained in this appendix Compensation equation overview ................. G-2 G.1.1 Encoder compensation ................G-2 G.1.1.1 Definition of position terms ............G-2 G.1.1.2 Definition of compensation terms ..........G-3 G.1.2 Laser compensation ................. G-5 G.1.2.1 Definition of position terms ............G-5 G.1.2.2 Definition of compensation terms ..........
-
Page 177: Compensation Equation Overview
Reference G.1 Compensation equation overview This section provides details of the equations which are used by the RCU10 to provide compensation for the following: 1. Encoder thermal compensation 2. Laser compensation 3. Structure thermal compensation 4. Workpiece thermal compensation G.1.1... -
Page 178: Definition Of Compensation Terms
Reference G.1.1.2 Definition of compensation terms Note that a positive correction or compensation value causes the servo-control to move the axis in a negative (reverse) direction as it holds the demand position. Encoder thermal expansion compensation (µm) = Input position (m) . . - Page 179 Reference - WO) . Workpiece thermal expansion compensation (µm) = ( AP - AP . (20 - T This is the compensation for the linear thermal expansion of the workpiece in µm. It includes the facility to provide additional compensation if the workpiece expansion origin is not coincident with the point at which workpiece expansion compensation was enabled.
-
Page 180: Laser Compensation
Reference G.1.2 Laser compensation Axis position (m) = Input position (m) + Laser wavelength compensation (µm) + Laser dead path wavelength compensation (µm) + Machine structure thermal expansion compensation (µm) Output position (m) = Axis position (m) + Workpiece thermal expansion compensation (µm) G.1.2.1 Definition of position terms Input position (m) = IQR... -
Page 181: Definition Of Compensation Terms
Reference G.1.2.2 Definition of compensation terms Note that a positive correction or compensation value causes the servo-control to move the axis in a negative (reverse) direction as it holds the demand position. . ( λ Laser wavelength compensation (µm) = Input position . 10 /λ... - Page 182 Reference If the interferometer is located at the positive extreme of the axis, then LO will be a negative value (see Figure G.2). Note: In the case of a double pass plane mirror interferometer system, the dead path value must not be doubled. It is still the physical separation between the optics at the instant the laser is referenced.
- Page 183 Reference - WO) . Workpiece thermal expansion compensation (µm) = ( AP – AP . (20 - T This is the compensation for the linear thermal expansion of the workpiece in µm. It includes the facility to provide additional compensation if the workpiece expansion origin is not coincident with the point at which workpiece expansion compensation was enabled.
-
Page 184: Air Refraction Compensation
Reference G.2 Air refraction compensation The equations below define how to calculate the refactive index of air and hence the current laser wavelength. The equations are defined using the T temperature scale and have been taken from the following reference. Tables of Physical and Chemical Constants - 16 Edition ... - Page 185 ) and the wavelength in normal air (λ ) at 101,325 Pa, 20°C, 50% RH, 450 ppm CO (calculated as above) of the various Renishaw laser interferometer sources are as shown below. Note: The vacuum wavelengths should be taken as exact values, the NTP values are rounded to nine significant figures.
-
Page 186: Worked Example - Laser Compensation
G.3.1 Direction sense setting The RCU10 input quadrature direction sense is set so that input quadrature count (IQC) value becomes more positive as the Y axis moves in a positive (forward) direction (spindle assembly moves up the column). The RCU10 output quadrature direction sense is set so that the machine controller also shows positive (forward) movement as the spindle moves up the column. -
Page 187: Laser Dead Path (Lo
G-12 Reference G.3.2 Laser dead path (LO) When the machine is at the axis reference position there is a small separation of 200 mm between the interferometer and moving reflector. The laser air dead path is therefore set to -0.2 m. A negative value is entered because the interferometer is located at the positive end of the axis, hence the separation between the optics increases as the axis is moved in a negative (reverse) direction. - Page 188 Reference G-13 Because the machine thermal behaviour may be quite complex, the value entered for S may be improved by performing a practical test. For example, a clock gauge can be used to measure how much the spindle moves, relative to the table surface, as the column temperature varies.
- Page 189 G-14 Reference This page is intentionally left blank.
- Page 190 Test records Appendix H Test records Contained in this appendix Installation and configuration checklist ..............H-2 Installation details ....................H-3 Sensor record/test sheet..................H-5 Parameter table record sheets ................H-7...
-
Page 191: Installation And Configuration Checklist
Test records H.1 Installation and configuration checklist Section in Completed Process manual () Hardware installation 4.1.1 RCU10 address set-up 4.1.2 Electrical installation 4.1.3 RCU CS settings 4.1.4 Configure system tab 4.2.1 Configure sensor tab 4.2.2 Configure compensation tab (including all sub-tabs for each axis) 4.2.3... -
Page 192: Installation Details
Test records H.2 Installation details Customer Machine RCU10 Axis Encoder Encoder Axis name type serial no model serial no length RLE Ax1 H11092 (example) RCU10-P H11802 1000 mm Axis 1 Axis 2 Axis 3 Axis 4 Axis 5 Axis 6 No. - Page 193 Test records This page is intentionally left blank.
-
Page 194: Sensor Record/Test Sheet
Test records H.3 Sensor record/test sheet Connected to RCU Sensor type Serial number Location/function axis number Example V12345 X axis laser Air temperature Air pressure ----------... - Page 195 Test records This page is intentionally left blank.
-
Page 196: Parameter Table Record Sheets
Test records H.4 Parameter table record sheets Table <1>: _______________________________________ Units Axis Axis Axis Axis Axis Axis (select) mm / m / Air dead path <1> inch Workpiece temperature Serial # sensor <1> Workpiece expansion ppm/C coefficient <1> ppm/F mm / m / Workpiece origin offset inch Actuation method... - Page 197 Test records Table <2>: _______________________________________ Units Axis Axis Axis Axis Axis Axis (select) mm / m / Air dead path <2> inch Workpiece temperature Serial # sensor <2> Workpiece expansion ppm/C coefficient <2> ppm/F mm / m / Workpiece origin offset inch Actuation method Structure thermal...
- Page 198 Test records Table <3>: _______________________________________ Units Axis Axis Axis Axis Axis Axis (select) mm / m / Air dead path <3> inch Workpiece temperature Serial # sensor <3> Workpiece expansion ppm/C coefficient <3> ppm/F mm / m / Workpiece origin offset inch Actuation method Structure thermal...
- Page 199 H-10 Test records Table <4>: _______________________________________ Units Axis Axis Axis Axis Axis Axis (select) mm / m / Air dead path <4> inch Workpiece temperature Serial # sensor <4> Workpiece expansion ppm/C coefficient <4> ppm/F mm / m / Workpiece origin offset inch Actuation method Structure thermal...
- Page 200 Index of figures and tables Index of figures and tables Page number Access levels (Table C.1) ............................C-2 Active parameter table box (compensation axis screen) (Table D.5) .................D-9 Advanced box (compensation axis screen) (Table D.4) .....................D-8 Air temperature and material temperature sensors (Figure 2.2) ................2-3 Air temperature sensor dimensions (Figure 2.14) ....................
- Page 201 Simple mode axis referencing sequence with laser encoder input (Figure 2.11)............. 2-16 Simple mode axis referencing sequence with laser encoder input and Seek reference and Reset inputs to RCU10 tied to 0 V (Figure 2.9) .................... 2-14 Simple mode axis referencing sequence with non-laser encoder input and Seek reference and Reset inputs to RCU10 tied to 0 V (Figure 2.10) ..................
- Page 202 Renishaw plc +44 (0)1453 524524 +44 (0)1453 524901 New Mills, Wotton-under-Edge, uk@renishaw.com Gloucestershire, GL12 8JR www.renishaw.com United Kingdom For worldwide contact details, please visit our main website at www.renishaw.com/contact *M-9904-1122-09...
Need help?
Do you have a question about the RCU10 and is the answer not in the manual?
Questions and answers