Table of Contents
Advertisement
Advertisement
Table of Contents

Related Manuals for CIAT EREBA T/HT


Summary of Contents for CIAT EREBA T/HT
- Page 1 10156 06 - 2017 Us er Manua l...
-
Page 2: Table Of Contents
Contents 1 - QUICK START ............................... 3 1.1 Important ................................3 1.2 Key features ................................ 3 2 - WUI DISPLAY OVERVIEW ............................ 4 3 - OVERVIEW OF ICONS ............................5 4 - PROGRAMMING THE CONTROL......................... 6 4.1 Clock/Day: Setting the time and day ........................6 4.2 Heating / Cooling / DHW only / Off: Changing the operating mode .............. -
Page 3: Quick Start
1 - QUICK START 1.1 Important 1.2 Key features Your system is controlled by a Wall-Mounted User ● Heating / Cooling: Depending on the unit, the interface (WUI) that can be installed inside your home. system may operate in Heating or Cooling. This manual provides guidelines on how to use this ●... -
Page 4: Wui Display Overview
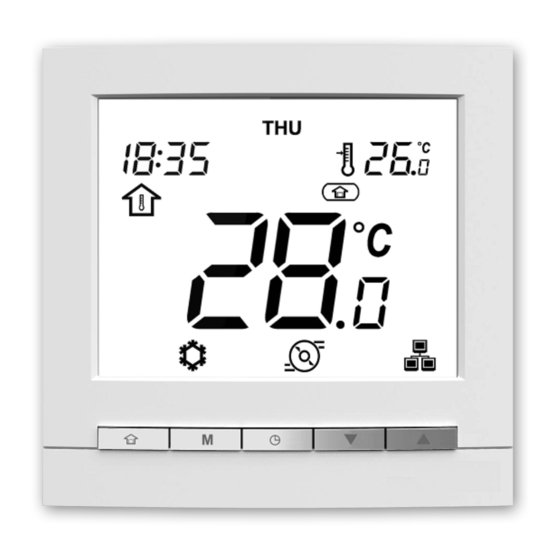
2 - WUI DISPLAY OVERVIEW ⑰ ⑯ ① ⑮ ② ⑭ ③ ⑬ ④ ⑫ ⑪ ⑤ ⑥ ⑦ ⑧ ⑨ ⑩ ① ⑦ ⑬ Legend: ② ⑧ ⑭ Days of week Cooling mode Occupancy lock ③ ⑨ ⑮ Clock Pump running Occupancy status ④... -
Page 5: Overview Of Icons
3 - OVERVIEW OF ICONS Days of week: Temperature display: Monday – Sunday Room temperature Clock: Water temperature 12-hour or 24-hour clock display Room temperature: Occupancy lock: System control is based on room Occupancy is set manually by the user temperature (schedule control is disabled) Water temperature:... -
Page 6: Programming The Control
4 - PROGRAMMING THE CONTROL 4.1 Clock/Day: Setting the time and day You may customise the clock to display time in a 12- hour or 24-hour format. Before using any programming features of the WUI, it is Example: 12-hour clock display necessary to set the time and day of the control. -
Page 7: Heating / Cooling / Dhw Only / Off: Changing The Operating Mode
4 - PROGRAMMING THE CONTROL 4.2 Heating / Cooling / DHW only / Off: Heating Mode Changing the operating mode Home Occupancy Water temp. control Temp. control The operating mode display depends on the unit 34°C Water temp. configuration as well as user settings. 35°C Setpoint Heating: The heat pump heats the water... -
Page 8: Home / Sleep / Away: Changing The Comfort Range
4 - PROGRAMMING THE CONTROL 4.3 Home / Sleep / Away: Changing the Occupancy lock comfort range The current occupancy can be locked during a period specified by the user (“occupancy lock”). During this To optimise energy efficiency of the building while preserving time, the scheduling will be ignored. - Page 9 4 - PROGRAMMING THE CONTROL To cancel the occupancy lock Press and hold the Occupancy key for 2 seconds. The display will show you the time remaining till the end of the selected occupancy. Press the Down key to set the counter to “0”. To confirm your action, press and hold the Occupancy key for 2 seconds.
-
Page 10: Current Setpoint Control: Changing The Temperature
4 - PROGRAMMING THE CONTROL 4.4 Current setpoint control: Changing To achieve better comfort, it is possible to adjust the current setpoint according to your needs. the temperature Two different configurations could be available: To adjust the setpoint ● If the user interface is installed on the unit (local Press the Down key to decrease the temperature. -
Page 11: Additional Data Display: General Status Of The Unit
(1-17) are in read-only For units installed outdoors, the display normally shows access. the current water temperature and the water setpoint. Description Parameter number EREBA T/HT EREBA He Outdoor Air Temp P001 Entering Water Temp P003... -
Page 12: Scheduling: Assigning Schedules To Heating And Cooling Modes
4 - PROGRAMMING THE CONTROL 4.6 Scheduling: Assigning schedules to heating and cooling modes The scheduling functionality makes it possible to set the unit to operate in a specific mode during a pre-defined period of time.The system allows you to modify eight steps, where each step is defined by the day(s) of the week, start time, and occupancy. - Page 13 4 - PROGRAMMING THE CONTROL To modify the schedule (schedule steps) Press the Schedule key to confirm your choice and continue with the remaining days of the week. Press the Schedule key to edit the schedule. Upon entering the schedule menu, you will be able to edit the first schedule step.
- Page 14 4 - PROGRAMMING THE CONTROL Saving the schedule To exit the schedule menu At any time in the schedule menu, you can save the To exit the schedule menu at any time, press and current schedule step settings and go to the next hold the Occupancy key for 2 seconds.
-
Page 15: Advanced Programming Options
5 - ADVANCED PROGRAMMING OPTIONS 5.1 Advanced settings: Programming the Control The settings menu is used by technicians to configure To exit the password screen some advanced settings of the unit. Press and hold the Occupancy key until the home screen is displayed. -
Page 16: Master / Slave Control
5 - ADVANCED PROGRAMMING OPTIONS 5.4 Master / Slave control Example: Master / Slave mode Building installations may require a few units to be interfaced together in order to provide cooling / heating on the same network. The unit that is the decision point for the OPERATING MODE and the CONTROL POINT is defined as the Master, all other units belonging to the same group on the same network are referred to as Slaves. -
Page 17: Alarms And Errors
6 - ALARMS AND ERRORS 6.1 Alarms Alarms are used to inform you of the failure of one of Example: the parts of the heat pump or chiller system. In the case of an alarm, the alarm icon is displayed: Steady icon: Alarm condition detected;... -
Page 18: Errors
6 - ALARMS AND ERRORS 6.2 Errors Some components failure may cause the user interface In case of error, please verify that all WUI local parameters to malfunction. In such cases, the error will be displayed are correct, i.e. check the value of parameters given in on the screen. - Page 19 (0,15 € / mn) Compagnie Industrielle d’Applications Thermiques Non-contractual document. With the thought of material improvement S.A. au capital de 26 728 480 € always in mind, CIAT reserves the right, without notice R.C.S. Bourg-en-Bresse B 545.620.114 to proceed with any technical modification.
Need help?
Do you have a question about the EREBA T/HT and is the answer not in the manual?
Questions and answers